


Getting Started with QuiltLab: What Each Tool Does and Where to Begin
QuiltLab brings fabric images, blocks, quilt layouts and written patterns into a browser workspace. Getting started is easier when you choose the tool for your next decision: preparing a fabric image is different from arranging a quilt, and saving a design is different from sharing it.
This is a tour of those choices, with a small planning brief you can use before drawing a complete quilt. For the full block-to-layout exercise, continue to Design Your First Quilt in QuiltLab.
The retained cover is an AI-generated illustration, not a QuiltLab screenshot or a photograph of a quilt we made. The editor images below are first-party help-center captures.
Choose the task before the editor
Start with one question you can answer in this session. A desktop or laptop gives the drawing tools and inspector panels more room. You can create an account to save personal work; check current access and allowances before planning a large library or an export-heavy project.
| Your next decision | Start with | What to check before moving on |
|---|---|---|
| How should this fabric image appear? | Swatch Editor | Crop, dimensions and completed save |
| What shapes make one block? | Block Editor | Block dimensions, pieces and fills |
| How should blocks or pieces occupy the top? | Quilt Editor | Design approach and finished area |
| Which images and ideas belong together? | Canvas Editor | Arrangement and document destination |
| How will someone read the instructions? | Pattern Builder | Pages, review and downloaded PDF |
| How can one sewing step be illustrated? | Diagram Editor | Elements, labels and saved diagram |
You do not need to visit every editor in that order. Use a library block for a layout experiment, prepare your own swatch when print scale matters, or begin with a canvas while the design is still undecided. If your starting point is a written description, the AI quilt-design guide explains how to review the assistant's proposal before treating it as your design.
Prepare fabric images and reusable blocks
Swatch Editor: give the image useful boundaries
A swatch is a fabric image you can reuse in designs. The Swatch Editor guide shows File > Upload Image for a new photo and File > Open Swatch Library for an existing swatch. Crop to the useful fabric area and check its dimensions before placing it in a block. An image's pixel count does not tell the editor how many real inches you photographed.
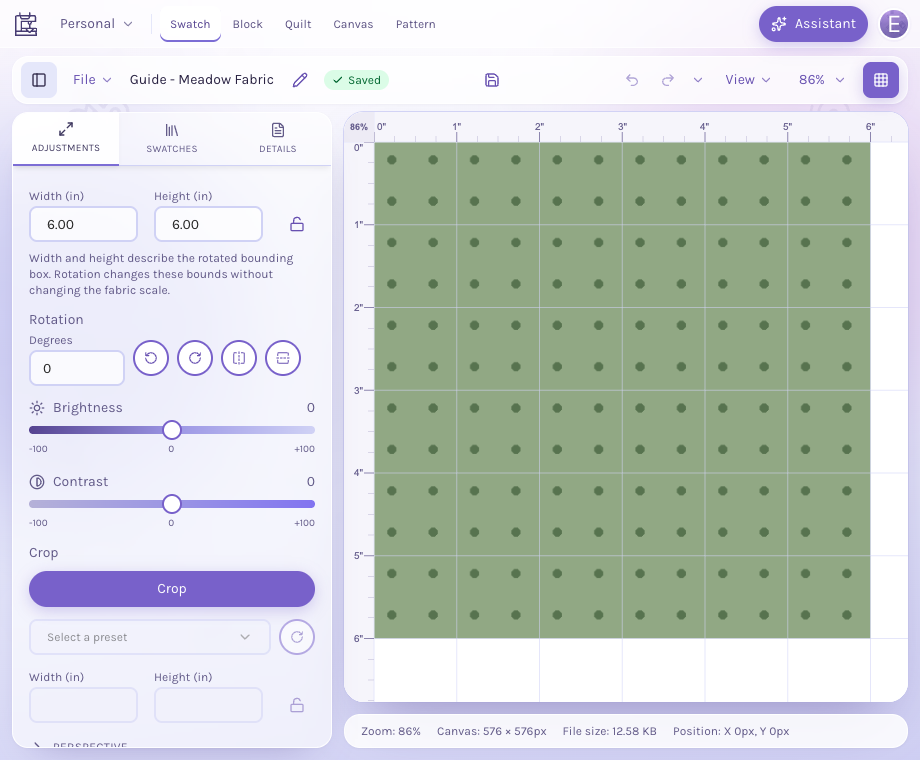
Retained help-center capture: the Adjustments panel puts dimensions and image controls beside the fabric. These fields describe the example image; they do not measure a reader's fabric automatically.
A newly uploaded image is a browser draft until its first save and name. After that first save, edits save automatically. Watch the badge separately from the preview: a correctly cropped image is not proof that the account has its latest version.
Block Editor: work on the pieces inside a block
Use the Block Editor to draw pieces, select them and assign fabric or solid fills. Set the block's dimensions before making its internal arrangement. A finished block dimension and an individual fabric piece's cutting dimension answer different questions.
Keep the reusable block separate from a quilt that uses it. Saving a newer library version does not silently replace every placed block. In the Quilt Editor's Blocks tab, Block updates lets you inspect a proposed version and choose Accept update. That choice changes the quilt you are reviewing.
Choose a quilt approach deliberately
In the Quilt Editor, File > New Quilt... opens the New quilt chooser. It starts a separate document; choosing another approach there does not convert the quilt already open. Check the stated save destination before creating it.
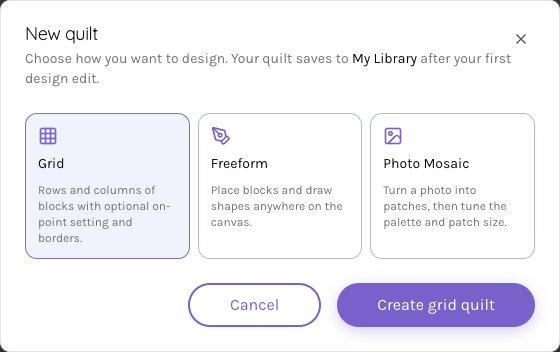
Retained help-center capture of the three choices. The destination notice belongs to this personal example; read the notice in your own session.
- Grid arranges library blocks in rows and columns. Properties contains Layout, with block width, height, column and row counts, and Standard or On Point orientation. Borders are added separately.
- Freeform supports drawing rectangular pieces on the quilt canvas, then selecting them to move or edit. Choose it when a regular block grid does not express the arrangement you want. The improv design-constraints article can help you write a manageable shape and color brief before exploring.
- Photo Mosaic begins with a photo and settings for the mosaic. Use its mode-specific guide rather than assuming every mode has the same cutting method. Square, triangle and appliqué instructions are not interchangeable. For a square-patch example, use the photo-quilt tutorial, then read the guide produced for your selected mode.
The Quilt Editor guide covers the current controls. A newly created Local draft is still browser-local until you sign in and a design edit saves it to your account. Creating the chooser's blank document alone is not an account-save confirmation.
Work through a first planning brief
Suppose you want a straight-set top measuring 48 x 72 inches, without sashing or borders, using blocks that finish at 12 x 12 inches. This brief chooses which decisions go to which tool; it is not a complete pattern or a sewn sample.
- Width: 48 divided by 12 gives 4 columns.
- Height: 72 divided by 12 gives 6 rows.
- Positions: 4 times 6 gives 24 block positions.
In a current production check, setting a new Grid quilt to those dimensions and counts displayed 48 x 72 inches beside Layout. The blank planning grid had 0 blocks placed. Its completed Saved badge and Saves to My Library notice confirmed the personal destination for that planning document; they did not establish a finished design or a project-shared version.
| Record in your brief | Tool or reference | Decision still to make |
|---|---|---|
| 4 columns, 6 rows, 12-inch blocks | Quilt Editor Layout | Which blocks occupy the 24 positions |
| Chosen prints or solid fills | Swatch and Block editors | Actual fabric selection and placement |
| No sashing or borders yet | Written planning notes | Whether those additions change the target size |
| Construction instructions and checks | Pattern Builder | Cut sizes, quantities and tested assembly order |
The number 24 is a position count, not a count of fabric patches. A pieced block may contain many pieces. For a single plain square intended to finish at 12 inches after quarter-inch seams on all four sides, the nominal cut size is 12 + 1/4 + 1/4 = 12 1/2 inches. That formula does not supply the cutting list for a pieced 12-inch block.
The American Patchwork & Quilting editors' quarter-inch seam guide explains why actual seam accuracy and a measured sample matter. Software dimensions do not remove that sewing check. If a pattern already supplies the construction, read its finished, unfinished and cut-size instructions before buying or cutting fabric.
Record additions separately. A sashing decision changes the dimensions between blocks; our sashing-width comparison is a manual planning reference, not a claim that the Grid editor has a sashing-width control. Backing, binding and batting also need their own plan. The batting-distance article explains how the selected product's instructions constrain later quilting.
Arrange ideas, then write instructions
Canvas Editor: keep an arrangement open to change
Use the Canvas Editor for images, text, shapes and library assets while exploring a composition. Select items to move them or edit their properties. It saves actions automatically and has no manual Save button.
Conversion is a separate decision. Edit > Convert selection to offers the available Block, Swatch or Quilt destinations. Converting artwork to a quilt places shapes as annotations; it does not automatically create a pieced construction plan. Inspect the destination before confirming.
Pattern Builder and Diagram Editor: make the plan readable
The Pattern Builder guide covers pages, text, images, tables and diagram frames. File > Export PDF... starts an export; it requires editing access and the allowance available to the account. Wait for the download and open the file to check it. A Saved badge confirms saving, not a successful PDF download.
Use the Diagram Editor to illustrate sewing steps with elements, lines and labels. Inside a pattern's diagram frame, Done saves pending diagram edits before returning. Ordinary saving, publishing a diagram version and publishing a pattern are separate actions. Public pattern publishing requires paid access; review the document before publishing a public version.
QuiltLab shows layout dimensions, but do not treat a generic design preview as an automatic, verified cutting list or yardage calculation. Build those instructions for the construction method you will actually use, then check them against a sample. The full first-design tutorial handles the block construction and cutting arithmetic rather than duplicating it in this tour.
Read the destination as well as the save badge
Personal libraries and project assets have different ownership. A project name in the workspace bar does not, by itself, share a personal document. Read the destination note, such as Saves to My Library, beside the current workspace context.
For project Swatches and Blocks, Save to Project updates the version members can see. For project Quilts, that action is Update project quilt. Saved privately identifies a private draft; Shared version identifies the shared version. Project Canvases and Patterns save directly to their shared documents, so their edits do not use that same private-draft release step.
Read Saving, Recovery and Projects before copying or moving a design. Copying preserves the personal original; moving changes ownership and availability. Membership and document access also decide who can edit.
Find current help and check the next milestone
Open the QuiltLab menu at the top left for the current editor's help and shortcuts entry; the Quilt Editor entry is Quilt Editor help and shortcuts. Use that reference for the current mode instead of assuming a shortcut works in every editor or canvas. Use File for document actions.
Keep three milestones separate: the design is saved to its intended destination, the export has downloaded and been inspected, and the version intended for others has been shared or published. If a badge says Saving, wait. If it says Couldn't save, keep the editor open and inspect the error. A browser draft or an offline queue is not proof of an account save.
For an existing EQ8 library, start with the import comparison and its fidelity checks. Before committing to imports, public publishing or many PDF exports, check current pricing and account allowances. Choose the next tool for the decision in front of you, and verify that milestone before moving on.
Related posts
Best Free Quilt Design Software: A Practical Check
Compare browser quilt tools by what you can draw, keep, export and use for construction, with dated public checks and a common Four-Patch task.
Design Your First Quilt in QuiltLab: A Nine Patch Chain Throw, Step by Step
Plan a 68 x 80-inch nine-patch chain throw in QuiltLab, then check the separate cutting sizes, border lengths and fabric quantities.
How to Make a Quilt Pattern Bigger: Three Plans
Compare extra blocks, larger blocks and borders on one original layout, with checked dimensions and fresh seam allowances.