


Plan a Leaders and Enders Quilt You Can Finish
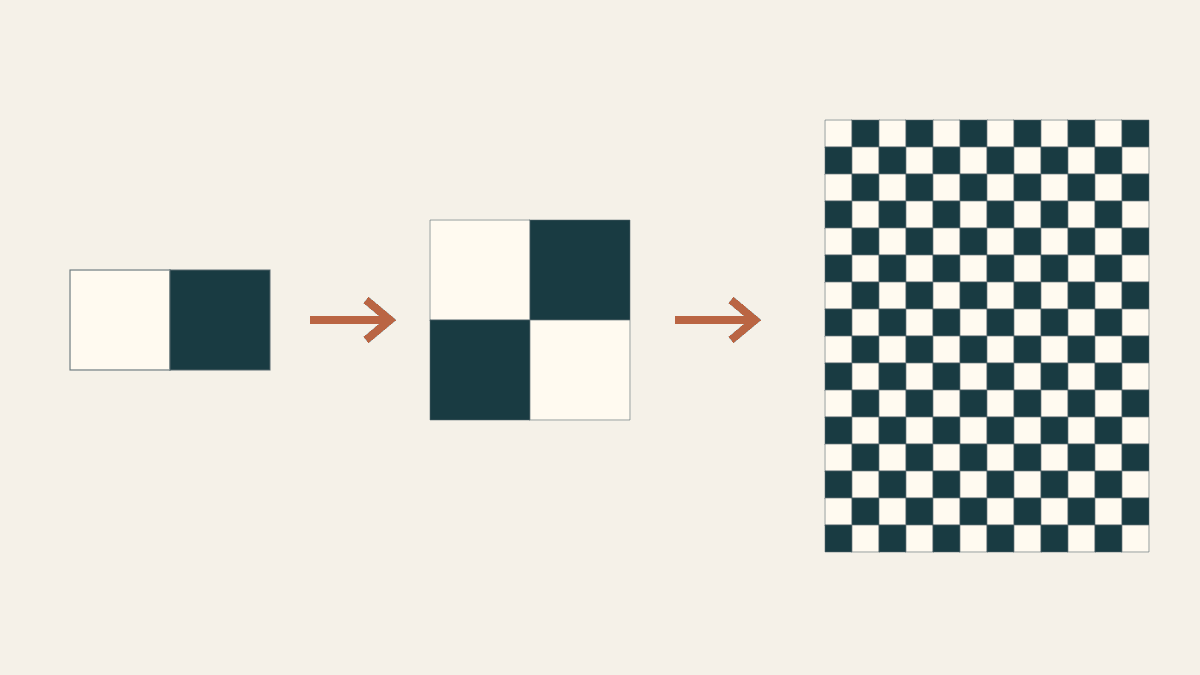
A leaders and enders quilt is a second project you build in small units while piecing your main project. Start with one simple unit, a definite quilt size and a written count. For a first try, light-and-dark pairs that become Four Patches give you an easy target to check and keep beside the machine.
Bonnie K. Hunter explains the method in her Leaders & Enders: The Whys and Hows. Instead of repeatedly sewing onto a thread bunny, you put prepared pieces for another quilt through the machine. Those little units gradually become useful patchwork. The plan below gives them somewhere to go: a 24 x 32-inch top made from 48 Four Patches.
Keep the second project simple and recognizable
Choose a unit that suits the machine setup you're already using. A straight-seam main project with a 1/4-inch seam allowance pairs well with the Four Patch example here. If the main work needs another foot, stitch or seam width, pause the second project until the settings suit it again.
Give the two projects an obvious visual difference. JayeL's guild demonstration notes at Artquiltmaker discuss keeping the projects distinct and having prepared pieces close at hand. You might use plain light/dark squares for the second project while your main quilt uses larger rectangles or another palette.
For these Four Patches, put lights in one small stack and darks in another. Choose fabrics with enough value difference that you can still tell the two groups apart when the prints sit side by side. The goal is a pair you can pick up without reopening a design decision at every seam.
If you're starting from mixed scraps, use your scrap inventory to find pieces large enough for the chosen cut size. Decide the unit first; then prepare only the squares this project needs.
Turn a quilt size into a unit target
Our example uses 48 Four Patches, each 4 inches finished, set six across and eight down. With no sashing or border:
- Width: 6 x 4 = 24 inches.
- Length: 8 x 4 = 32 inches.
- Blocks: 6 x 8 = 48.
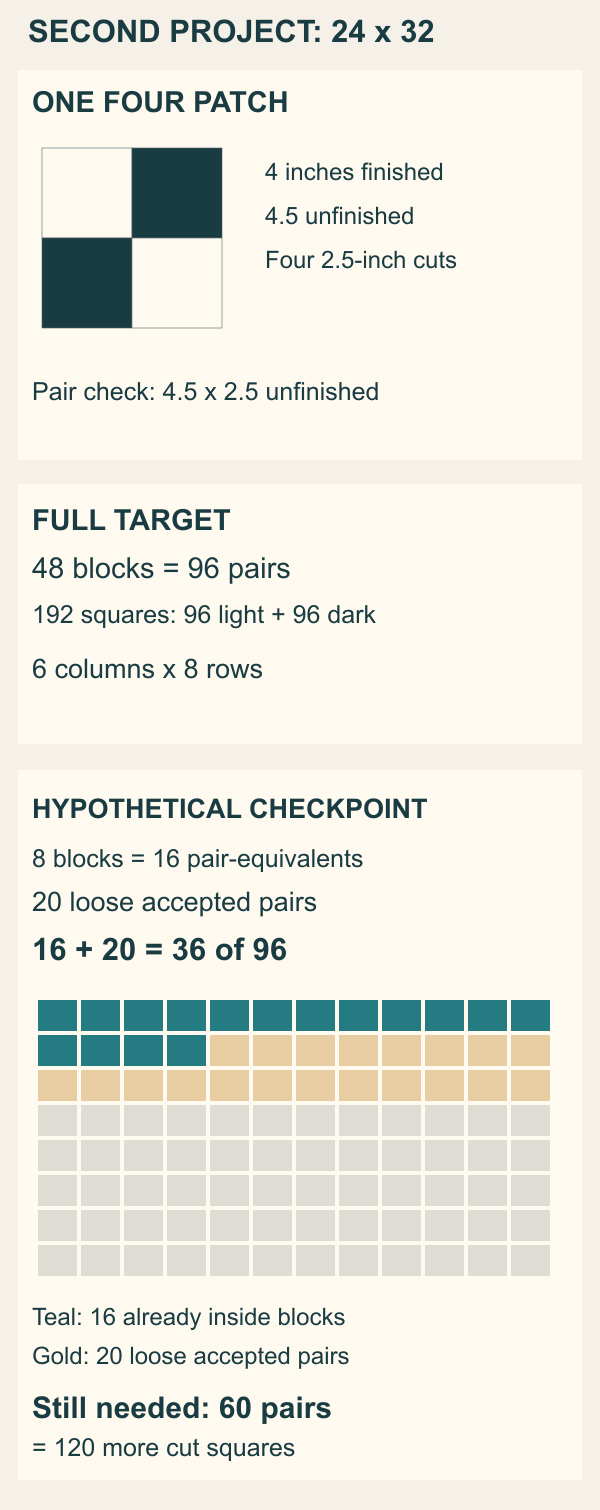
Each Four Patch has two light squares and two dark squares, all 2.5 inches cut. The squares finish at two inches after their seam allowances are used. Julie Baird's quilt-block design guide explains the finished-size-plus-1/2-inch rule for ordinary squares.
Write the full target on a card:
| What you need | Per Four Patch | Whole top |
|---|---|---|
| Light cut squares | 2 | 96 |
| Dark cut squares | 2 | 96 |
| Light/dark pairs | 2 | 96 |
| Accepted Four Patches | 1 | 48 |
That's 192 cut squares altogether. A small wall piece is a useful first goal because you can see the end of the count. If you want a different size, change the row and column counts before cutting, then multiply again.
Check the first pair and block
Sew one light 2.5-inch square to one dark square. After pressing, the pair should measure 4.5 x 2.5 inches. The width check is 2.5 + 2.5 - 0.5 = 4.5 inches: a 1/4-inch seam takes 1/4 inch from each piece.
Make a second pair. Press the pair seams toward the dark squares, then turn one pair around so the two rows make a checkerboard. The seams can nest at the center. Join the rows and press the block. It should measure 4.5 inches square unfinished, ready to finish at four inches when joined into the top.
If the first pair or block is off, check cutting, seam position and pressing before preparing a large queue. The American Patchwork & Quilting editors' seam guide explains using a measured sample to check how the seam and pressing affect the result. Adjust for the fabric and thread you're using, then measure again.
Write the two unfinished checkpoints on the target card: pair 4.5 x 2.5; block 4.5 square. They're quick reminders when you come back to the project after a break.
Set out a small ready-to-sew queue
Start with enough cut pieces for ten pairs: ten light squares and ten dark squares. Keep the rest of the material put away. This makes it easier to notice a wrong cut or an accidental main-project piece before a large stack is sewn.
Use four clearly labeled places beside the machine:
- Ready: matched light/dark squares waiting to be sewn.
- Pairs: pressed, checked pairs ready to become blocks.
- Blocks: checked Four Patches ready for the layout.
- Rework: anything that needs another look.
At the start of a sewing run, sew a prepared second-project pair, then follow it with the main-project pieces, leaving a short thread chain between them. At the end, sew another prepared pair after the last main-project unit. Clip the chain between the main work and that ender to remove your main work. The ender stays attached to the machine thread, ready to lead into the next run.
That's the second-project habit Hunter describes. Within-project chain piecing joins repeated units from the quilt you're already making; here, the prepared pair belongs to a different quilt with its own target.
When a handful of pairs is ready, press and check them. Join some into Four Patches before cutting another tray. You'll catch an awkward color combination or a measurement problem while the pile is still small.
Count loose pairs and completed blocks separately
The easiest counting mistake happens when you write down every pair you made, then add completed blocks without subtracting the pairs inside them. Choose one counting unit so the work only gets counted once.
For this project, use pair-equivalents. A loose pair counts as one. A completed Four Patch contains two. Here's a hypothetical checkpoint:
| Accepted work | How it counts | Pair-equivalents |
|---|---|---|
| 8 completed Four Patches | 8 x 2 | 16 |
| 20 loose pairs | 20 x 1 | 20 |
| Total already sewn | 16 + 20 | 36 |
The target is 96 pairs, so 96 - 36 = 60 more pairs need sewing. They require 120 more cut squares: 60 light and 60 dark.
You still need 40 blocks, but the 20 loose pairs already cover part of that work. Those 40 blocks need 80 pairs in total; 20 existing + 60 new = 80. Both ways of checking reach the same answer.
Keep units in the Rework place out of the accepted total until you've checked them. If you count cut squares too, put them on a separate line. Cutting them makes the queue ready; it doesn't increase the sewn-pair count.
Give the accumulated units a finish line
Once you have 48 accepted Four Patches, stop making units for this layout. Arrange them six across and eight down. Check the light/dark orientation across block edges, then join the blocks and rows using the same seam allowance.
The unfinished top should measure 24.5 x 32.5 inches before its outer seam allowances are used. Across a row, six 4.5-inch blocks lose half an inch at each of five joins: 27 - 2.5 = 24.5 inches. Eight rows similarly give 36 - 3.5 = 32.5 inches.
Pressing, checking, assembly and finishing still need their own sewing sessions. Keep them on the project card so the growing stack of pairs leads to a finished top. If the goal changes, update the block and fabric counts before you refill the Ready tray.
Put one target card beside the machine
Write the finished size, the 48-block target and the two unfinished measurements on a card. Add separate lines for accepted blocks, loose pairs and cut squares. Prepare ten light/dark pairs, then sew and measure the first pair and Four Patch.
When those measurements are right, put the checked work in its labeled place and return to your main quilt. The next time you need a leader or ender, you'll know which pieces to reach for and exactly what they're becoming.
Related posts

How to Design a Bargello Quilt: Plan the Wave on Paper
A bargello wave is a staircase of stepped columns. Number your strips, write one row per column, and see how column width turns a zigzag into a curve.

Borderless Quilt Design: Plan an Edge That Looks Finished
With no border, the outer blocks and the binding make the edge. Compare whole and halved motifs on one 48 x 60 inch quilt, then pick the binding color.

Crosshatch Quilting: How to Make the Lines Meet at the Edges
Space a 45-degree crosshatch so the lines meet in a V at every edge and corner. Choose the edge step first, mark dots around the quilt, then connect them.