


Flying Geese Methods: One at a Time or Four at a Time?
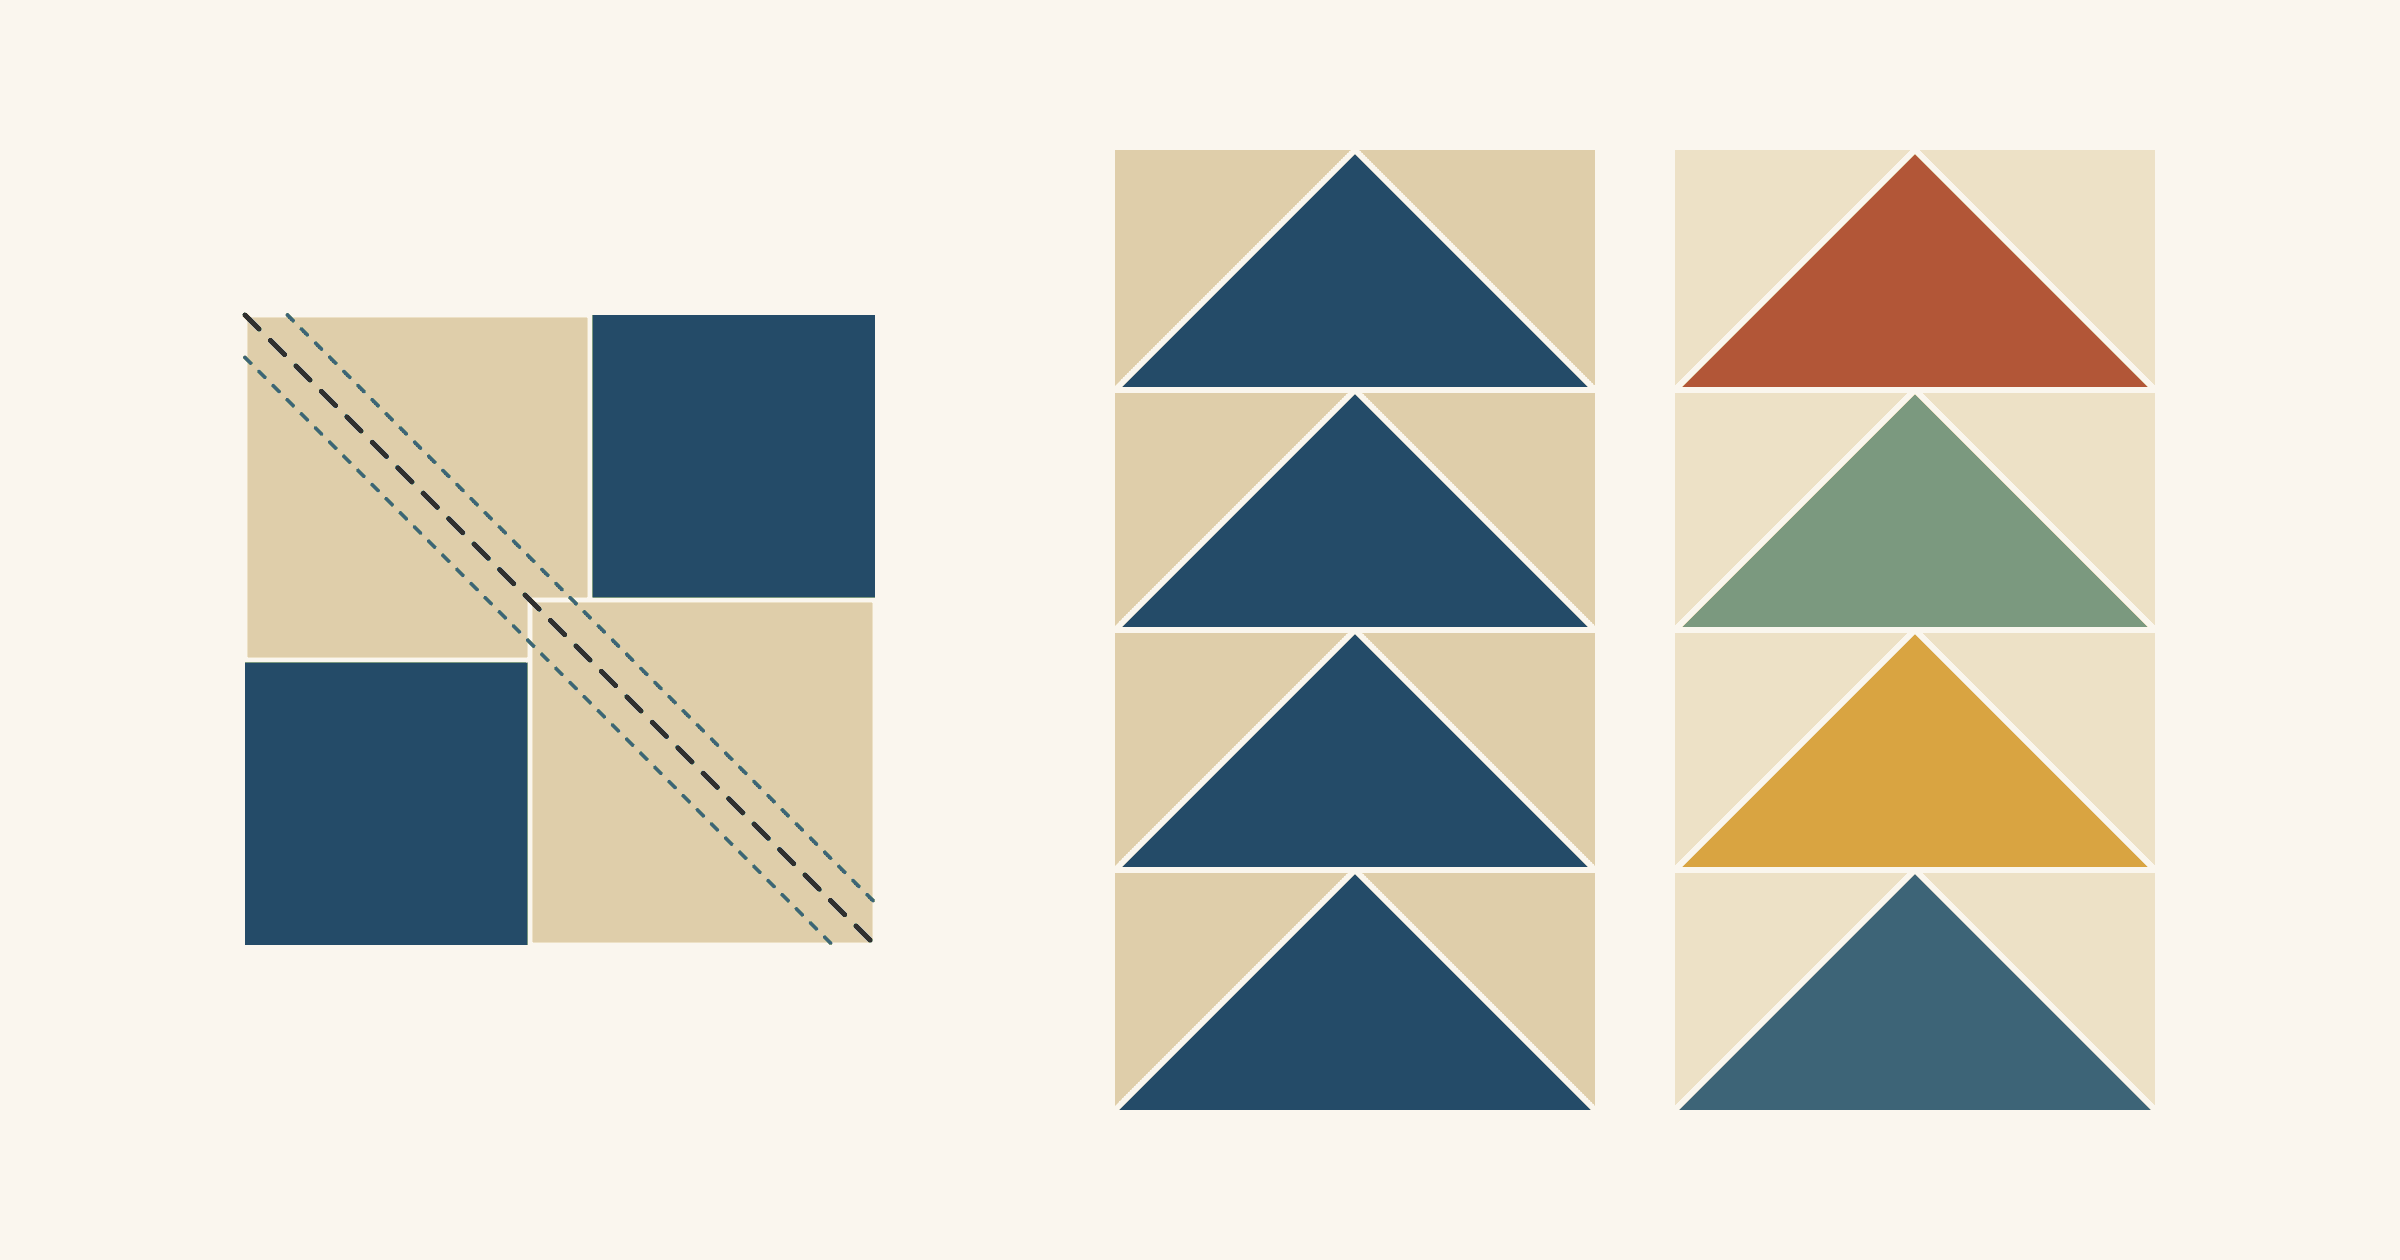
Quilters make most flying geese one of two ways. One at a time, often called stitch-and-flip, sews a square onto each end of a rectangle. Four at a time, the "no-waste" method, sews four small squares onto one large square and cuts it into four geese. For a goose that finishes 2 x 4 inches, one at a time starts with a 2 1/2 x 4 1/2-inch rectangle and two 2 1/2-inch squares. Four at a time starts with one 5 1/4-inch square and four 2 7/8-inch squares, the sizes in Connie Kresin Campbell's four-at-a-time tutorial.
Use four at a time when you need geese in sets of four from the same two fabrics and neither fabric has a one-way print. It cuts about a third less fabric per goose, and cutting the squares a little oversized lets you trim each goose to an exact size. Use one at a time for directional prints, scrappy geese, small scraps and counts that don't divide by four. The sections below work through each of those decisions with the same 2 x 4-inch goose.
What to cut for a 2 x 4-inch goose
A flying goose finishes twice as wide as it is tall, as Amy Smart points out at Diary of a Quilter. Ours finishes at 2 x 4 inches, so it should measure 2 1/2 x 4 1/2 inches before you sew it to anything. The extra 1/2 inch is a 1/4-inch seam allowance on each side. If a pattern or chart lists the same goose by a different size, translate it back to the finished size before you cut.
| Method | Goose fabric | Sky fabric | Makes |
|---|---|---|---|
| One at a time | One 2 1/2 x 4 1/2 in rectangle | Two 2 1/2 in squares | 1 goose |
| Four at a time | One 5 1/4 in square | Four 2 7/8 in squares | 4 geese |
| Four at a time, oversized | One 5 1/2 in square | Four 3 in squares | 4 geese to trim |
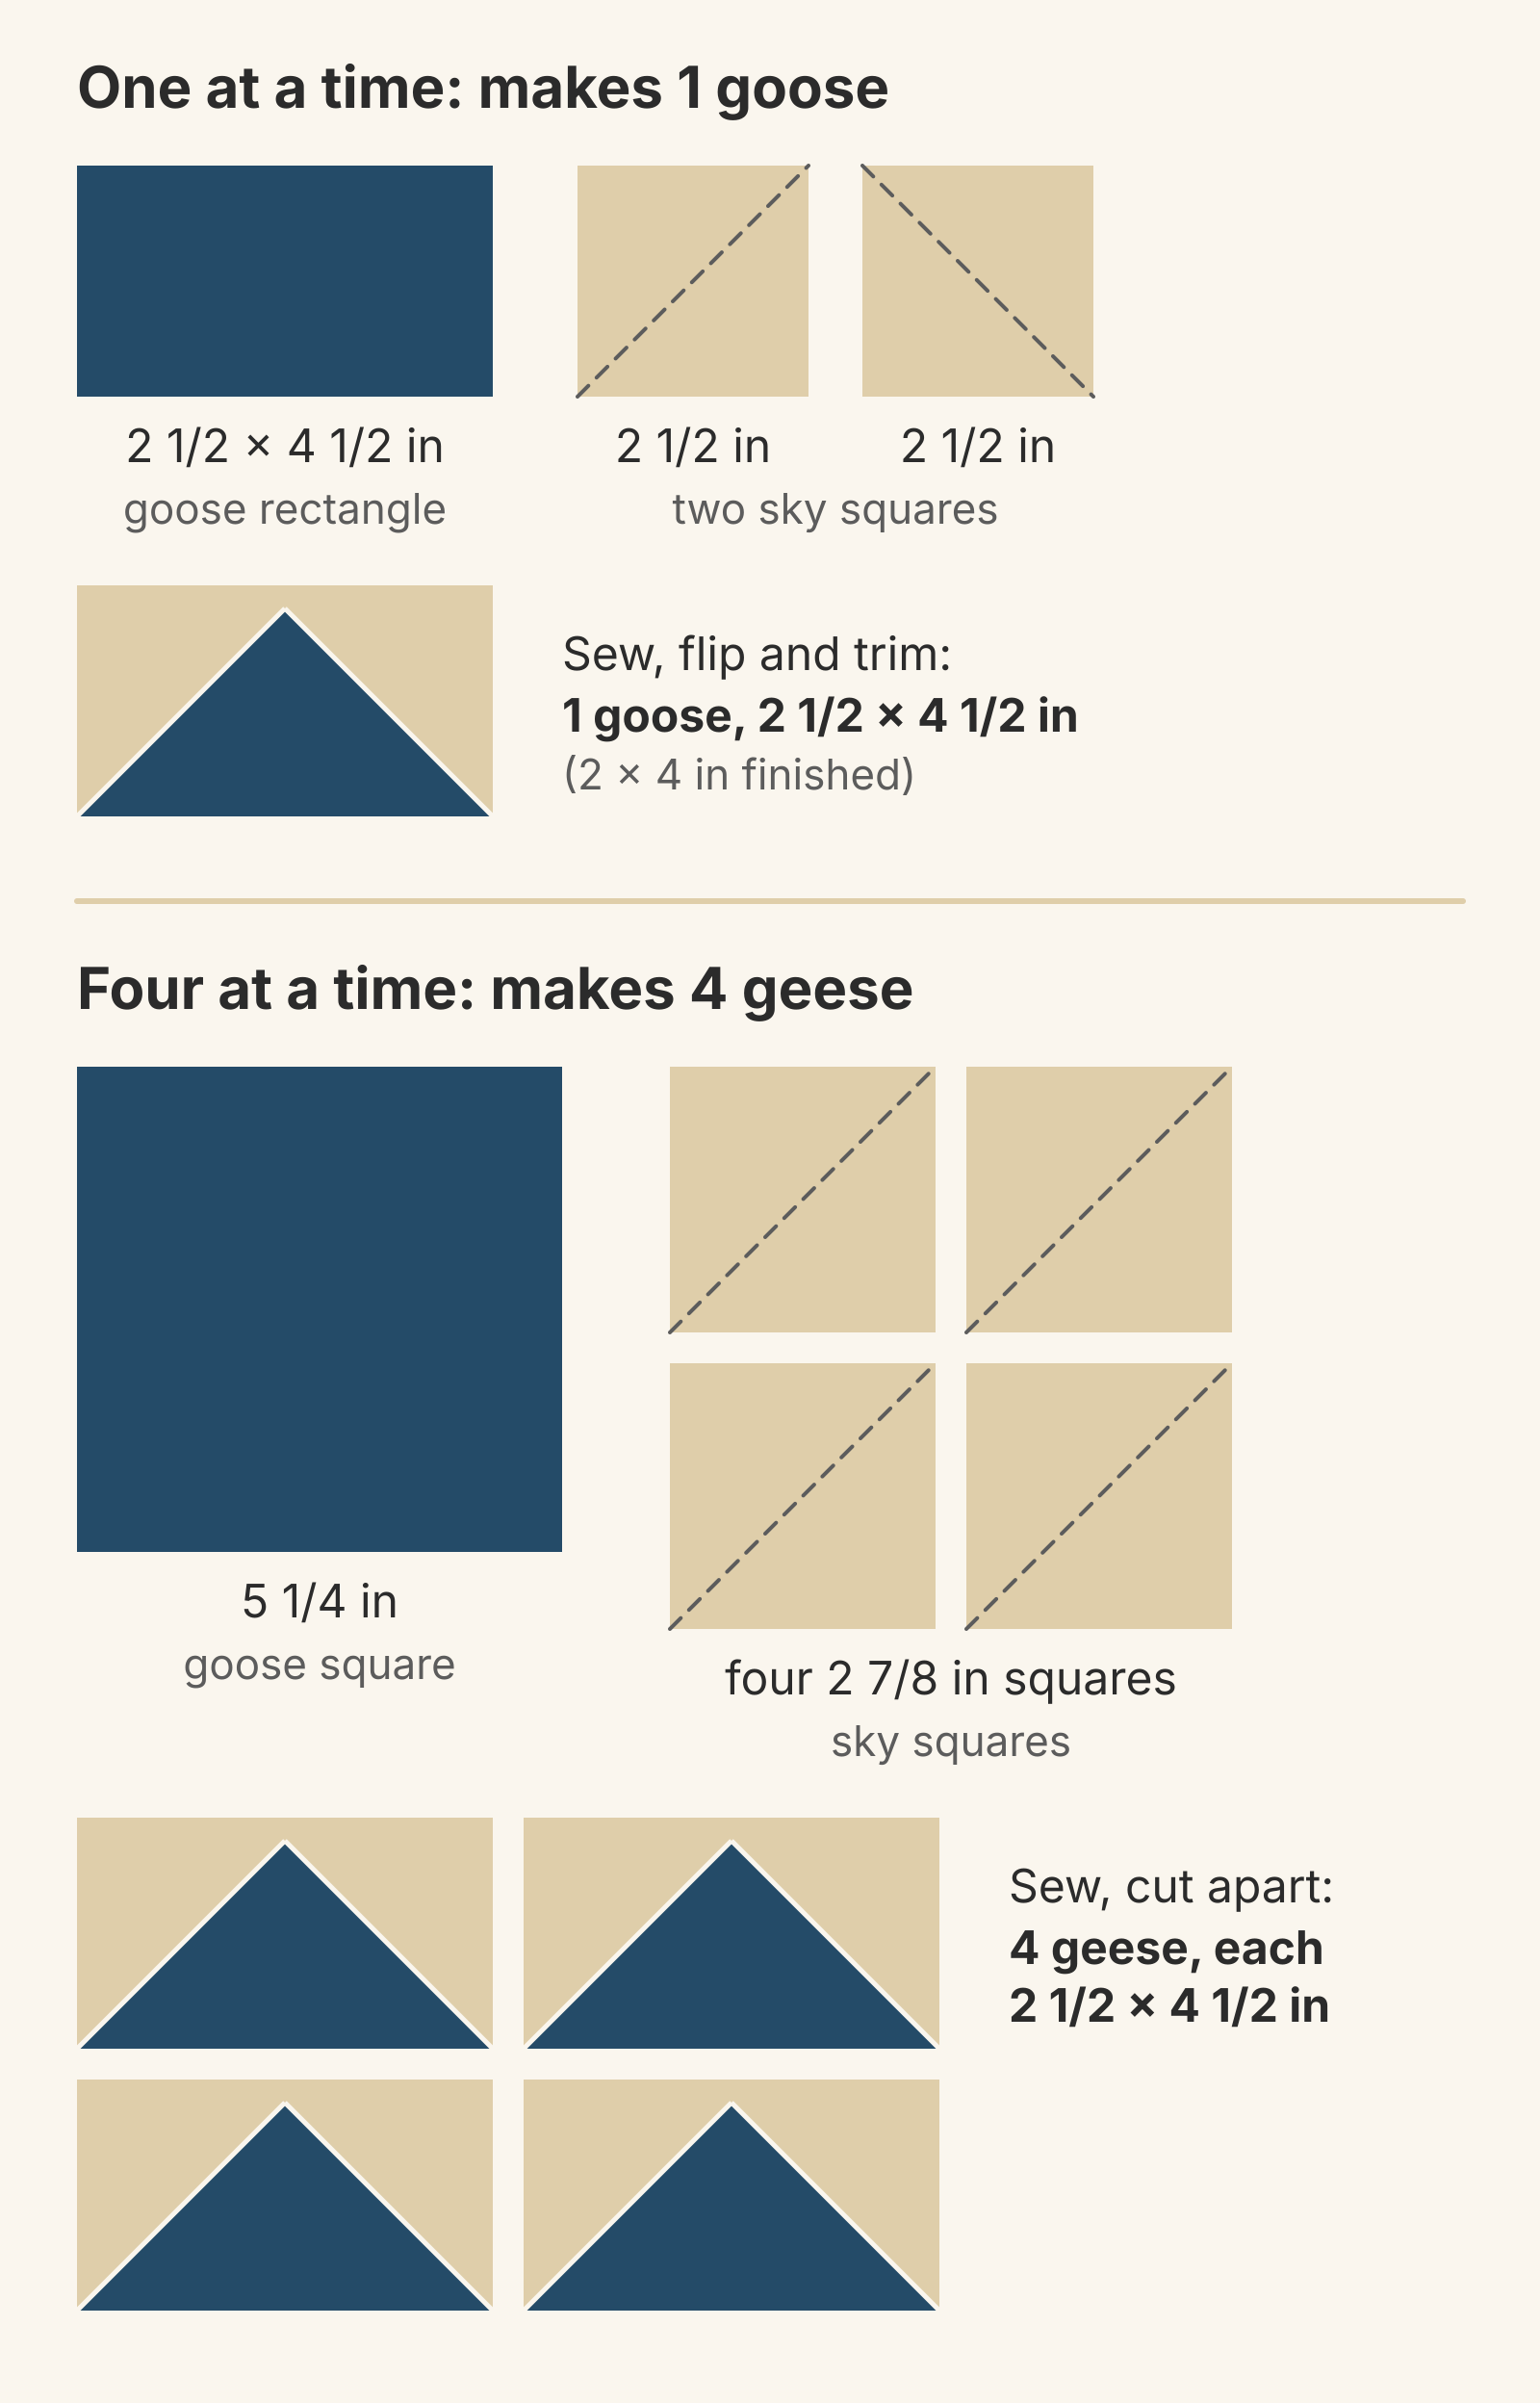
The rules behind those numbers work for any size:
- One at a time: cut the rectangle 1/2 inch larger than the finished goose both ways, and cut each square to half the finished width plus 1/2 inch. That's Christine Baker's rule at QUILTsocial. Her 3 x 6-inch geese start from a 3 1/2 x 6 1/2-inch rectangle and two 3 1/2-inch squares.
- Four at a time: cut the large square 1 1/4 inches bigger than the finished width, and the small squares 7/8 inch bigger than the finished height. Christine's 4 x 8-inch geese use a 9 1/4-inch square and four 4 7/8-inch squares, which fits the same rule.
- Four at a time, oversized: add 1 1/2 inches to the large square and 1 inch to the small ones, then trim. That's the formula in Kimberly Coffin's no-waste tutorial at Sweet Red Poppy.
The 7/8 inch is the same allowance you add for two-at-a-time half-square triangles, for the same reason: each sky triangle is half of a square, sewn along its long edge. Our two-at-a-time HST guide walks through that geometry.
Count your geese by fabric pair
Four at a time makes geese in sets of four, and all four share one goose fabric and one sky fabric. Count the geese you need for each fabric pair, divide by four and round up.
Here's a worked example: a column of 24 geese flying nose to tail. Each goose adds 2 inches of height, so the column finishes 4 x 48 inches.
- All navy geese on cream: 24 divided by 4 is 6 sets. Cut six navy 5 1/4-inch squares and twenty-four cream 2 7/8-inch squares.
- Twenty-four different goose prints on cream: each set repeats one print four times, so four at a time would give you six prints instead of twenty-four. Make them one at a time: 24 rectangles and 48 cream 2 1/2-inch squares.
- Twenty-six navy geese: six sets make 24. Make the last two one at a time, or make a seventh set and keep two spares.
This is what the all-navy column takes from yardage. The strip counts assume 40 usable inches across the width of fabric, and they come out the same at 42.
| 24 geese, 2 x 4 in finished | One at a time | Four at a time | Oversized |
|---|---|---|---|
| Navy pieces | 24 rectangles, 2 1/2 x 4 1/2 in | 6 squares, 5 1/4 in | 6 squares, 5 1/2 in |
| Cream pieces | 48 squares, 2 1/2 in | 24 squares, 2 7/8 in | 24 squares, 3 in |
| Strips to cut | 3 navy and 3 cream, 2 1/2 in | 1 navy 5 1/4 in, 2 cream 2 7/8 in | 1 navy 5 1/2 in, 2 cream 3 in |
| Strip depth, both fabrics | 15 in | 11 in | 11 1/2 in |
Per goose, one at a time cuts 23 3/4 square inches of fabric, against about 15 for four at a time, or 16 1/2 with the oversized sizes. If you trim both layers at each corner, as Christine's instructions do, the four corner offcuts add up to about 9 square inches per goose. That's nearly two-fifths of what you cut. Christine sews a second line 1/2 inch from the first, so the offcuts become small half-square triangles instead of scraps.
Directional prints: four at a time turns the print
In the four-at-a-time method, each goose triangle is one quarter of the large square, cut between its two diagonals. Its long edge lies along one side of the square and its point sits at the center. Turn all four finished geese to point the same way, and a one-way goose print faces four directions: one upright, one upside down and two on their sides. Turning the big square before you sew only changes which goose gets which direction. A striped goose fabric comes out a little better: two geese get stripes parallel to the base and two get them running up and down.
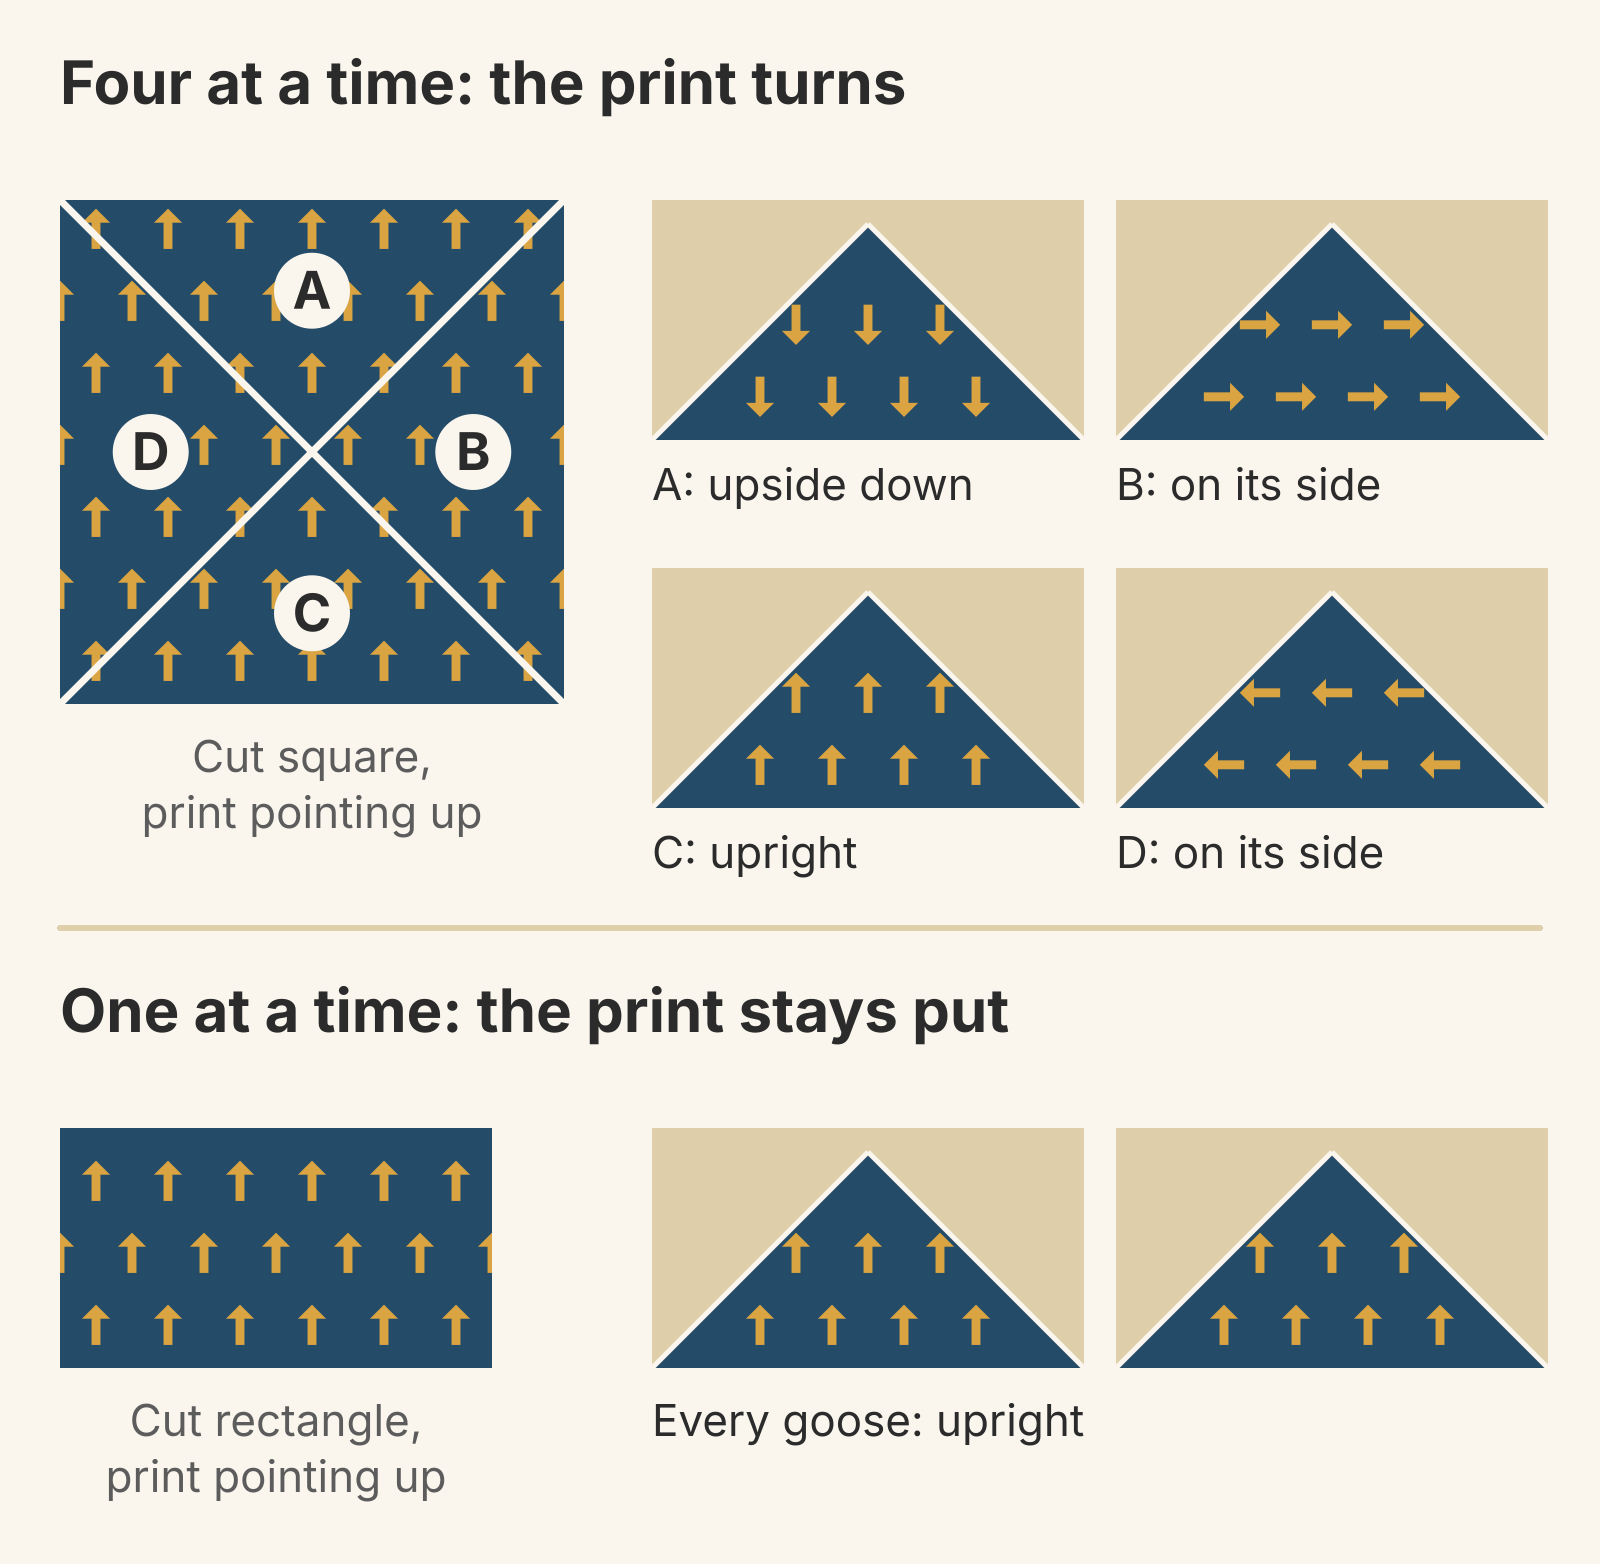
The sky fabric can't all face up either. Each small square is cut in half, and its two halves end up in geese that are turned a quarter turn apart.
One at a time keeps you in control. The rectangle never turns, so a goose print cut upright stays upright. Each sky square goes on by itself, too. Lay it right side down on the end of the rectangle, fold it back along the line you plan to sew and look at the print. Turn the square until the print faces the way you want, then mark the line.
For the fabric roles in that block, see Sawtooth Star color placement.
Scraps and precuts: which pieces fit
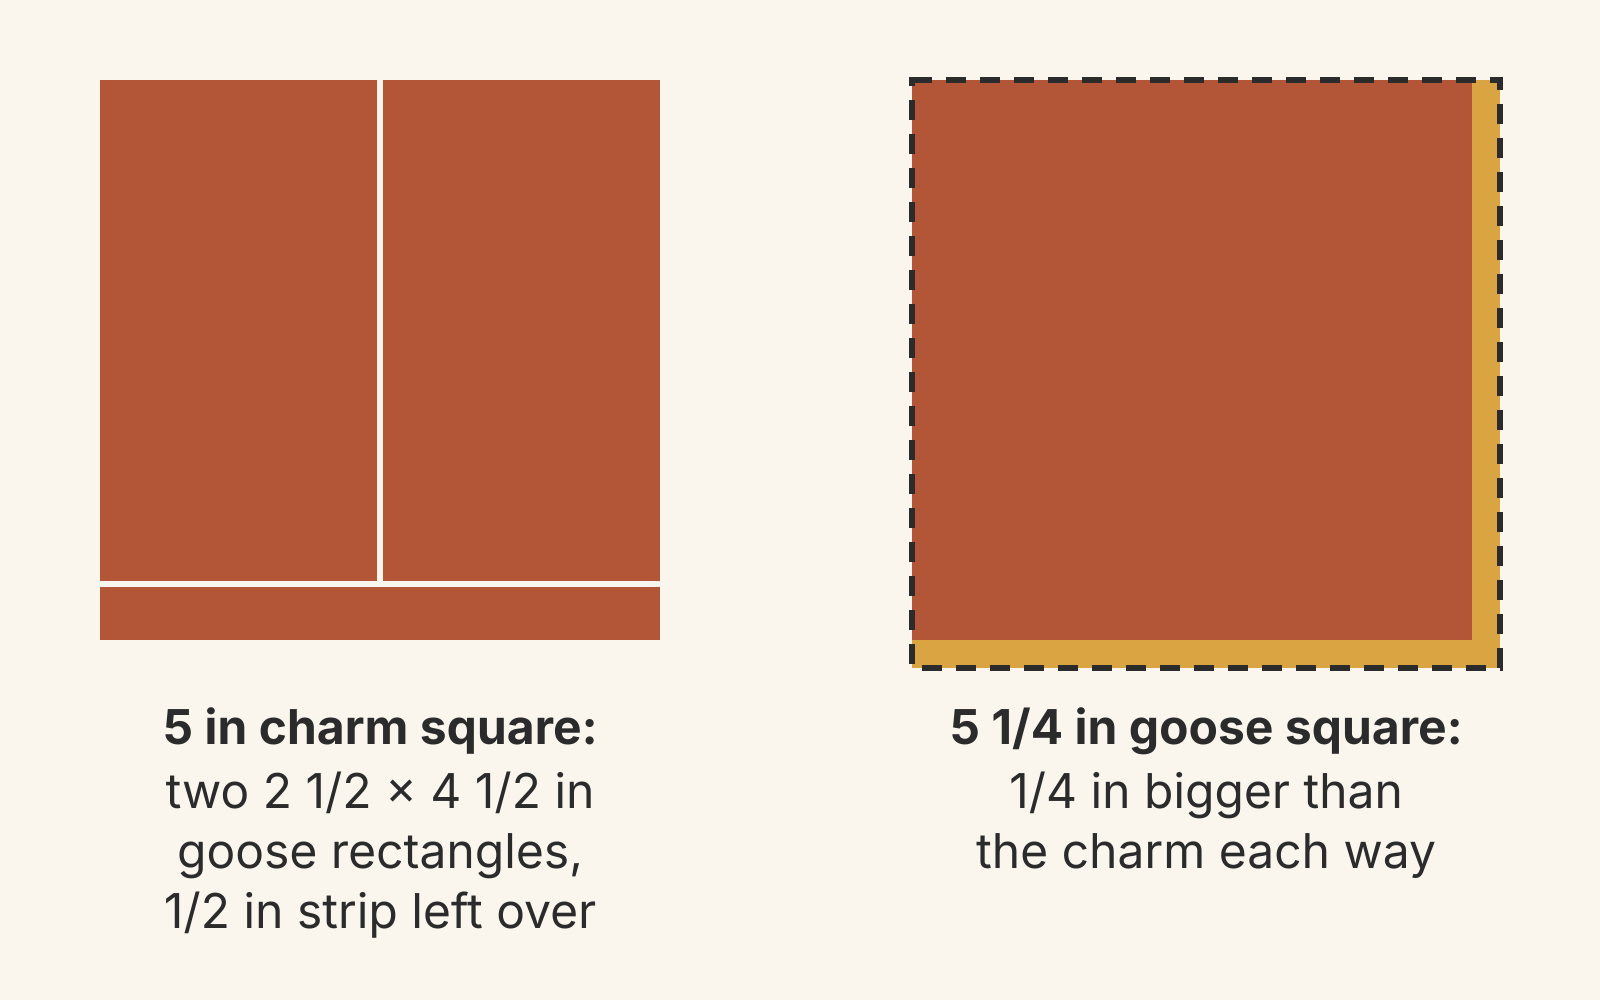
One at a time cuts from narrow pieces. For a 2 x 4-inch goose, every piece fits on a 2 1/2-inch strip. The rectangle comes from a 2 1/2-inch strip, such as a jelly roll strip. The sky squares are the size of a mini charm. A 5-inch charm square gives you two goose rectangles or four sky squares. Christine Baker counts this as a plus of stitch-and-flip: you can cut the pieces from scraps, while four at a time needs a larger piece of fabric.
Four at a time needs one piece of goose fabric 5 1/4 inches square. That's 1/4 inch bigger each way than a charm square. If you use the charm square as the big square anyway, the same rule gives geese that finish 1 7/8 x 3 3/4 inches instead of 2 x 4.
Trimming: build in room or cut exact
The conventional four-at-a-time sizes leave almost nothing to trim. On paper, with a perfect 1/4-inch seam, a 5 1/4-inch square and four 2 7/8-inch squares make geese less than 1/16 inch larger than 2 1/2 x 4 1/2 inches. A seam that runs a thread wide will make them small. Amy Smart adds that sewing and cutting on the diagonal can leave the units "a little mis-shapen," which is why she squares them up and builds extra fabric into her chart.
The oversized sizes, 5 1/2 and 3 inches, leave a little over 1/4 inch of extra width and just over 1/8 inch of extra height. Erin Kroeker's tutorial for OLFA shows the trim on a larger goose. She cuts a 10 1/2-inch square and four 5 1/2-inch squares for geese that finish 4 1/2 x 9 inches, then trims each to 5 x 9 1/2 inches. Keep 1/4 inch of fabric above the point, and take the same amount off the left and right sides so the point stays centered. That 1/4 inch puts the point on the next seam line, so you can sew through the X and keep the point.
If you make geese four at a time, start with the oversized sizes. For the 24-goose column, they add only 1/2 inch of strip depth: 11 1/2 inches instead of 11.
One at a time is cut to exact size, so there's nothing to trim but the corners. Press each flipped square and check that it reaches the corner of the rectangle before you trim the layers behind it.
Which method fits your project
| If your geese need... | Use |
|---|---|
| Four or more in the same two fabrics, no one-way print | Four at a time, oversized and trimmed |
| A one-way print in the goose or sky | One at a time |
| A different print in every goose | One at a time |
| Pieces cut from charm squares or 2 1/2-inch strips | One at a time |
| A count that doesn't divide by four | Sets of four, plus a few one at a time |
Plan the geese, then sew one test
Pick the method for each fabric pair, then sew one goose, or one set of four, in your real fabrics. Check that it measures 2 1/2 x 4 1/2 inches, trimmed, before you cut the rest. For a layout to drop them into, the Flying Geese Row block shows four geese flying nose to tail.
If a directional print is in the mix, you can preview it in QuiltLab's Block Editor before you cut. Draw the geese, apply your fabric and select a goose triangle. The Draw panel's Appearance section has a Fabric rotation (degrees) field. Leave one goose triangle at 0 and set the other three to 90, 180 and 270 to see what four at a time would do to your print. The Block Editor doesn't work out cut sizes or yardage, so keep the numbers above in your own notes. You can try it on the Free plan.
Block Editor guide →Draw pieces, assign fabrics and save blocks for your quilt layoutsRelated posts

How to Design a Bargello Quilt: Plan the Wave on Paper
A bargello wave is a staircase of stepped columns. Number your strips, write one row per column, and see how column width turns a zigzag into a curve.

Borderless Quilt Design: Plan an Edge That Looks Finished
With no border, the outer blocks and the binding make the edge. Compare whole and halved motifs on one 48 x 60 inch quilt, then pick the binding color.

Crosshatch Quilting: How to Make the Lines Meet at the Edges
Space a 45-degree crosshatch so the lines meet in a V at every edge and corner. Choose the edge step first, mark dots around the quilt, then connect them.