


Floating Quilt Blocks: How Much Space Should You Leave?
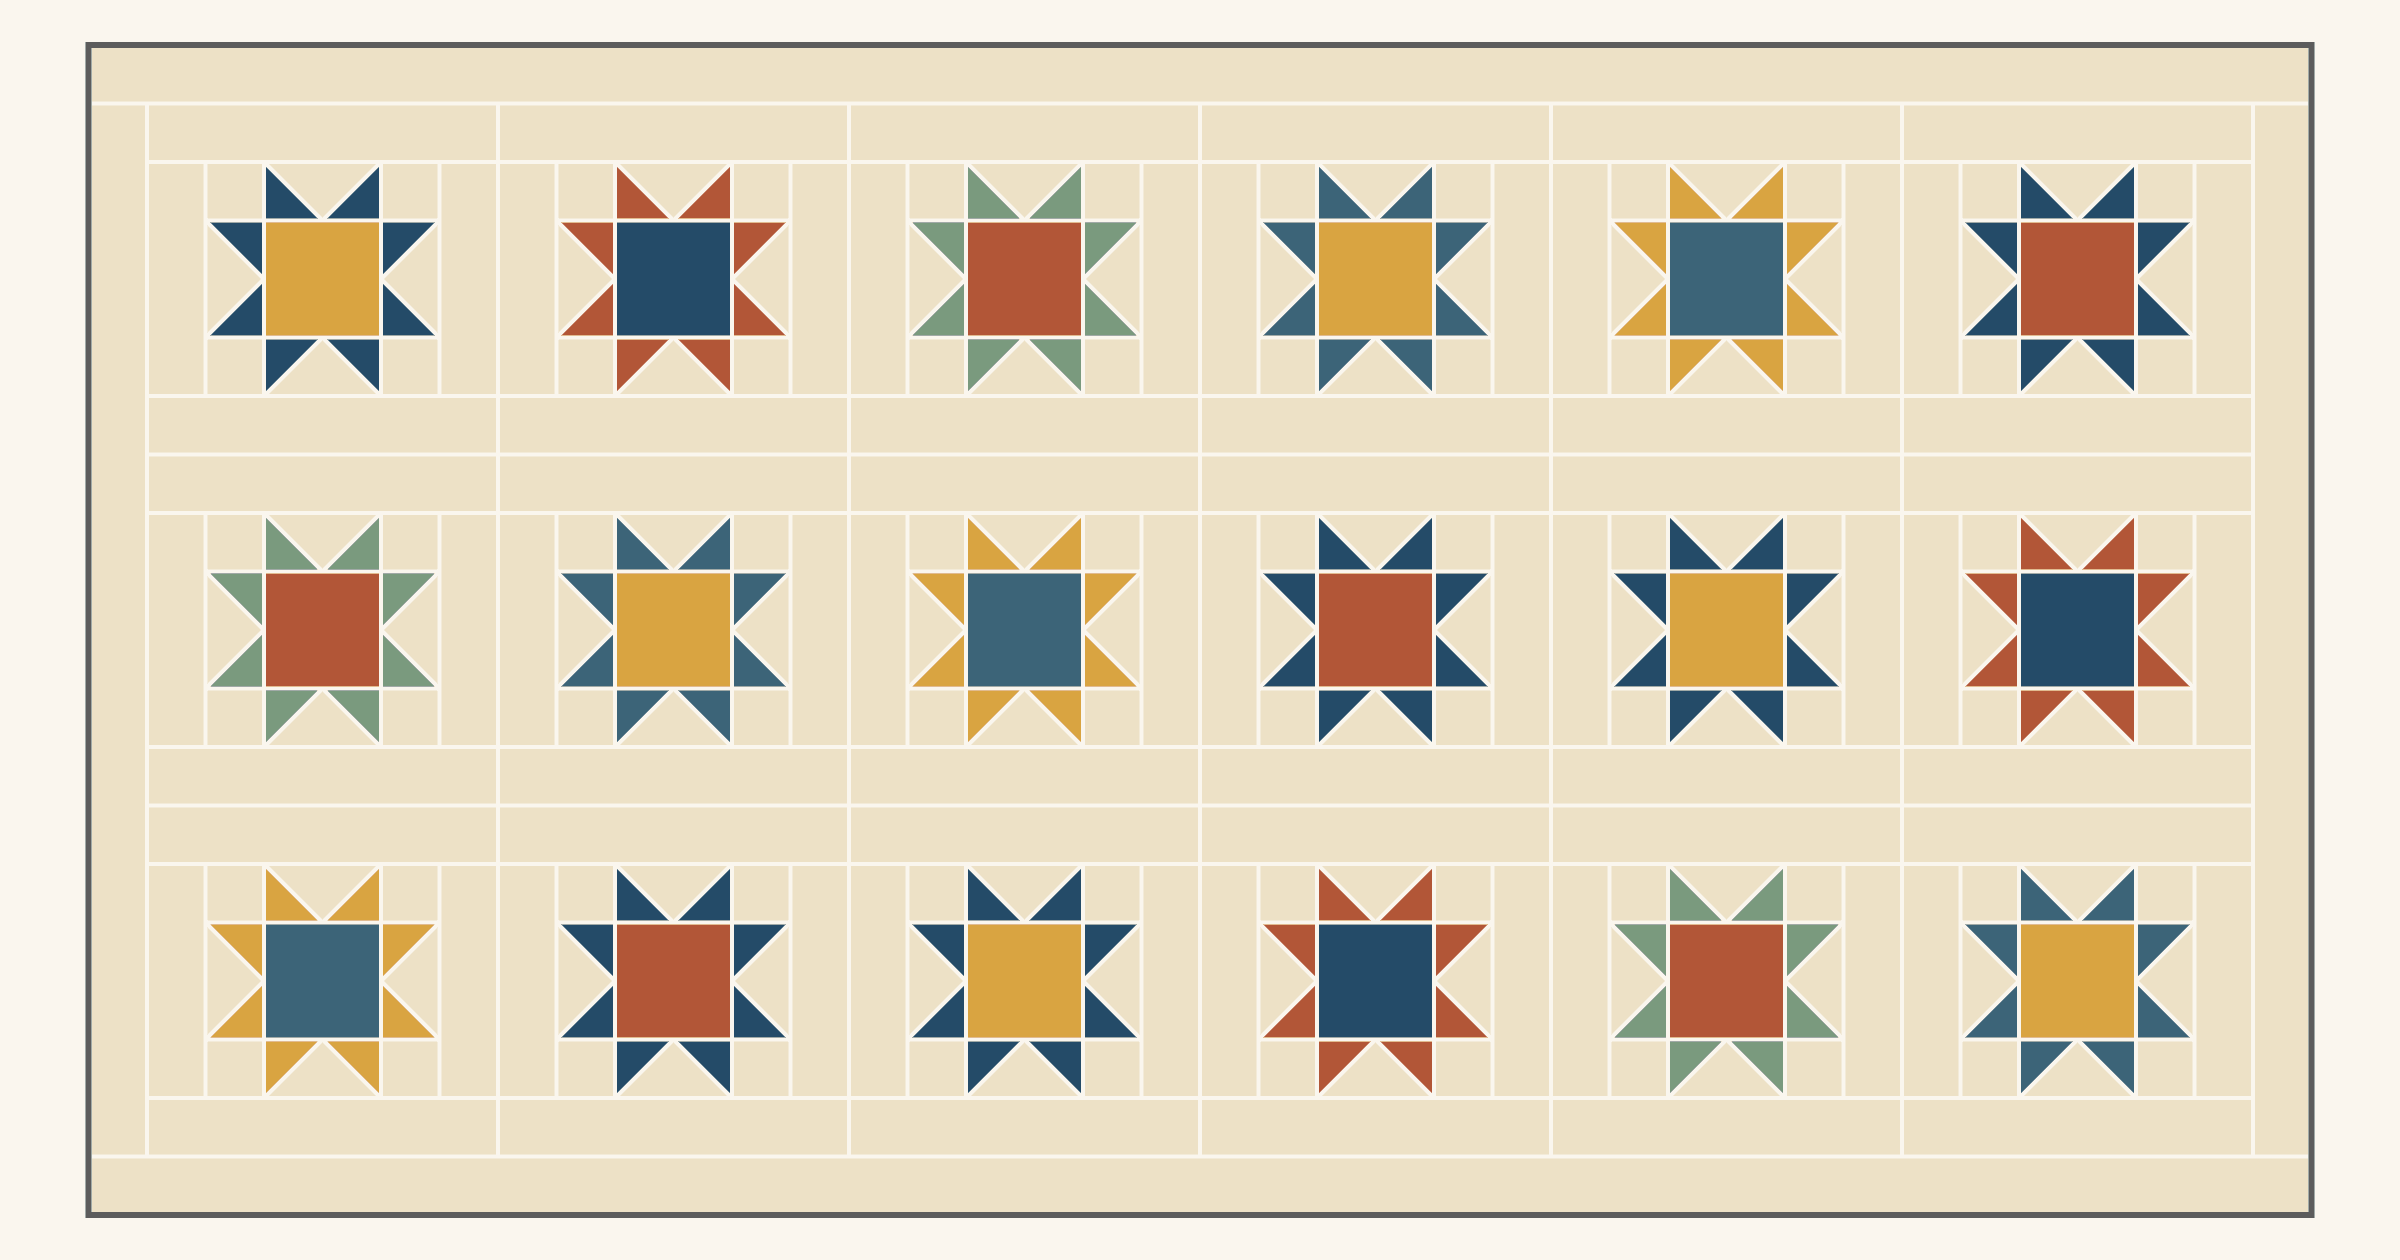
Blocks float when matching background fabric surrounds each motif, so its points never run into a neighbor or the border. There's no standard width for that space. Published floating borders run from 1 1/2 inches finished in Christine Baker's QUILTsocial tutorial (strips cut 2 inches wide) to 3 inches in Kris Driessen's Scrapdash tutorial. For a grid of matching blocks, start with a gap between motifs half as wide as the block, and leave the same space at the edge.
On twenty 6-inch Sawtooth Stars, that's a 3-inch gap. Frame each star with 1 1/2-inch strips of its own background (cut 2 inches wide), then add a 1 1/2-inch border of the same fabric. Every star sits 3 inches from its neighbors and from the edge, and the top finishes at 39 by 48 inches.
We drew these diagrams for this article and haven't sewn them. Sizes are finished unless we say cut.
What makes a block float?
Two things: background that matches, and room past the points.
The background has to carry on past the block's edge. Driessen calls a border floating when it's "made of the same fabric as the background" and surrounds the center. Baker cut her strips from the same fabric as the sky in her flying geese, so the geese "appear to 'float' on the background." Frame a cream-background star in gray and you get a framed block instead. That's a fine look, but the star now sits in a box.
Then measure from the motif, not the block. A Sawtooth Star's points reach the block's finished edge, at the corners of each flying-geese unit. Sew two stars side by side and their points meet tip to tip in the seam, so the stars chain together. Our Sawtooth Star color placement post labels each part of the block.
Some blocks already float their motif. A 6-inch star drafted in the middle of an 8-inch block has 1 inch of background on each side, and a centered appliqué motif works the same way. Count that inside margin as part of the space.
Measure the motif inside its unit
The unit is the square that repeats across your quilt: the block plus its frame. Work in finished inches.
- Motif: measure from outermost point to outermost point. For the Sawtooth Star, 6 inches.
- Unit: the finished framed block. With 1 1/2-inch frames, 6 + 1 1/2 + 1 1/2 = 9 inches.
- Margin: (unit - motif) / 2. Here, 1 1/2 inches of background on each side of the star.
- Gap between motifs: two margins, because each neighbor brings its own. Here, 3 inches.
- Edge: one margin plus any border. Here, 1 1/2 inches with no border.
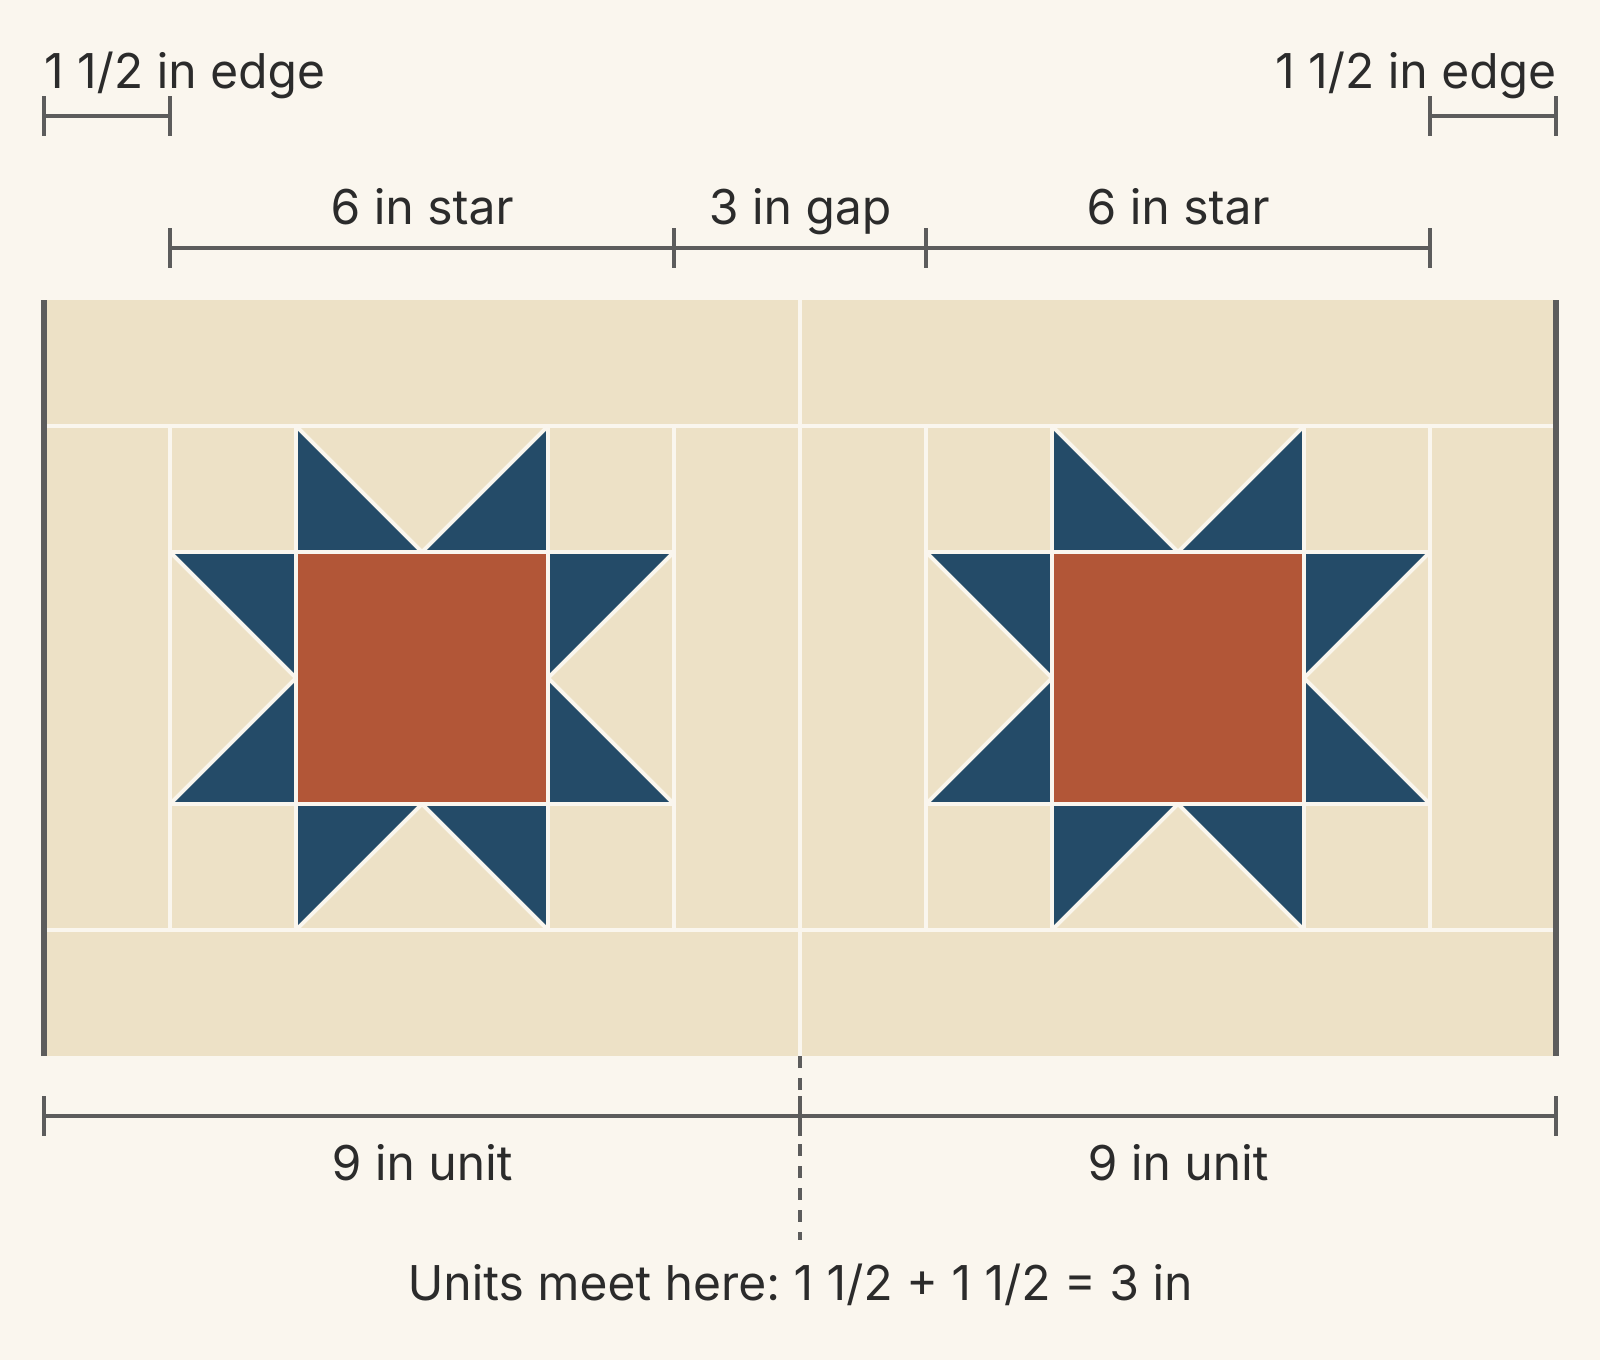
If your motif or unit is a rectangle, measure across and down separately. The two gaps can differ, and you'll see it in the finished quilt.
How wide should the frames be?
Here's the same row of three 6-inch stars with four frame widths, all drawn at one scale.
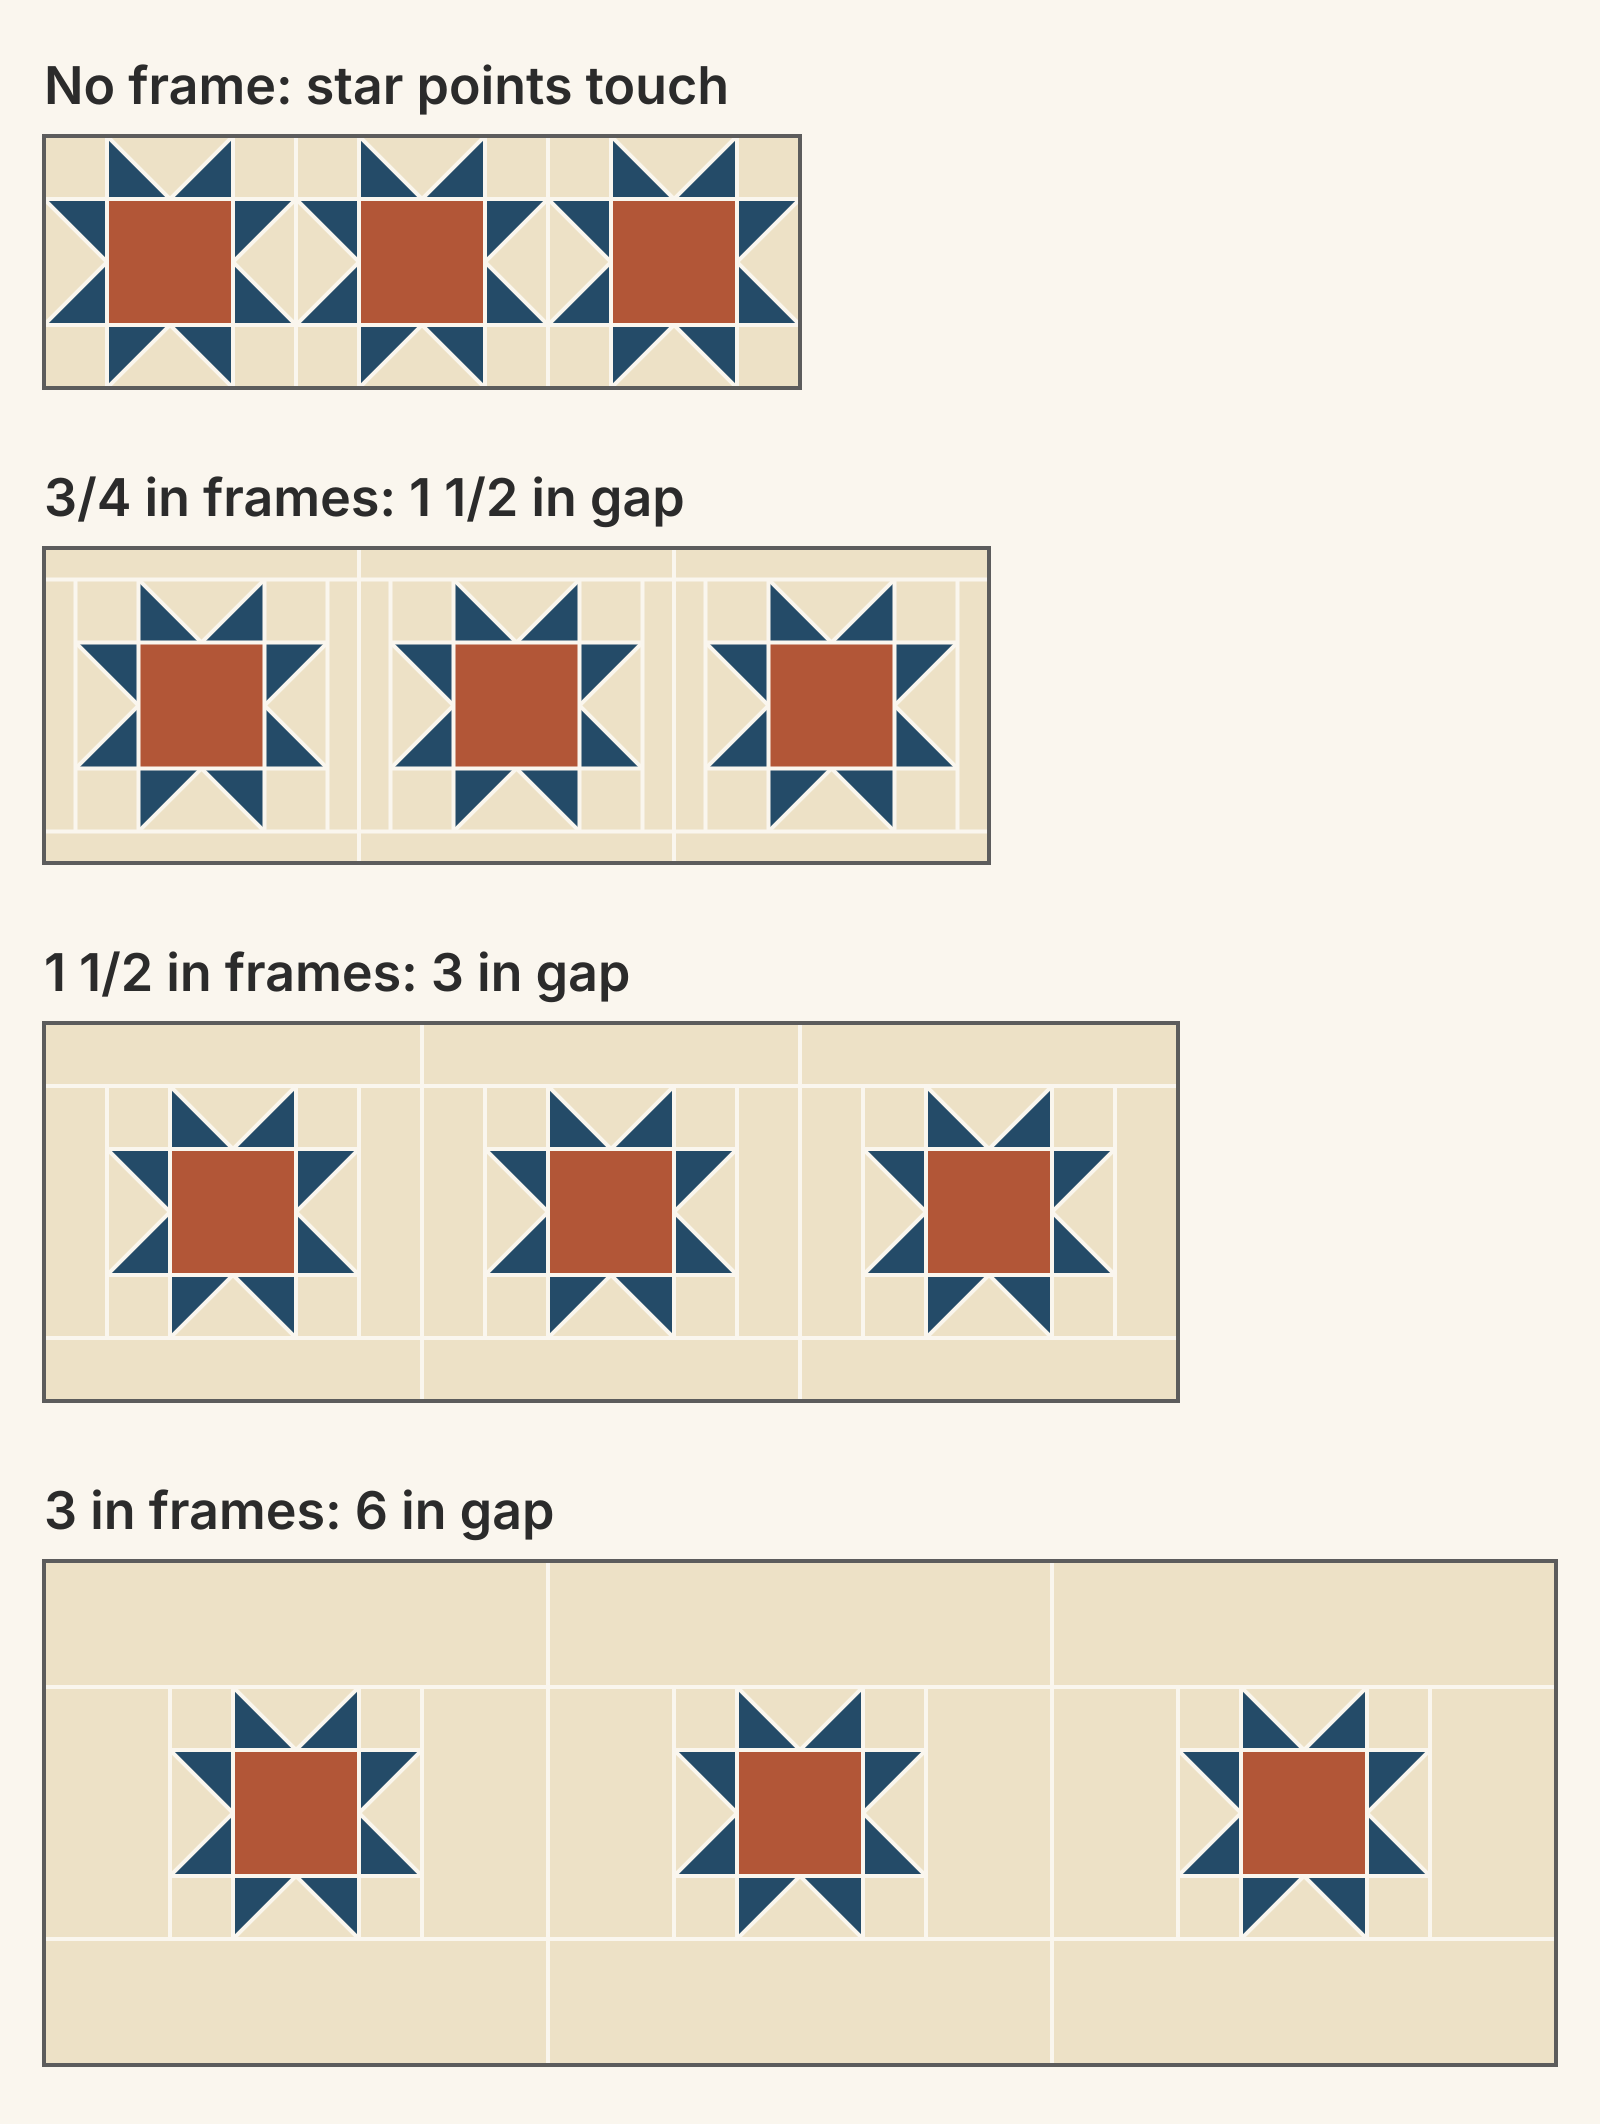
No frame. The points meet, and the row reads as a chain. That can make a lovely secondary pattern, but nothing floats.
3/4-inch frames (cut 1 1/4-inch strips). A 1 1/2-inch gap, a quarter of the star's width. The stars separate, and the background between them reads as narrow lanes.
1 1/2-inch frames (cut 2-inch strips). A 3-inch gap, half the star's width. Each star reads as its own shape on the background, and the grid still holds together.
3-inch frames (cut 3 1/2-inch strips). A 6-inch gap, as wide as the star. The stars spread out across a big cream field. For a single star in open background, see how much negative space a focal block needs.
Frame width also sets the quilt size, because every unit grows by two frames. For four columns and five rows of 6-inch stars:
| Frame | Cut strip width | Unit | Top before border |
|---|---|---|---|
| None | None | 6 in | 24 x 30 in |
| 3/4 in | 1 1/4 in | 7 1/2 in | 30 x 37 1/2 in |
| 1 1/2 in | 2 in | 9 in | 36 x 45 in |
| 3 in | 3 1/2 in | 12 in | 48 x 60 in |
When the points reach the block's edge, as on a Sawtooth Star, start with frames a quarter of the block's finished size: 1 1/2 inches for 6-inch blocks, 3 inches for 12-inch blocks. That leaves half a block of background between motifs, and each unit is one and a half times the block. If your block already has background around its motif, subtract that from the frame. Then audition it. Fold background fabric to the finished frame width, lay it around two real blocks on the design wall, and step back.
Make the edge match the gap
Frames alone leave the outer stars closer to the edge than to each other: 1 1/2 inches against 3. Right next to the binding, that outer ring of stars can look crowded.
Add a background border half as wide as the gap. On the example, a 1 1/2-inch border (cut 2-inch strips) brings the edge to 3 inches, the same as the gap. The top grows from 36 x 45 to 39 x 48 inches.
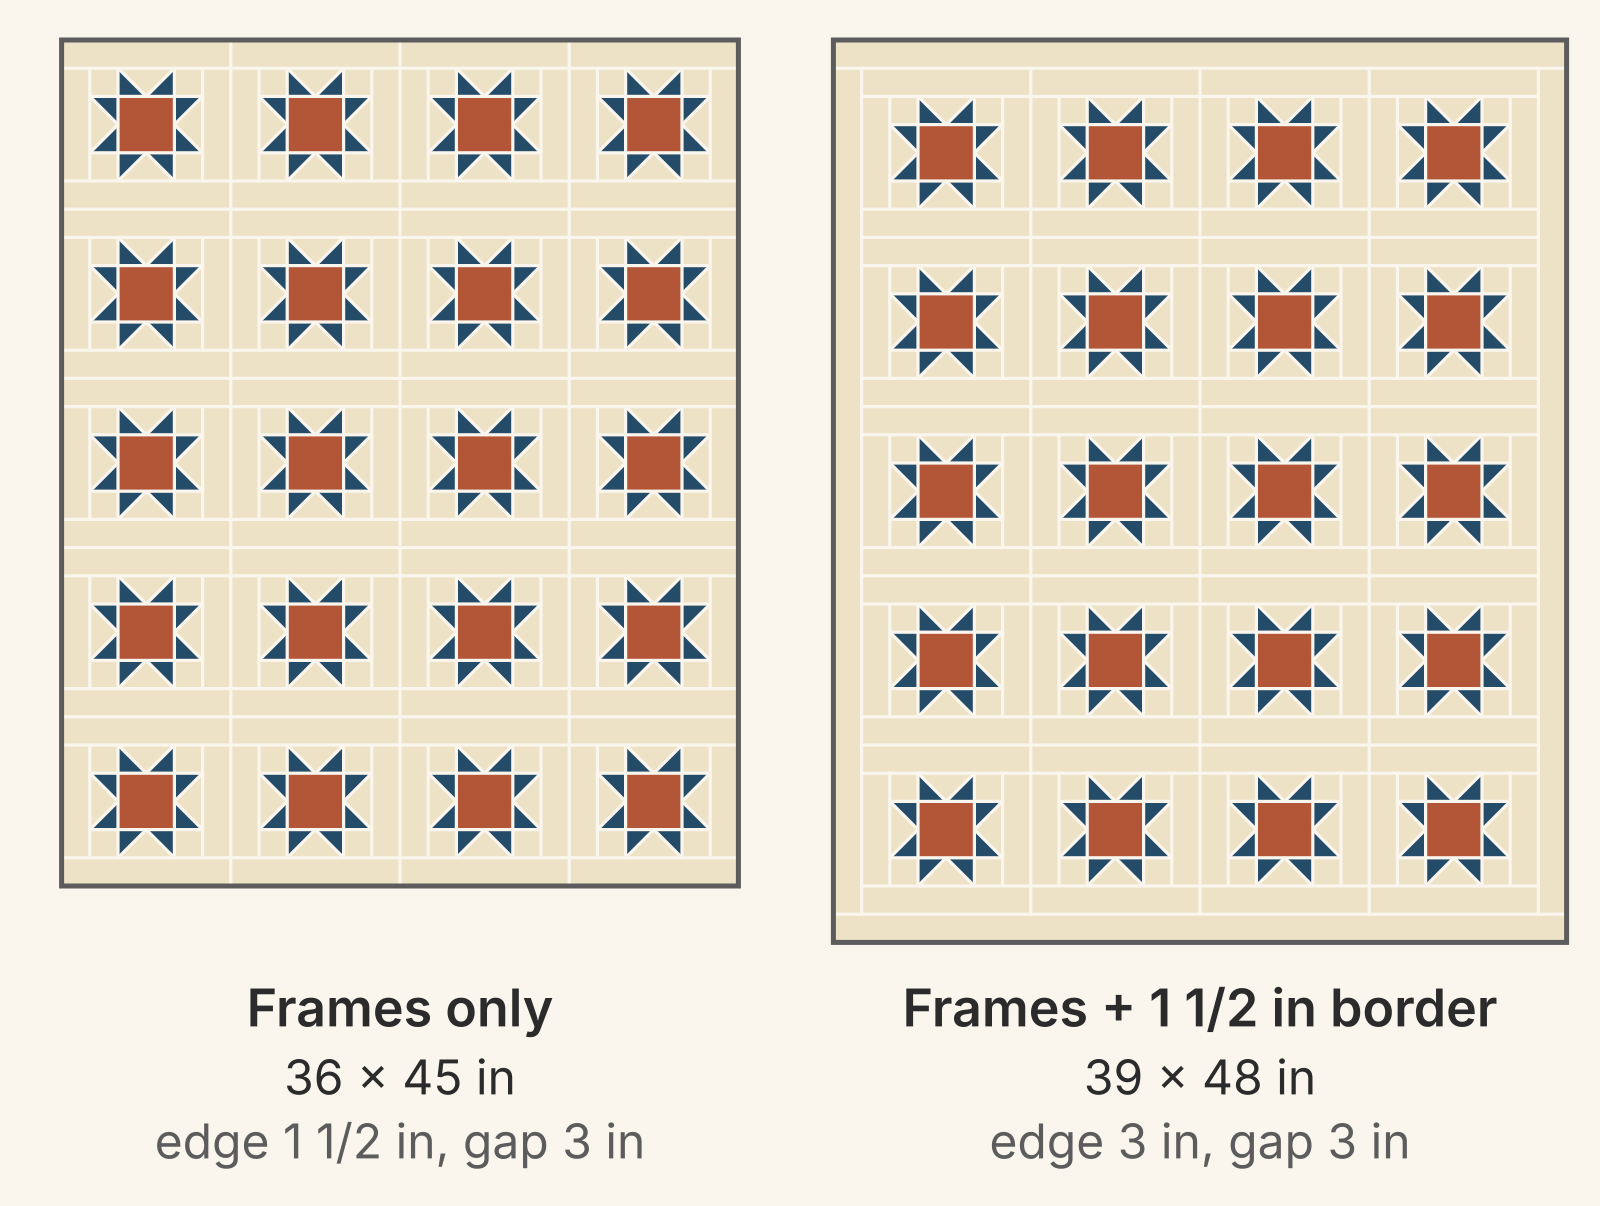
Measure the sewn center before you cut border lengths. If it measures 36 1/2 x 45 1/2 inches, cut two side strips 2 x 45 1/2 inches and sew them on. Then cut the top and bottom strips 2 x 39 1/2 inches. Our wavy borders guide shows how to measure the center in three places.
Want more room at the edge than between the stars? Make the border wider. Driessen's border strips are cut 3 1/2 inches wide. On this example, that would put the outer stars 4 1/2 inches from the edge, and the top would finish at 42 x 51 inches. For an outer border in a different fabric beyond the float, see quilt border ideas.
Frames or background sashing?
Background sashing reaches the same layout. Set the unframed 6-inch stars with 3-inch sashing (cut 3 1/2 inches) and a 3-inch border, and every star lands in exactly the same spot: 39 x 48 inches, with 3-inch gaps and 3-inch edges. The difference is in the sewing.
- Frames: 80 frame strips plus 4 border strips, 84 pieces of background. Cut the strips a little wide and you can trim every framed block to 9 1/2 inches, so the units match even when a star came out a little big or small.
- Sashing: 15 short strips, 4 long strips between the rows and 4 border strips, 23 pieces. Every star has to measure 6 1/2 inches before you start, or the columns won't line up from row to row.
If your stars vary, frames are more forgiving. In her floating blocks tutorial, Elizabeth Hartman cuts background pieces with about an inch of leeway on all sides and squares up after each addition. Here, that means cutting 3-inch strips, 3 x 6 1/2 inches for the sides and 3 x 11 1/2 inches for the top and bottom. Trim each framed block to 9 1/2 inches with the star centered. On a star that measures true, the ruler's 1 3/4-inch line sits on each seam where star meets frame. When a star isn't true, our guide to squaring up a block by its seams and points shows which landmark to trust.
If your stars all measure true, sashing is quicker. Our sashing width post compares widths at other block sizes.
Either way, the seam that joins background to star runs right through the star tips. Baker's tip applies here: sewing with an accurate 1/4-inch seam "ensures the points of your geese don't get lost in the seam."
Floating blocks on point
On point, the setting triangles decide the edge. In her on-point math at Quiltville, Bonnie Hunter rounds her side-triangle cuts up and notes that "the blocks will float inside the top a bit when pieced with bigger triangles." Then she trims the edge 1/4 inch beyond the block corners, so the corners land right at the finished edge.
To float on-point blocks, trim the same way, then add a border cut from the setting-triangle fabric. A 1 1/2-inch border (cut 2-inch strips) puts every outer block corner 1 1/2 inches from the edge. Bigger triangles could do the same job, but they'd have to reach 1 3/4 inches past the corners, and the usual triangle sizes leave only about 1/4 inch past them before any rounding up. Our on-point setting guide covers those sizes.
The triangles and border only set the edge. Blocks sewn edge to edge on point still touch each other, so frame them first if you want space between them too.
Plan your floating quilt
Measure one finished block's motif from point to point. Choose the gap you want and halve it. That's the background each block needs on every side, and the width of the border. Then work out the top: columns x unit + 2 x border across, and rows x unit + 2 x border down. Frame two blocks and pin them side by side on the design wall before you cut all 80 strips.
To see the layout first, draw the star and its frame together as one 9-inch block in QuiltLab's Block Editor. Put the star in the center 6 inches and the frame in your background fabric. The Quilt Editor's grid has no sashing setting, so the frame lives inside the block.
In the Quilt Editor, start a Grid quilt with 9-inch blocks in 4 columns and 5 rows, and place the block. Layout shows the finished size beside its heading: 36 x 45 inches for this grid. Under Borders, choose Add border, set a 1 1/2-inch finished width and give it the same fabric. Each border's width adds to the overall quilt size. The Quilt Editor doesn't give cut sizes, so keep the strip sizes from this post beside your design.
Quilt Editor guide →Set block size, grid counts and borders, and read the finished sizeRelated posts

How to Design a Bargello Quilt: Plan the Wave on Paper
A bargello wave is a staircase of stepped columns. Number your strips, write one row per column, and see how column width turns a zigzag into a curve.
Irish Chain Quilt Colors: Which Fabric Goes Where?
Most Irish Chains put darker chain fabrics on a light background. Compare single and double chain value maps and see which fabric shapes the diamonds.
How to Design a Medallion Quilt So Every Border Fits
Plan a medallion ring by ring: check that each pieced border divides its side, add a plain spacer when it doesn't, and grow a 12 in star to a 48 in quilt.