


How to Design a Bargello Quilt: Plan the Wave on Paper

A bargello quilt is a strip set cut into columns and stepped. You sew the strips into a round, slice it into columns of different widths, and open each column one seam above or below where you opened the last. Lynn Woll's bargello tutorial at Create Whimsy works this way, "moving up and down one seam," with columns cut from 2 1/2 inches down to 1 1/4 inches. The one-strip step makes the color climb. The column width decides how steep the climb looks: narrow columns rise fast and wide ones level off.
For a first bargello, keep every step at one strip, cut columns between 1 1/4 and 2 1/2 inches, and plan one wave on paper before you cut. The plan has two parts: a numbered strip order and a table with one row per column. Below we build both for an eight-fabric panel and show what each choice does to the wave.
How a strip set becomes a wave
Our example uses eight fabrics, numbered 1 (lightest) to 8 (darkest). Each strip is cut 2 1/2 inches wide, the width of a jelly roll strip, and finishes at 2 inches. Sewn into a round, the eight strips make a column 16 inches tall.
Every column contains the same eight strips in the same order. The only thing that changes is which strip sits at the top. Call that number the column's top strip. To put strip 3 on top, you open the seam between strips 2 and 3.
When the top strip goes up by one from one column to the next, every color moves up one row. Keep doing that and each color band climbs across the quilt like a staircase. Count back down and the bands fall again. Woll's tutorial calls a shift that makes the wave go up a "step up," and the opposite a "step down."
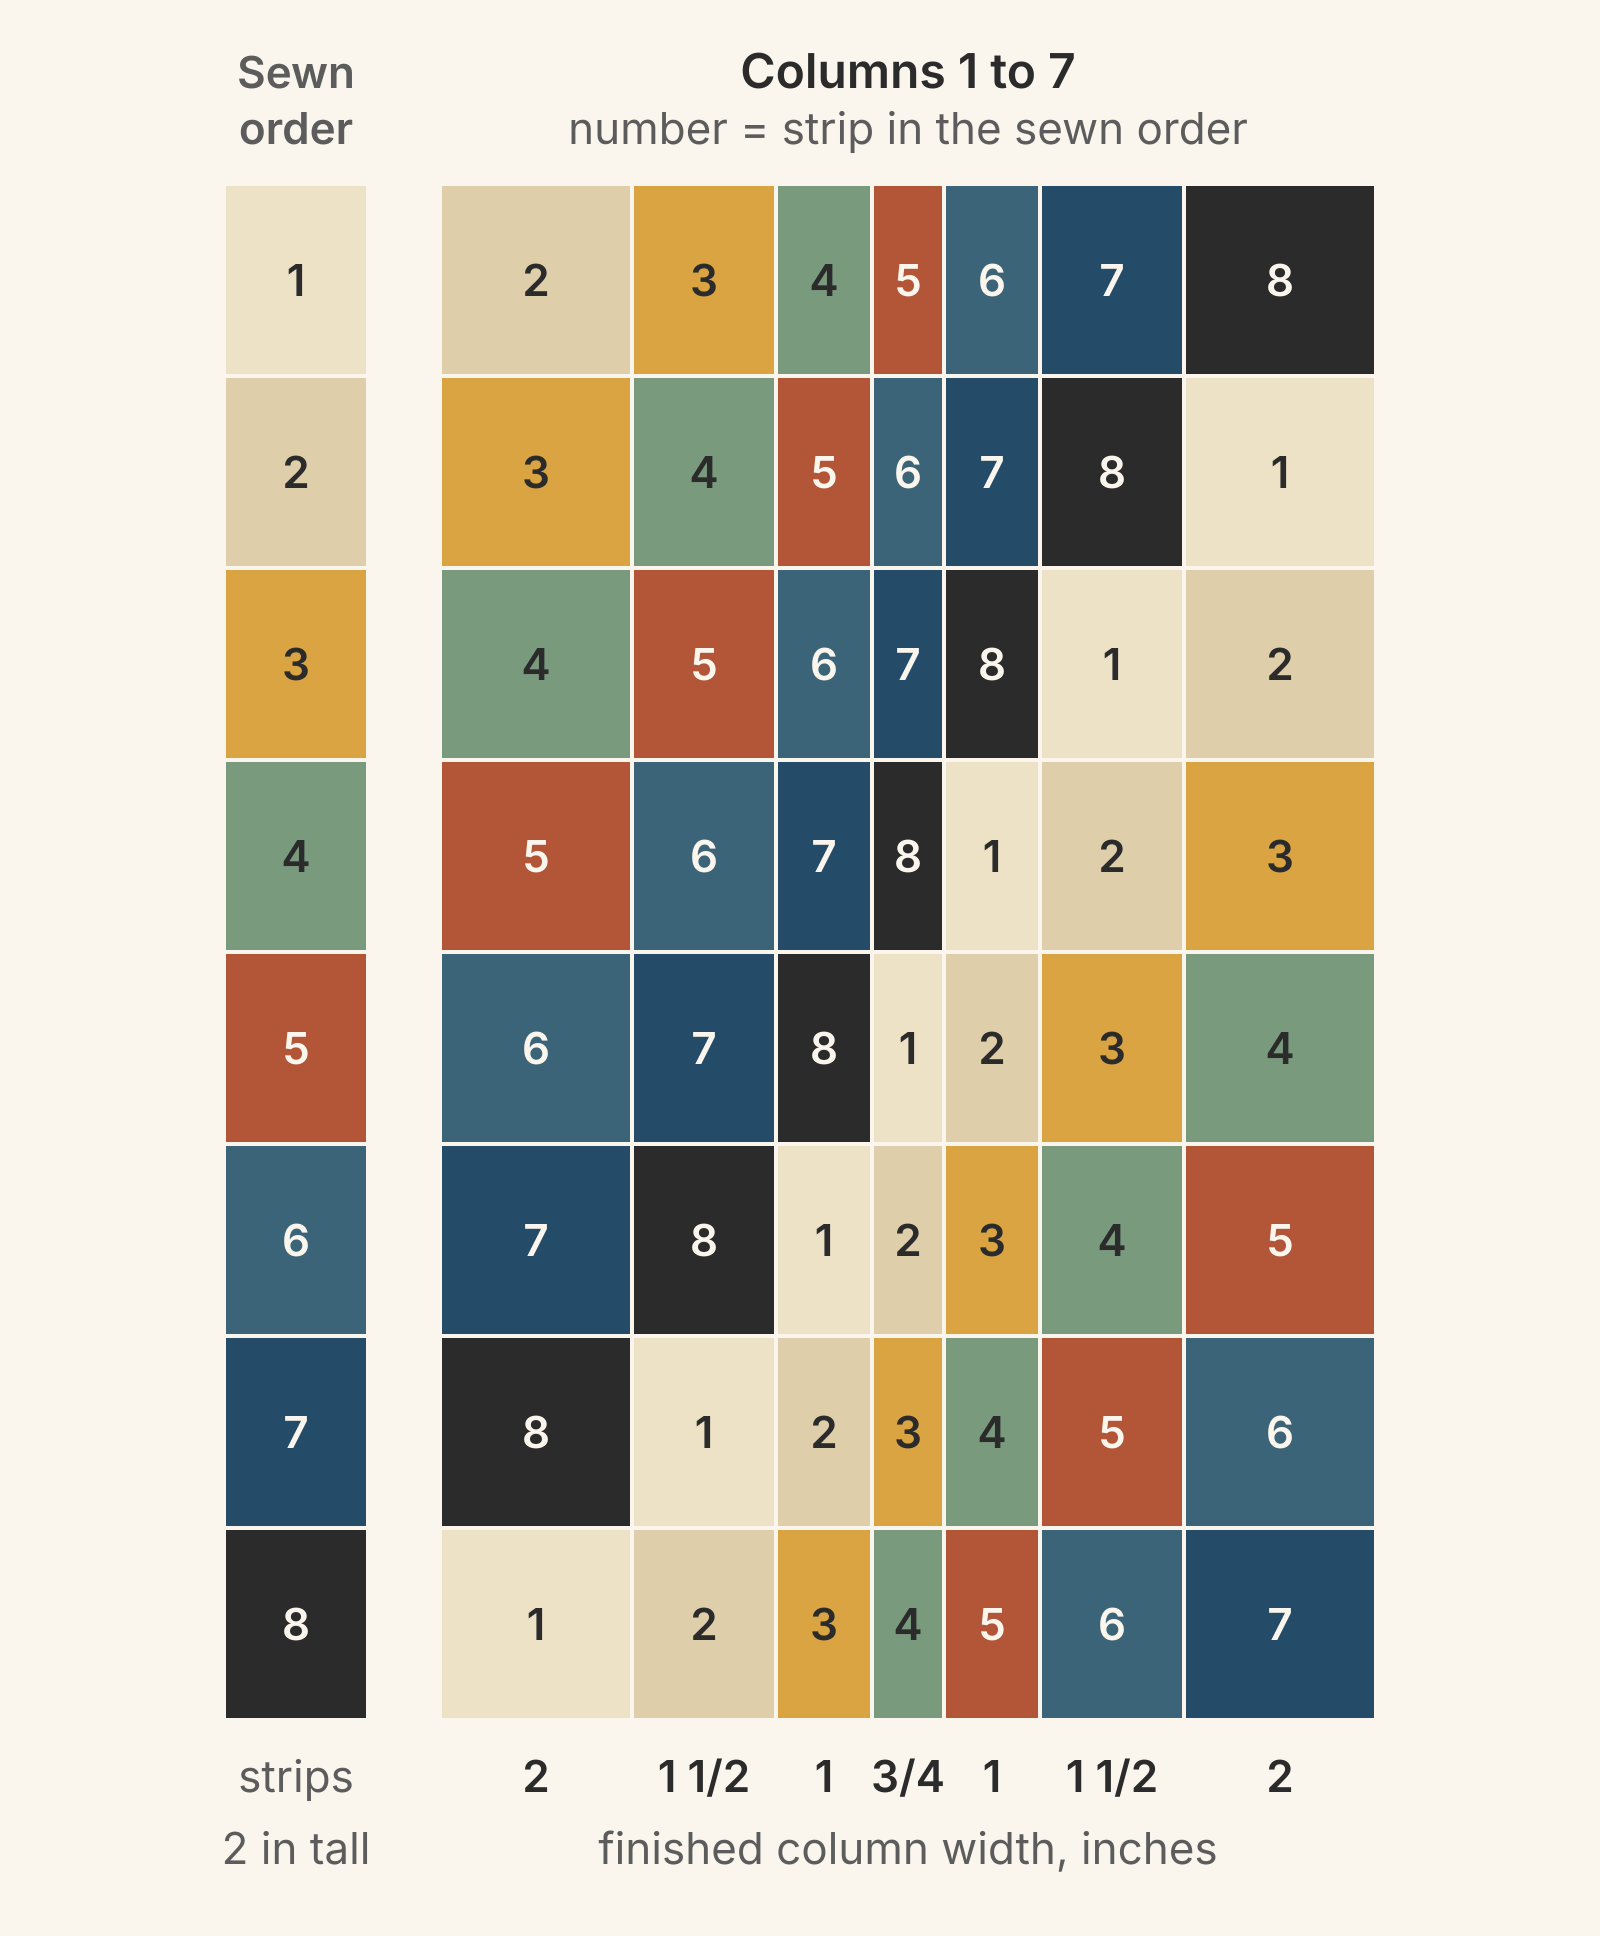
On her PBS series Lap Quilting, Georgia Bonesteel shows a paper mock-up and asks whether her red should "come up one whole seam" or "part way." Opening a seam always moves the colors a whole strip, so this plan uses whole steps only.
Column width decides the shape
Every step rises the same amount: one finished strip, 2 inches here. The column width is how far the step runs sideways. The narrower the column, the steeper the step:
| Finished column | Cut column | Slope of a 2-inch step |
|---|---|---|
| 2 inches | 2 1/2 inches | 45 degrees |
| 1 1/2 inches | 2 inches | about 53 degrees |
| 1 inch | 1 1/2 inches | about 63 degrees |
| 3/4 inch | 1 1/4 inches | about 69 degrees |
Cut width is finished width plus 1/2 inch, a quarter inch of seam allowance on each side. Woll makes the same point about her narrowest cut: a 1 1/4-inch slice finishes at 3/4 inch. Our Log Cabin strip width guide uses the same rule for logs.
If every column is the same width, every step has the same slope. The bands climb in straight lines and turn at sharp points, which makes a zigzag. To get a curve, change the widths. Put wide columns where the wave turns, at the crest and the trough, and narrow columns on the slopes. The color then levels off at the top and bottom and climbs fastest in between.
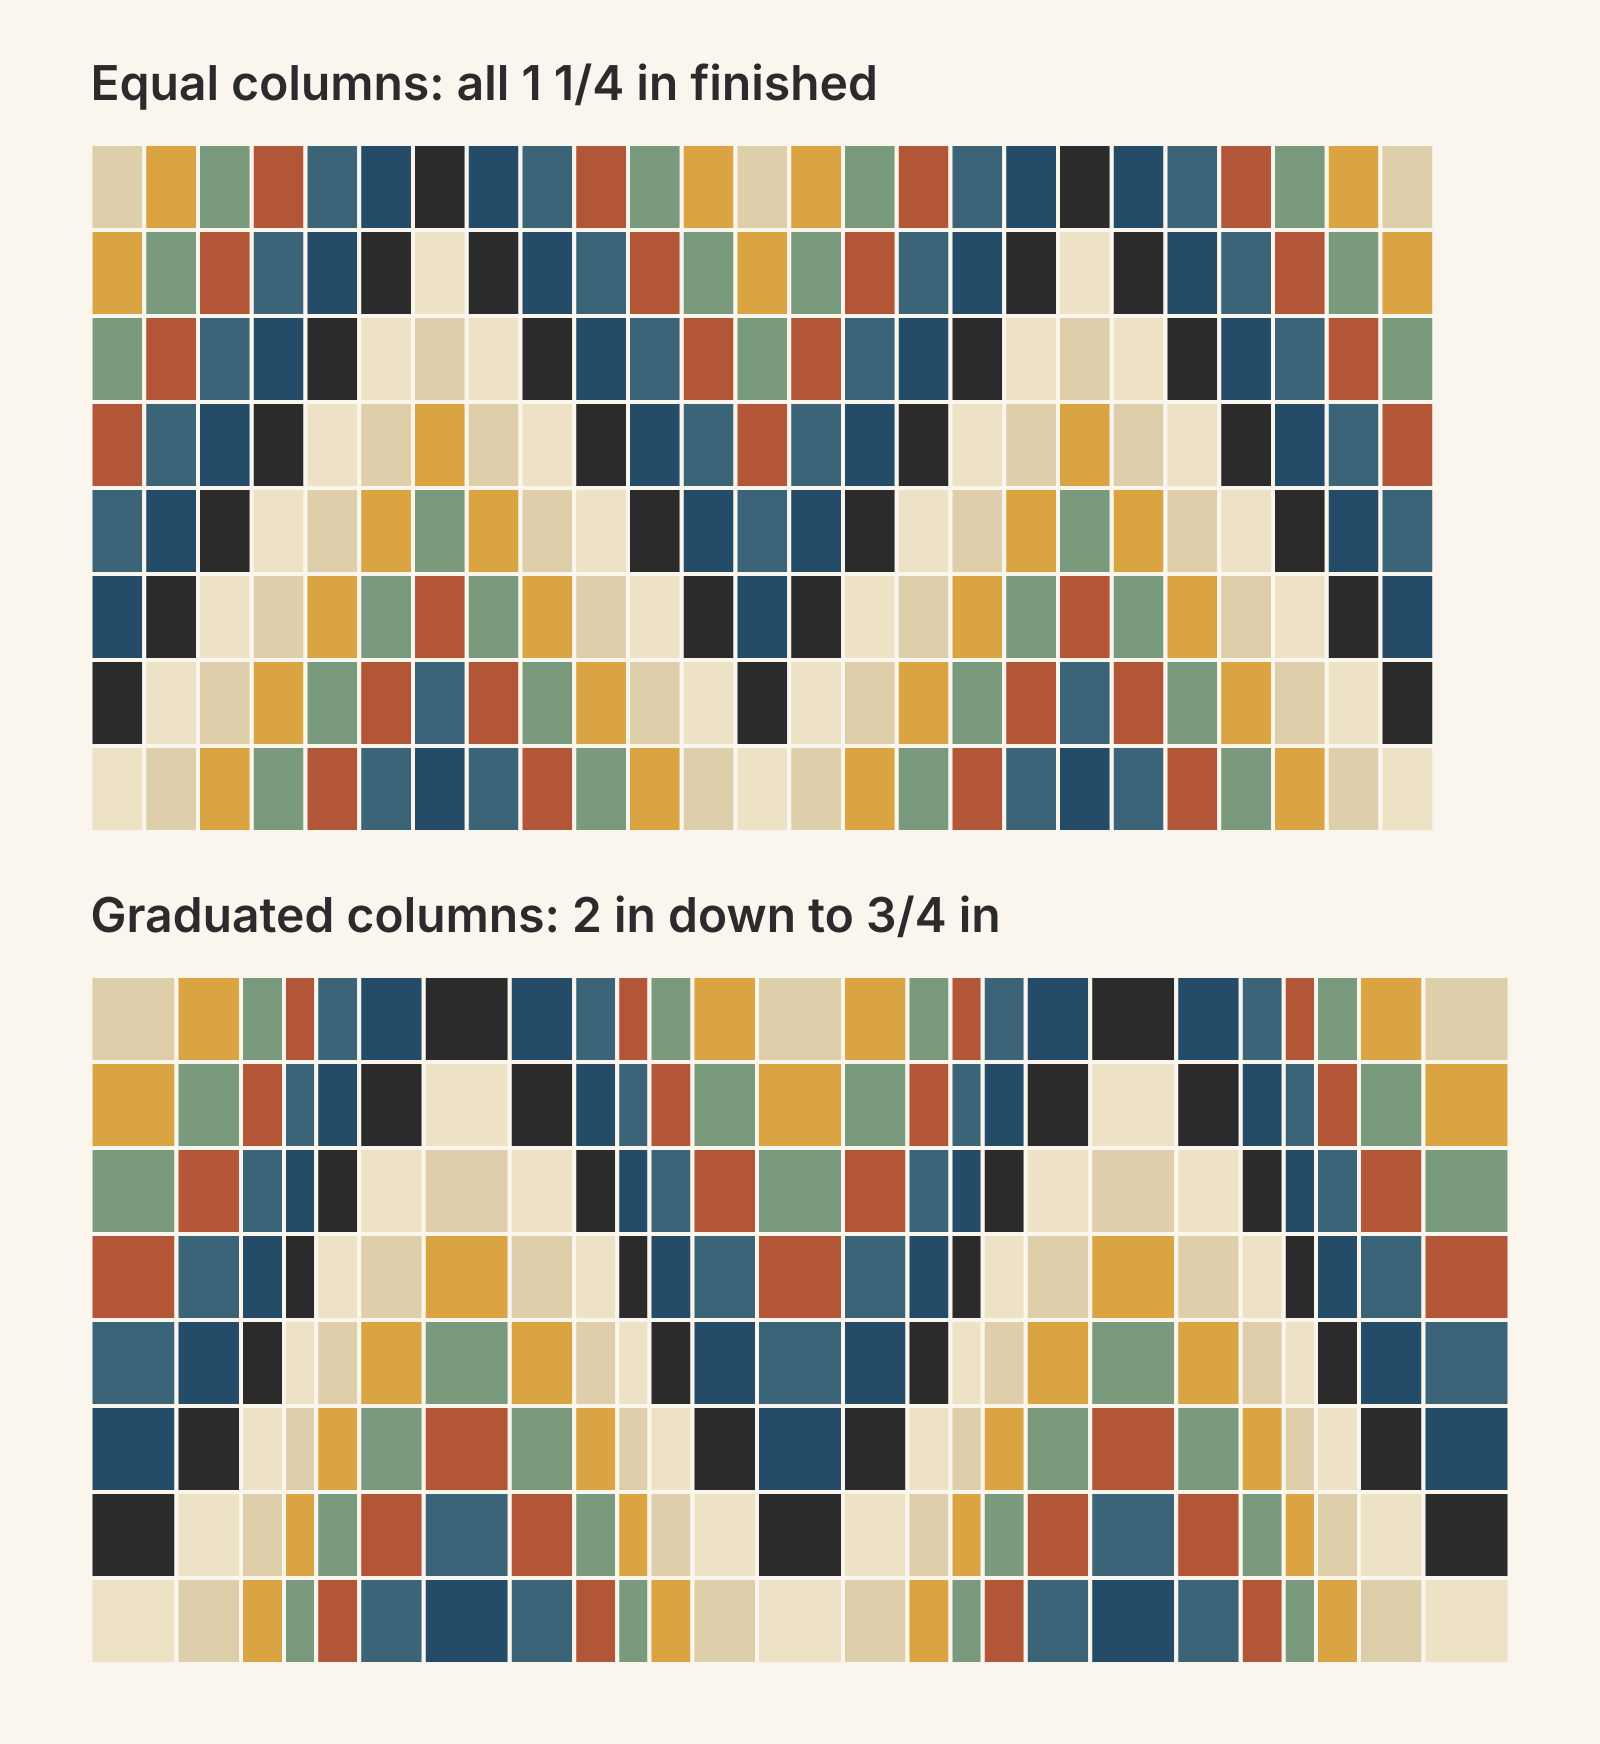
Where the narrow columns go is a design choice. Alison Wood's bargello quilt pattern for Today's Quilter ties each cut width to a shift: columns cut 2 1/4 inches move one square, 2-inch columns move two, and so on down to 1-inch columns, which move six. The column order reverses on either side of each block's center, so her single 1-inch column sits at the peak. Narrow columns at the peak make it pointed; wide columns at the peak make it round. Try both on paper.
Choose the strip order
The round joins the last strip back to the first, so your strip order is a loop. Two orders are a good place to start.
- Straight order: fabrics 1 to 8, then the round joins 8 back to 1. Every fabric appears once, and the darkest strip sits against the lightest. That join draws a crisp line through the wave. Wood's pattern uses this order with ten fabrics: "Fabric 1 will always be joined to Fabric 10."
- There and back: 1, 2, 3, 4, 5, 4, 3, 2, then back to 1. Five fabrics fill eight strips, and fabrics 2, 3 and 4 appear twice. Every strip sits next to a fabric one value step away, so there's no sharp line. The wave reads as mirrored ribbons around the lightest and darkest bands.
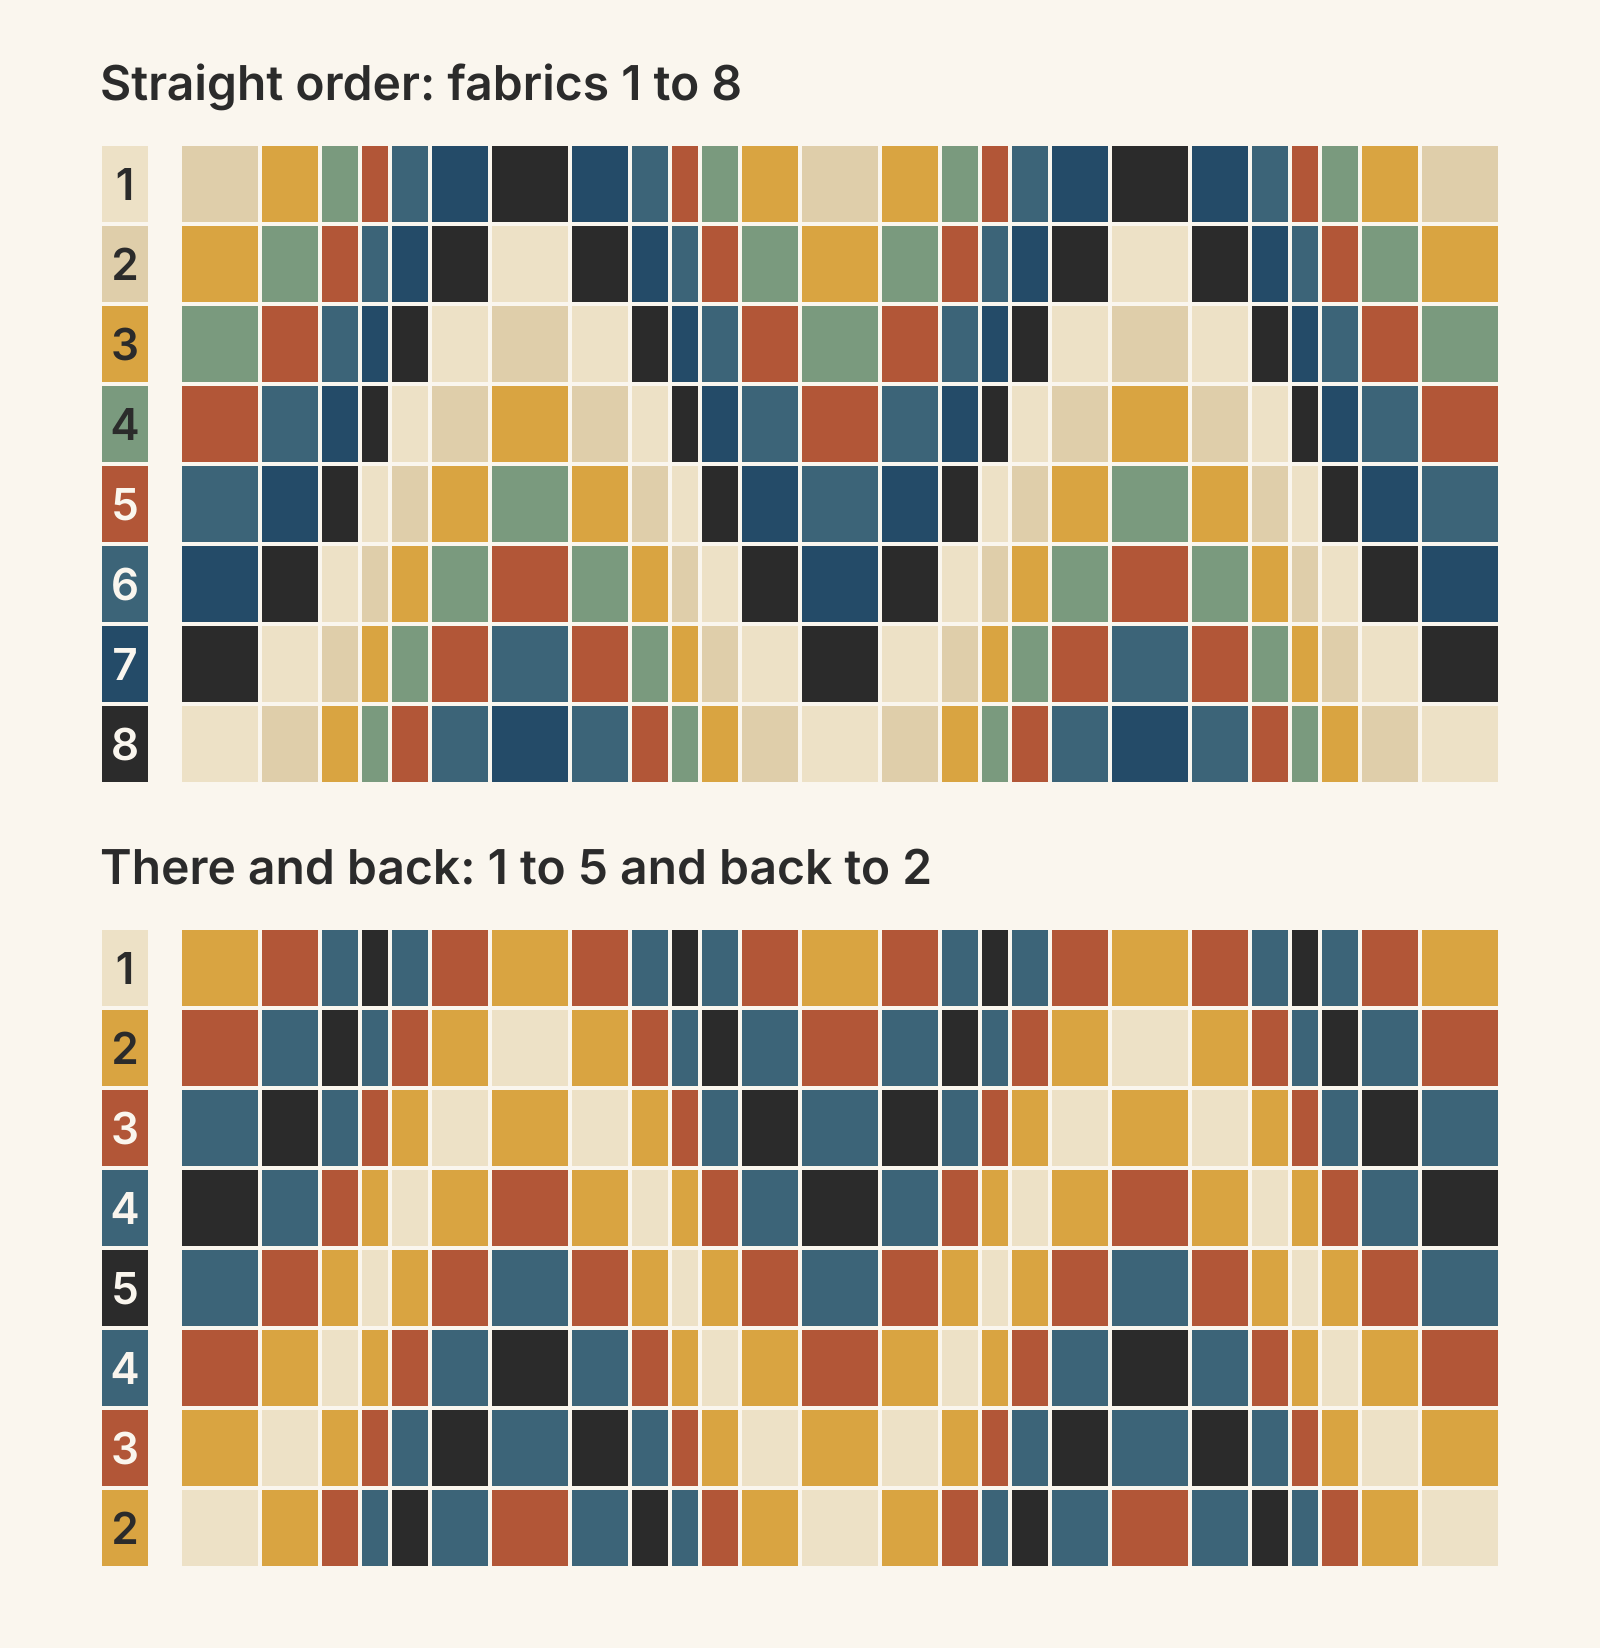
Choose the straight order when you want the wave outlined. Choose there and back when you want a softer, mirrored look or have fewer fabrics.
Then check the values. Woll suggests using your phone to see the fabrics in black and white, so you can make sure their values differ enough. Wood's pattern has you paste a snippet of each fabric on a sheet of paper, in order, and keep checking it as you sew. Our color and value guide explains why value, more than hue, carries the wave.
The strip count also sets the height. Woll's example: ten fabrics cut 2 1/2 inches make a 20-inch finished height. Our eight make 16 inches.
Worked example: write the offset table
Here is one full wave in 12 columns, using the straight order. It climbs six steps, from top strip 2 to top strip 8, then comes back down.
| Column | Cut width | Finished width | Top strip |
|---|---|---|---|
| 1 | 2 1/2 inches | 2 inches | 2 |
| 2 | 2 inches | 1 1/2 inches | 3 |
| 3 | 1 1/2 inches | 1 inch | 4 |
| 4 | 1 1/4 inches | 3/4 inch | 5 |
| 5 | 1 1/2 inches | 1 inch | 6 |
| 6 | 2 inches | 1 1/2 inches | 7 |
| 7 | 2 1/2 inches | 2 inches | 8 |
| 8 | 2 inches | 1 1/2 inches | 7 |
| 9 | 1 1/2 inches | 1 inch | 6 |
| 10 | 1 1/4 inches | 3/4 inch | 5 |
| 11 | 1 1/2 inches | 1 inch | 4 |
| 12 | 2 inches | 1 1/2 inches | 3 |
One repeat is 15 1/2 inches wide finished and uses 21 1/2 inches of strip set.
Why start with strip 2 on top and not strip 1? Watch the line where strip 8 meets strip 1. With strip 2 on top, it sits 14 inches down the column. With strip 8 on top, it sits 2 inches down. Across the repeat it swings 12 inches and never touches the top or bottom edge. Start with strip 1 on top and the line runs along the edge in the trough columns, so that part of the wave disappears. With eight strips, a swing of six steps is the most that keeps the line inside the panel.
Repeat the wave to size the quilt
The repeat is your unit of width. Plan three repeats (36 columns), then add one more column matching column 1 so both side edges match. That's 37 columns and a panel 48 1/2 inches wide and 16 inches tall, finished.
Add up the cut widths before you sew anything: they total 67 inches. Woll notes that width-of-fabric strips "will probably end up close to 40-inches once trimmed," so that's two strip sets of eight strips, with 13 inches to spare for squaring up as you cut. To check that 40-inch figure against your fabric, measure the usable length of your own strips.
To change the size:
- Wider: add a repeat. Four repeats plus the closing column make 49 columns and 64 inches. Their cut widths total 88 1/2 inches, so you'd sew three strip sets.
- Taller: sew the strip order twice, 16 strips per strip set. The columns are 32 inches tall, and the table doesn't change. The cover image shows this version, 48 1/2 by 32 inches.
- A different wave: change the widths or the number of steps, then add up the repeat again.
Draw the plan on paper before you cut
Bonesteel's advice on Lap Quilting holds up: "Play on paper first." She suggests drawing lines on paper, coloring them in, then cutting the paper apart and gluing the strips into a mock layout.
Graph paper makes the scale easy. At one square to 1/2 inch, each strip is 4 squares tall, a 2-inch column is 4 squares wide and a 3/4-inch column is 1 1/2 squares. One 12-column repeat is 31 squares wide and 32 tall. On quarter-inch graph paper that's 7 3/4 by 8 inches, small enough for a letter-size sheet. Color each patch by its fabric, then prop the sheet up and look at it from across the room.
When you cut, label each slice with its column number. Woll keeps her slices in size order on a table or design wall. For the round itself, pressing and unpicking, follow a published pattern or a class: Woll's tutorial walks through them with photos, and Heather Thomas teaches the tube method in a bargello table runner lesson at National Quilters Circle (the full video needs a membership).
Check the wave in QuiltLab
QuiltLab has no bargello tool, and the Standard grid has no offset or stagger control. A Freeform quilt can still draw the wave to its real measurements before you cut.
In the Quilt Editor, choose New, then Freeform. Under Measurements, set the quilt to 15 1/2 inches wide and 16 inches tall for one repeat. Choose Draw rectangle and drag out a patch. With it selected, type its Shape X, Shape Y, Shape width and Shape height, using finished sizes. X and Y are inches from the quilt's top-left corner: X is the total width of the columns to the left, and Y is 0, 2, 4 and so on down the column. One repeat is 96 rectangles: 12 columns of eight.
As you go, name a fabric group for each fabric number. Then Change fabric for the entire group swaps that fabric everywhere it appears, so you can try a different fabric 5 without redrawing anything. QuiltLab won't write your cutting chart or count your strip sets; the table above stays your cutting plan.
Draw a Freeform quilt in the Quilt Editor →Draw rectangles, set their sizes and assign fabricsYour next step: number your fabrics, write a 12-row table like the one above and draw one repeat, on graph paper or as a Freeform quilt in QuiltLab. If the wave looks right from across the room, sew a short test strip set and cut a few columns before you cut the rest.
Related posts
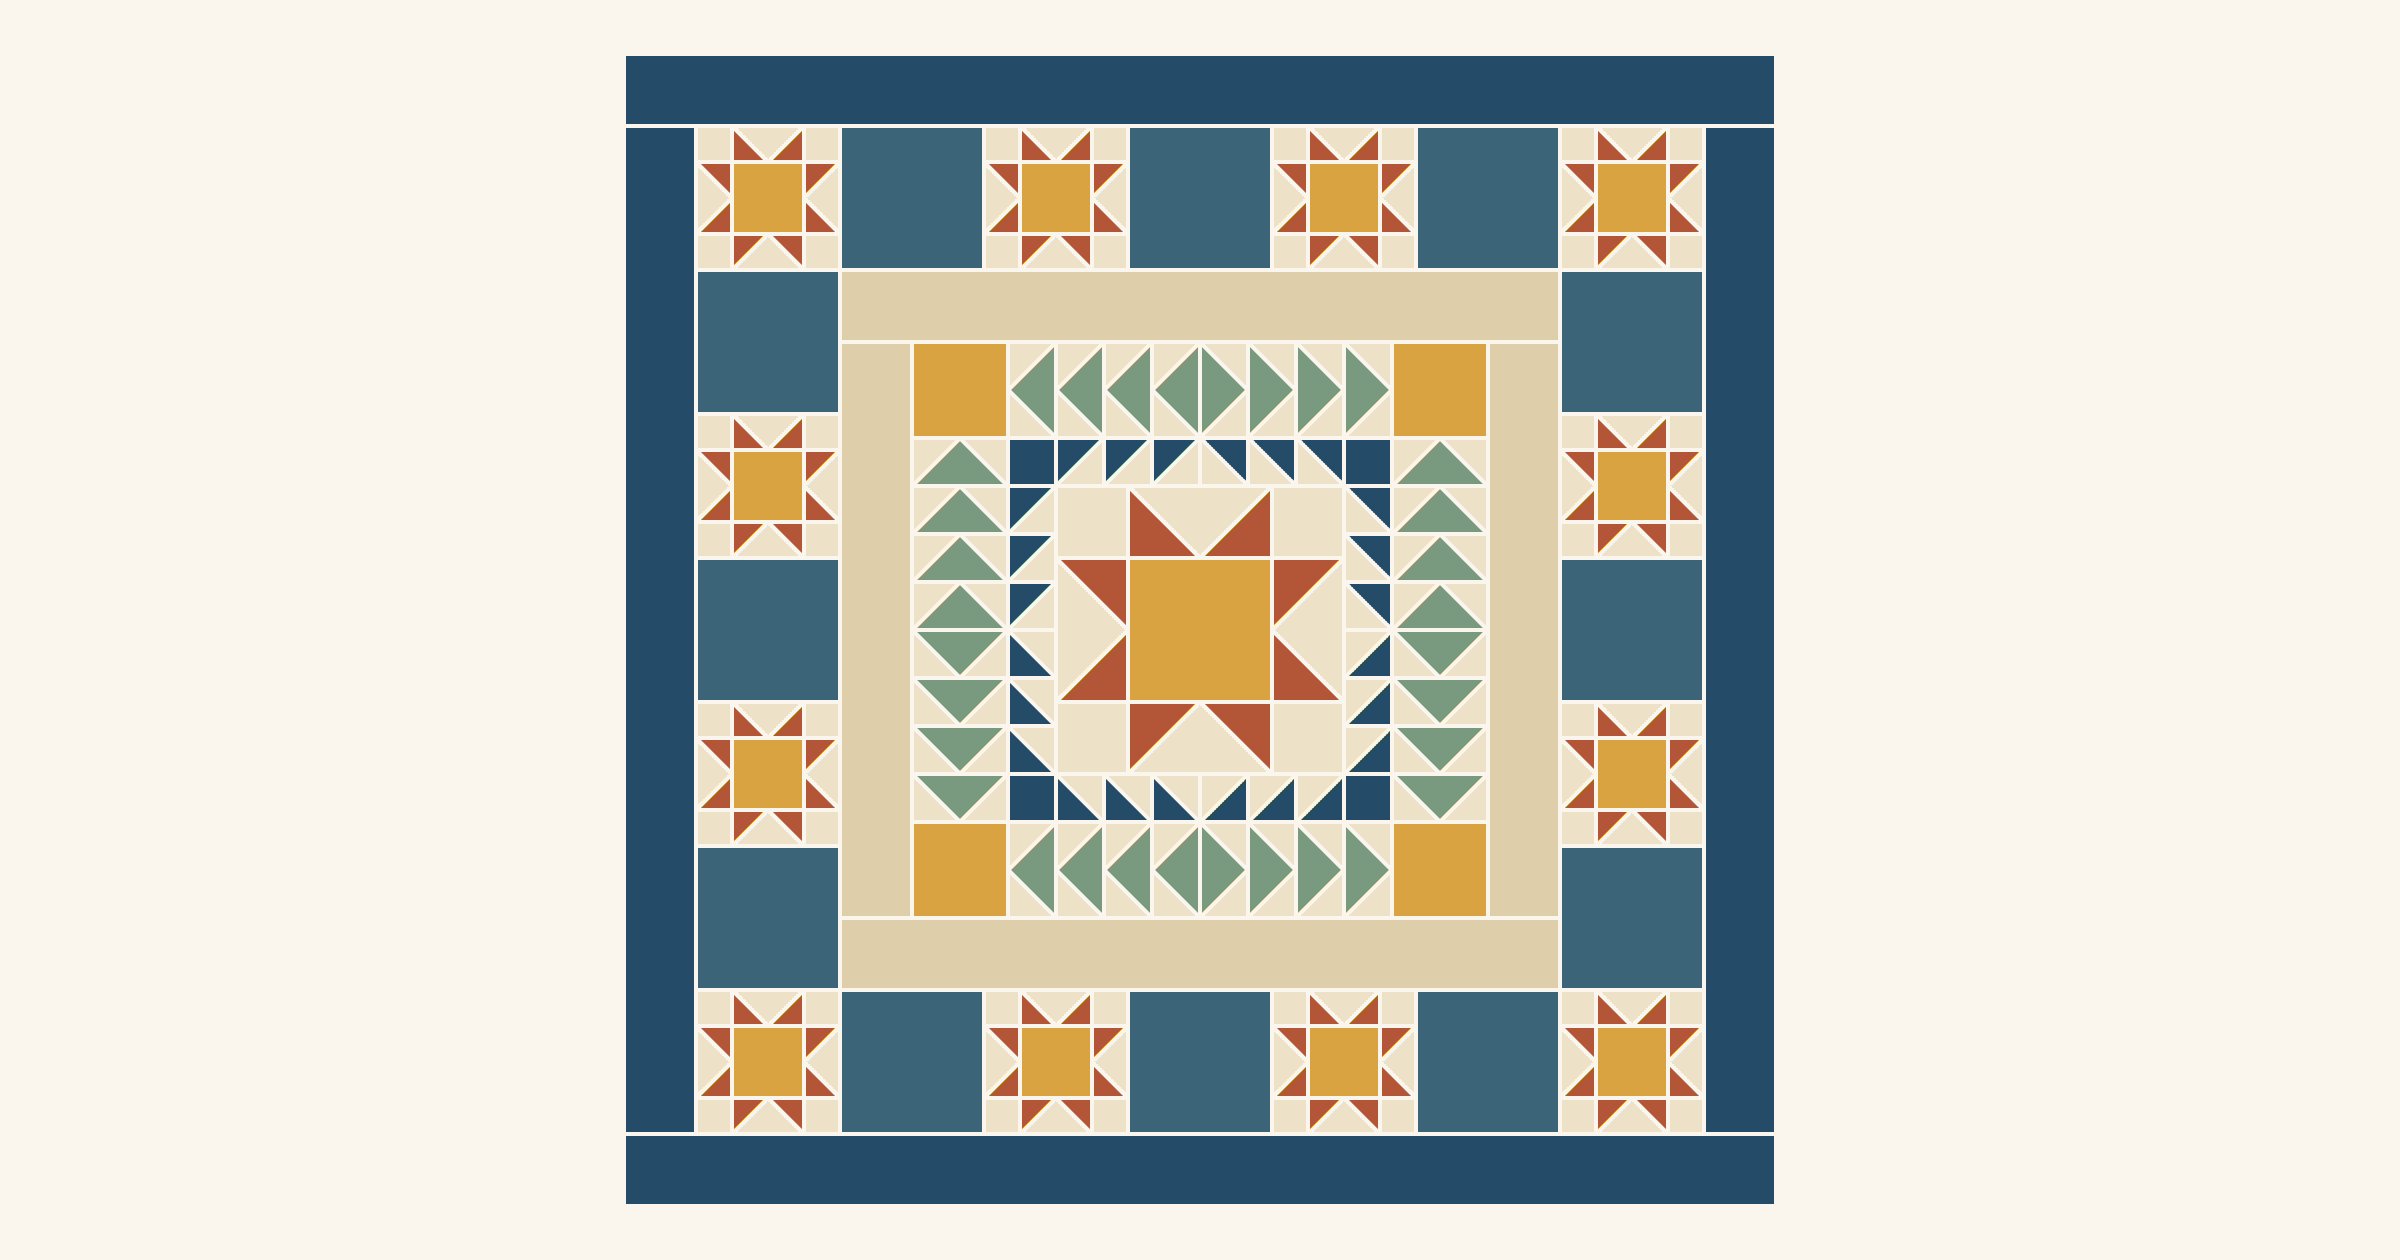
How to Design a Medallion Quilt So Every Border Fits
Plan a medallion ring by ring: check that each pieced border divides its side, add a plain spacer when it doesn't, and grow a 12 in star to a 48 in quilt.
English vs Foundation Paper Piecing: Which Should You Try?
Compare what the paper does, where stitching happens and which project brief suits EPP or sew-through FPP before choosing a pattern.
Fussy Cutting Hexagons: Plan Repeats for a Rosette
Count six matching motifs, record their orientation and preview a hexagon rosette before cutting the fabric.