


Crosshatch Quilting: How to Make the Lines Meet at the Edges

The usual crosshatch runs at 45 degrees, with lines about 2 to 3 inches apart. That's the range Brittany Lloyd of Lo & Behold Stitchery uses when she quilts lines in both directions. Whether those lines meet neatly at the edges depends on a second number: how far apart they land along the edge. At 45 degrees that edge step is the spacing times 1.41, so lines 2 in. apart cross the edge every 2.83 in.
When each side of the quilt is a whole number of edge steps, the lines from the two directions meet in a V all the way around, and a line runs into every corner. So choose the edge step first and let the spacing follow. On a quilt whose sides divide by 3 in., mark dots every 3 in. around all four edges and connect them at 45 degrees. The lines come out 2 1/8 in. apart, a mark on your ruler and an easy setting for a walking foot's guide bar.
How far apart should crosshatch lines be?
Teachers' numbers run from about 1 in. on small projects to 5 in. on a drapey quilt. Closer lines mean more texture and more sewing:
- About 1 in. Sherri McConnell of A Quilting Life used a 1 in. crosshatch in her tutorial. She calls crosshatching one of the easiest ways to quilt pillow tops, wall hangings, place mats and table runners.
- 2 to 3 in. Lloyd's usual range for lines in both directions, wider than the 1 to 1 1/2 in. she uses for lines in one direction.
- 3 to 5 in. Nikki of Sew Nikki marked a 4 in. diagonal grid on her quilt and suggests 3 in. for denser or smaller work and 5 in. for a drapier quilt.
Your batting sets the upper limit. The spacing in each direction has to stay inside the maximum quilting distance printed on the package; our batting gap check shows how to read it. For a lap quilt with no strong preference, start near 2 in. The plan below uses 2 1/8 in.
Where do crosshatch lines land on the edge?
Spacing is measured square to the lines. That's the distance a guide bar holds and the number most tutorials give. Along the edge of the quilt, the same two lines land farther apart, because the edge crosses them at a slant.
At 45 degrees, multiply the spacing by 1.41 to get the edge step. To go the other way, divide the edge step by 1.41. This table starts from round edge steps, since those are what you'll mark with a tape measure:
| Edge step | Spacing at 45 degrees | Nearest ruler mark |
|---|---|---|
| 1 1/2 in. | 1.06 in. | 1 1/16 in. |
| 2 in. | 1.41 in. | 1 7/16 in. |
| 3 in. | 2.12 in. | 2 1/8 in. |
| 4 in. | 2.83 in. | 2 13/16 in. |
| 4 1/2 in. | 3.18 in. | 3 3/16 in. |
| 6 in. | 4.24 in. | 4 1/4 in. |
Edge steps in multiples of 1 1/2 in. convert almost exactly: a 3 in. step gives 2.121 in., and 2 1/8 in. is 2.125 in. The 2 in. and 4 in. steps miss their nearest sixteenth by 1/64 to 1/32 in. per line. That's small, but across 12 guide-bar lines the 2 in. step's error grows past 1/4 in.
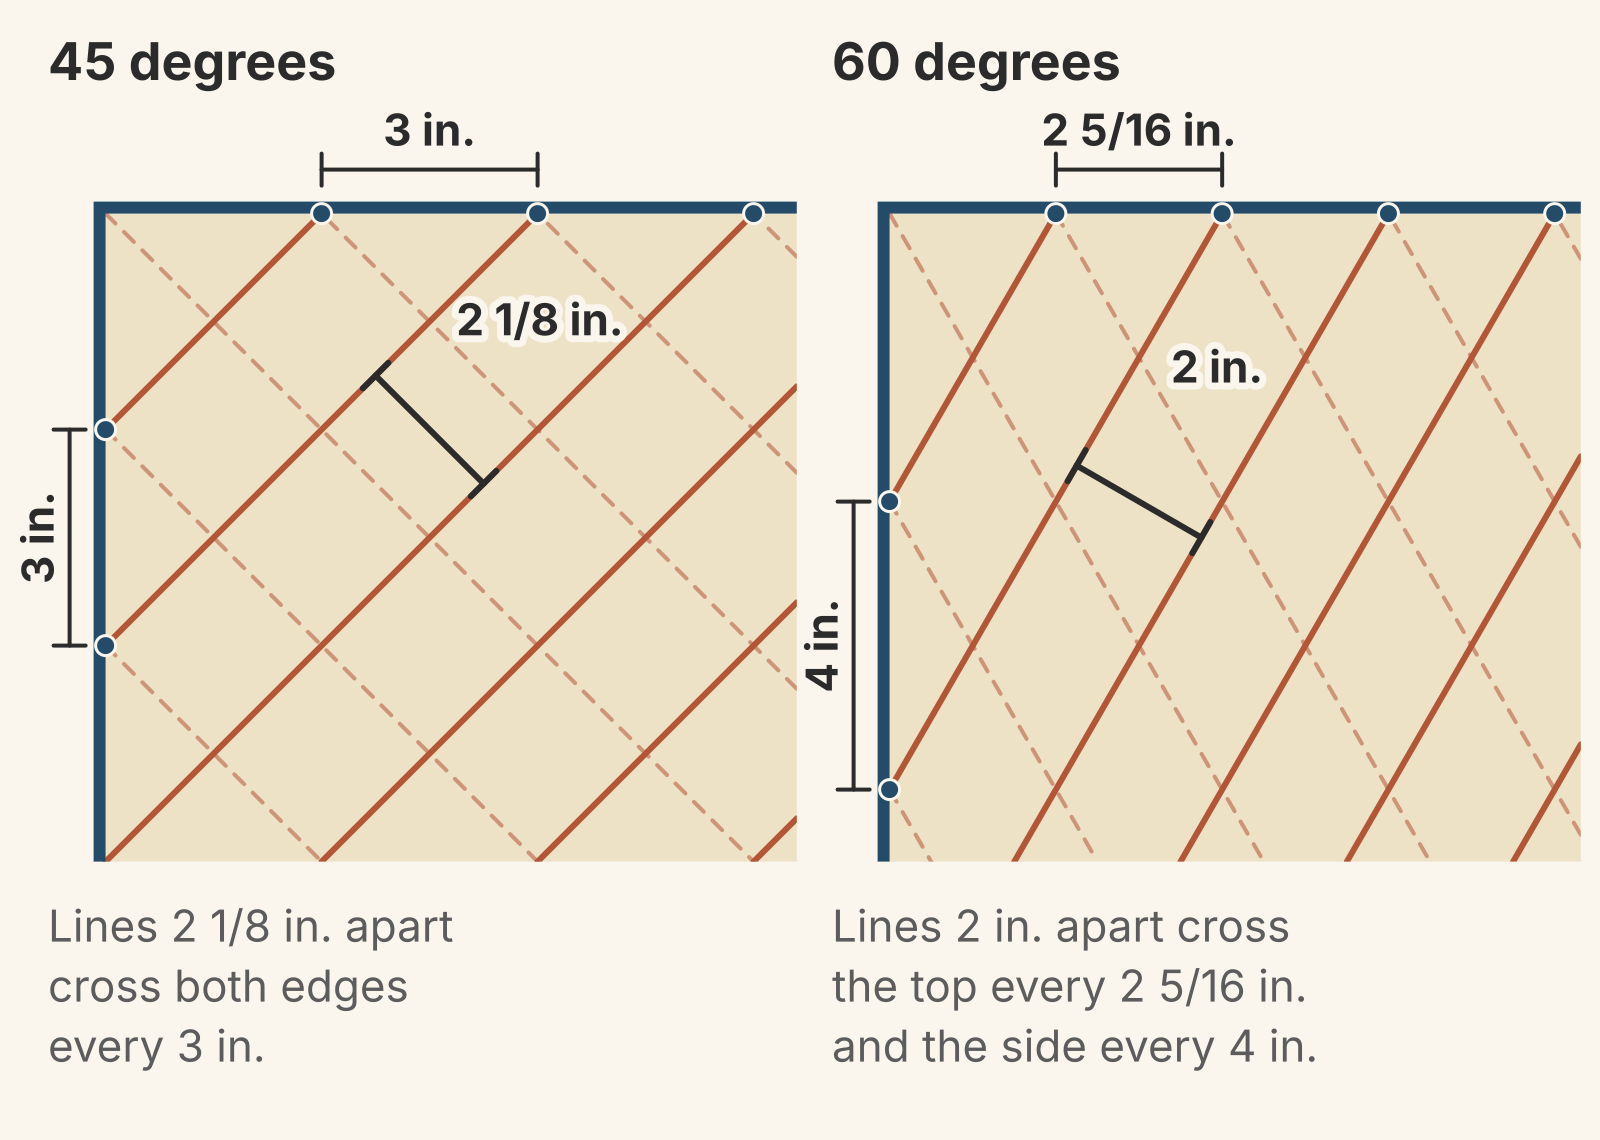
The angle changes the edge step too, and at most angles the top and the sides get different steps. Measured from the bottom edge, the step along the top and bottom is the spacing divided by the sine of the angle. Along the sides it's the spacing divided by the cosine. For lines 2 in. apart:
| Angle from the bottom edge | Step along top and bottom | Step along the sides |
|---|---|---|
| 30 degrees | 4 in. | 2 5/16 in. |
| 45 degrees | 2 13/16 in. | 2 13/16 in. |
| 60 degrees | 2 5/16 in. | 4 in. |
Only 45 degrees gives the same step on all four sides, so one dot spacing works all the way around. That's the main reason it's the easiest crosshatch to plan. A square grid, with lines parallel to the edges, follows the same idea in its simplest form: the edge step equals the spacing. To space lines that run parallel to the edges, see our straight-line spacing guide, which fits them to your blocks and keeps them off the seams.
When do the lines meet in a V?
Divide the width and the length of the quilt by the edge step. If both answers are whole numbers, the crosshatch closes. Lines from the two directions meet in a V at every dot on all four edges, and a line runs into each corner. All four corners match.
If an answer has a fraction, the lines miss on the far side: the right edge for the width, the bottom edge for the length. There they end in pairs that don't quite meet. You get a row of uneven slivers at the binding instead of matching half-diamonds, and those two corners don't match the others. A fraction of exactly 1/2 is the one exception. The lines still meet, but halfway between the dots, and those corners get a small triangle instead of a line.
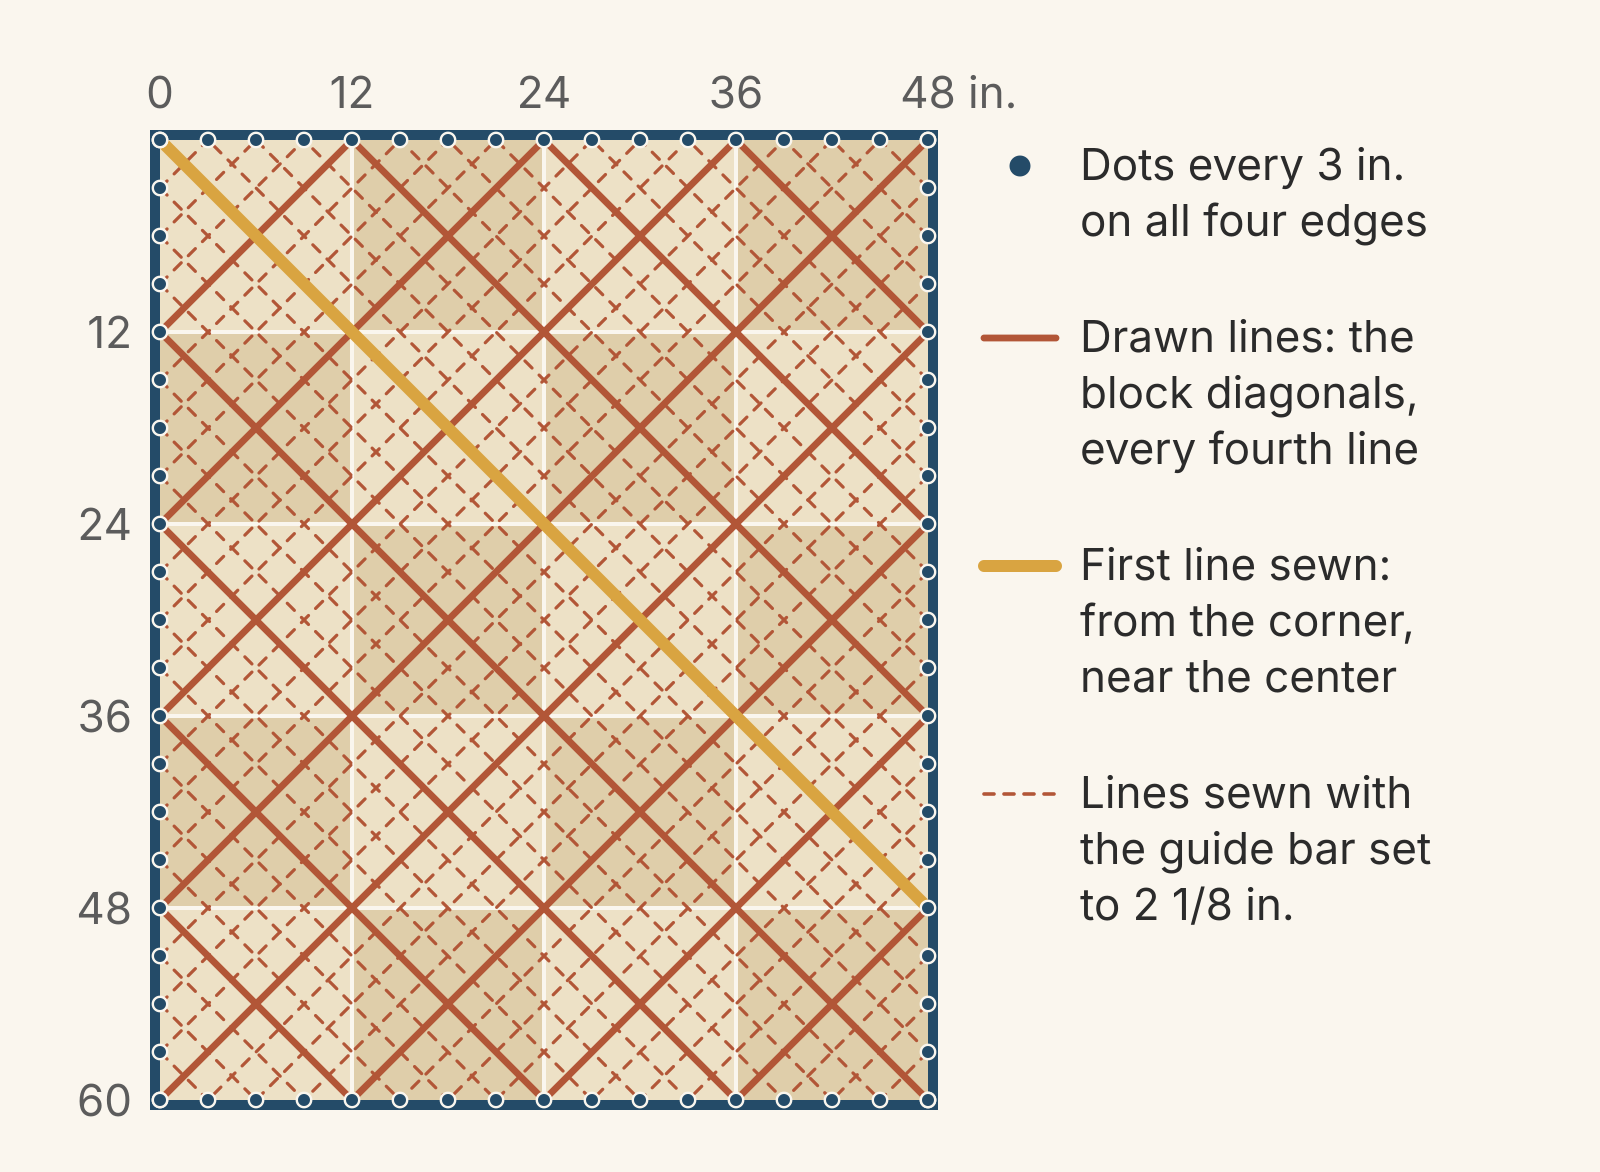
On a rectangle, the 45-degree line from one corner never reaches the opposite corner. On the 48 x 60 in. quilt below, it meets the right edge 48 in. down, 12 in. above the corner. That's expected, and it doesn't stop the corners from matching. When the sides are whole numbers of steps, each corner still gets a line of its own.
Worked example: three plans for a 48 x 60 in. lap quilt
The top is twenty 12 in. finished blocks, 4 across and 5 down, with no border. Before binding it measures 48 1/2 x 60 1/2 in. The binding seam will sit 1/4 in. in from the raw edge, so the crosshatch plan uses the finished size: 48 x 60 in.
Plan A: lines 2 in. apart, starting at the top-left corner. The edge step is 2.83 in. The width is 48 ÷ 2.83 = 16.97 steps and the length is 60 ÷ 2.83 = 21.21 steps. Neither is whole. The right side comes close, and its lines miss each other by about 3/16 in. Along the bottom they miss by 1 3/16 in. or more, so the last row of half-diamonds is lopsided.
Plan B: a 3 in. edge step. The lines are 3 ÷ 1.41 = 2.12 in. apart, so set the guide bar to 2 1/8 in. That's only 1/8 in. wider than Plan A. The width is 48 ÷ 3 = 16 steps and the length is 60 ÷ 3 = 20 steps, both whole. Every edge gets V's, and each corner gets a line. Because 12 divides by 3, every fourth line runs corner to corner through the blocks, so each block carries an X through its center.
Plan C: 16 equal steps on every side. Divide each side into the same number of parts and connect the dots: 3 in. along the 48 in. sides and 3 3/4 in. along the 60 in. sides. The lines run parallel to the quilt's own diagonals, about 51 degrees from the bottom edge. Both corner-to-corner diagonals are part of the grid. The spacing is 2.34 in., which falls between 2 5/16 and 2 3/8 in. on a ruler, so draw every line dot to dot instead of trusting the guide bar.
| Plan | Edge steps (top, side) | Lines apart | Lines each way |
|---|---|---|---|
| A: 2 in. at 45 degrees | 2.83 in., 2.83 in. | 2 in. | 38 |
| B: 3 in. step at 45 degrees | 3 in., 3 in. | 2 1/8 in. | 35 |
| C: 16 steps per side | 3 in., 3 3/4 in. | 2.34 in. | 31 |
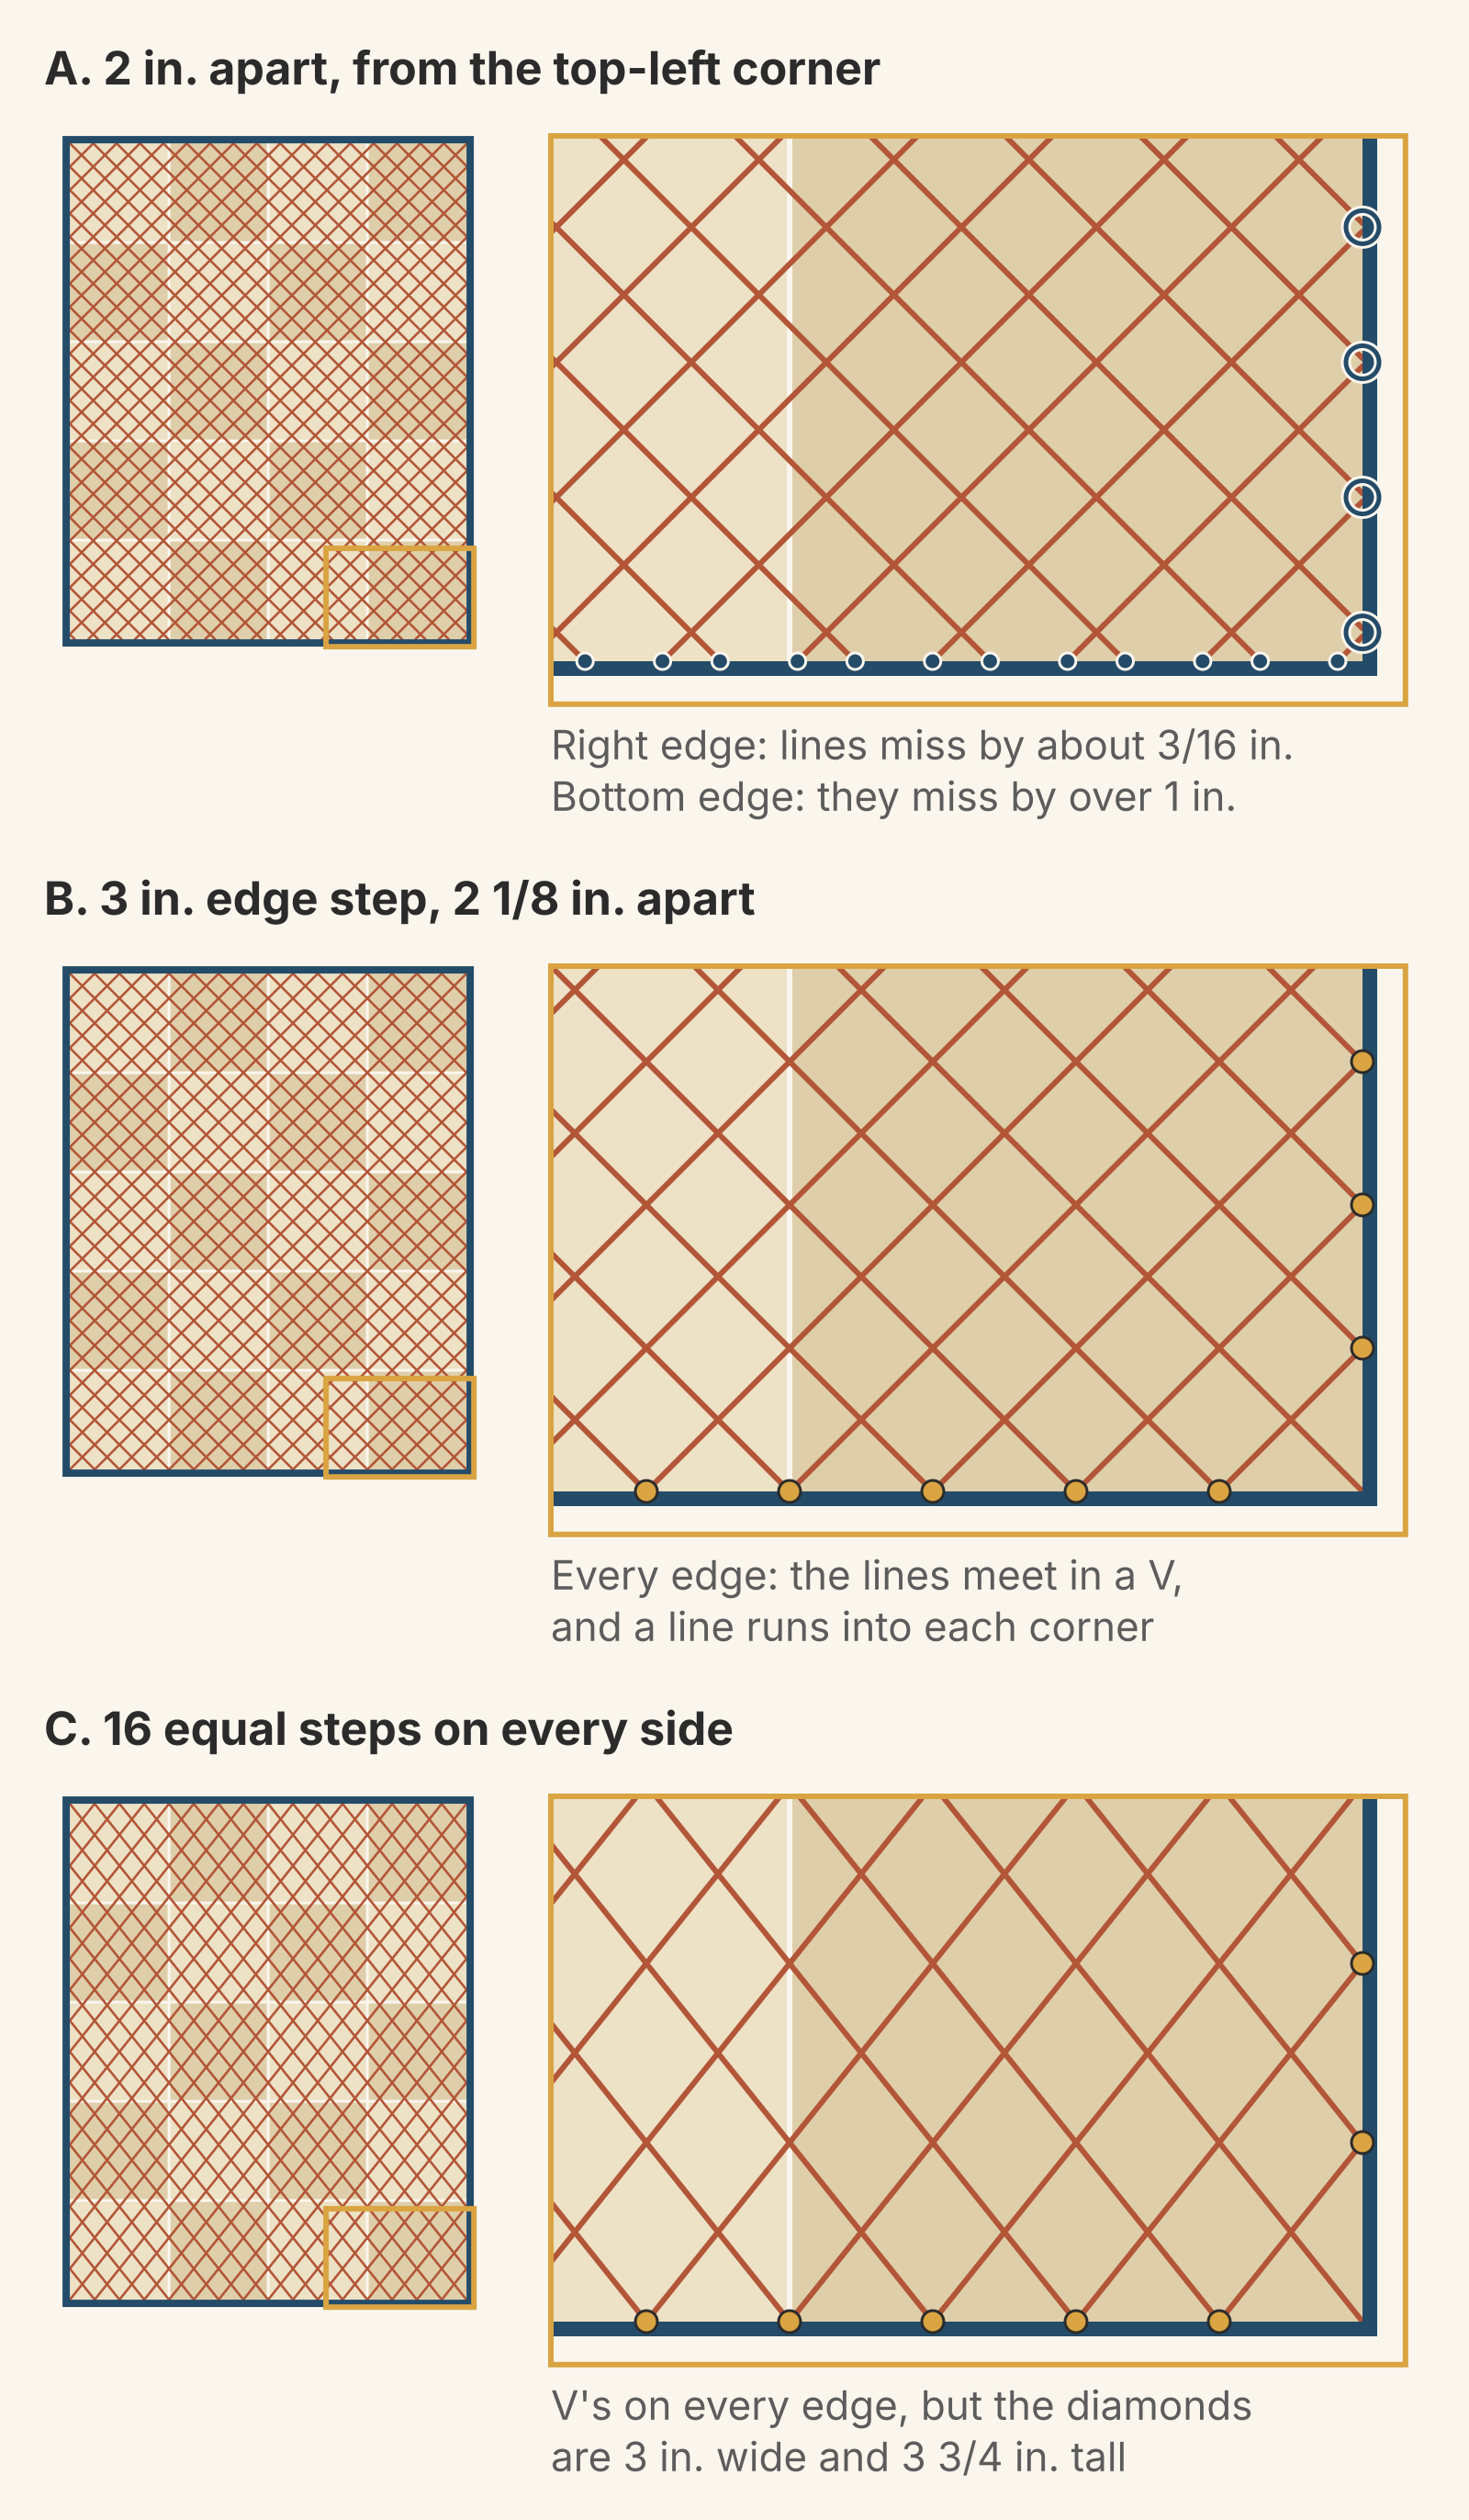
Sew Plan B unless you like the taller diamonds of Plan C. Plan C has two other costs: its lines cross the blocks at different points in each row, and every line has to be drawn. Plan A only works if uneven edges don't bother you.
Mark a crosshatch plan you can check as you sew
Here's how to mark Plan B. It uses dots on the edges as the reference and a few drawn lines as checkpoints, so any drift gets caught within four lines.
- Measure the top at the finished line, where the binding seam will go. Here that's 48 x 60 in.
- Choose the edge step. Pick one that divides both sides with nothing left over, ideally a multiple of 1 1/2 in. Here 3 in. gives 16 and 20 steps.
- Dot the edges. Mark a dot every 3 in. along all four sides, starting at a corner, on the finished line. That's 17 dots on each short side and 21 on each long side, corners included. Angela Huffman of Quilted Joy marks crosshatching this way, with evenly spaced tick marks around the outside of the space.
- Draw the checkpoint lines. Lay the ruler's 45-degree line along the edge, as McConnell does, and slide its long edge to a dot. Draw every fourth line in both directions. In this quilt those are the block diagonals, so the seams double-check them. Each line must land on a dot at the far edge. If one doesn't, fix the dots before you sew.
- Sew a line near the center first. McConnell and Lloyd both start in the middle and work out to each side. Here the block diagonal from the top-left corner passes 4 1/4 in. from the center of the quilt, so start there.
- Fill in with the guide bar. Set it to 2 1/8 in. and sew the three lines between each pair of drawn lines. Each one should end on a dot. The next drawn line resets any drift.
- Turn the quilt and repeat for the other direction.
Test your marker on a scrap of the same fabric before you dot the whole quilt. For a refresher on how a walking foot handles long straight lines, see walking foot vs free motion.
What if the top measures a little off?
Tops are rarely exact. Say yours measures 47 3/4 in. across instead of 48. Keep the 16 steps and spread the missing 1/4 in. across them, as in Plan C. Dot the block seams on the top and bottom edges first, then halve each block's edge and halve it again. Each step comes out about 1/64 in. short of 3 in., which no one will see. The lines still meet in a V at every dot. Leave the guide bar at 2 1/8 in.; the drawn lines take up the difference. Dotting every 3 in. from one corner instead would leave the lines 1/2 in. apart on the far side.
The same check works on any framed area: a border, a plain setting square, or the background behind appliqué, where Huffman likes to use it. Divide the area's width and length by the edge step. A 12 in. square takes four 3 in. steps each way; a 6 in. border takes two across its width.
Your next step
Before you mark anything, write down the finished width and length and divide each by the edge step you want. If either answer isn't whole, try the next multiple of 1 1/2 in., or switch to equal steps per side as in Plan C. Then dot the edges and draw your first checkpoint line.
QuiltLab doesn't draw quilting lines, but if you're still designing the top, you can plan for an easy crosshatch now. In the Quilt Editor, the Layout section of Properties shows the quilt's finished size, and any border widths add to it. Choose a block size and border width that keep both sides divisible by your edge step.
Quilt Editor guide →Set block size, grid counts and borders, and read the finished quilt sizeRelated posts

How to Design a Bargello Quilt: Plan the Wave on Paper
A bargello wave is a staircase of stepped columns. Number your strips, write one row per column, and see how column width turns a zigzag into a curve.

Borderless Quilt Design: Plan an Edge That Looks Finished
With no border, the outer blocks and the binding make the edge. Compare whole and halved motifs on one 48 x 60 inch quilt, then pick the binding color.
Crumb Quilt Blocks: How Small Can the Scraps Be?
Crumb quilters commonly stop at 1 to 1 1/2 inch scraps. See what each size costs a 6 inch block in pieces and seams, then write your smallest-scrap rule.