


Borderless Quilt Design: Plan an Edge That Looks Finished

A borderless quilt still has a frame. The outer row of blocks and the binding do the job a border would. Fat Quarter Shop's binding tutorial teaches the most popular method: 2 1/2 inch double-fold strips sewn on with a 1/4 inch seam. Your blocks have 1/4 inch seam allowances too, so every point that reaches the edge of the top ends right on the binding seam. Before you sew, decide three things. Which color runs along the edge? Does the motif there stay whole, or does the edge halve it? Should the binding frame the quilt or blend in?
Our default for borderless quilt design is to bind in the color of the points that touch the edge. In both layouts below, that color contrasts with the edge, so the binding reads as a frame. It also forgives a point that the binding seam nips off, because the blunt tip blends into a binding of its own color.
Julie Herman of Jaybird Quilts wrote a whole book of borderless quilts, Skip the Borders. Its description says it covers the structure of a borderless quilt and how different bindings change the look. Here we work one example through with numbers.
What the edge has to handle without a border
With a border, the outer blocks meet a border seam, and the border meets the binding. Without one, the blocks meet the binding directly. Three things change.
- Points meet the binding. A half-square triangle (HST) has a diagonal seam from corner to corner, so every HST in the outer row puts a point on the edge. Sawtooth Star points reach the block edge where the corner squares meet the flying geese. In the outer row, those points meet the binding.
- The trim runs through your blocks. When you square up a bordered quilt, you trim the border. On a borderless top, an extra 1/8 inch off the edge comes off the points.
- Seams end at the edge. OLFA's guide to preparing a quilt top says to stay-stitch about 1/8 inch from the edge with a longer stitch. It calls this especially necessary when there isn't a border, because it keeps edge seams from opening.
So the outer row needs the planning you'd otherwise give a border.
Whole or halved: the edge always cuts something
Our example is a 48 x 60 inch throw made of 80 HSTs. Each finishes at 6 inches, and they're set 8 across and 10 down.
In layout A, each 2 x 2 group of HSTs turns its navy halves toward the group's center. The navy forms 20 whole squares set on point, each 12 inches from point to point. The cream forms the squares between them, and the edge cuts those. You get 12 whole cream squares inside, 14 halves along the sides and 4 quarters in the corners.
Turn every HST half a turn and you get layout B. Now all 20 cream squares are whole, and the edge halves the navy. You get 12 whole navy squares, 14 navy halves along the sides and 4 navy quarters in the corners.
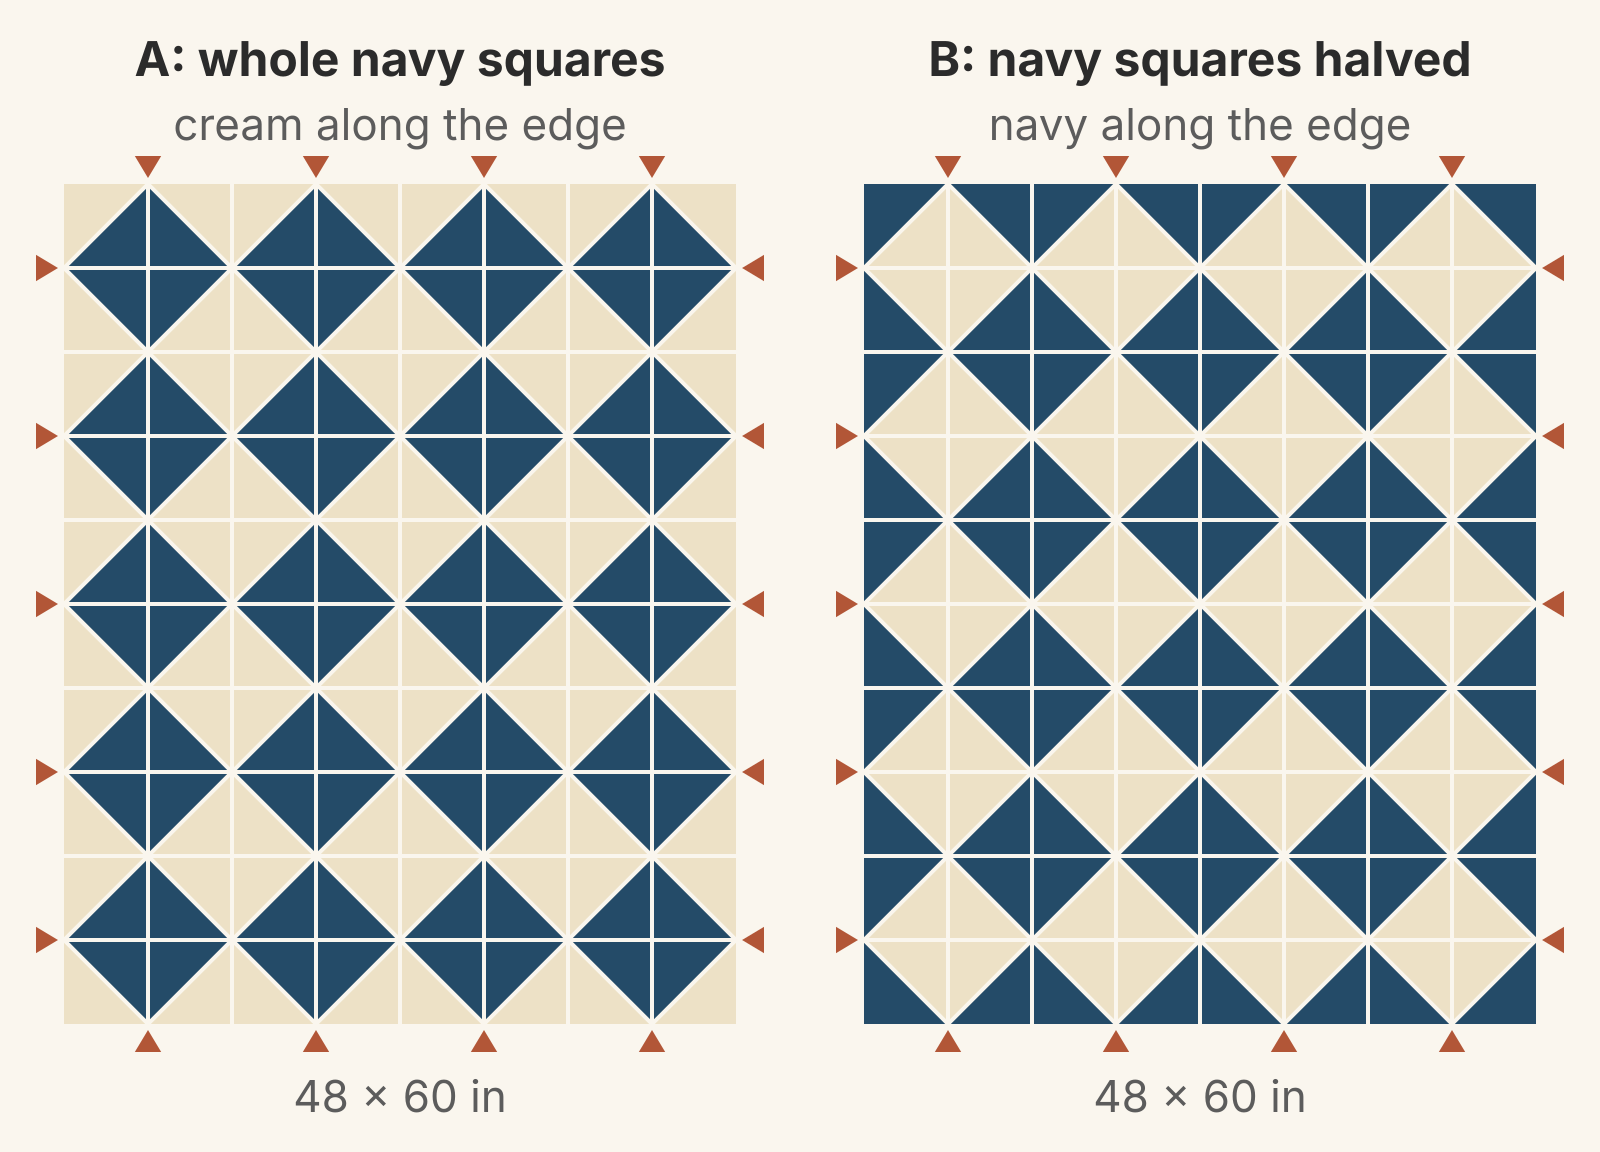
The two read differently. A looks like a set of motifs on a background, finished on all four sides. B looks like a piece cut from a larger field, and its halved navy squares line the edge like a sawtooth frame. Neither is wrong. When motifs cross block seams, the edge cuts some of them, and you choose which.
The points don't move between the two. Both layouts put 18 points on the edge. On each 48 inch side they sit 6, 18, 30 and 42 inches from a corner. On each 60 inch side they sit at 6, 18, 30, 42 and 54 inches. In A they're navy points on a cream edge. In B they're cream points on a navy edge.
Which half faces out sets the edge color
The outer ring decides the edge color: 32 of the 80 HSTs touch it. In A, each one has its cream half facing out. In B, its navy half faces out.
With HSTs you can't turn only that ring. The squares cross block seams, so turning the ring alone breaks every square it touches. Turn the whole field instead. Our half-square triangle layouts post has an orientation key if you want to label each unit before you sew.
The same check works for any block with a light side and a dark side, such as Log Cabin. Look at which side faces out in the outer row. Our Log Cabin layouts post maps four settings by their dark corners.
Count the repeat before you change the size
This layout repeats every two HSTs, or 12 inches. Keep an even number of HSTs across and down, and opposite edges match. Make it nine across and the quilt is 54 inches wide. But the left edge is cream, while the right edge halves the navy squares.
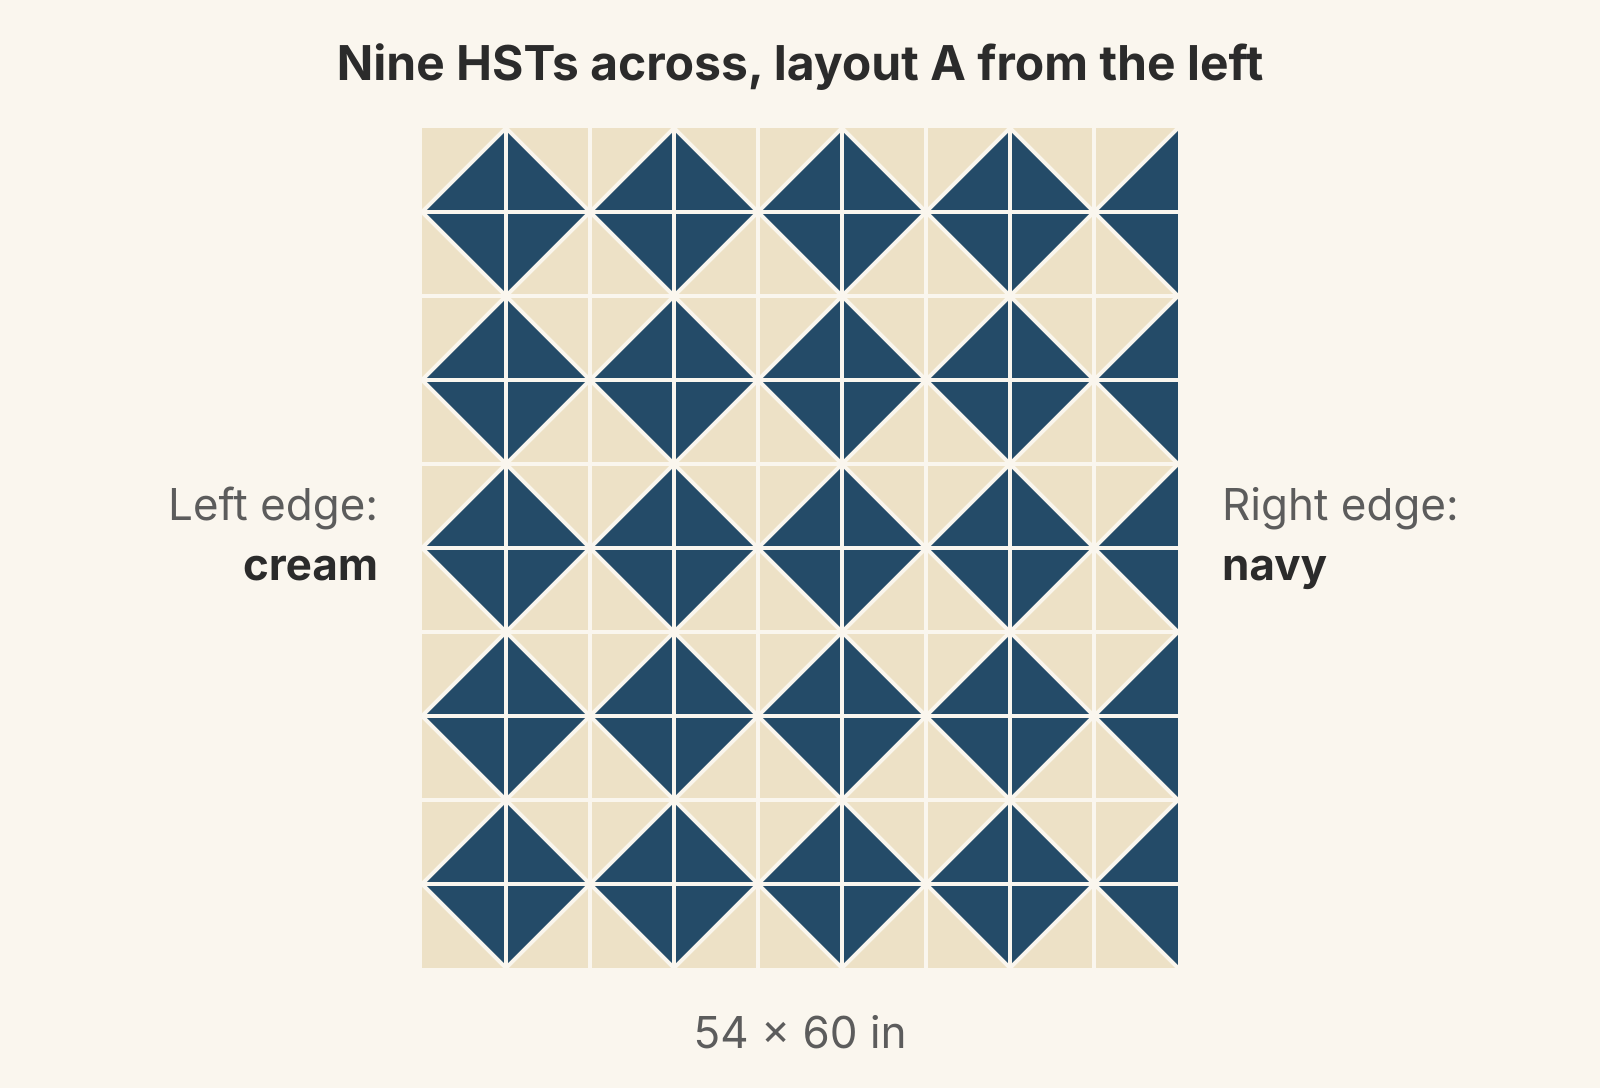
If you need about 54 inches, keep eight across and change the unit. Eight HSTs at 6 3/4 inches finished (trimmed to 7 1/4 inches) make 54 inches with matching sides, and ten down makes the length 67 1/2 inches. Or go to ten across for 60 inches.
Let the binding frame the quilt or blend in
The American Quilter's Society's binding advice asks whether a design calls for a visual frame. If it does, try a highly contrasting binding. A binding cut from the outermost border fabric extends that border and almost disappears. On a borderless quilt, the outermost "border" is whatever runs along the edge: cream in A, navy in B. If you want no frame at all, consider facing the quilt instead of binding it, since a facing turns completely to the back.
The binding color also decides which small miss at a point will show.
| Layout | Navy binding | Cream binding |
|---|---|---|
| A: cream edge, navy points | Frames the edge; hides a blunt point | Blends in; hides a point that stops short |
| B: navy edge, cream points | Blends in; hides a point that stops short | Frames the edge; hides a blunt point |
A point that runs 1/8 inch under the binding loses its tip. HST points are right angles, so the flat end is twice that depth: 1/4 inch wide. Against a binding the same color as the point, the flat end joins the binding. Against a binding in the edge color, it shows. A point that stops 1/8 inch short does the opposite. It leaves a strip of edge color between the tip and the binding. That strip shows against a binding in the points' color and disappears into one in the edge color.
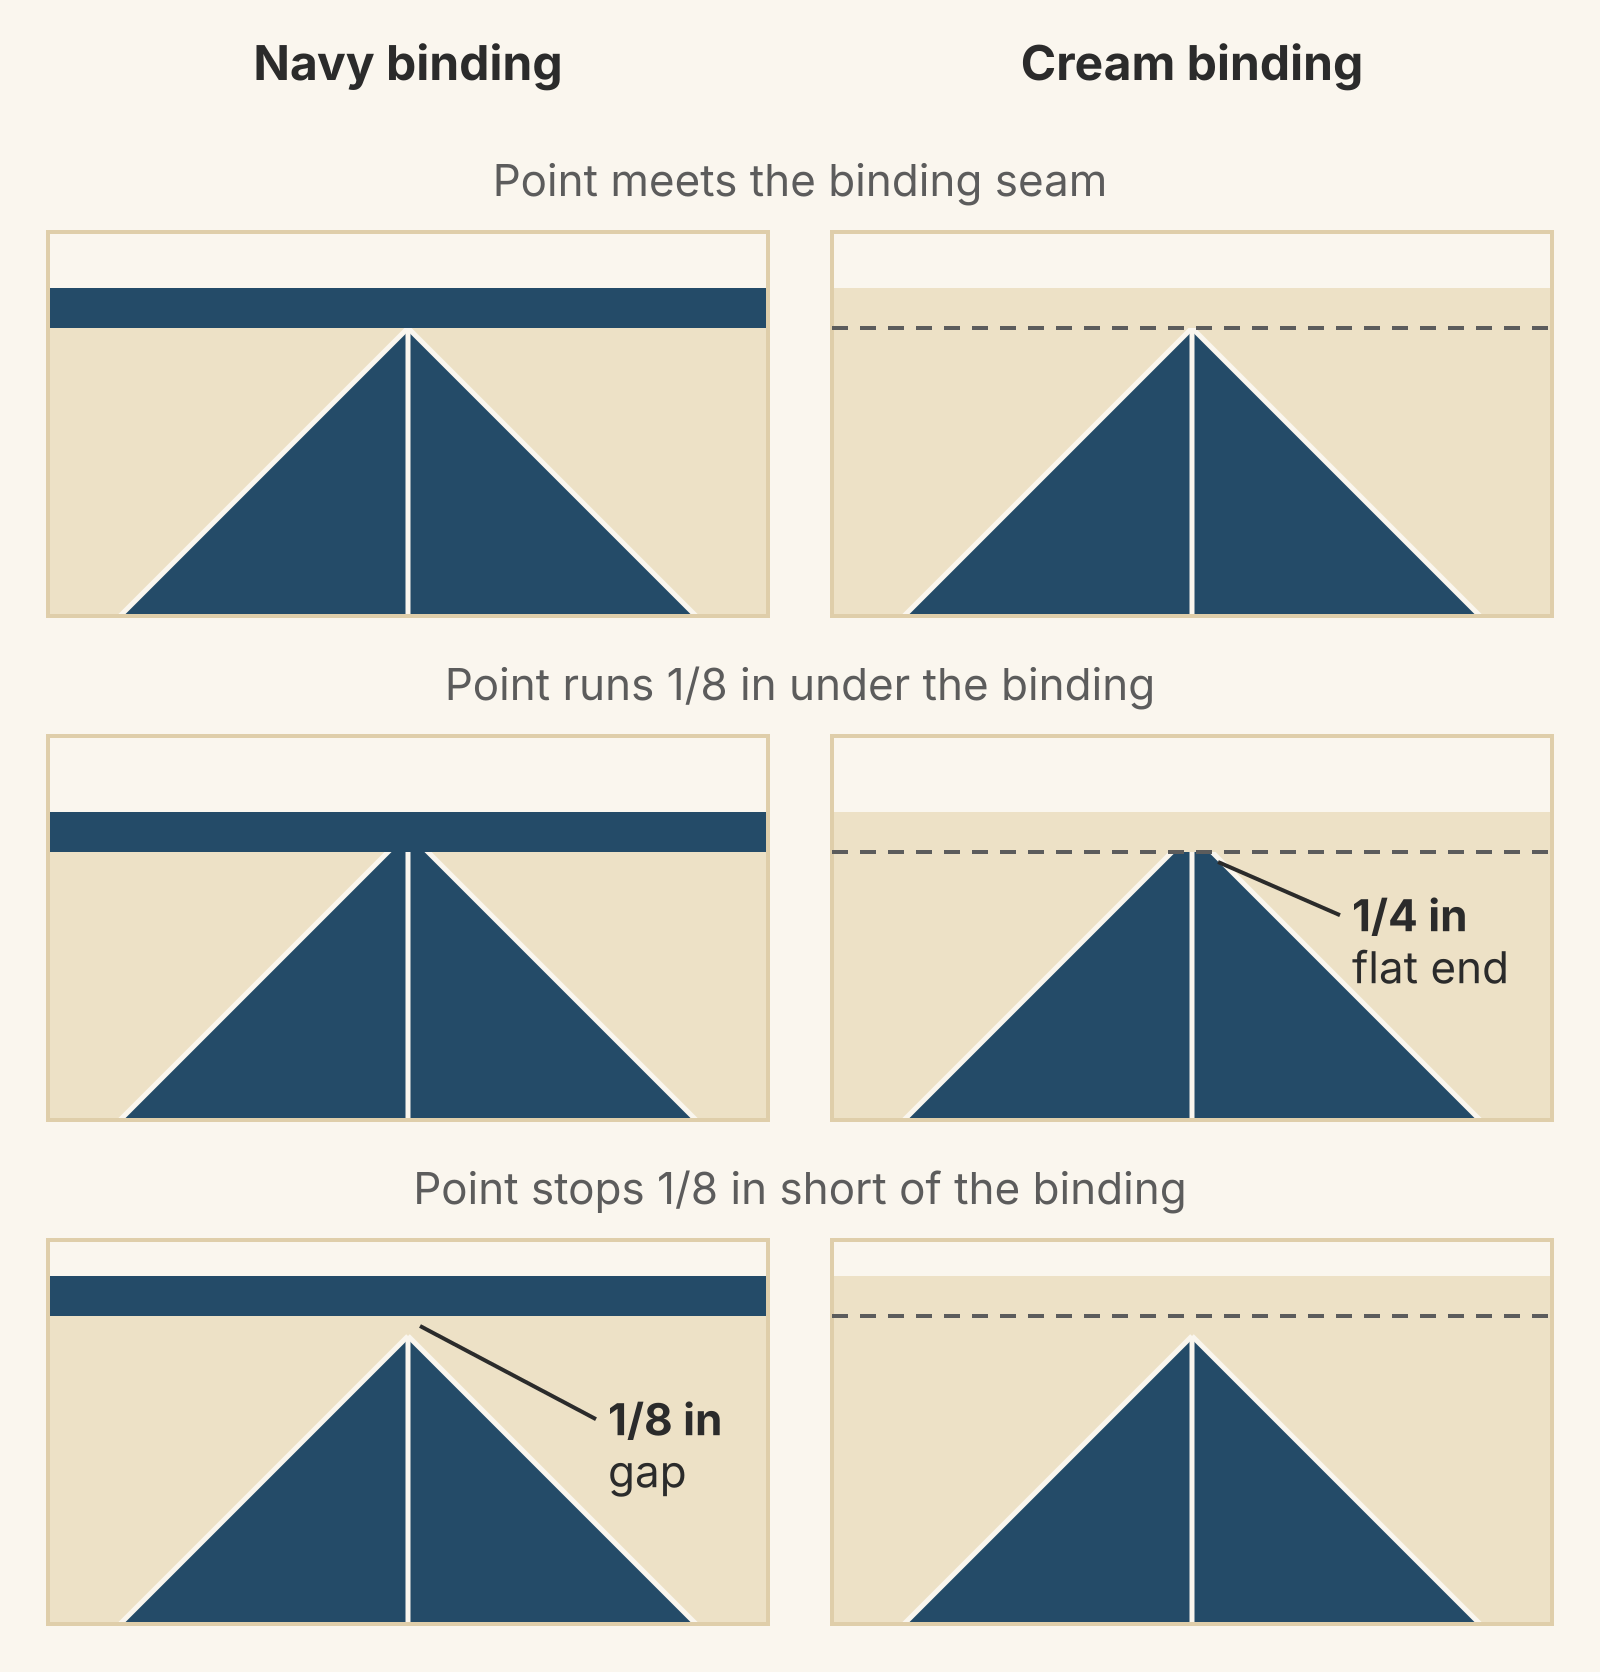
The same AQS article lists 1/4 to 1/2 inch as common finished binding widths. It adds that a thin binding holds seams that reach the edge more securely. Our top has 32 places where a seam meets the edge, so the narrow end suits it. A 1/4 inch finished binding goes on with a 1/4 inch seam, right at the points. A wider binding usually means a deeper seam, and a deeper seam cuts off the points. To cut strips for that 1/4 inch finish, see how wide to cut binding strips for your batting.
To audition colors, AQS suggests tucking a piece of the binding fabric under the edge of the quilt. It also suggests a black-and-white photo to judge value.
Worked example: finish the 48 x 60 inch edge
- Build the top. Make 80 HSTs, trim each to 6 1/2 inches, and sew them 8 across and 10 down. The top should measure 48 1/2 x 60 1/2 inches.
- Pick the edge. Choose A for whole navy squares and a cream edge, or B for a navy edge. Both counts are even, so all four sides match.
- Stay-stitch. Sew 1/8 inch from the raw edge before quilting. Seams meet the edge 7 times on each 48 inch side and 9 times on each 60 inch side, every 6 inches. The binding will cover the stitching.
- Square up after quilting. HollyAnne Knight of String & Story trims a finished on-point quilt 1/4 inch outside its outermost points. Here the top's raw edge already sits 1/4 inch outside the points, so you're trimming batting, backing and any wobble. Put your ruler's 1/4 inch line on the row of points and cut along the ruler's edge. The points sit every 12 inches, starting 6 inches from each finished corner. Check three or four per side before you cut. Where the edge wobbles, err toward cutting closer: a nipped tip disappears into a binding in the points' color, but a gap shows.
- Bind in the points' color. Use navy for A or cream for B, sewn with a 1/4 inch seam.
Try both edges in QuiltLab before you cut
You can lay out both versions in the Quilt Editor and compare the edges on screen.
- Choose File > New Quilt…, pick Grid, then Create grid quilt.
- In Properties, under Layout, set block W and H to 6, Cols to 8 and Rows to 10. Layout shows the finished size, 48 x 60 inches. Leave Borders empty.
- Draw a 6 inch HST in the Block Editor and save it. In the Quilt Editor's Blocks tab, choose it and click each cell, then press Enter to stop placing.
- Select one block and press R to turn it 90 degrees clockwise; Shift+R turns it back, and H and V flip it. Set up layout A, then press R twice on each block for B.
The Quilt Editor doesn't draw a binding or work out binding strips. To audition a binding color, choose Add border under Borders and set Finished width to 0.25 in the binding color. That adds 1/2 inch to each dimension shown, making 48 1/2 x 60 1/2 inches, so remove it before you record the finished size.
Your next step
Lay out your outer row, on the design wall or on screen, and decide which color should run around the edge. Then count the points that touch it and audition a binding in their color. In the Quilt Editor, you can set up both edges and compare them before you cut a single triangle. If you decide the quilt wants a border after all, quilt border ideas compares widths on one center. If your blocks are set on point with setting triangles, setting blocks on point covers the triangles and the trim.
Quilt Editor guide →Grid size, block placement and bordersRelated posts

How to Design a Bargello Quilt: Plan the Wave on Paper
A bargello wave is a staircase of stepped columns. Number your strips, write one row per column, and see how column width turns a zigzag into a curve.

Crosshatch Quilting: How to Make the Lines Meet at the Edges
Space a 45-degree crosshatch so the lines meet in a V at every edge and corner. Choose the edge step first, mark dots around the quilt, then connect them.
Crumb Quilt Blocks: How Small Can the Scraps Be?
Crumb quilters commonly stop at 1 to 1 1/2 inch scraps. See what each size costs a 6 inch block in pieces and seams, then write your smallest-scrap rule.