


How to Cut Directional Fabric for Quilting So Prints Stay Upright
Decide which way is up in the finished quilt, then cut each print piece so the turns it takes in the pattern bring it back upright. Squares just get turned before you sew. Rectangles may need a different strip, and two-at-a-time triangles a different diagonal. Some layouts also need twice the print: FreeSpirit Fabrics' Jack Frost Quilt pattern, designed by Sue Penn of Penn2Paper, lists double the yardage for each of its four directional prints.
That's 1 1/4 yards of Fabric A instead of 5/8 yard, for example. With the smaller amount, the pattern warns, its two-at-a-time triangles put the print upside down in half the units. Whether your quilt needs that extra depends on its layout, and you can work that out before you shop.
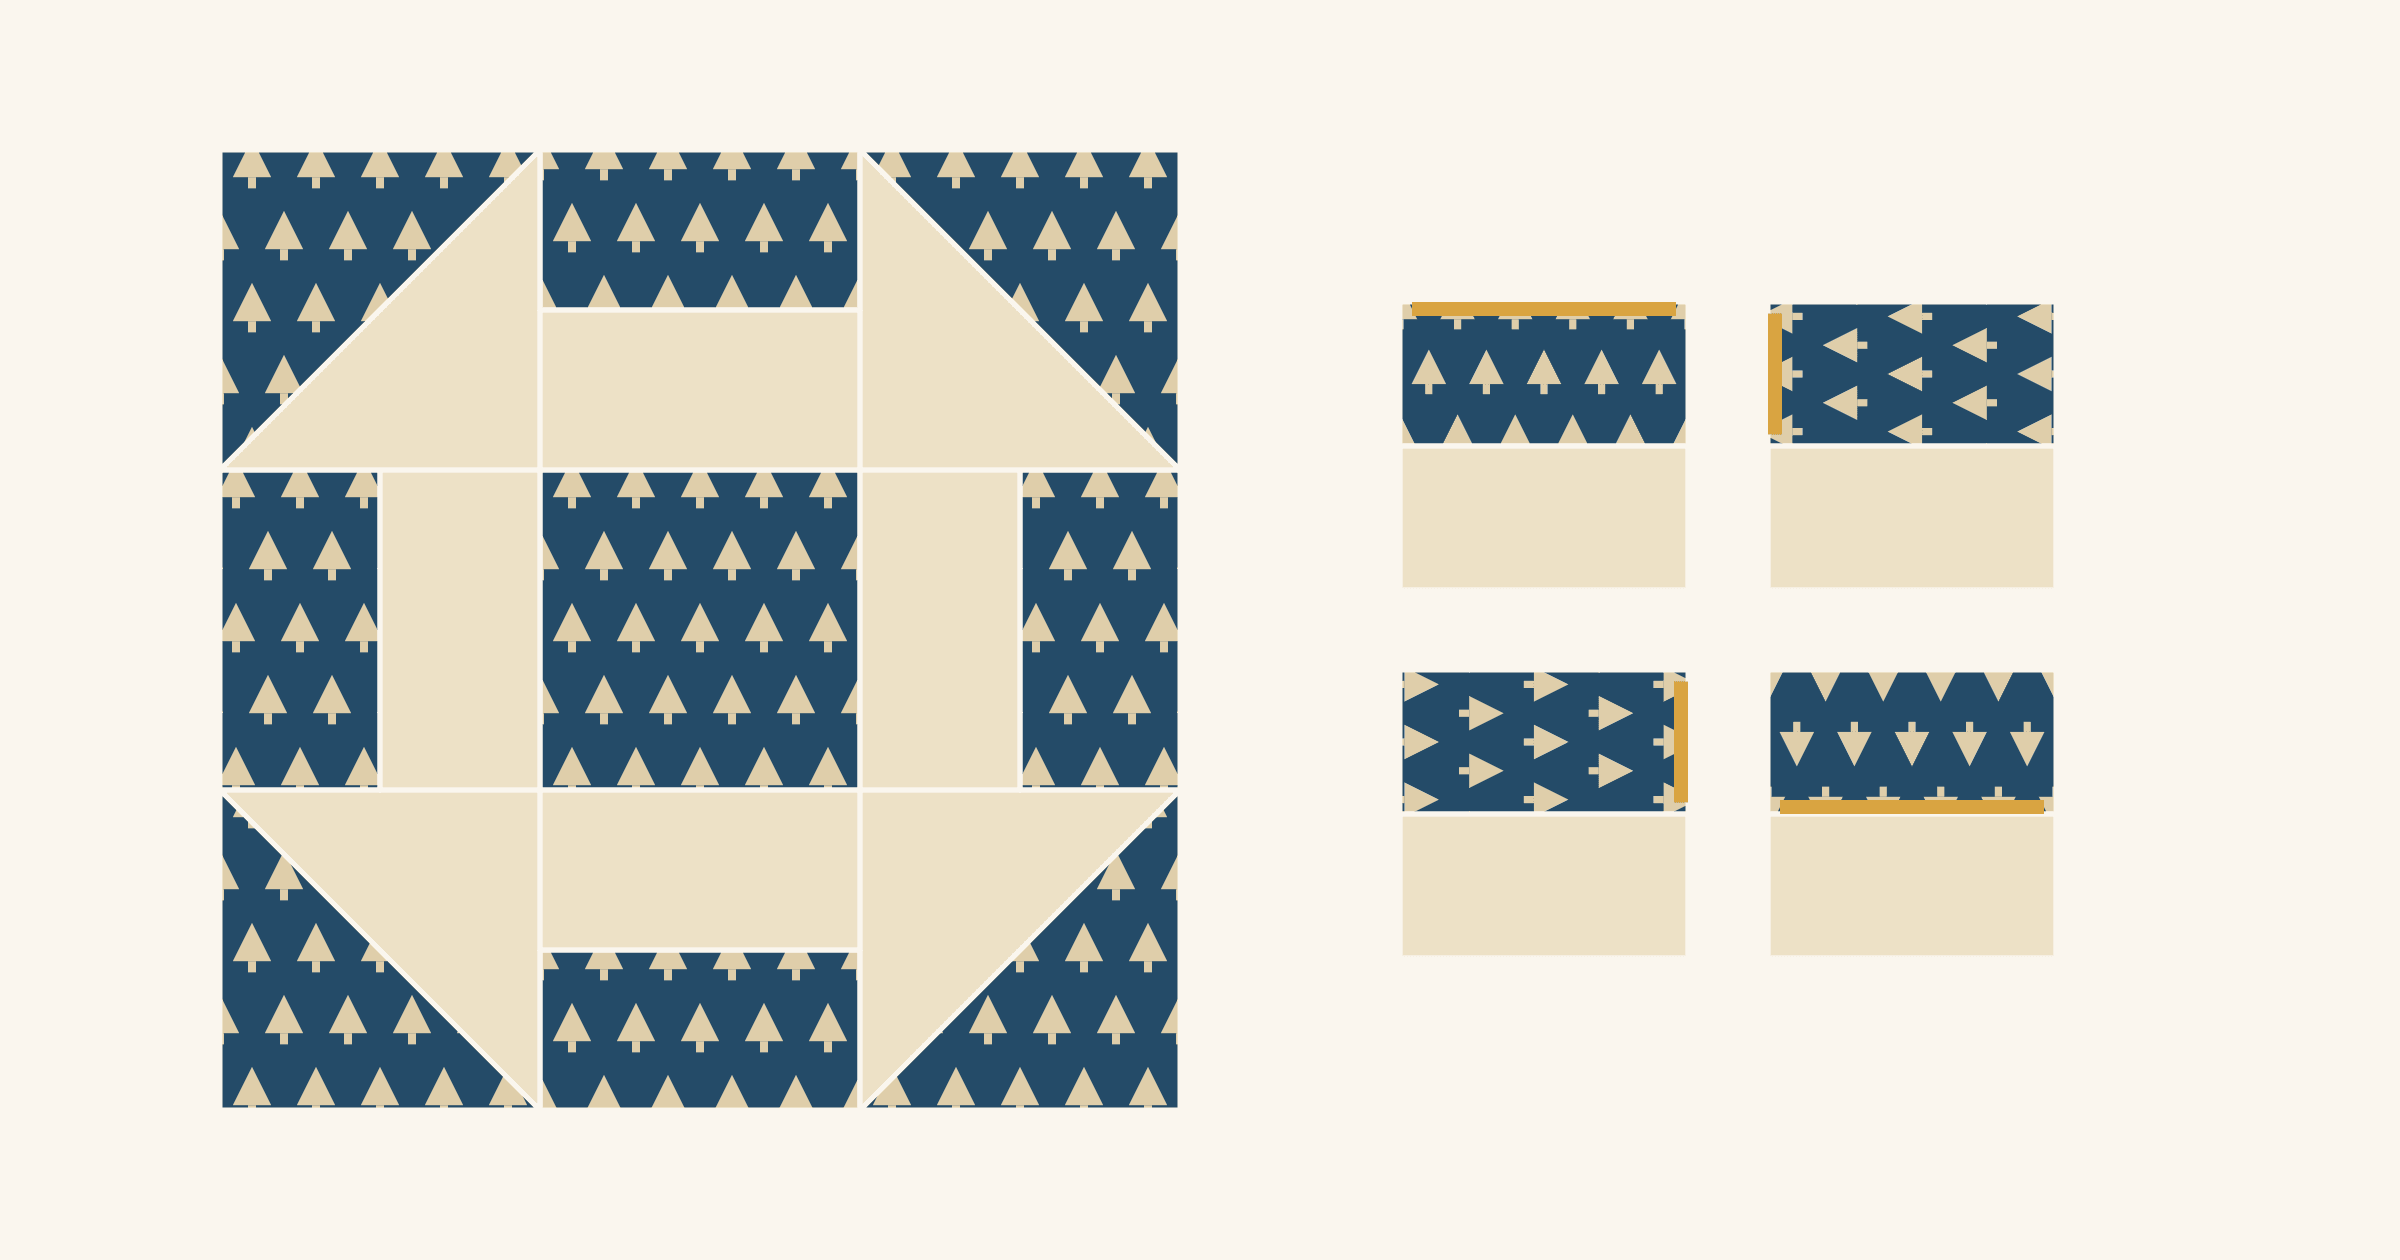
For a first directional project, choose a block whose triangles fill all four corners equally, like the Churn Dash below. Every piece you cut gets used. Only the strip plan changes.
Which prints count as directional?
A one-way print has motifs that all face one way: trees, houses, animals, lettering. A two-way print reads the same upside down, like a stripe or a print with motifs alternating up and down. Tossed prints, most blenders and solids look the same at any turn.
| Turns that still look right | What to plan | |
|---|---|---|
| One-way | Upright only | Every piece, every turn |
| Two-way | Upside down (180°) | Pieces that turn a quarter |
| Nondirectional | Any | Nothing extra |
Spread your yardage with the selvages at the sides and see whether the motifs stand upright or lie on their side. The strip directions in this article assume they stand upright. If yours lie on their side, swap the strip and subcut measurements.
Choosing which motif to frame in a patch is a separate job; our fussy cutting guide covers it. Here the goal is keeping the whole print facing up once the pieces turn.
Mark the top edge, then undo the turns
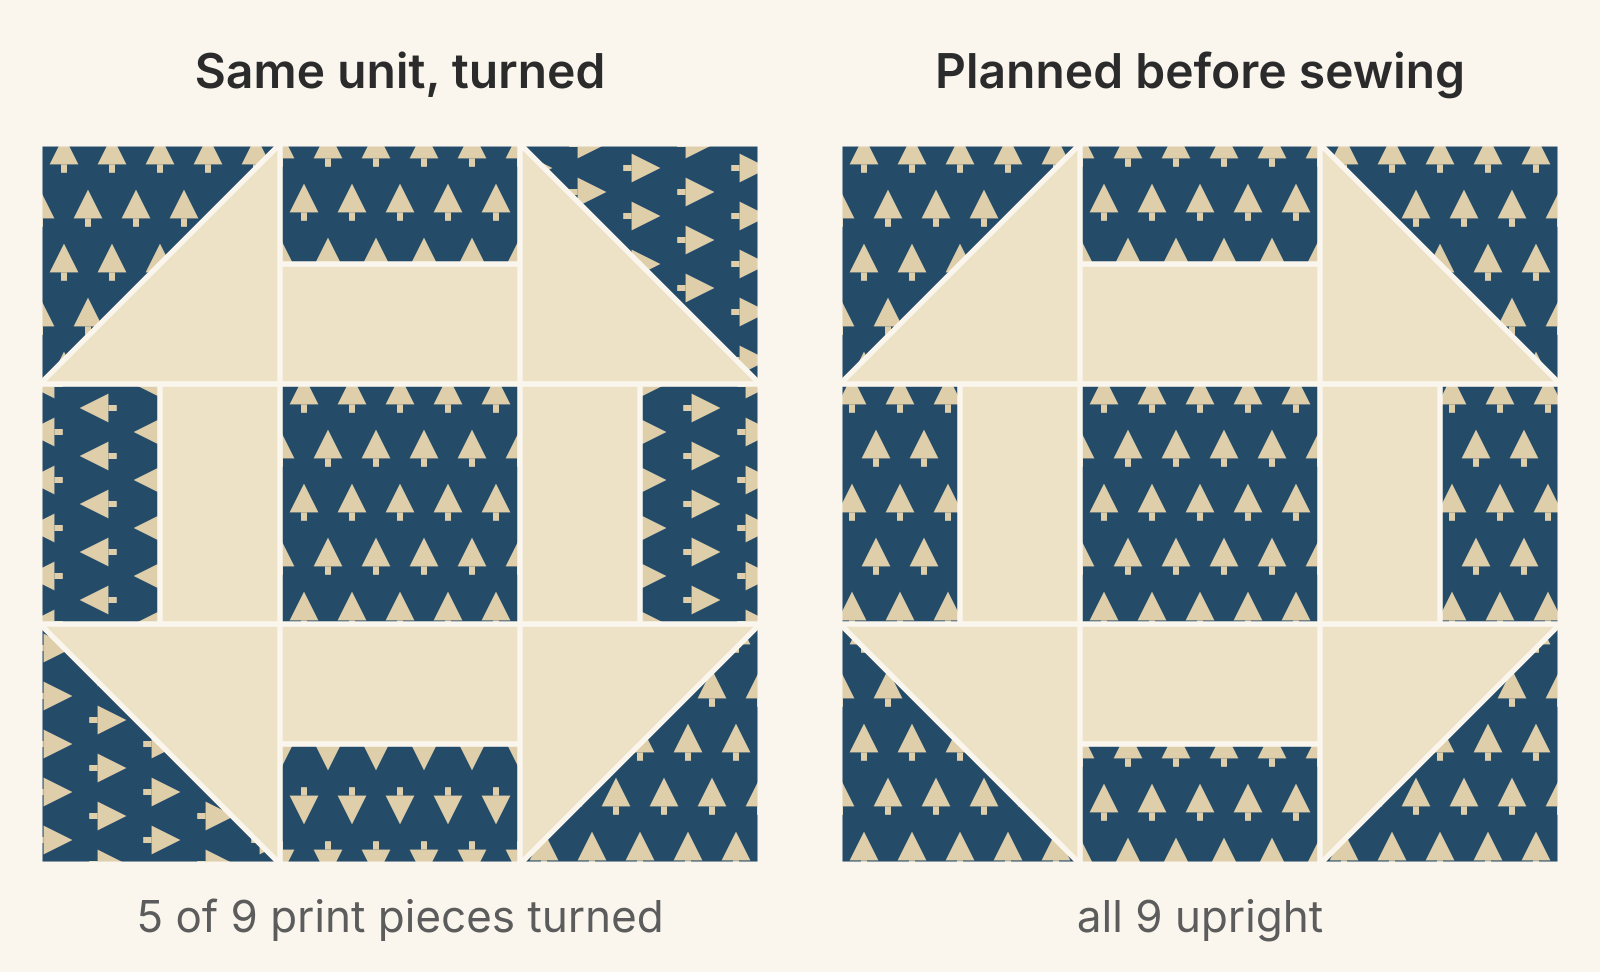
Patterns turn units all the time. You sew one side unit and turn it four ways around a center, or sew a block and turn it in the layout. The print turns with it. A top-edge mark tells you how to cut so the turns land the print upright.
- Draw the finished block the way it sits in the quilt. On every print piece, put a mark on the edge that faces the top of the quilt. If a piece has no flat top edge, draw an arrow pointing up instead.
- Write each unit's turn beside it: 0, 90, 180 or 270 degrees clockwise from the way you'll sew it.
- Turn each unit back by that amount, counterclockwise. The mark travels with the piece. The edge it lands on, or the way the arrow now points, is the top of the print as you cut and sew.
If the block also turns in the layout, undo the block's turn first, then the unit's. Turns add up. A unit turned 90 degrees inside a block that is also turned 90 degrees needs its print sewn upside down.
Worked example: a 12-inch Churn Dash in a one-way print
The Churn Dash is a 3 x 3 grid of 4-inch finished units: four half-square-triangle corners, four side units of two bars each, and a center square. QuiltLab's Churn Dash page shows the classic coloring, with the dark halves turned toward a light center. Ours swaps the values so the one-way print is the background. A navy tree print fills the outer triangle of each corner, the outer bar of each side and the center, and a cream solid makes the dash.
Cut from the print for one block:
- One 4 1/2-inch center square.
- Four 2 1/2 x 4 1/2-inch bars.
- Two 5-inch squares for the corners, sewn two at a time and trimmed to 4 1/2 inches.
From the cream, cut four 2 1/2 x 4 1/2-inch bars and two 5-inch squares. The bars and center are their finished sizes plus 1/2 inch. The triangle squares are the finished size plus 1 inch, which leaves room to trim; our two-at-a-time HST guide explains that starting-square math.
The side units
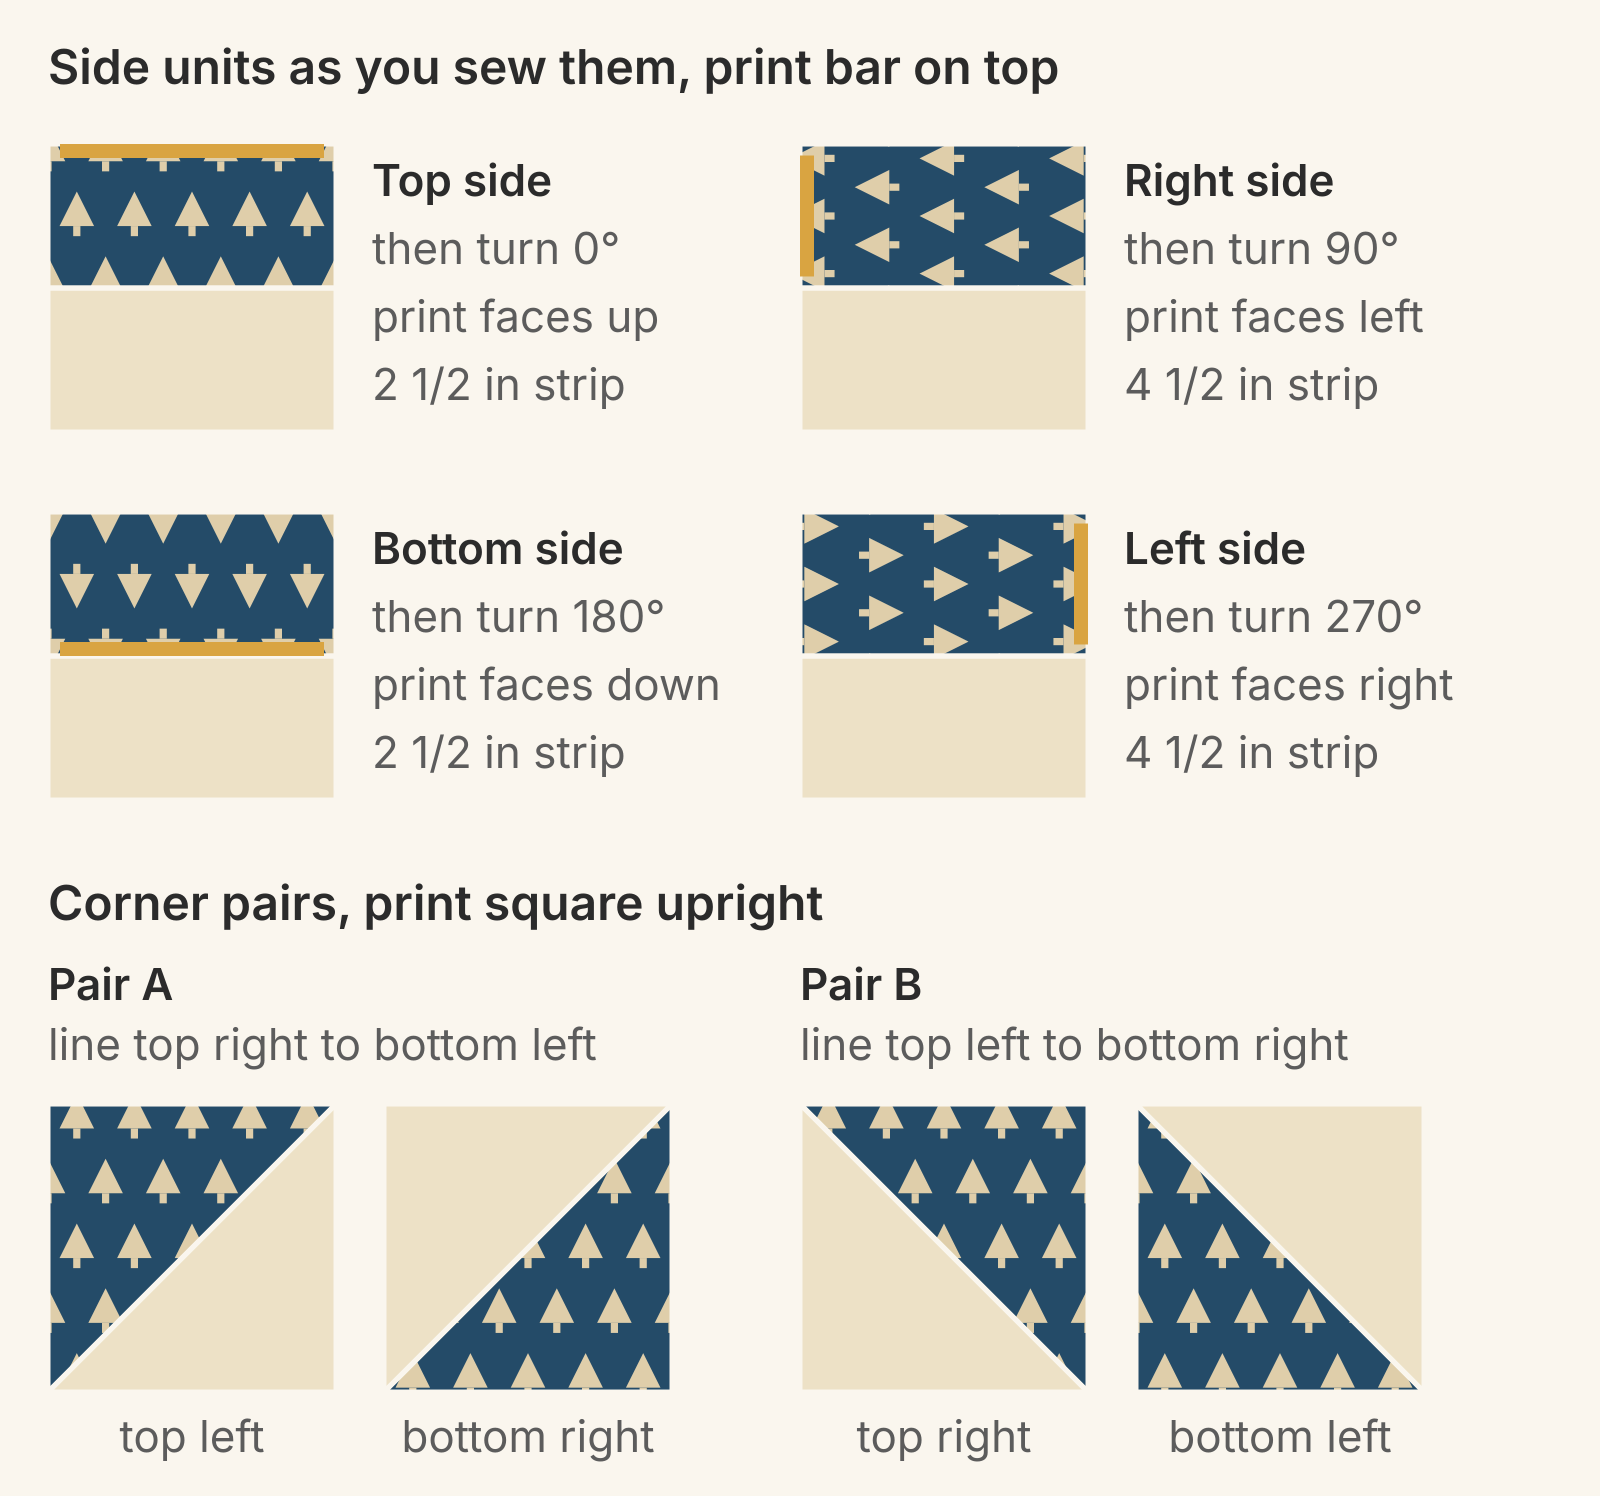
Sew each side unit with the print bar on top. Then trace the top-edge mark through the turn each one takes into the block:
| Side | Turn into place | Print faces as you sew | Cut the bar from |
|---|---|---|---|
| Top | 0° | Up | 2 1/2-inch strip |
| Right | 90° | Left | 4 1/2-inch strip |
| Bottom | 180° | Down | 2 1/2-inch strip |
| Left | 270° | Right | 4 1/2-inch strip |
The top and bottom bars lie down in the block, so the motifs line up along their 4 1/2-inch length. Cut a 2 1/2-inch strip and subcut it every 4 1/2 inches. Turn the bottom bar upside down before you sew it to its cream bar.
The left and right bars stand up, so the print runs up their length. Cut a 4 1/2-inch strip and subcut it every 2 1/2 inches. The center square comes from the same strip.
If you like strip sets, the top and bottom units still work that way. Sew a 2 1/2-inch print strip to a 2 1/2-inch cream strip and subcut every 4 1/2 inches. Put the print strip above the cream for the top units and below it for the bottom units, and the bottom units go in without a turn. The left and right bars have to be sewn one at a time.
The corners
Two-at-a-time triangles come in pairs whose print triangles sit in opposite corners. Keep the print square upright under the cream square, and choose the line you draw:
- Pair A: on the cream square, draw the line from top right to bottom left. It makes the top-left and bottom-right corners.
- Pair B: on the cream square, draw the line from top left to bottom right. It makes the top-right and bottom-left corners.
All four corners come out upright with no turning. Bev McCullough uses the same trick for pinwheels in her Flamingo Toes tutorial, angling the lines on her background squares in opposite directions. Christa Watson did it across a whole quilt in her Herringbone notes: she marked half her lines on each diagonal, kept the print squares the same way up, and got four stacks of triangles, exactly what her layout needed. If you cut single triangles instead, Christine Baker's QUILTsocial tips follow the same idea. Cut half your squares on one diagonal and half on the other, and preview each triangle before you sew. If your block has flying geese, our comparison of flying geese methods explains why one at a time suits a one-way print.
Twelve blocks
For a 36 x 48-inch quilt of twelve blocks, three across and four down, multiply by twelve. From the print you need 24 lying bars, 24 standing bars, 12 centers and 24 five-inch squares.
With 40 inches of usable width, three 2 1/2-inch strips give the lying bars, eight per strip. Three 4 1/2-inch strips give the standing bars and centers: eight bars and four centers use 38 inches of each strip. Three 5-inch strips give the 24 corner squares, eight per strip. Measure your own fabric's usable width before you count on that.
A nondirectional print needs the same 48 bars, 12 centers and 24 squares. The one-way print only changes which strip each bar comes from.
When the whole block turns in the layout
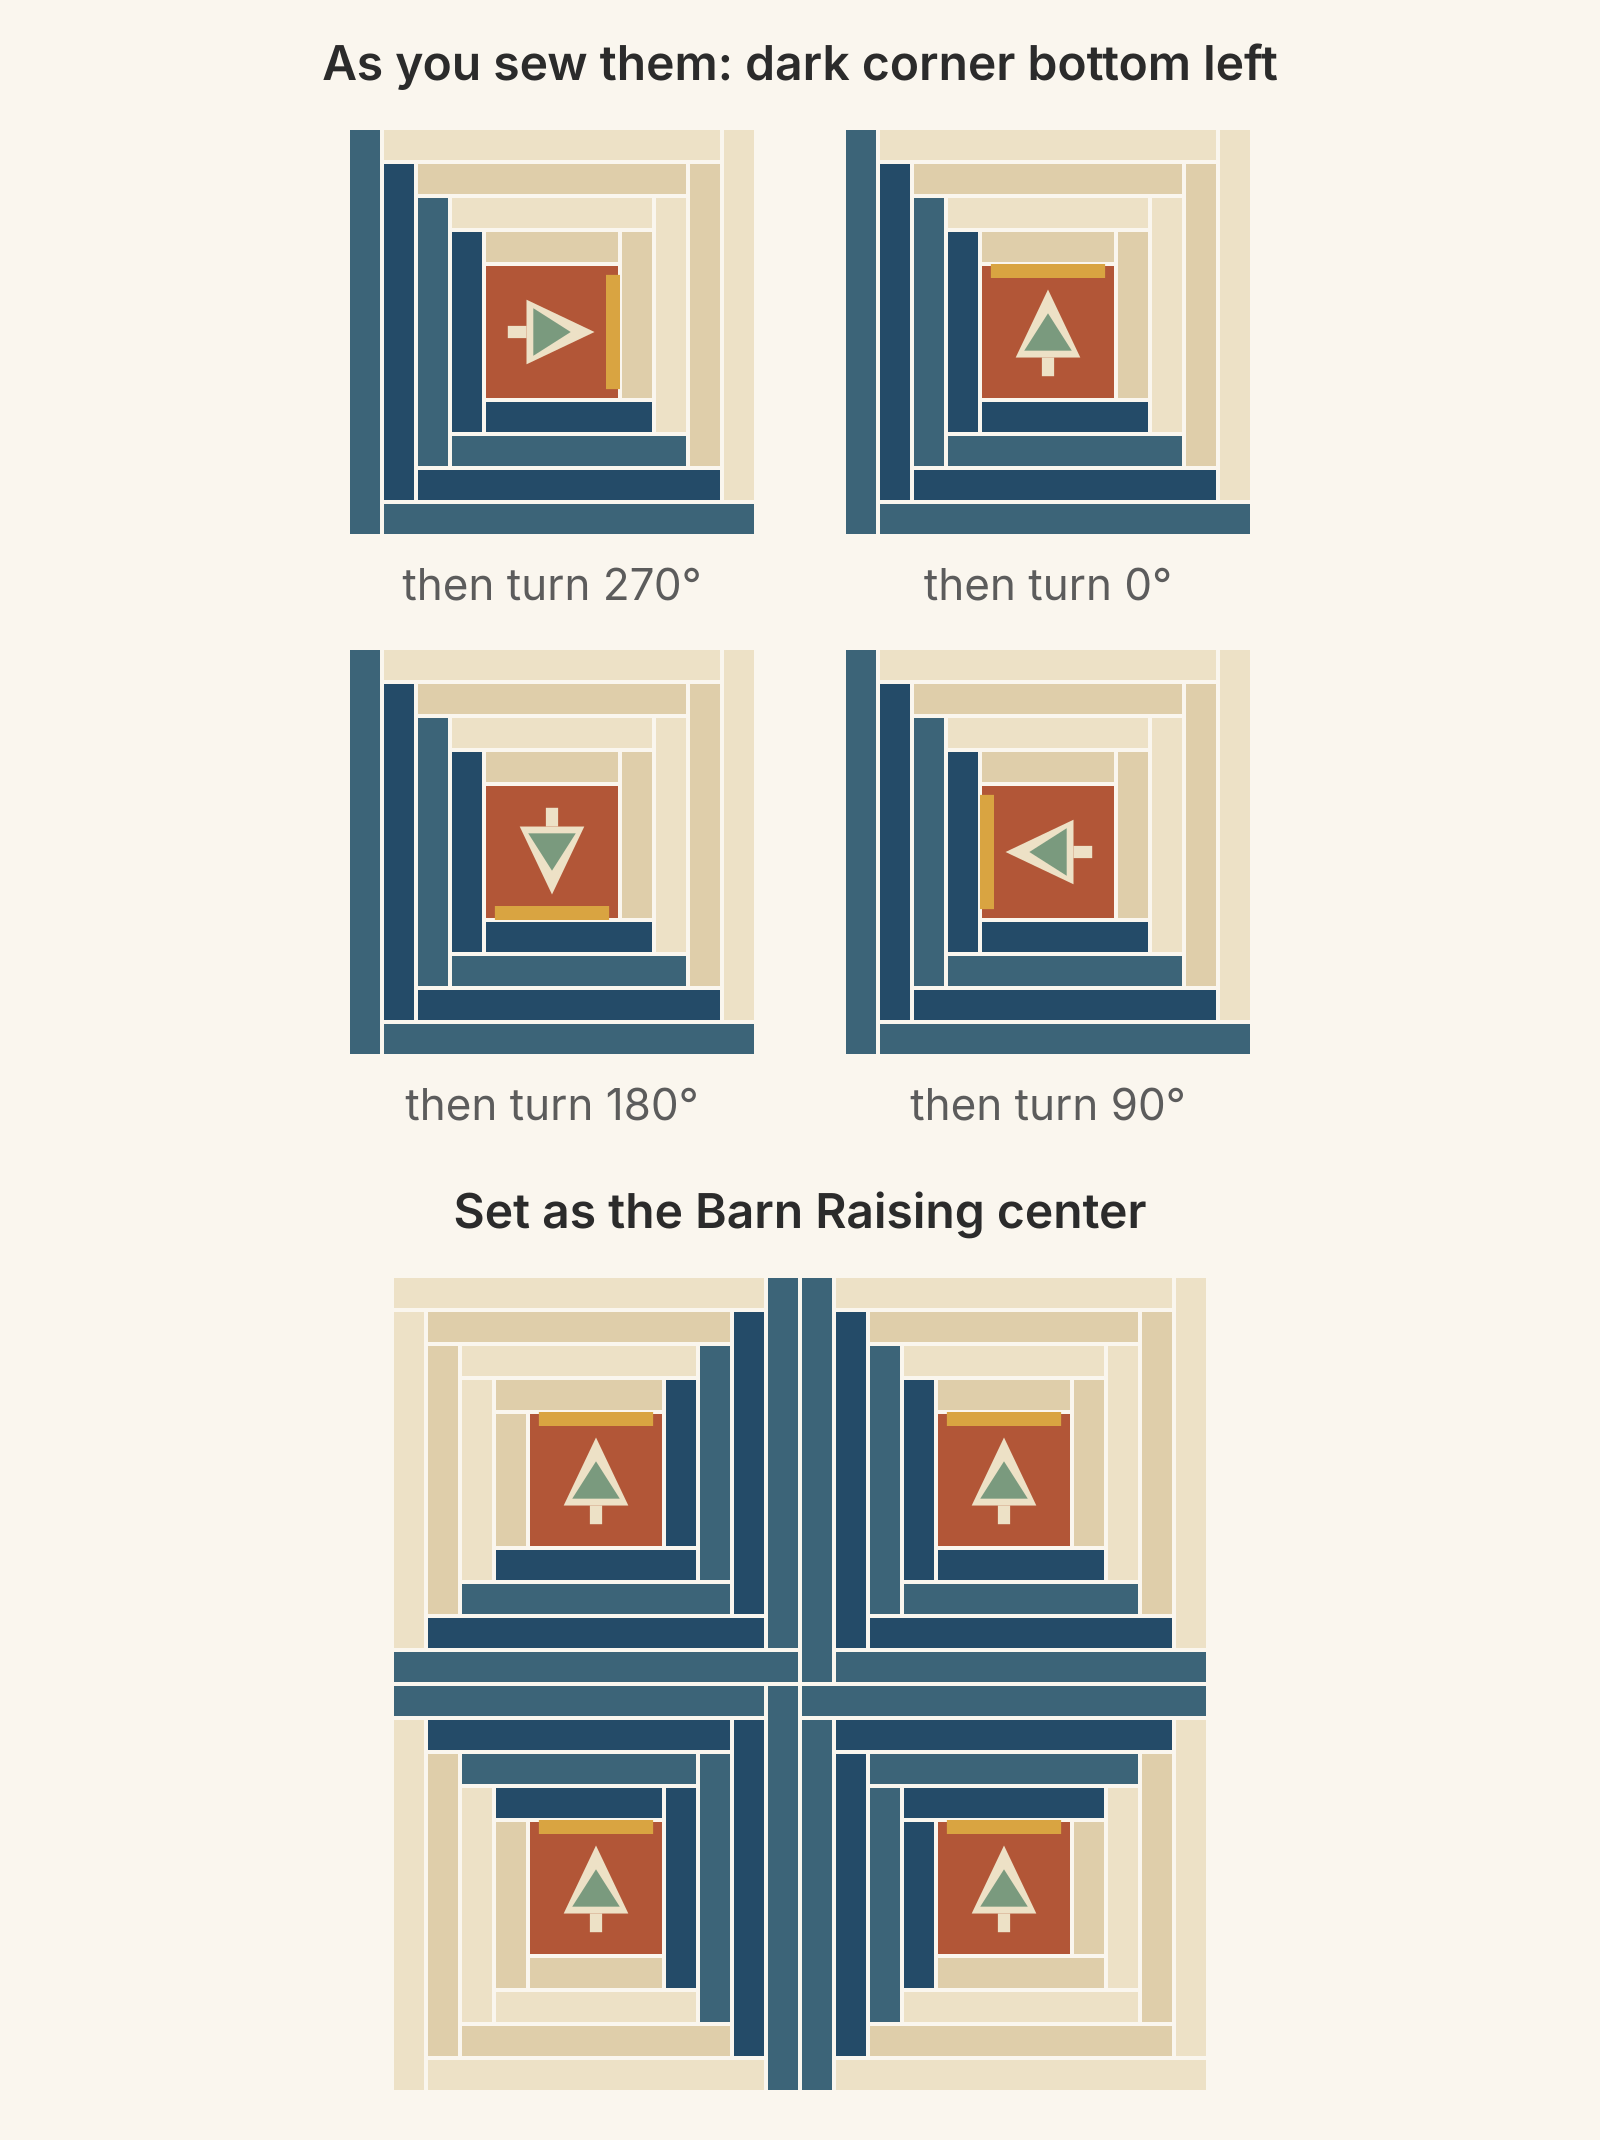
Some layouts turn finished blocks, and the block's turn adds to every turn inside it. A Log Cabin Barn Raising turns the same block four ways. If each block has a one-way center, such as a fussy-cut tree or animal, you need four versions of the block.
Our Log Cabin layouts name each block by its dark corner, starting from bottom left. Reading across the top pair and then the bottom pair, the four center blocks of a Barn Raising have dark corners at bottom right, bottom left, top right and top left. Those are turns of 270, 0, 180 and 90 degrees clockwise. Undo each turn on the center square:
- Turned 270°: sew the center with the print facing right.
- Turned 0°: facing up.
- Turned 180°: facing down.
- Turned 90°: facing left.
The center is a square, so you only turn it before adding the first log. In that post's 16-block Barn Raising, each quadrant repeats its center block's turn, so you sew four blocks of each version. Pin a note with the turn to each finished block so it goes to the right spot.
An on-point setting turns everything 45 degrees, so a one-way print cut on the straight grain ends up leaning. For plain setting squares, the fix is the same: undo the turn when you cut. Shari at Bear Creek Quilting Company wanted the diagonal arrows in her background print to run the same way across her on-point Airmail Envelope quilt as they do on the bolt. She cut her 6 1/2-inch setting squares on point from 9 1/4-inch strips, just wider than the square's 9.19-inch diagonal, and cut her corner triangles in opposite directions. Squares cut on point have bias edges, so handle them gently. Our on-point setting guide has the setting-triangle math.
How much extra directional fabric do you need?
Count the corners before you buy. Each two-at-a-time pair gives print triangles in two opposite corners: top left with bottom right, or top right with bottom left. The examples below treat the print as the dark half of each triangle unit.
- Balanced layouts need no extra. The Churn Dash uses each corner once. The 64-unit Barn Raising in our HST layouts guide uses each corner 16 times, so 16 pairs on each diagonal make all 64 units upright. Its Streak of Lightning setting uses only top-left and bottom-right triangles, 32 of each, so 32 pairs on one diagonal leave no spares.
- Unmatched corners need twice the squares. When a layout uses one corner without its opposite partner, each pair gives one usable unit. The other lands sideways or upside down wherever you turn it. That's why Jack Frost doubles its directional yardage. The flying geese-style setting in the same guide uses 32 top-right and 32 top-left triangles and no partners, so it needs 64 pairs for 64 units.
- Rectangles need no extra pieces, only a second strip width.
A two-way print forgives unmatched corners, because a triangle turned upside down still reads correctly. If you love one of those layouts, that's the print to choose.
Check the plan in QuiltLab before you cut
You can preview each block version in QuiltLab. In the Block Editor, apply your print to a piece from the Fabric tab. Select the piece, open the Draw tab, and type 90, 180 or 270 in Fabric rotation (degrees) under Appearance. Check which way the print now faces, and save each version as its own block.
In the Quilt Editor, the print turns with a placed block when you rotate it, the same way cloth would. Place your versions, turn them as the layout says, and look for any motif that isn't standing up. QuiltLab doesn't work out strips or yardage, so keep your cut table with your notes.
Block Editor guide →Draw pieces, assign fabrics and save blocks for your quilt layoutsYour next step
Draw your block once and put a top-edge mark on every print piece. Write each unit's turn, undo it, and note the print direction beside every line of your cutting list. Then cut one block, lay the pieces out in their final places, and check every motif before you sew.
To see the versions on screen first, start on the Free plan, build them in the Block Editor, and lay them out with the Quilt Editor guide.
Related posts

How to Design a Bargello Quilt: Plan the Wave on Paper
A bargello wave is a staircase of stepped columns. Number your strips, write one row per column, and see how column width turns a zigzag into a curve.

Borderless Quilt Design: Plan an Edge That Looks Finished
With no border, the outer blocks and the binding make the edge. Compare whole and halved motifs on one 48 x 60 inch quilt, then pick the binding color.

Crosshatch Quilting: How to Make the Lines Meet at the Edges
Space a 45-degree crosshatch so the lines meet in a V at every edge and corner. Choose the edge step first, mark dots around the quilt, then connect them.