


Check Donation Quilt Requirements Before You Cut

Check donation quilt requirements with the organization receiving the quilt before choosing its size, fabrics or finishing method. Programs serve different people and accept different construction. Start with one current brief, then design to it; a quilt that suits one group may not suit another.
For a concrete example, the current Quilts for Kids FAQ suggests approximately 38 inches wide by 44 inches tall for hospital quilts. Below, we'll turn that target into a proposed 42-block layout. Confirm the current needs and handoff with the receiving program before beginning; this design doesn't guarantee acceptance.
Put the receiving program at the top of the page
Write down the program or chapter name, the page you checked and the date. If a local contact gives you a more specific request, save that instruction alongside the general guidelines. A note that simply says "charity quilt" loses the most important part of the brief.
Ask whether the current request is for a hospital, another recipient group or a particular drive. Check the finished size, materials, quilting, edge finish, washing, labels and delivery. Resolve any conflict before purchasing the materials, rather than hoping someone at drop-off can make use of the finished quilt.
Distinguish a supplied kit from a quilt made with your own fabric. The Quilts for Kids donation kit page asks for its completed, washed kits back within six to eight weeks. That's a kit condition, not a deadline to attach to every donation quilt.
Read requirements and preferences differently
For the Quilts for Kids hospital example, the current FAQ gives this working brief. Reopen the source before you sew, especially if the quilt will take months to finish.
| Item | Current program guidance | Planning decision |
|---|---|---|
| Top fabric | New, 100% quilting cotton | Start with identified new quilting cotton |
| Batting | Cotton or 80/20 cotton-poly preferred | Choose an exact suitable product and keep its directions |
| Quilting | Machine quilting; about 4 inches maximum unstitched | Draw the quilting plan before sandwiching |
| Thread and edge | Avoid monofilament; machine-stitched binding strongly recommended | Choose a compatible thread and plan the binding method |
| Final preparation | Wash with a color catcher; avoid strong scents; no personal label | Reserve time for washing, drying and the program's handoff |
"Preferred" and "strongly recommended" carry a different meaning from a requirement. Keep those words in the brief when discussing a substitution with the recipient. Also check the exact batting's own quilting limit; a program's maximum spacing cannot relax a tighter product limit.
This is a single-program summary. It isn't a list of rules for every hospital or every child's quilt.
Draw a layout that reaches the requested size
Suppose your proposed quilt uses 6-inch finished blocks, arranged in six columns and seven rows, without sashing. The center is:
- Width: 6 columns multiplied by 6 inches = 36 inches.
- Height: 7 rows multiplied by 6 inches = 42 inches.
- Block count: 6 multiplied by 7 = 42 blocks.
Add a 1-inch finished border on each side. The two side borders add 2 inches to the width, and the top and bottom add 2 inches to the height. The proposed finished quilt becomes 38 by 44 inches.
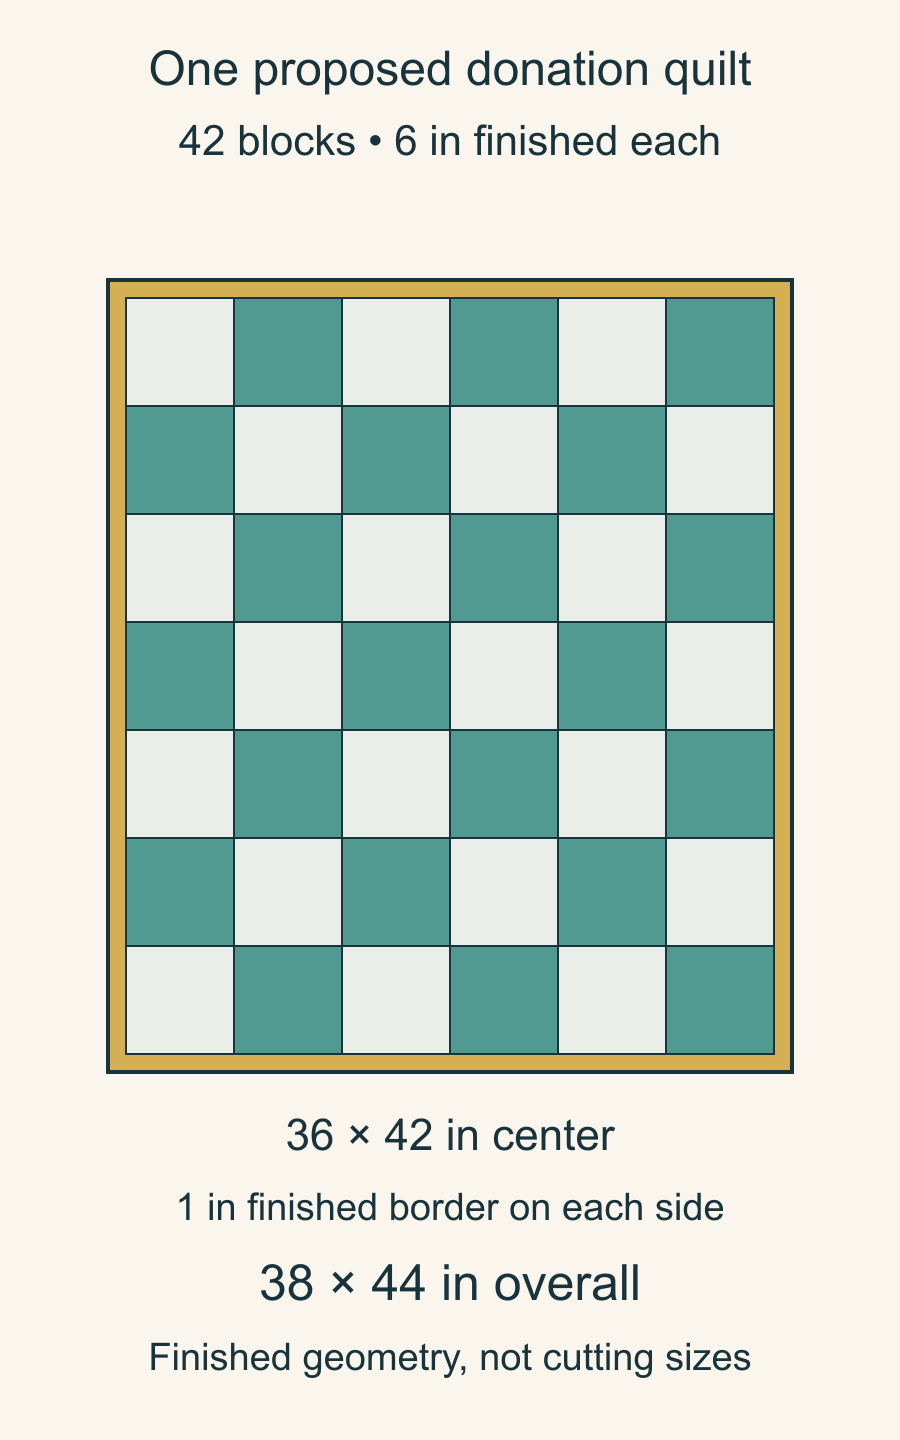
If you use simple square blocks and a quarter-inch seam allowance, each square would be 6.5 inches before sewing. Don't transfer that cut size to every pieced block: use the construction directions for the block you actually choose. Border strip lengths also depend on the measured assembled center and how the corners join.
The proposed layout is a size check before a cutting plan. A long rectangle that looks right on screen still needs that arithmetic.
Add a quilting plan while the center is still a drawing
A 6-inch block grid alone is not enough to demonstrate compliance with an approximately 4-inch unstitched limit. The distance between quilting matters inside the blocks as well as on their seams.
One proposed straight-line map divides the finished 36-by-42-inch center into 3-inch intervals horizontally and vertically. It has 13 vertical lines across the width, including both boundaries, and 15 horizontal lines across the height, again including boundaries. The center contains 12 by 14, or 168 three-inch cells.
That is a drawn planning grid, not proof of a completed quilt's stitching. Plan how the quilting continues through the narrow border, and check the actual finished quilt for gaps. Read our batting quilting-distance example if you need to separate a drawn motif from the largest space it leaves unstitched.
Choose the quilting method you can execute reliably with the stated materials and equipment. There is no need to make an unfamiliar dense motif part of a donation commitment when simple suitable quilting would fulfill the brief.
Don't borrow another program's permissions
The San Jose Project Linus chapter specifications illustrate why the recipient must remain named. That chapter accepts both quilts and certain fleece blankets, gives a 36-inch-square minimum and lists larger child and teen examples. Those permissions and sizes belong to that chapter.
They don't change the Quilts for Kids hospital brief, which excludes tied and fleece quilts. A general search for "donation blanket" can put both sources beside each other, but combining their easiest conditions would produce a brief neither organization supplied.
When choosing between programs, select one that fits the quilt you can make and the recipient's current needs. Ask about an exception before construction, not after shipping.
Make delivery part of the project
Confirm the correct current chapter or headquarters handoff, whether donor contact details belong on a separate slip, and how a supplied kit must be returned. Keep personal information off public quilt photographs and use the receiving program's instructions for anything attached to the quilt.
Give the project a final check after washing and drying: secure seams and binding, remove temporary items and inspect the quilting coverage. Keep its material details in your quilt materials record, along with the dated recipient brief.
Before cutting the first square, fill in three lines: who will receive it, what finished size they currently want, and how the completed quilt will reach them. Once those are settled, the block grid becomes a useful plan rather than a hopeful donation.
Plan your next quilt
Lay out blocks and try colors in QuiltLab's grid editor before you cut.
Free forever, no card needed.
Get quilting tips by email
QuiltLab updates, tips and quilting inspiration. Unsubscribe anytime.
Related posts
Write Clear Quilting Bee Instructions
Specify block sizes, fabric roles and a first-sample check so contributors know what to make and when to ask before continuing.
How to Size a Quilt Block Pillow Front
Size a pillow front from your actual block, then account for borders, the closure seam and the panel's measured size after quilting.
Quilt Pattern Testing Checklist for a Useful Brief
Give testers an exact assignment, useful measurement checkpoints and a clear way to report questions before they start cutting.