


Quilt Pattern Testing Checklist for a Useful Brief
A useful quilt pattern testing checklist begins with the assignment: which version and size to make, what stage to finish, when feedback is due and where questions go. Give testers expected measurement checkpoints and a simple reporting form before they cut. You will learn more than you would from a general request to tell you whether the pattern works.
For a first test, keep the assignment small enough to support promptly. A tester should be able to identify the file, find the next checkpoint and ask for clarification without searching several message threads.
Separate the sewing assignment from the editing job
A sewing tester can tell you how instructions behave in use: whether a step is understandable, a diagram helps, or a measurement matches the piece in front of them. Technical editing is another task.
Cait Lisle Designs distinguishes testing's user experience from a technical editor's detailed review of math, consistency and style. Plan for both needs rather than assuming that a finished tester top proves every number correct.
Our pattern-writing overview covers the wider process. This checklist is the packet you give someone who has agreed to test one draft.
Put the agreement on the first page
Write down the exact pattern title, version identifier, assigned size and completion stage. A block-only test, a finished top and a bound quilt require different commitments. Say which materials the tester provides and which files or samples you provide.
Agree on the feedback date, photo date if applicable, and how questions should reach you. Include what happens if a tester cannot finish. A workable agreement makes it easier to report a problem early.
Cheryl Brickey's testing article at Meadow Mist Designs discusses tester scope, schedule, feedback, compensation and photo sharing. Her arrangements are one designer's practice, so decide and state your own terms rather than treating a particular tester count or reward as a standard.
Before someone accepts, make these decisions explicit:
- The assigned version, size, technique and expected skill level.
- The required finish stage and the dates for questions, feedback and photographs.
- The material and time commitments the tester is accepting.
- Any payment, reimbursement or other agreed compensation.
- Confidentiality, public sharing dates and permission to use submitted photos or names.
- The contact route and the plan for delays or withdrawal.
Ask for the permissions you need rather than assuming a submitted photograph is yours to publish. Keep a copy of the agreement with the assigned version.
Give each tester a specific job
Make a small assignment table. If several sizes need testing, show who is making each size and where coverage is still missing. A tester's preferred size is not coverage until they confirm it.
Indigo Shima's testing program is a concrete example of an invitation that describes size, skill, timing, draft files and feedback expectations. Its particular completion stage and program structure belong to that designer. Use the example to check whether your own invitation leaves important questions unanswered.
Copy this assignment record for each tester:
| Assignment field | Fill in before acceptance |
|---|---|
| Pattern and file/version | Record here |
| Tester and assigned size | Record here |
| Required completion stage | Record here |
| Materials and agreed compensation | Record here |
| Question route and designer contact | Record here |
| Feedback and photo dates | Record here |
| Sharing permissions and delay plan | Record here |
Include a blank place for the actual file/version received. If you send a replacement file, tell the tester which one to use and what changed for their current stage. Do not leave two drafts with indistinguishable filenames circulating at once.
Supply checkpoints that can be measured
Choose points where a size or count discrepancy is still small enough to investigate. A first completed unit is often more informative than waiting for an entire top.
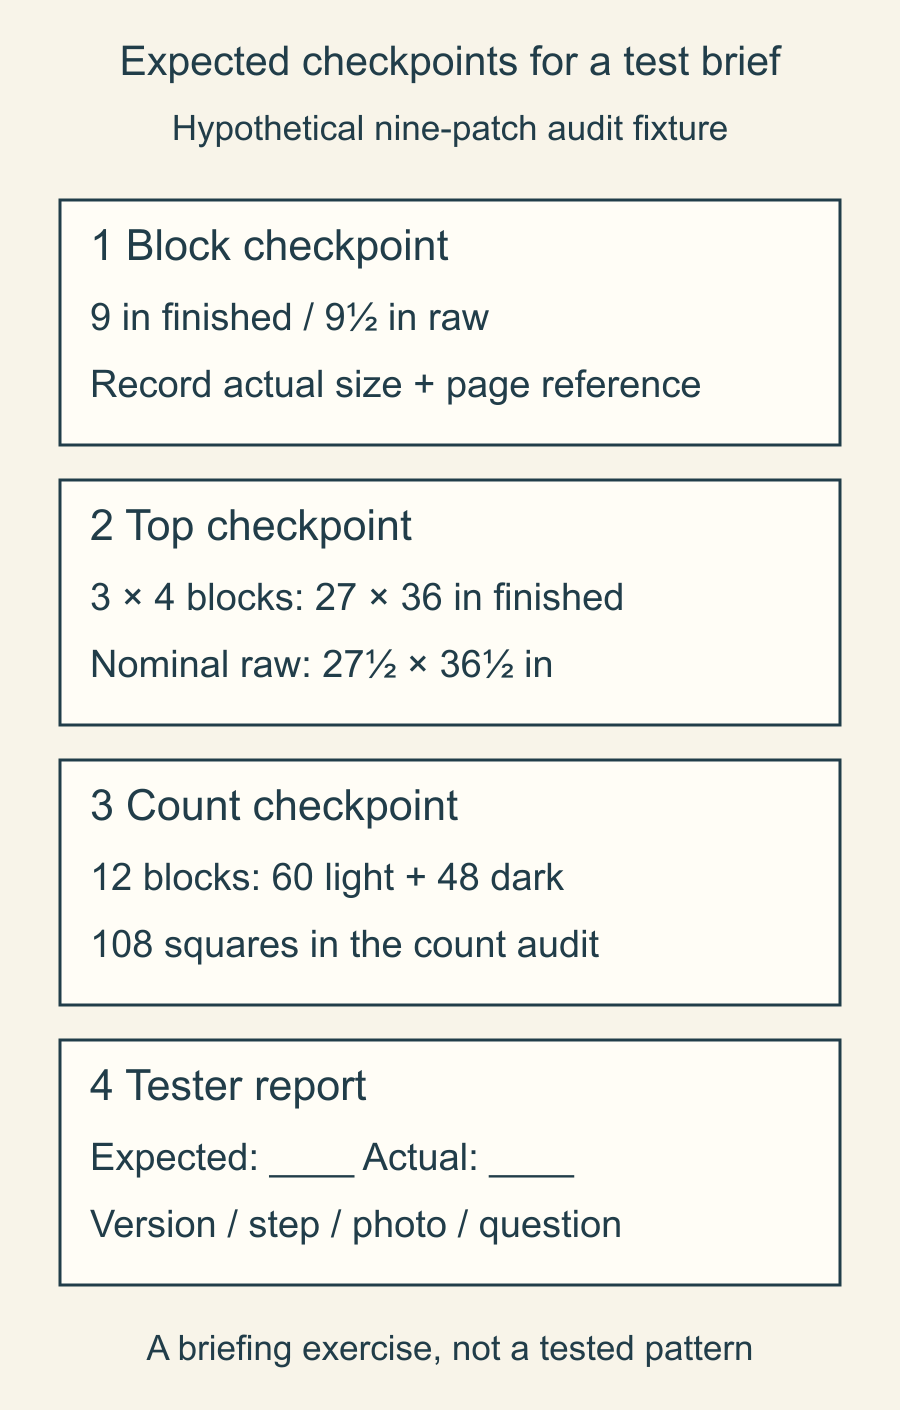
Here is a hypothetical audit fixture for designing that part of a brief. It has 12 nine-patch blocks in a three-column, four-row layout. Each block is intended to finish at 9 inches and measure 9 1/2 inches raw. We drew this exercise and have not sewn it; it is not a released construction pattern.
| Checkpoint | Expected value in this fixture | Tester records |
|---|---|---|
| Assigned layout | 3 columns by 4 rows | Version and size received |
| First block, raw | 9 1/2-inch square | Actual width and height |
| Completed raw top | 27 1/2 by 36 1/2 inches | Actual width and height |
| Finished design | 27 by 36 inches | Whether the stated size is clear |
The raw-top check accounts for joins. Across three raw blocks: three times 9 1/2 inches, minus two joins consuming half an inch each, gives 27 1/2 inches. Down four blocks, three such joins give 36 1/2 inches.
If the fixture's count audit specifies five light and four dark squares per block, 12 blocks require 60 light and 48 dark squares: 108 in total. That is an expected count to check against a document, not a shopping list or a tested sewing method.
Ask for the step, the expectation and the observation
Give the tester one repeatable form. Useful fields are version, size, page and step, expected result, actual observation, photograph if helpful, and the question they need answered.
This blank report can be copied into the agreed message channel:
| Report field | Tester fills in |
|---|---|
| File/version and assigned size | Record here |
| Page, step and unit name | Record here |
| Expected size, count or instruction | Record here |
| Actual measurement or observation | Record here |
| Photo reference, when useful | Record here |
| Can continue or needs to pause? | Record here |
| Question for the designer | Record here |
Use the continuation field to explain whether the tester can proceed or should pause. The designer needs to distinguish a suggested wording improvement from missing information that blocks cutting.
Avoid making testers diagnose the cause before they can report it. "My first unit measures this size; the checkpoint says that size" is useful evidence. "The pattern is wrong" is harder to investigate, and a photograph alone may omit the seam or ruler detail you need.
Quiltbound's testing guidance describes assignments, scope, supplies, question routes and sharing expectations. It also encourages testers to ask before guessing through unclear instructions. Give your testers the same practical permission to stop and ask.
Make the packet easy to use at the sewing table
Keep the assignment, checkpoints and feedback form beside the pattern rather than buried in an invitation. Use stable unit names that match the draft. Give a diagram a page or step reference so a tester can identify it precisely.
If you assemble the packet in QuiltLab, the Pattern Builder guide explains its document tools. The author supplies table contents and measurements; the document layout does not check sewing correctness. Review the actual file you send to the tester, including its version label and readable tables.
Before sending the packet, fill out one blank report yourself using a hypothetical question. Can you locate the page, identify the expected checkpoint and see who should answer? Then ask a tester to confirm the assignment before buying or cutting materials. A clear start makes the eventual feedback much more useful.
Plan your next quilt
Lay out blocks and try colors in QuiltLab's grid editor before you cut.
Free forever, no card needed.
Get quilting tips by email
QuiltLab updates, tips and quilting inspiration. Unsubscribe anytime.
Related posts
Write Clear Quilting Bee Instructions
Specify block sizes, fabric roles and a first-sample check so contributors know what to make and when to ask before continuing.

How to Size a Quilt Block Pillow Front
Size a pillow front from your actual block, then account for borders, the closure seam and the panel's measured size after quilting.

Which Unfinished Quilt Projects Should You Finish?
Choose whether to finish, redesign, pause or repurpose an old quilt project using its current purpose, usable materials and next missing prerequisite.