


Fabric Grain Explained: Which Way Should You Cut?
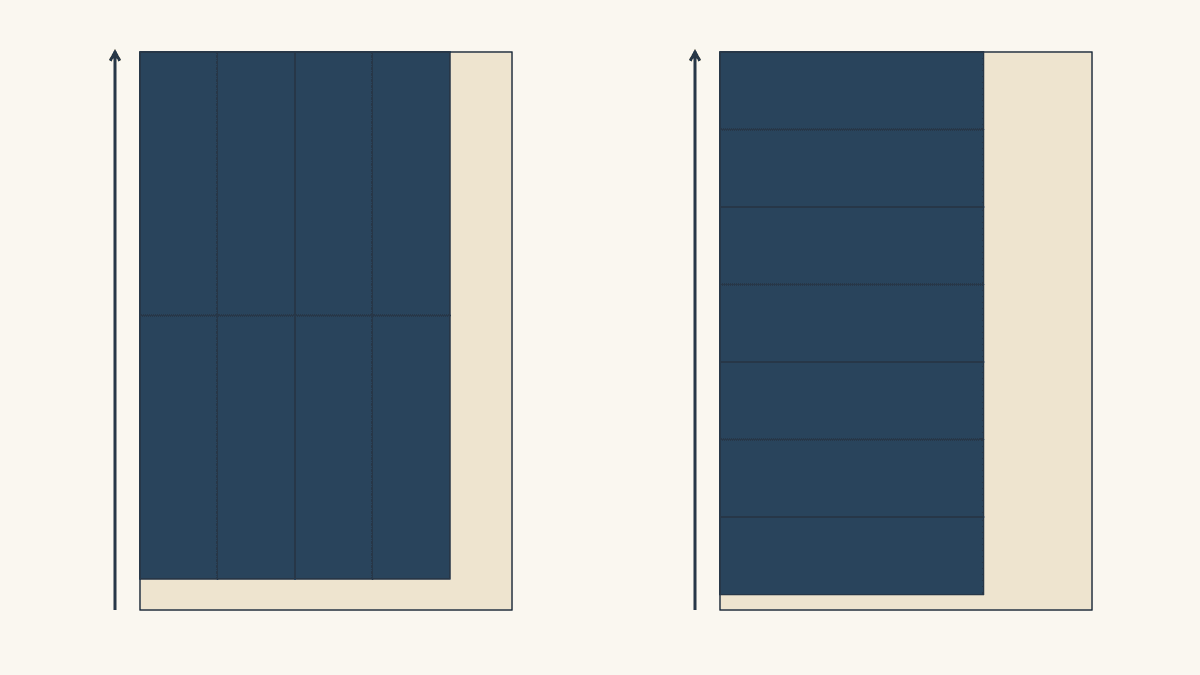
On woven quilting cotton, start by marking the direction parallel to the selvage: that's the lengthwise grain. The crosswise grain runs across it, and diagonal cuts create bias edges. Follow your pattern's grain arrow, then check which grain will run along the edge that matters in the finished layout.
Both lengthwise and crosswise cuts can have straight-grain edges. Turning a rectangle can still change how its long edge behaves, how the print faces, and how many pieces fit. Mark those choices before rotating cuts to fill an empty space.
Put the grain directions on your fabric outline
The University of Kentucky Cooperative Extension's Understanding Fabric Grain distinguishes the woven directions:
- Lengthwise, or warp: parallel to the selvage.
- Crosswise, or weft: perpendicular to the selvage.
- Bias: a diagonal direction between those axes. True bias is at 45 degrees.
Lengthwise yarns are usually more stable than crosswise yarns, and the weave has its greatest give on true bias. The amount depends on the actual cloth. This lesson concerns woven fabric; knit loops and nonwoven materials need their own instructions.
Before removing the selvage, put a lengthwise arrow on a paper cutting plan or record it with a mark appropriate for the fabric. The selvage establishes the direction, but it isn't part of the usable rectangle in the examples below.
If you're working with a scrap whose original edges are gone, inspect its woven threads rather than assuming a previous cut followed them. A printed stripe or the edge of a flower may point in a different direction from the weave.
Ask what the edge needs to do
A long outside edge may benefit from the less-giving lengthwise direction. A seam inside a block may use either straight grain as the pattern requires. A diagonal edge needs a plan for how it will be joined and supported.
The American Quilter's Society's border-cutting advice favors lengthwise cuts for long borders because crosswise edges have more give. That's an example of choosing grain for a particular job. It doesn't make ordinary crosswise patchwork cuts incorrect.
Use the pattern's grain arrow when one is supplied. If the pattern doesn't specify, draw the intended piece and mark the edge you want to keep more stable. Then compare that orientation with the print and the fabric you have.
Compare one rectangle in two orientations
Suppose you have a 12 x 18-inch usable piece. On the plan, 12 inches runs crosswise and 18 inches runs lengthwise. Its area is 216 square inches.
The pattern calls for rectangles cut 2-1/2 x 8-1/2 inches. These are already cut dimensions, so don't add another allowance. We compare two plans that keep every rectangle in one orientation.
We drew these cutting and grain diagrams and haven't sewn them; the cloth dimensions are stated examples, not measurements of fabric we tested.
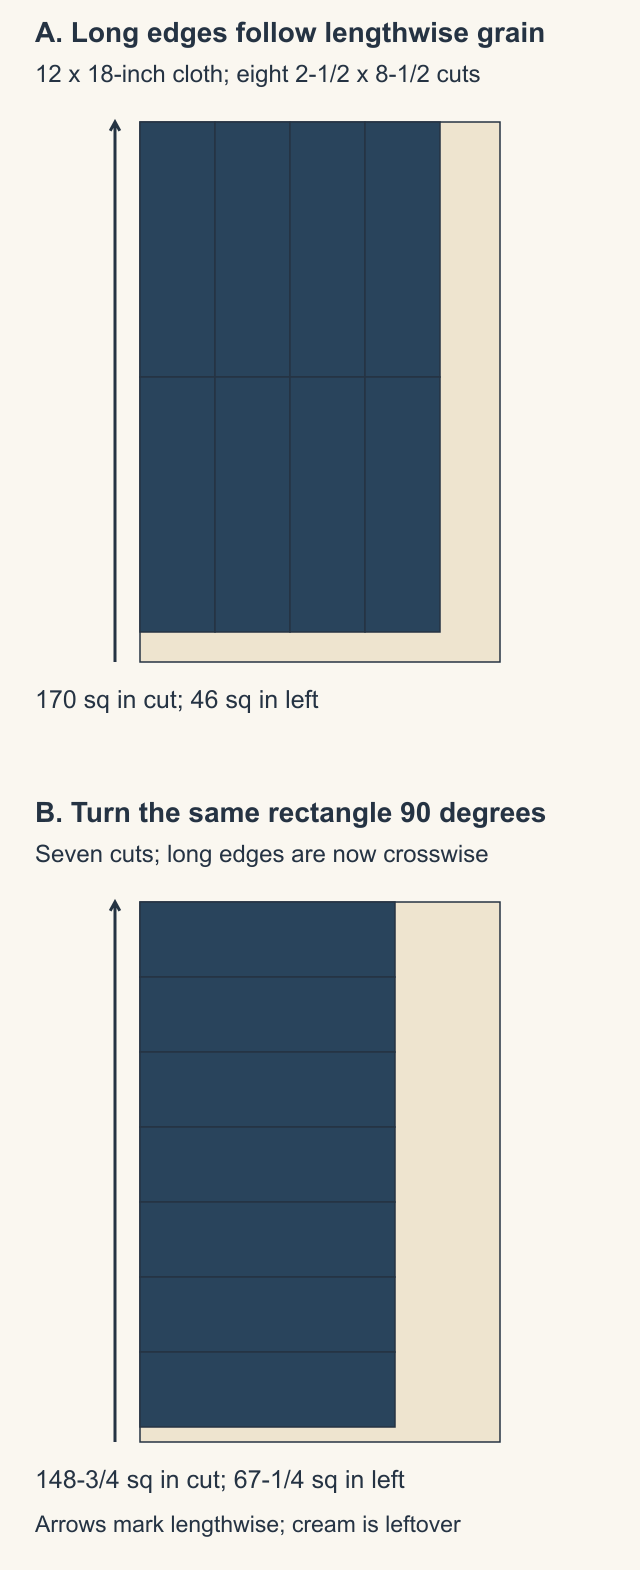
A: keep the long edges lengthwise
Put the 8-1/2-inch dimension along the 18-inch lengthwise direction. Four 2-1/2-inch widths fit across the 12-inch width, using ten inches. Two 8-1/2-inch lengths fit down the eighteen inches, using seventeen.
That gives 4 x 2 = 8 rectangles. Each long edge follows lengthwise grain; the short edges follow crosswise grain.
The eight cuts use 8 x 2.5 x 8.5 = 170 square inches. Draw the leftovers as two separate rectangles: a 2 x 18-inch strip at the right, and a 10 x 1-inch strip below the cuts. Their areas total 36 + 10 = 46.
Cut area plus leftovers is 170 + 46 = 216, so the whole usable piece is accounted for.
B: turn the cuts a quarter turn
Now put the 8-1/2-inch dimension across the twelve-inch crosswise direction. One rectangle fits across. Seven 2-1/2-inch widths fit down the eighteen-inch length, using 17-1/2 inches.
That gives seven rectangles, with their long edges crosswise and short edges lengthwise. Every edge still follows one of the straight grains.
These cuts use 7 x 2.5 x 8.5 = 148-3/4 square inches. The right-hand leftover is 3-1/2 x 18 inches, and the small strip below the cuts is 8-1/2 x 1/2 inch. Their combined area is 63 + 4-1/4 = 67-1/4.
Again, 148-3/4 + 67-1/4 = 216. The area check catches accidental overlap or a leftover counted twice.
Choose the orientation before chasing the count
For this piece, A gives eight rectangles with lengthwise long edges. B gives seven with crosswise long edges. Choose A when those longer edges and the required quantity suit the pattern, provided the print also faces correctly.
If the motif needs the orientation shown in B, a higher count in A won't solve that design requirement. You might need different cloth or a revised plan. Our directional-fabric guide shows how the turns in a pieced unit affect the print's final direction.
These are two feasible fixed-orientation layouts. Mixing orientations might fit a different combination, but that would give some rectangles a different long-edge grain. Label those exceptions before cutting rather than discovering them while sewing.
A triangle moves the bias to different edges
Use a raw right triangle with two four-inch legs. Cut its legs along the two straight grains and its long diagonal edge lies on true bias. Its area is 4 x 4 / 2 = 8 square inches.
Now turn that same triangle 45 degrees on the cloth. The two short edges become true bias, while the long edge lies crosswise. The shape and area haven't changed; the grain along its boundaries has.
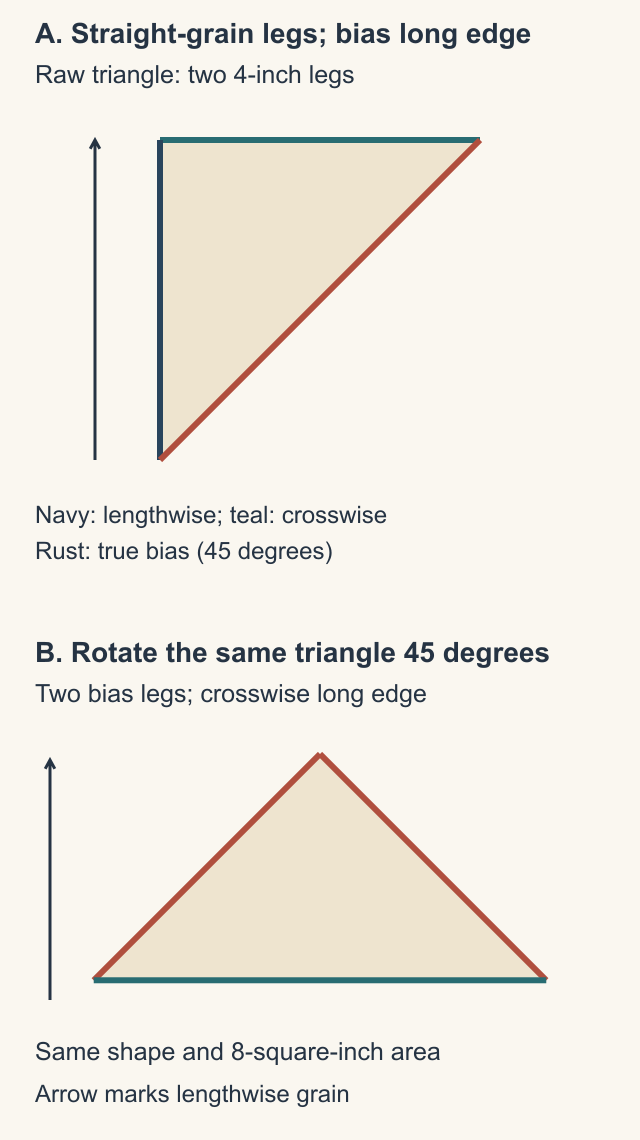
That long edge measures 4 x the square root of 2, about 5.66 inches, in both orientations. These are raw shape dimensions; they don't specify the finished size of a sewn triangle unit.
If a particular boundary needs straight grain, rotating the template can put it there while moving bias elsewhere. Mark all three edges so the tradeoff stays visible. For a specific HST method, use its own cutting instructions: our four-at-a-time guide explains why that method places bias around the completed units.
Keep the tool's instructions with the cutting plan
Grain placement can also matter while a cutter is making the shape. AccuQuilt's GO! user manual gives lengthwise-grain guidance for fabric placed on its dies, and recommends testing a cut before making many shapes. Follow the instructions for the actual die and cutter you use.
That manufacturer instruction concerns the cutting tool as well as the resulting patch. A rotary-cutting diagram and a die's loading direction describe different parts of the process; don't transfer one tool's setup blindly to another.
Before the next batch, mark the lengthwise direction, trace the pattern's cut shape, and label each edge. Check the grain arrow, print direction and quantity together. Keep the chosen map beside the fabric so every repeated cut follows the plan you meant to make.
Related posts
How to Choose Quilt Batting Loft for the Texture You Want
Compare flatter and puffier batting with a four-sample plan that keeps fabric and thread steady while you change quilting density.
Batting Quilting Distance Planning: How Far Apart Can You Quilt?
Your batting's package sets the limit, from 4 inches to 10. Check the widest gap between your quilting lines against it, with a worked 12-inch example.
Why Is Your Rotary Cutter Skipping Threads?
Stop adding pressure. Use the cutter's exact instructions and a short scrap-check record to decide whether the blade, assembly or cutting surface needs attention.