


Freezer Paper Foundation Paper Piecing or Sew-Through?

Freezer paper foundation paper piecing lets you fold the paper away and stitch beside its edge; sew-through foundation piecing puts the needle through the printed line and the fabric. Choose sew-through when following a visible stitch line is the help you want. Choose folded freezer paper when you prefer removing an intact foundation and may want to reuse it.
Both methods still require accurate printing, fabric placement, seam allowances and pressing. Freezer paper changes how the foundation is held and where you stitch. It doesn't make those checks disappear.
The difference happens at the seam
Kimberlee Tanner's On Williams Street lesson explains the folded method: adhere the first fabric to the coated side, fold on the next line, add the next piece, sew alongside the fold, then open and press. The paper is peeled away before sections are joined.
For the sew-through comparison, Carol Doak's own illustrated instructions put the printed side up and stitch on its line. Her foundation supports the fabric while the seam is made. Use the machine and material settings appropriate to your chosen foundation rather than copying one stitch length into every method.
| Decision | Sew-through foundation | Folded freezer paper |
|---|---|---|
| Needle path | Through paper and fabric | Beside the folded paper |
| Main reference | Printed stitch line | Accurate crease and folded edge |
| Removal | Paper is removed from stitching | Foundation peels away intact if undamaged |
| Repetition | Usually another foundation for another unit | Reuse depends on condition and remaining adhesion |
Neither workflow is English paper piecing, where fabric is wrapped around shapes. Our EPP and FPP comparison covers that separate choice.
Compare one deliberately simple unit
Use a 6-inch finished square divided into three equal vertical panels. Its two internal seam lines are 2 and 4 inches from the left finished edge. Add 1/4 inch around the outside, making a 6 1/2-inch loose unit after final trimming.
We drew this unit to compare the two workflows and haven't sewn it. You could piece three simple panels conventionally; the uncomplicated geometry makes the foundation decision easier to see.
The finished panel areas are each 2 x 6 inches. Three of them fill the 6 x 6 square: 3 x 12 = 36 square inches. Those are visible areas, not a fabric cutting list. Each piece also needs its seam allowances and enough positioning room for the method.
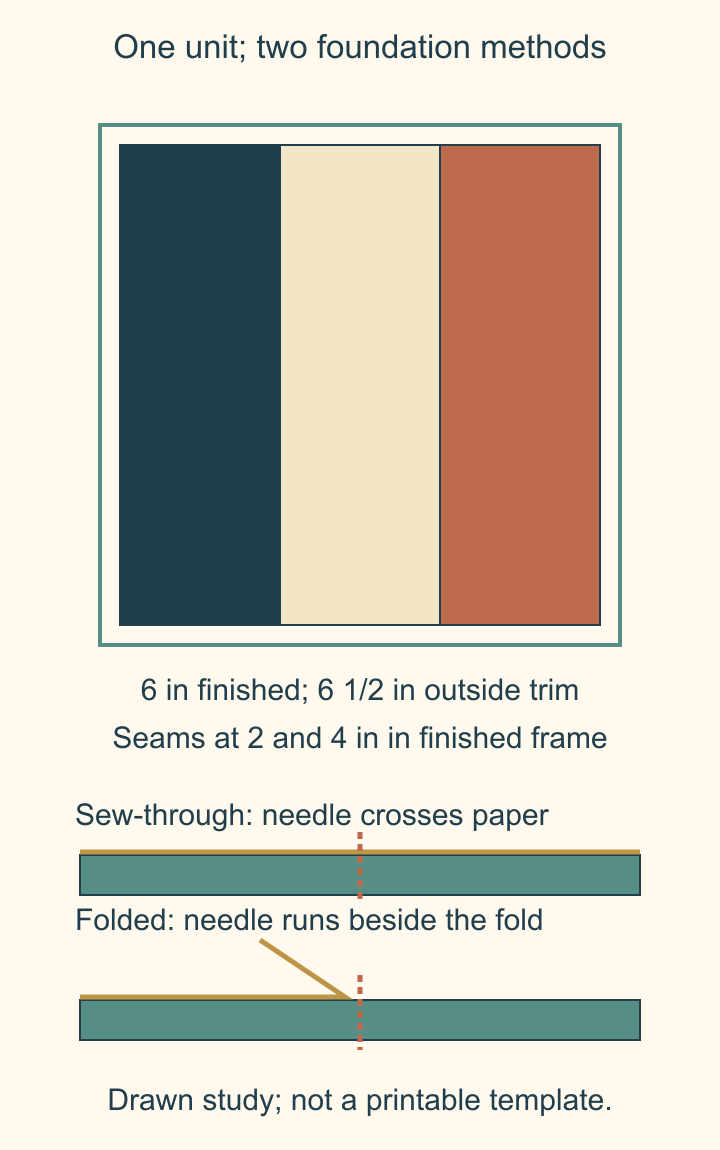
Start with two verified copies or tracings of that same geometry. Label one sew-through and one freezer paper. Keep the final fabric-facing view consistent; the printed foundation and the front of the block can be mirror images. Our foundation-pattern reading guide explains which view you're looking at.
Work through the folded version
Joanne Kerton's Canuck Quilter tutorial shows the repeating sequence in detail. Pre-crease the foundation's sewing lines. Press the first fabric onto the coated side, then fold back at the next seam. Trim the allowance from that fold, position the next piece right sides together, and stitch close beside the fold without catching the paper. Open and press before the next seam.
On the three-panel study, that sequence happens twice. A crease that wanders away from the intended 2-inch division changes the panel width. Check the fold against the line before adding the second piece; don't wait until the final square-up to discover the shift.
If the next fabric doesn't cover its full area when opened, reposition or replace it before sewing. The fabric-coverage guide owns that placement problem; a larger foundation doesn't automatically correct a misplaced scrap.
Plan sixteen repeats without promising template life
Sixteen of these units require 32 internal joining seams under either method: two seams per unit times sixteen. Reusing paper reduces paper preparation, not the number of fabric seams.
For a sew-through plan, prepare sixteen foundations and check their scale. For a freezer-paper estimate, suppose your own trial shows that each foundation remains accurate and adhesive for four complete units. Then 16 / 4 = 4 foundations would cover the project. If it lasts for only two, you need eight. If it stops holding during the first unit, replace it instead of continuing to meet the estimate.
Write the actual number of successful uses on the template after each unit. Replace it when a crease tears, a line becomes hard to follow or the paper no longer holds fabric in position. A reused template is useful only while it preserves the reference you need.
Check the paper and the printer separately
Kerton describes an inkjet workflow for her freezer paper. That isn't permission to feed every coated household paper through every printer. Check both the paper package and the printer's approved media instructions. Tracing is an alternative when the materials aren't approved for direct printing.
Measure a known scale mark after printing or tracing, and check both directions. Keep a verified master for comparison as foundations are reused. Changing paper type halfway through a project deserves another scale and handling check.
Choose one small unit and try the two seam references before preparing a large batch. If sewing on a printed line feels more dependable, keep sew-through. If an accurately folded edge works well and intact removal helps your project, keep freezer paper. Record that result beside the master rather than choosing solely by how many copies you hope to save.
Related posts
Pinked Edges on Precuts: Where to Measure the Seam
Peaks or valleys? Compare Moda and C&T guidance, then use a three-strip check to choose a consistent seam reference for your actual precuts.
Wonky Log Cabin Quilt Blocks That Trim to One Size
Keep the irregular strips and still make blocks that fit. Plan an 8-inch finished block, check the trimming square and protect the outer seams.

How to Chain Piece Quilt Rows in Layout Order
Keep a settled quilt layout in order with labeled row stacks, a checked pickup route and a three-row assembly example.