


Four at a Time Half Square Triangles Without Stretched Edges
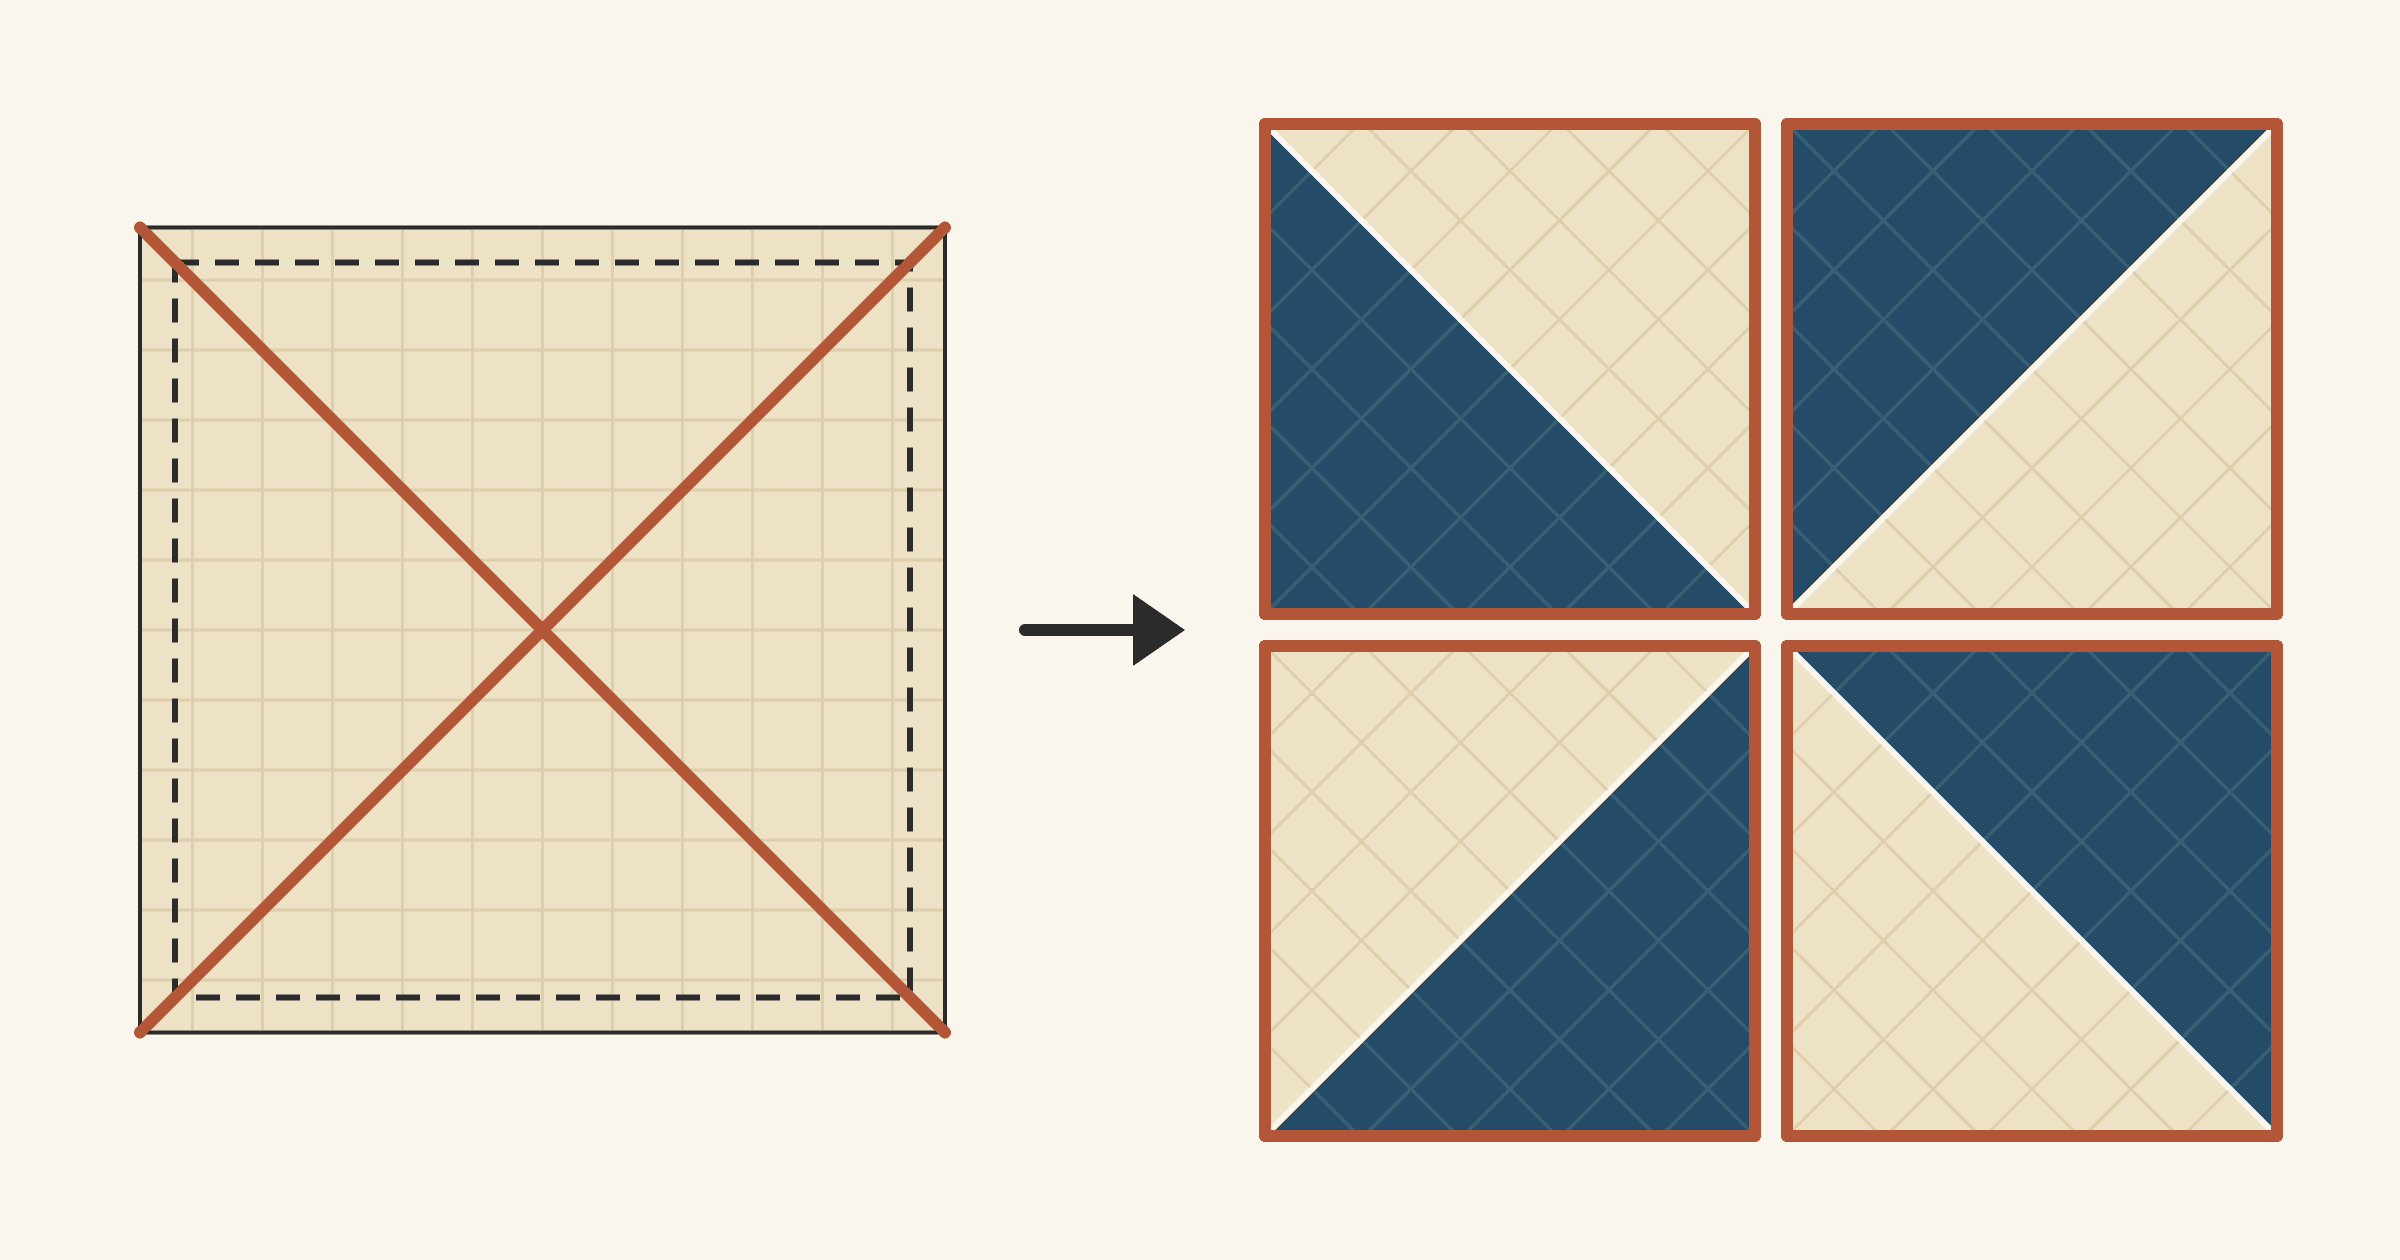
To make four at a time half square triangles, put two squares right sides together, sew 1/4 inch in from all four edges, and cut both diagonals. Each starting square is usually the unfinished HST size divided by 0.64, rounded up. That's the rule Leslie gives at The Seasoned Homemaker and Monika uses at Penny Spool Quilts. The catch is the grain. The seam sits on the straight grain, so all four outside edges of every unit are bias.
That's manageable with a plan. Starch before you cut, add 1/4 inch to the starting square for trimming room, and press without sliding the iron. Where the HSTs will form the outer edge of a quilt with no border, make those units from a rectangle instead, so the quilt's edge stays on the grain. The examples below use 3-inch finished HSTs, trimmed to 3 1/2 inches before they go into the quilt.
Where the bias ends up in a four-at-a-time unit
Woven cotton has lengthwise and crosswise threads. An edge cut along either one is on the straight grain. An edge cut at 45 degrees to them is on the bias. Jennifer Houlden at QUILTsocial explains why that matters: bias-cut fabric is very stretchy, and stretched pieces leave blocks misshapen and quilts out of square.
You cut the two starting squares on the grain. The perimeter seam then runs along four straight-grain edges, which makes it easy to sew. The bias appears when you cut the X. Each diagonal cut crosses the threads at 45 degrees, and those cuts become the sides of the four units.
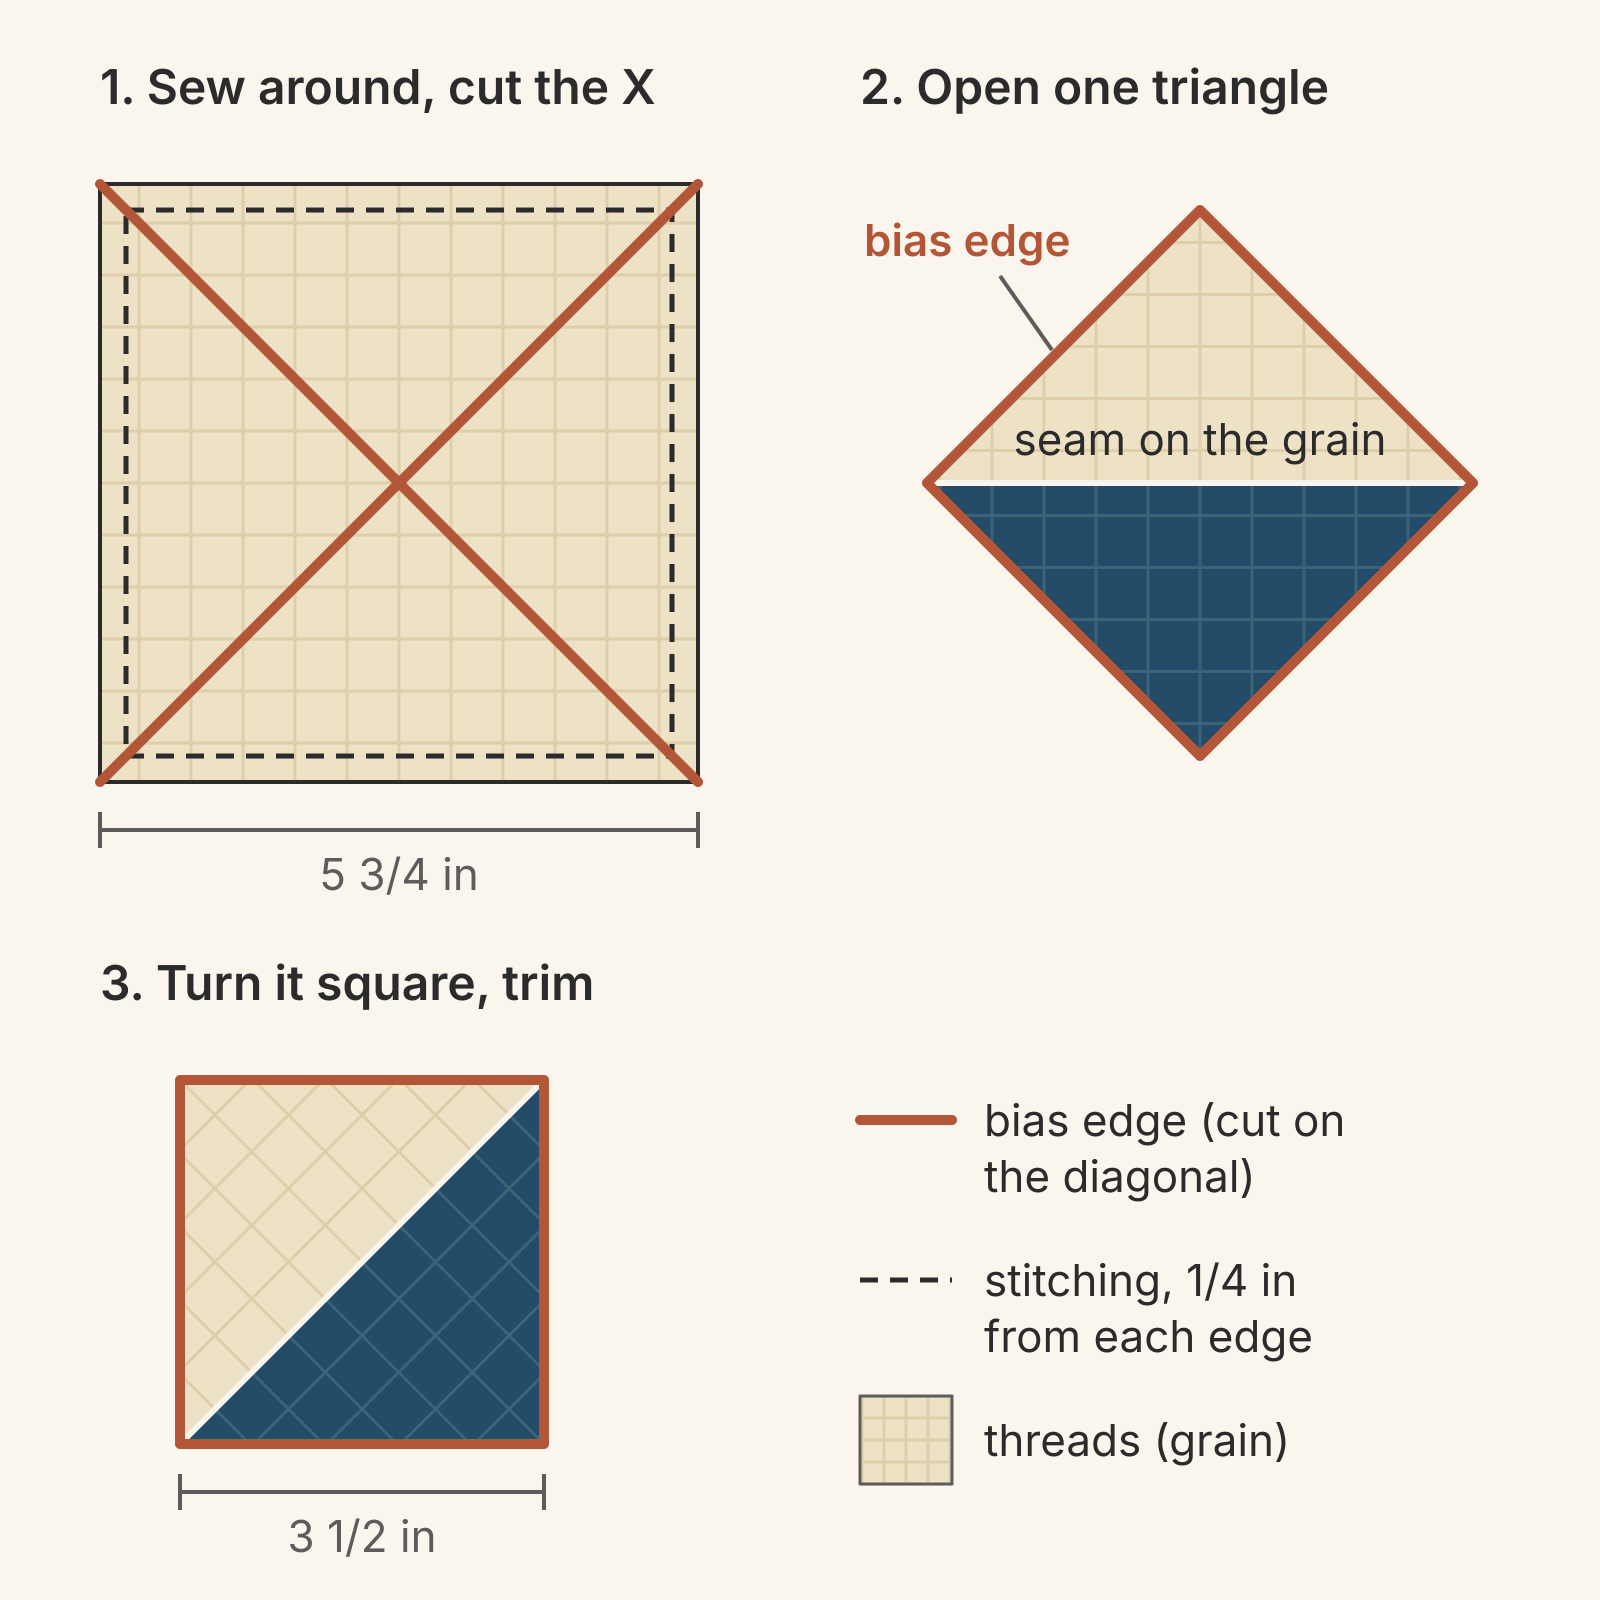
Turn a unit square, the way it sits in a block, and the threads run diagonally across it: parallel to the seam and at right angles to it. Becky Jorgensen at Patchwork Posse gives the practical warning: if you stretch these edges when you press, move or sew them, you could run into issues.
The diagonal grain has a design side effect too. A stripe that ran parallel to an edge of the starting square now crosses each unit on the diagonal. In two of the four units it runs along the seam, and in the other two it runs across it. If you're using a stripe or a one-way print, make one sample batch and look at it before you cut the rest.
How four at a time compares with other HST methods
Most HST methods put the bias in the seam. Four at a time puts it on the outside.
| Method | Seam runs on | Unit edges run on | Units per pair |
|---|---|---|---|
| Two at a time | Bias | Straight grain | 2 |
| Four at a time | Straight grain | Bias | 4 |
| Four from a rectangle | Bias | Straight grain | 4 |
| Eight at a time | Bias | Straight grain | 8 |
With two at a time and eight at a time, you stitch beside a drawn diagonal. The bias is held in the seam, and the unit edges come from straight cuts. Monika makes the same comparison: eight at a time "doesn't have the bias edge issues that the four-at-a-time method has." Our guides to two-at-a-time HSTs and eight-at-a-time HSTs cover their starting squares.
So why choose four at a time? Leslie points out that it needs no marking: you sew around the edge and cut. And one pair of squares makes four matching units, a handy batch when your counts come in fours.
Size the starting squares with room to trim
Divide the unfinished size by 0.64 and round up. Monika rounds up to the next 1/4 inch and suggests adding another 1/4 inch if you want room to trim wonky blocks. With bias edges, take that extra 1/4 inch. Trimming is where you square up a unit that shifted during pressing, and a unit cut to the bare minimum has nothing left to trim. Leslie leans generous too: for 3-inch unfinished HSTs, she cuts 5-inch squares rather than 4 3/4.
| Finished HST (in) | Trim to (in) | Divide by 0.64, round up (in) | Our cut, plus 1/4 (in) |
|---|---|---|---|
| 2 | 2 1/2 | 4 | 4 1/4 |
| 2 1/2 | 3 | 4 3/4 | 5 |
| 3 | 3 1/2 | 5 1/2 | 5 3/4 |
| 3 1/2 | 4 | 6 1/4 | 6 1/2 |
| 4 | 4 1/2 | 7 1/4 | 7 1/2 |
| 5 | 5 1/2 | 8 3/4 | 9 |
| 6 | 6 1/2 | 10 1/4 | 10 1/2 |
Here's the math behind 0.64. On paper, an opened unit measures the starting square minus 1/2 inch, divided by 1.414. Work backward, and the smallest square that gives a 3 1/2-inch unit is 3 1/2 times 1.414, plus 1/2 inch: 5.45 inches. Dividing 3 1/2 by 0.64 gives 5.47, a hair more. For small units the shortcut runs short. At 2 inches finished it rounds to 4 inches, against a minimum of 4.04. The extra 1/4 inch covers that gap.
For the 3-inch finished HSTs in this post, that 5.47 rounds up to 5 1/2 inches. On paper, a 5 1/2-inch pair makes units about 3.54 inches across. That's about 1/32 inch over the trim size, before thread and the fold at the seam take their share. A 5 3/4-inch pair makes units just over 3 11/16 inches, which leaves a little over 3/16 inch to trim.
Cut one pair, sew it and measure before you cut the rest. Becky gives the same advice: try one set before cutting a whole bunch of squares.
Handle the bias at each step
- Starch before you cut. Leslie calls starch the step not to skip with this method, because every unit is cut across the bias. She starches before cutting the starting squares, so any shrinking happens before you measure, and lets at least two layers dry fully. To choose a spray, see starch vs sizing for bias edges.
- Sew, then set the seam. Stitch 1/4 inch from all four edges; Leslie uses a scant 1/4 inch and pins the center to keep the layers from shifting. She presses to set the seam before any cutting.
- Cut the X without moving the fabric. Monika lifts only the ruler between the two diagonal cuts. Leslie turns a rotating mat instead. Either way, the pieces stay put until both cuts are done.
- Press by lifting the iron. Open each unit gently and finger press the seam. Then, as Monika puts it, lift the iron up and down only: don't slide it around or push the top triangle over the seam.
- Trim to size. Put the ruler's 45-degree line on the seam and trim all four sides to 3 1/2 inches. Trimming squares the unit, but the new edges are still bias, because each cut runs parallel to the old edge. See how to trim HSTs in two passes for where the ruler goes each time.
- Pin when you join units. Jennifer Houlden's advice for bias pieces applies here: handle them as little as possible, don't stretch or pull them as you sew, and pin them so they keep their shape.
Inside the quilt, every bias edge ends up in a seam with a neighbor. The edges that stay loose longest are the ones on the outside of the top.
Plan the outer edge before you cut
If the HSTs run right to the binding, every unit in the outer row puts a bias edge on the quilt's edge, and each corner unit puts two. That edge gets the most handling before it's finished: measuring, basting, quilting and binding. You have two straightforward fixes.
Add a border. A border cut on the straight grain gives the quilt a new outer edge. Measure across the sewn center, away from the edges, and cut the strips to fit, so a stretched HST edge doesn't set the border length. How to prevent wavy quilt borders walks through that measuring.
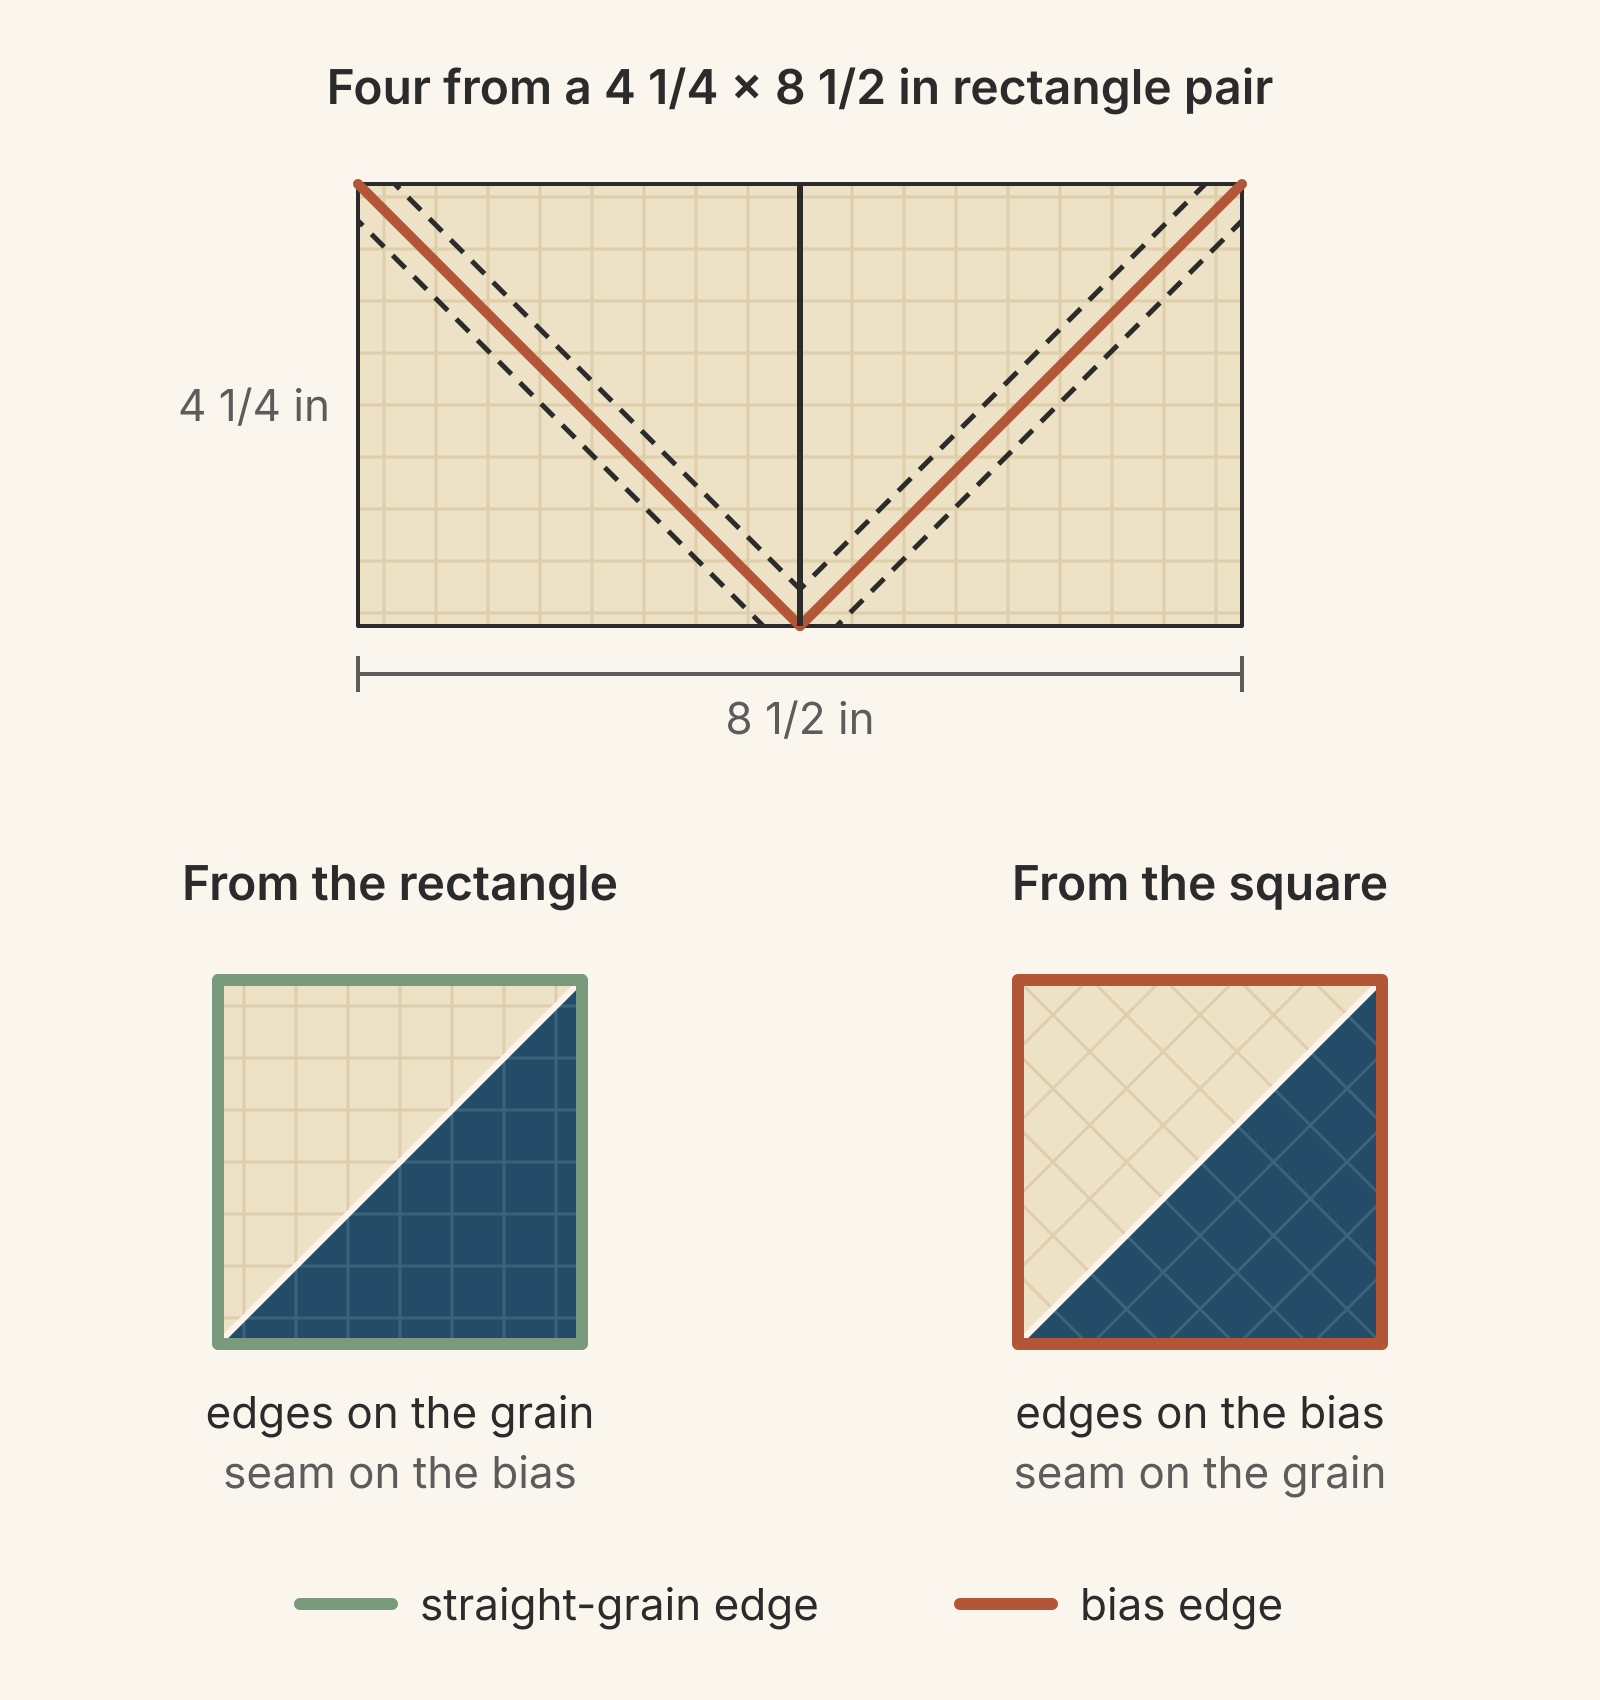
Make the edge units from a rectangle. Lynett Muhaso at Lyn's Avenue shows a four-at-a-time method that avoids bias edges. Cut two rectangles. The short side is the unfinished HST size plus 3/4 inch, and the long side is double that. Draw a line down the center and a diagonal across each half, sew 1/4 inch on both sides of each diagonal, then cut on every drawn line. In effect, it's two two-at-a-time squares side by side, so the seams are bias and the edges are straight grain.
For 3 1/2-inch units, that's 3 1/2 plus 3/4, or 4 1/4 inches, by 8 1/2 inches. On paper each half makes units about 3.9 inches across, so you'll have about 3/8 inch to trim. That's 1/4 inch roomier than the 4-inch squares in our two-at-a-time guide. We keep Lyn's size because the edge units set the quilt's outline, and the extra room lets you trim each one true. At that size the rectangle uses a little more fabric: 36 1/8 square inches of each fabric per four units, against 33 1/16 for a 5 3/4-inch square. That's about 9 percent more.
Worked example: a 24-inch center of 64 HSTs
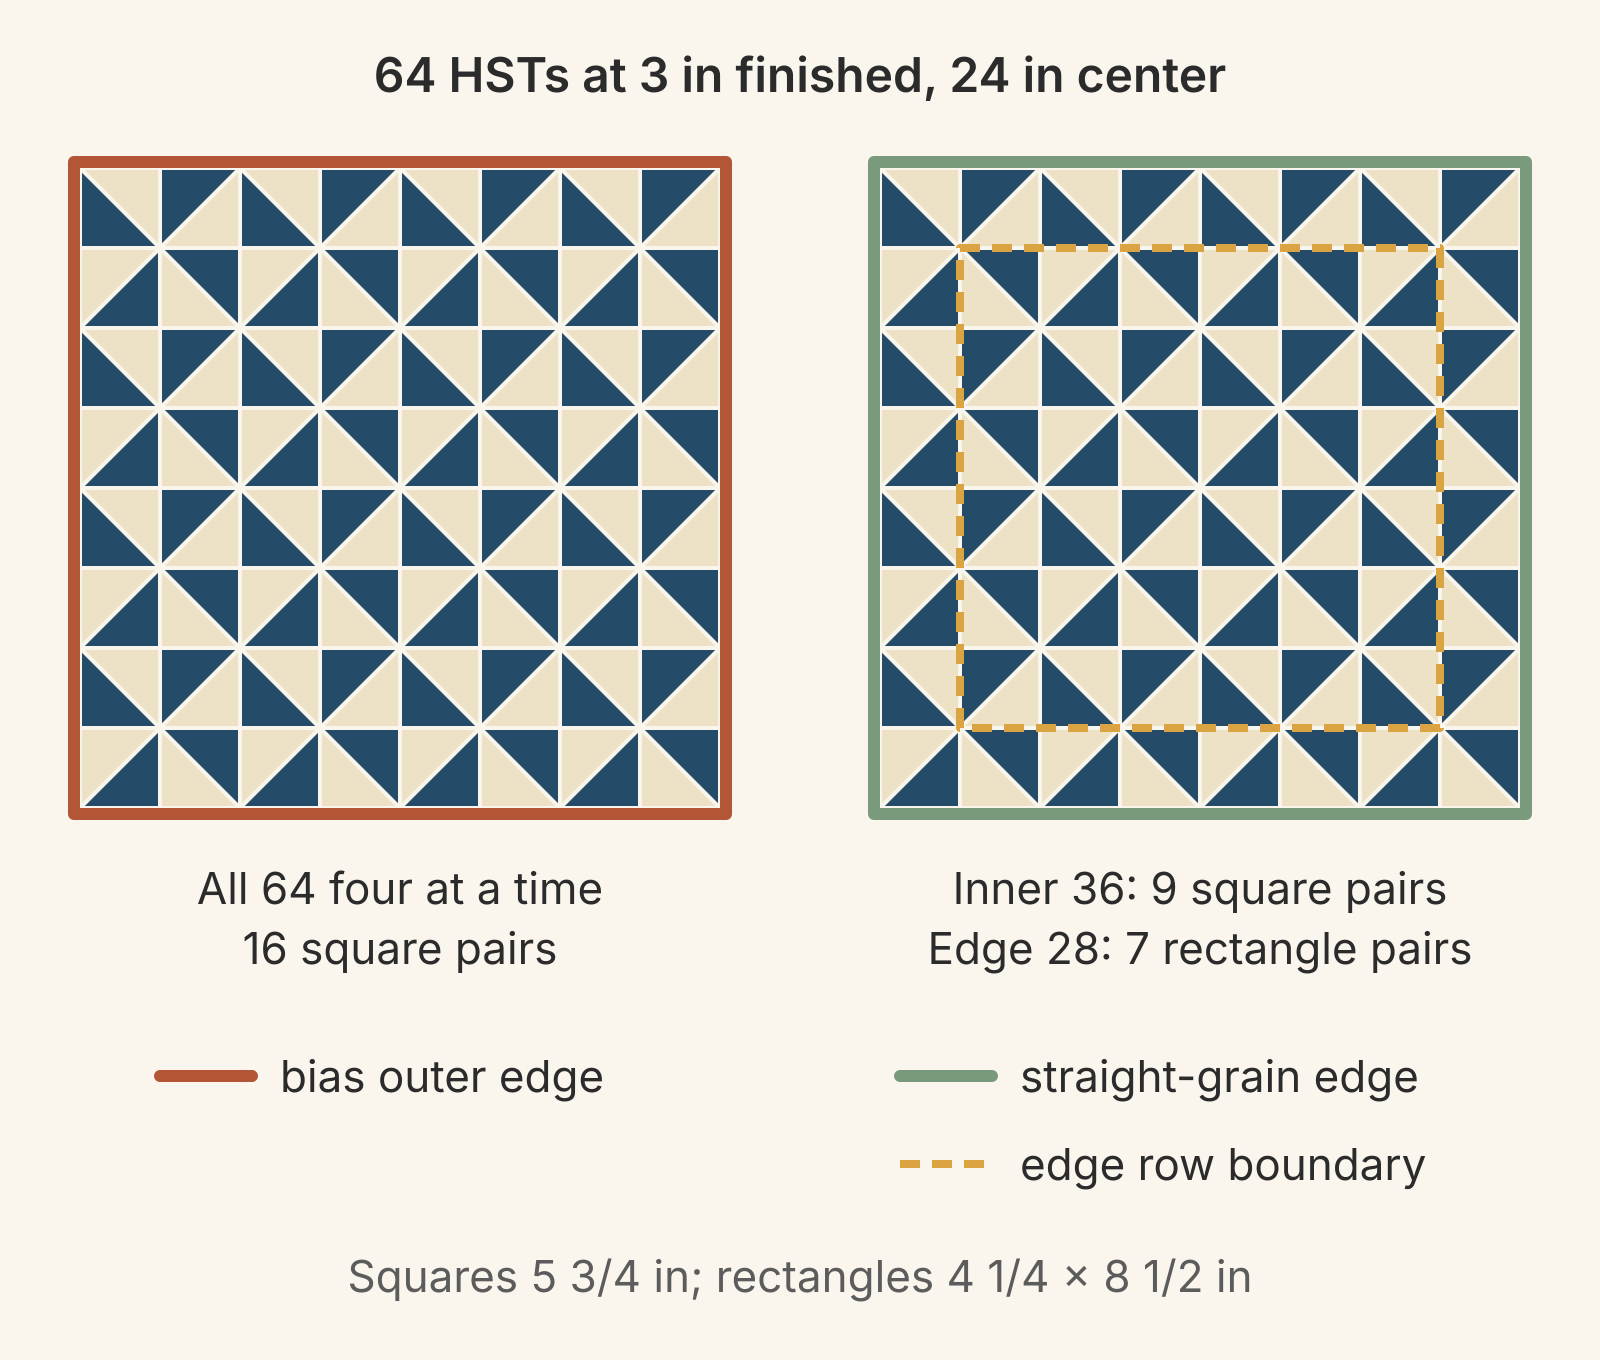
Picture an 8-by-8 grid of 3-inch finished HSTs set as pinwheels. That's a 24-inch center made of 64 units.
- With a border: make all 64 four at a time. Divide 64 by 4 to get 16 pairs, so cut 16 navy and 16 cream squares at 5 3/4 inches.
- With HSTs to the binding: the outer row holds 28 units (8 per side times 4, minus the 4 corners counted twice), and the inside holds 36 (6 by 6). Make the 36 inner units from 9 pairs of 5 3/4-inch squares. Make the 28 edge units from 7 pairs of 4 1/4 by 8 1/2-inch rectangles.
Both batches trim to 3 1/2 inches, so they join the same way. Once trimmed they look alike, so keep the rectangle units in their own labeled stack. Lay out the whole center before you sew any pinwheels: each edge block mixes the two kinds.
Next step: count edge units before you cut
Before you cut a single starting square, decide whether a border goes on. Then count your units by where they sit: outer row or inside. That count tells you how many square pairs and how many rectangle pairs to cut. Sew one test pair of each to check that the extra 1/4 inch is enough for your seam.
QuiltLab can show you the layout before you count. Draw the HST as a block in the Block Editor, then place it in a Grid quilt in the Quilt Editor set to 8 columns, 8 rows and 3-inch blocks. Select a placed HST and press R to turn it a quarter turn at a time until the pinwheels spin. The Layout section shows the finished size, and Add border under Borders shows what a border adds. The Quilt Editor won't work out starting squares or a cutting list for your layout. Keep the 5 3/4-inch and 4 1/4 by 8 1/2-inch cuts in your own notes. For more ways to turn the units once they're made, see half-square triangle quilt layouts.
Related posts

How to Design a Bargello Quilt: Plan the Wave on Paper
A bargello wave is a staircase of stepped columns. Number your strips, write one row per column, and see how column width turns a zigzag into a curve.

Borderless Quilt Design: Plan an Edge That Looks Finished
With no border, the outer blocks and the binding make the edge. Compare whole and halved motifs on one 48 x 60 inch quilt, then pick the binding color.

Crosshatch Quilting: How to Make the Lines Meet at the Edges
Space a 45-degree crosshatch so the lines meet in a V at every edge and corner. Choose the edge step first, mark dots around the quilt, then connect them.