


How to Cut Fabric for Foundation Paper Piecing
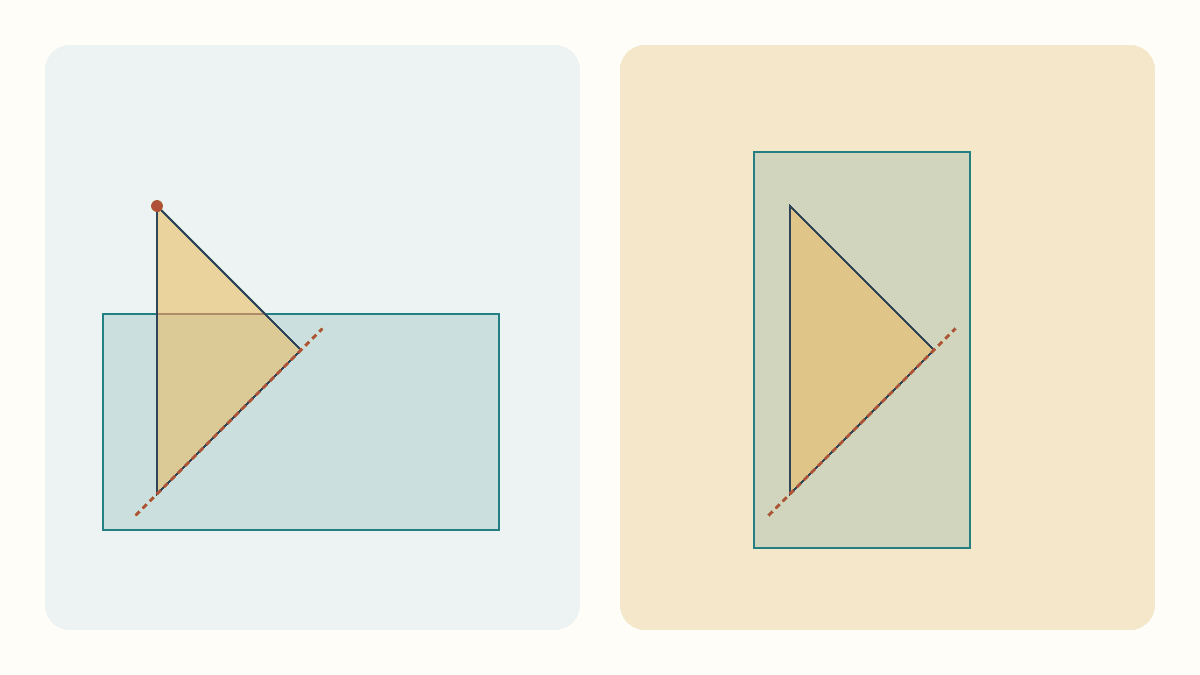
Cut foundation-paper-piecing fabric large enough to cover its section after it opens, including the seam allowances. Follow the pattern's cutting directions when supplied. Otherwise, start generously, pin at the intended stitching line and open the piece to check it before sewing. Antony Perring's FPP instructions call for at least a quarter inch around the whole section.
The tricky part is placement. A piece can look large against the flat paper, yet miss a long tip when it folds around an angled seam. Another piece can cover the numbered shape but leave too little fabric for its next join. Check those two failures separately.
Find the hinge before choosing a scrap
Identify the seam that adds the next piece. That stitching line is the hinge around which the fabric opens. It is different from a raw edge sitting a quarter inch away.
Work on the blank side of the foundation with the existing fabric in place. The new fabric will lie right sides together with it before sewing, then open into the next area. You need enough fabric in that opened position, not merely enough material somewhere near the printed shape.
If the numbers and outer lines are still confusing, start with our guide to reading an FPP pattern. Here, we already know which line to sew and will concentrate on whether the next piece reaches its destination.
The American Quilter's Society lesson recommends checking against light and pinning the sewing line to preview the next piece when coverage is uncertain. That temporary hinge gives you a useful answer before a short seam needs unpicking.
Compare two placements of one rectangle
Our example section is a long triangle. Put its lower-left vertex at zero. Its upper-left tip is four inches above that point; the third vertex is two inches right and two inches up. The adding seam runs diagonally from the lower-left vertex to that third point.
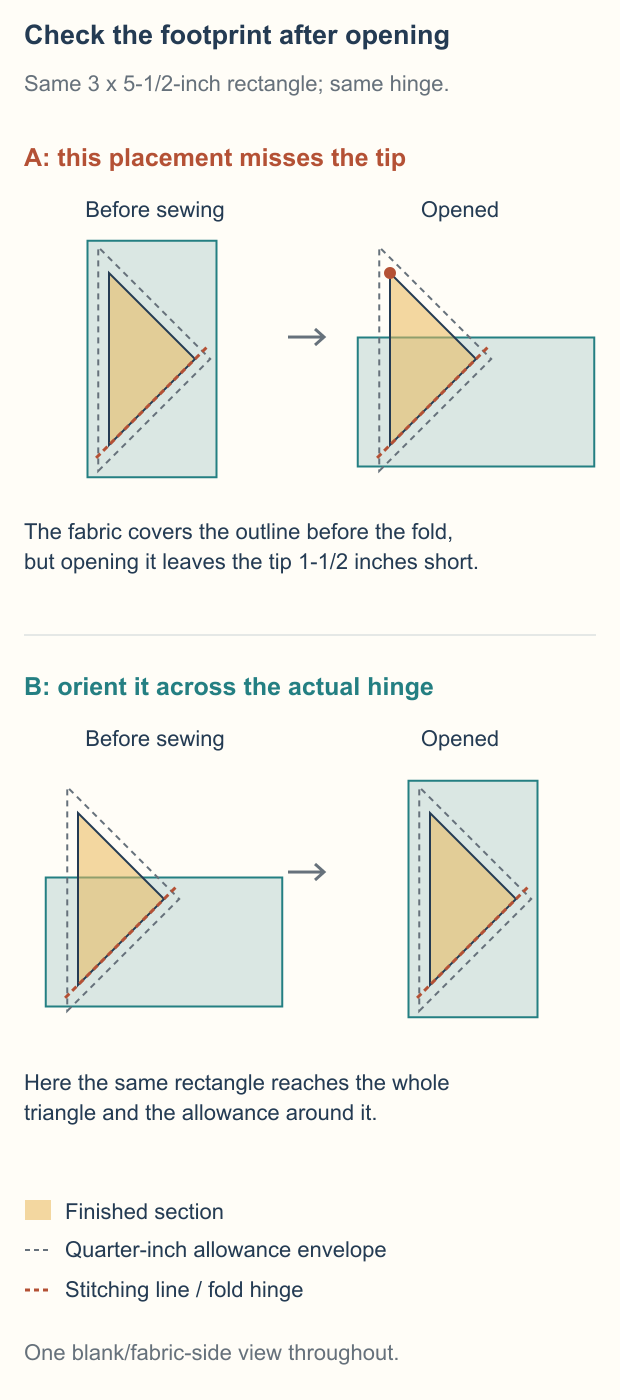
The triangle is 4 inches high and 2 inches wide, with 4 square inches of finished area. The dashed outline in the drawings sits a quarter inch outside each edge, measured perpendicular to the edge. At an angled corner, that outline extends farther than a quarter inch in a horizontal or vertical direction.
We drew these flat coverage studies and haven't sewn them. They are diagnostic examples; use your pattern's cut sizes, allowances and sewing sequence for the actual project.
First try a rectangle measuring 3 x 5-1/2 inches. Its area is 16-1/2 square inches, much greater than the triangle's area. That sounds ample, but area alone cannot decide which part will be covered.
A: the flat placement looks generous
In placement A, the long rectangle stands upright before sewing. It covers the drawn triangle at that moment. It crosses the intended diagonal seam too, so looking only at that overlap doesn't expose the problem.
Opening it around the diagonal makes the long side run across the drawing. Its upper edge now reaches only 2-1/2 inches above zero. The triangle's tip reaches four inches, leaving the tip 1-1/2 inches short of fabric.
You cannot fix that gap by trimming the finished section smaller or moving its sewing line. The paper still describes the same triangle. Change the fabric placement or choose another piece before stitching.
B: the same rectangle follows the hinge
In placement B, put the same rectangle across the seam in the other orientation. After it opens, its long side reaches up the triangle. This position covers the entire finished shape and the quarter-inch allowance envelope.
The two candidates use the same amount of fabric. Their difference is where that fabric lands after opening around the actual line.
Check the allowance after the outline fits
Now consider candidate C. It reaches all three vertices and covers the gold triangle. A quick check of the numbered region would accept it.
Look at its left edge. Only 1/8 inch of fabric extends past the finished section there. This example needs 1/4 inch, so half the required allowance is missing along that edge. The uncovered part is easy to overlook when attention stays on the pointed end.
Keep the finished outline and the allowance outline visible together. Reaching the finished shape is the first checkpoint; reaching the complete required allowance is the second. Include edges that will join another piece later, as well as the section's outside edges.
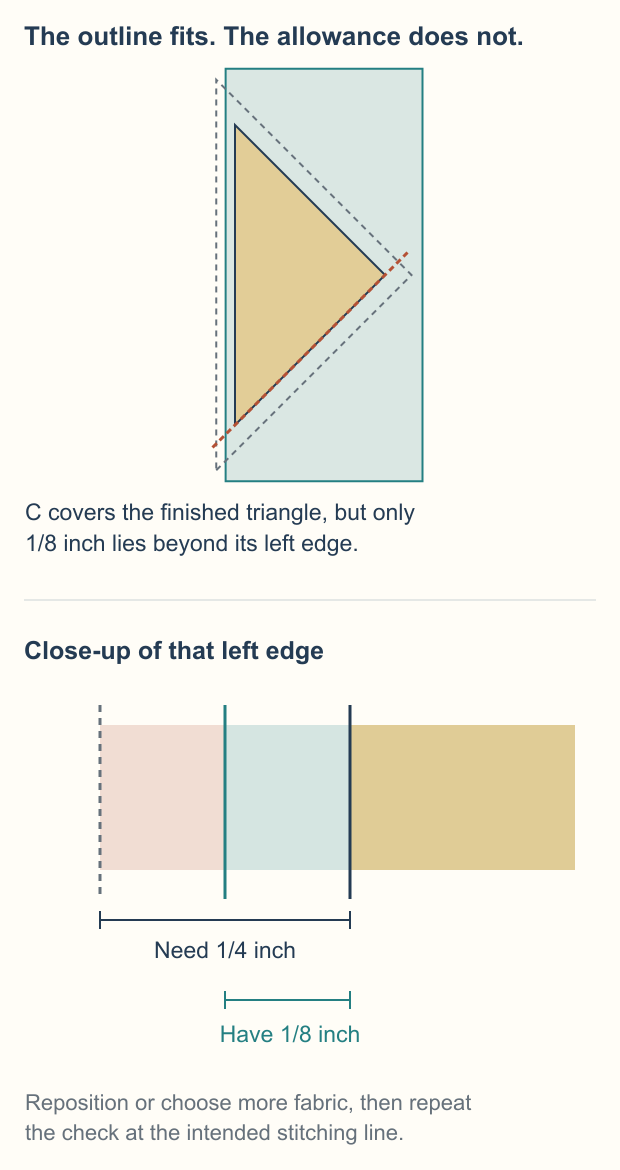
A shift may solve a small margin problem, but recheck the whole piece after moving it. Gaining fabric at the left can take fabric away from a far corner. If no position covers both shape and allowances, use a larger piece.
Make the physical check repeatable
Ships & Violins' written FPP lesson shows pinning through the sewline to simulate stitching, opening the new fabric and checking the section plus its allowance. Its difficult-angle example also shows why one corner needs a separate look. Follow that check on your own foundation:
- Identify the next stitching line and prepare the existing seam allowance using your chosen method.
- Place the new fabric right sides together with the attached fabric. Keep it flat at the intended seam.
- Temporarily pin at the stitching line so the test turns around the same line the seam will use.
- Open the new piece and hold the work against a light source. Inspect the farthest tip, every corner and the allowance around each edge.
- If you reposition anything, repeat the opening check. Fold the fabric back into its sewing position and remove the checking pin before stitching.
- After sewing, follow the method's trim and press sequence, then inspect the opened piece again before adding the next one.
Keep the paper from sliding during the check. A successful preview followed by a shifted seam placement describes two different positions. Smooth the piece fully open so a tucked fold doesn't distort the coverage check.
Save the useful placement, not a universal size
For a repeated section, note which edge met the prepared allowance and which way the fabric's long side lay. Keep a paper sketch beside the first completed section. That record is more useful than writing "large rectangle" on a bag of scraps.
Check the next piece even when it came from the same strip. A different position or an angled offcut can remove a corner that the first piece had. Directional prints add another check: look at their intended top in the opened position. Our directional-print guide explains keeping that mark with the piece.
Start with the most awkward section in the pattern you want to make. Audition one generous piece, hinge it at the stitching line and check the finished shape plus every allowance. Sew and press that one section before preparing a batch of matching cuts.
Related posts
Freezer Paper Foundation Paper Piecing or Sew-Through?
Compare sewing through a foundation with sewing beside folded freezer paper, using one simple unit and a realistic plan for sixteen repeats.
Pinked Edges on Precuts: Where to Measure the Seam
Peaks or valleys? Compare Moda and C&T guidance, then use a three-strip check to choose a consistent seam reference for your actual precuts.
Wonky Log Cabin Quilt Blocks That Trim to One Size
Keep the irregular strips and still make blocks that fit. Plan an 8-inch finished block, check the trimming square and protect the outer seams.