


How to Read a Foundation Paper Piecing Pattern: Which Line Is Which?
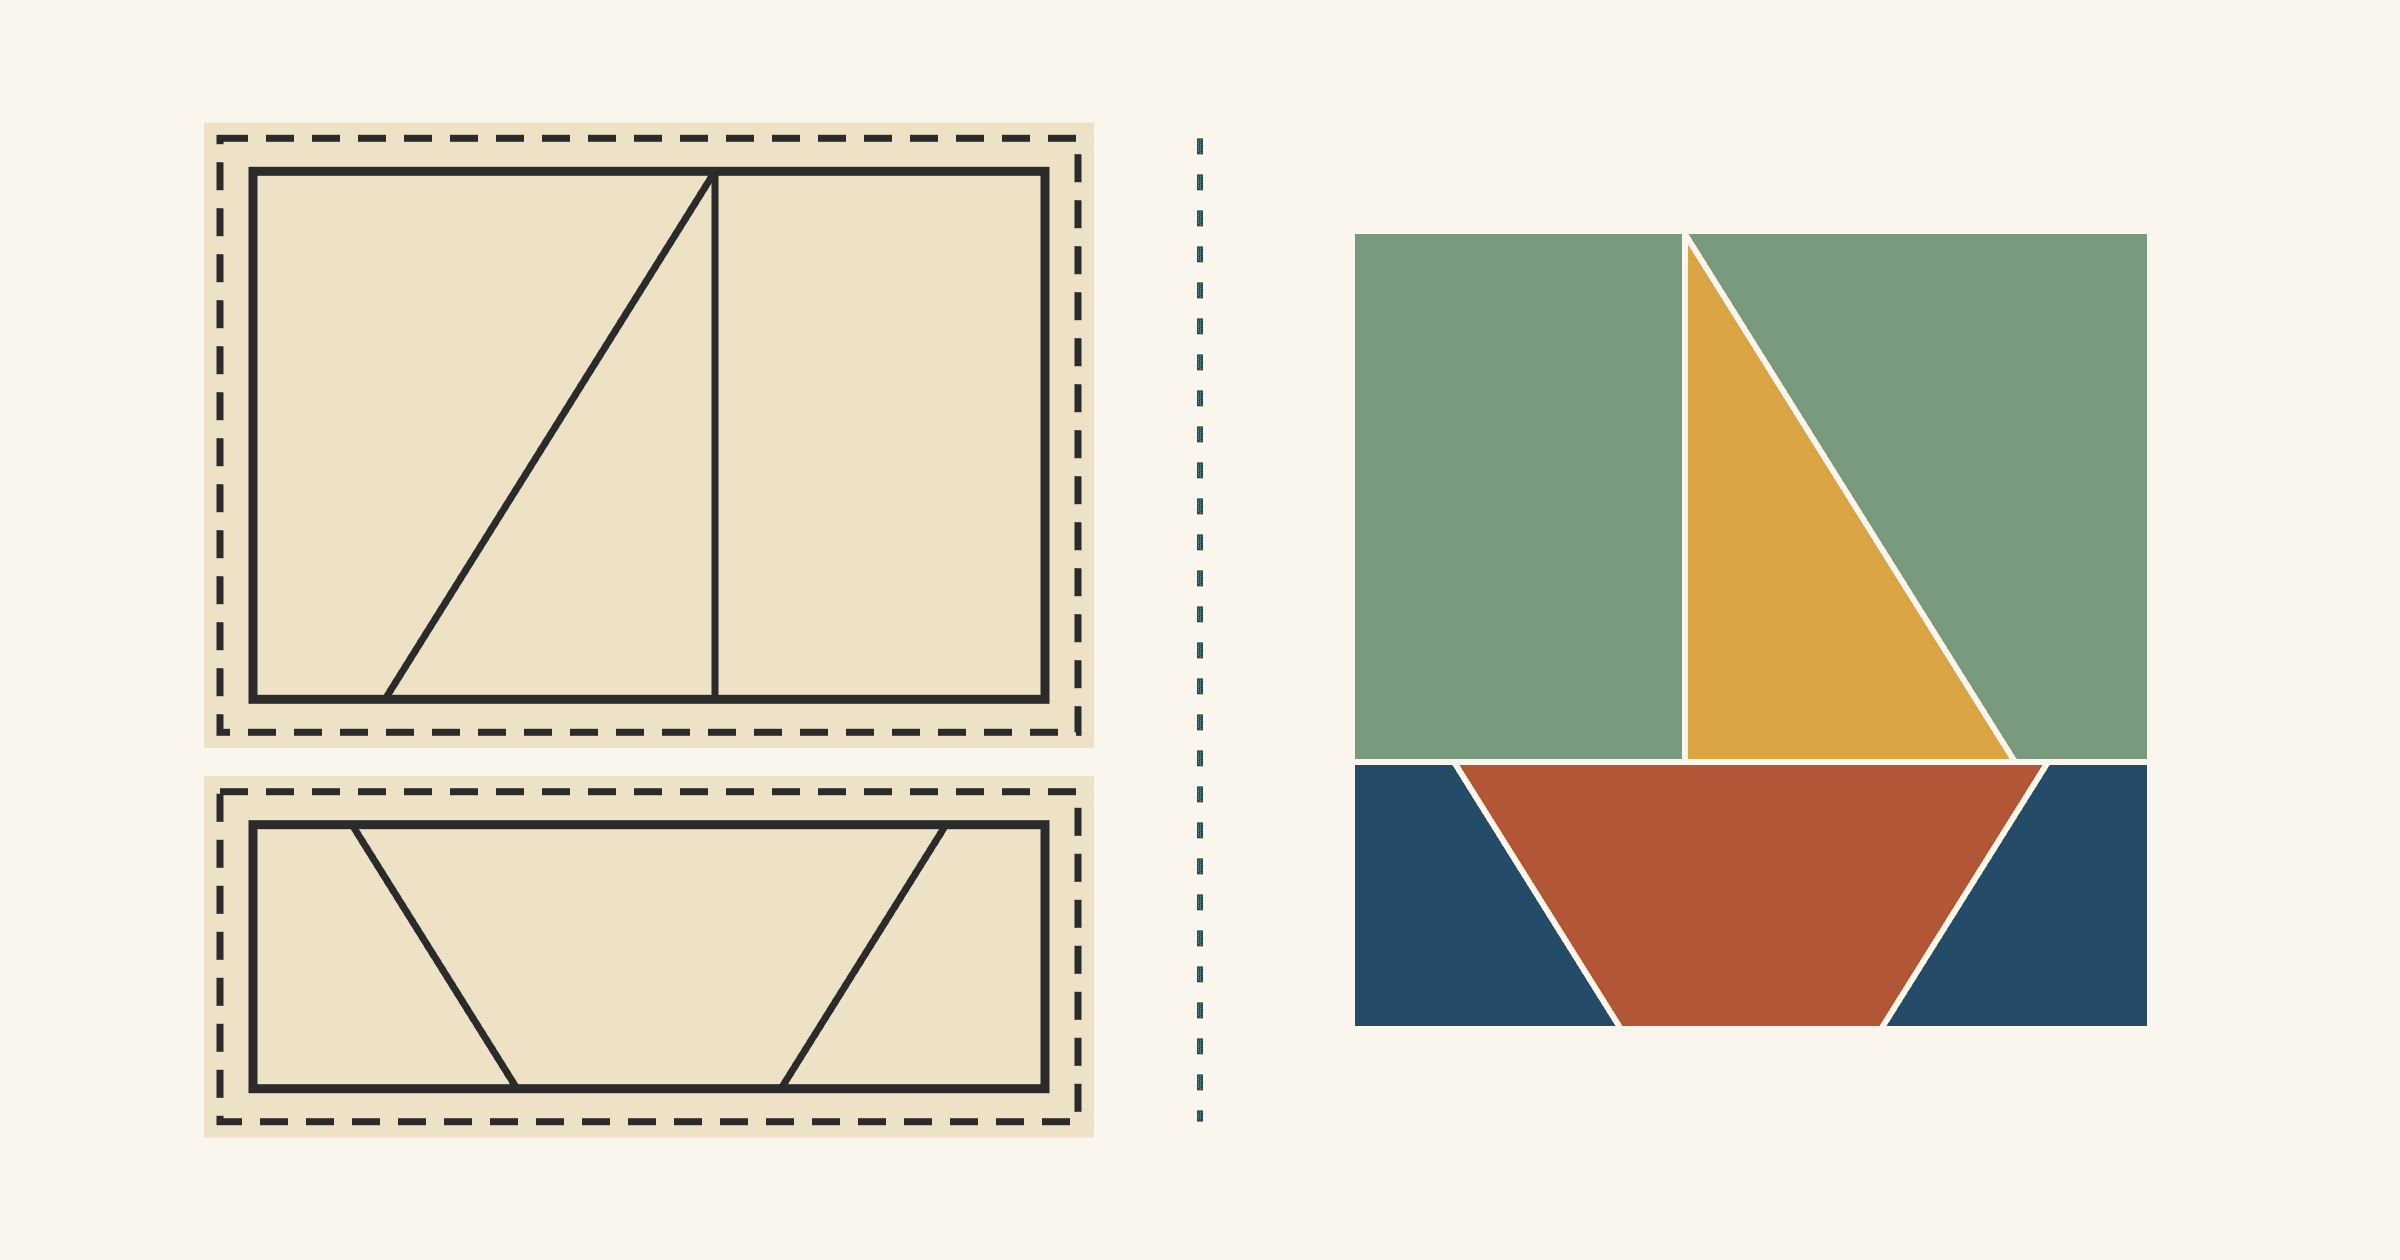
On a foundation paper piecing (FPP) pattern, the numbers give the order you add fabric and the lines inside each section are where you sew. The outer edge usually has two lines: a solid finished edge and a dashed trim line 1/4 in. outside it. Letters name the sections, which you sew one at a time and then join. That's the layout Monika Henry describes in Clover's foundation paper piecing tutorial. Line styles vary by designer, and some patterns leave off the 1/4 in., so go by the spacing: when two outer lines sit 1/4 in. apart, you trim on the outer one.
Read one whole section before you cut any fabric: its letter, its numbers, its inner lines, its outer lines, and which way the finished block will face. Below, we read the foundation for a 6 in. sailboat block made in two sections. We drew these diagrams for this article and haven't sewn them.
What do the letters and numbers mean?
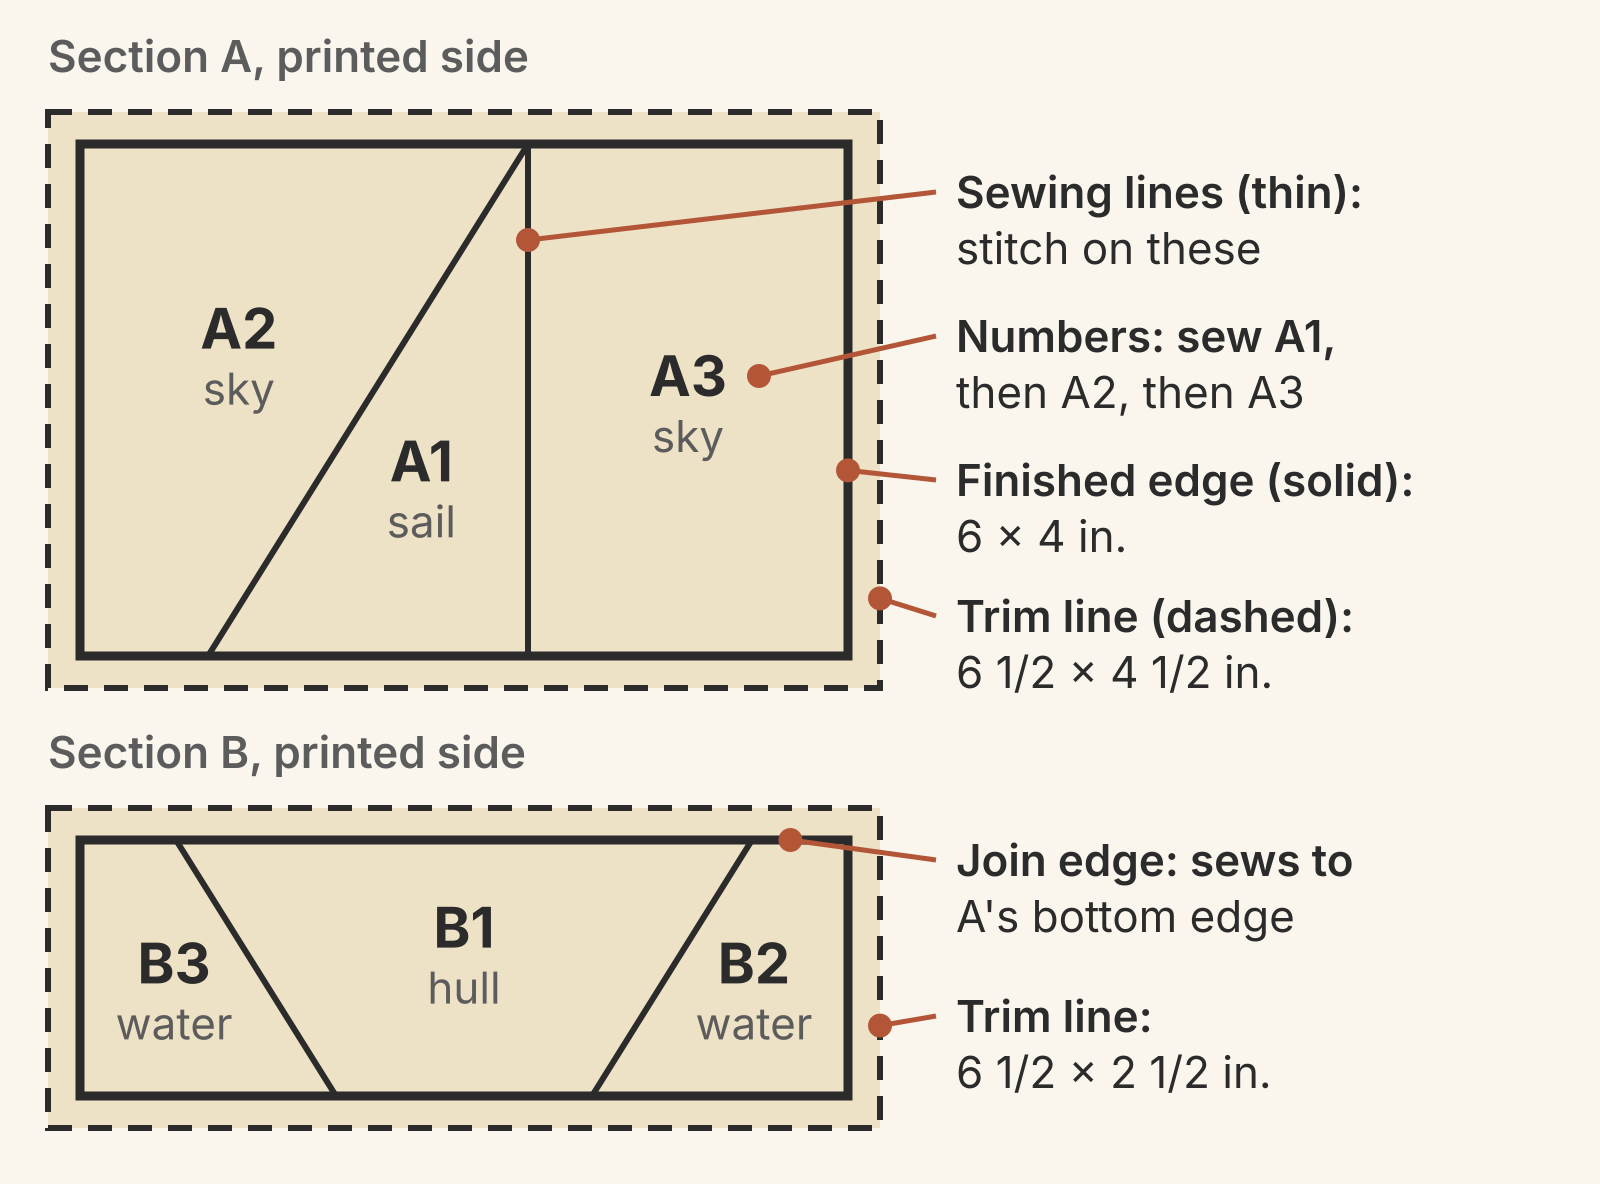
A label like A1 means section A, piece 1. Each number is one piece of fabric. You sew every piece in a section in number order, trim that section, and only then move on. Jennifer Fulton puts it simply in her foundation paper piecing lesson at The Inquiring Quilter: the foundation is numbered and you sew fabric in number order. When a block has sections, each one is pieced and trimmed before the sections are sewn together.
Some patterns also write a fabric name or color code in each space. Ours says sail, sky, hull and water. Match those words to your own fabrics before you start, and write your fabric choice beside each number if the pattern uses codes.
Here is how the sailboat foundation reads:
| Section | Finished size | Pieces in order | Sewing lines |
|---|---|---|---|
| A | 6 x 4 in. | A1 sail, A2 sky, A3 sky | 2 |
| B | 6 x 2 in. | B1 hull, B2 water, B3 water | 2 |
Which lines do you sew on?
Sew on the solid lines inside the section. Each one sits between two numbered spaces, and stitching it adds the higher number. The line between A1 and A2 is the seam that adds A2. The line between A1 and A3 (the mast, in our block) is the seam that adds A3.
You stitch with the printed side facing up and the fabric on the blank side underneath. So the lines you see are exactly where the needle goes. Start and stop a little past each end of the line, as Henry and Fulton both advise. Use a short stitch so the paper tears away easily later; Henry sets her machine to about 1.5.
Count the lines as a check. A section has one fewer sewing line than it has pieces, because every piece after the first is added by one seam. Section A has 3 pieces and 2 sewing lines, and so does section B. If your count doesn't match, check the pattern key before you sew.
Before each seam, hold the work up to a light. The American Quilter's Society blog has you confirm that the fabric covers its numbered area and reaches at least 1/4 in. past the sewing line into the next one.
The finished-edge line is a seam too. You just sew it later, when you join one section to another or the block to its neighbors.
Which line is the trim line?
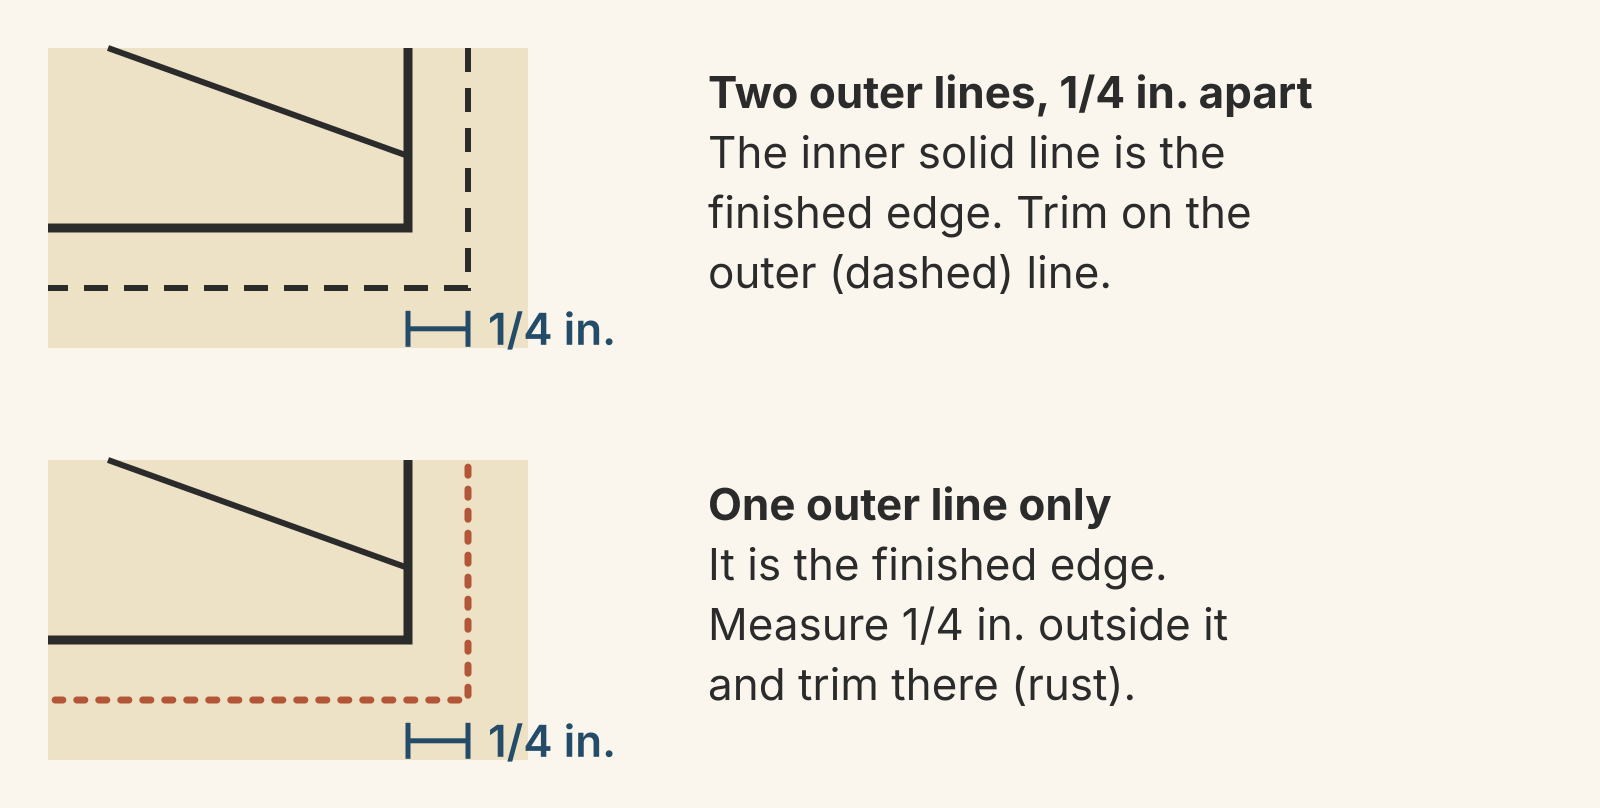
When the edge has two lines, the outer one is the trim line. It's usually dashed or dotted: Henry describes the solid lines as seam lines and the dashed line as the seam allowance around the template. Once every piece in a section is sewn, you trim the fabric, and any paper left outside the line, on that outer line.
For our block, section A measures 6 x 4 in. inside its finished edge and 6 1/2 x 4 1/2 in. to its dashed line. Section B measures 6 x 2 in. finished and 6 1/2 x 2 1/2 in. to the dashed line. Each dimension grows by 1/2 in. because the trim line sits 1/4 in. outside the finished edge on both sides.
Not every pattern prints that second line. The American Quilter's Society notes that a foundation may or may not have its seam allowances marked. When the allowance is included, you trim to the outer line. When it isn't, you trim 1/4 in. outside the marked edge.
For the most accurate trim on any pattern, lay a ruler's 1/4 in. line on the finished edge and cut along the ruler. Henry offers that as the alternative to following the dotted line. Fulton trims this way too: the solid line marks the section's outer edge, and you measure 1/4 in. from it.
So measure before you trim:
- Two outer lines 1/4 in. apart: the inner one is the finished edge and the outer one is the trim line, whatever their styles.
- One outer line: it's the finished edge. Lay a ruler's 1/4 in. mark on it and trim outside.
- Then compare with the section size the pattern gives, if it gives one. Our section A should be 6 1/2 x 4 1/2 in. after trimming.
Measure the printout itself, too. Henry sets the printer to Actual Size or 100% and checks that the pattern's test square is 1 in. on all sides. If that square is off, every section will be too.
The trims inside a section aren't printed at all. You fold the paper back along a sewing line and trim the fabric 1/4 in. past the fold. The American Quilter's Society steps do this right after each seam. Fulton folds along the next line before she adds the next piece, using an Add-A-Quarter ruler.
Why does the printed side look backward?
The printed foundation is a mirror image of the finished block. Henry explains why: the fabric is sewn to the back of the paper, so the pattern has to be printed reversed for the block to come out the right way. In our block, the sail points left on the paper and right on the fabric side. B2 sits on the right of the paper and on the left of the finished block.
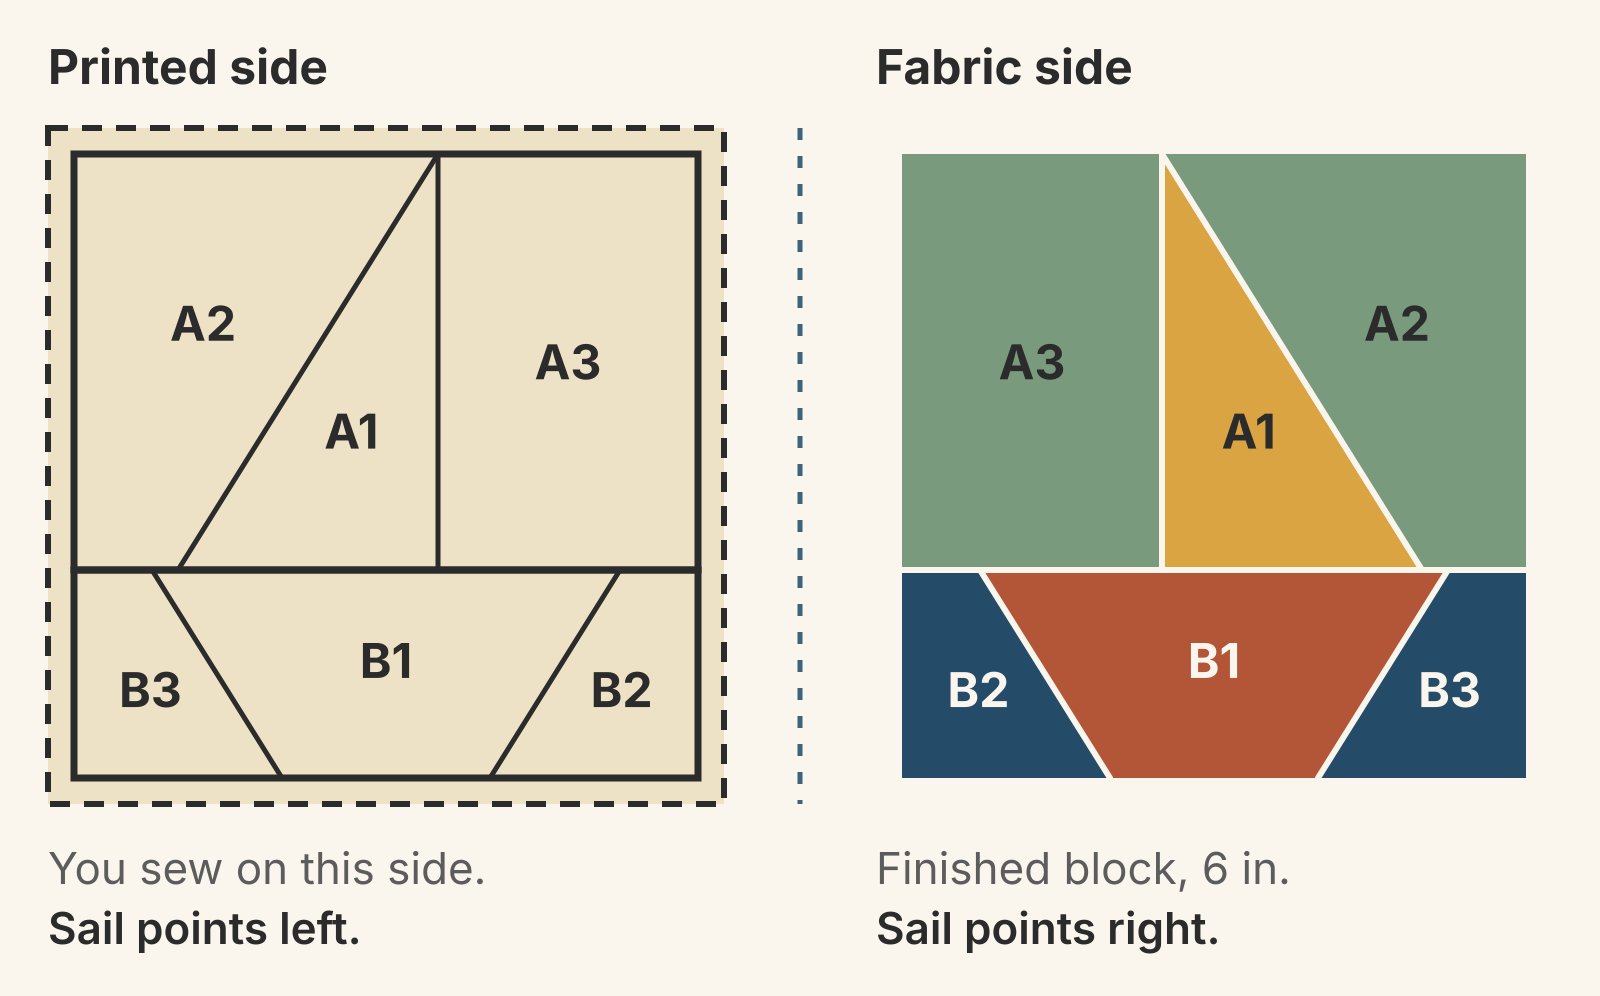
The reversal matters most with directional prints, lettering and any block that must face a set way in the quilt. Picture the fabric side when you place a stripe or a one-way print. Leave the printout as it is unless you want the whole block reversed. For one-way prints, our guide to keeping directional prints upright shows how to mark the top of each piece.
How do the sections join?
Join the trimmed sections in the order the pattern's assembly diagram or written steps give, as Clover's tutorial says. For our block, section A's bottom edge meets section B's top edge, the 6 in. join edge in the first diagram.
Place the two sections right sides together with their finished-edge lines on top of each other, pin, and sew on the line. Then turn the pair over and check that the stitching sits on the other section's line too. That's the check Henry makes in her tutorial.
The math confirms the block size. Section A is 4 1/2 in. tall trimmed and section B is 2 1/2 in. The 1/4 in. seam uses 1/2 in. between them:
4 1/2 + 2 1/2 - 1/2 = 6 1/2 in. unfinished, which is 6 in. finished once the block is sewn into a quilt. The width stays 6 1/2 in.
Patterns with more sections often join them in pairs before the final seam. Keep to the diagram's order, since it decides which seams cross which.
A reading checklist before you cut
- Print at 100% and measure the 1 in. test square.
- Find each section letter and the assembly order for joining them.
- In each section, read the numbers in order and note the fabric for each.
- Count the sewing lines: one fewer than the number of pieces.
- Measure the outer lines to find the trim line, or plan to add 1/4 in.
- Remember the printed side is reversed and picture directional fabrics on the finished side.
If the pattern also gives cutting sizes, yardage and a full quilt layout, our guide to reading a quilt pattern before cutting covers those pages. If you're still deciding whether a design calls for FPP at all, start with English vs foundation paper piecing.
Your next step
Pick one section of the pattern you want to make and mark it up before you cut fabric. Highlight the sewing lines, circle the line you'll trim on, and write the piece count beside the letter. Sew that one section, trim it, and measure it against the trimmed size before you sew the rest.
To try fabrics on the finished side first, draw the block's pieces in QuiltLab's Block Editor with the Polygon tool and give each one a fabric. QuiltLab doesn't make or number foundation papers, so print those from your pattern.
Block Editor guide →Draw block pieces, assign fabrics and save the blockRelated posts

How to Design a Bargello Quilt: Plan the Wave on Paper
A bargello wave is a staircase of stepped columns. Number your strips, write one row per column, and see how column width turns a zigzag into a curve.

Borderless Quilt Design: Plan an Edge That Looks Finished
With no border, the outer blocks and the binding make the edge. Compare whole and halved motifs on one 48 x 60 inch quilt, then pick the binding color.

Crosshatch Quilting: How to Make the Lines Meet at the Edges
Space a 45-degree crosshatch so the lines meet in a V at every edge and corner. Choose the edge step first, mark dots around the quilt, then connect them.