


Curved Log Cabin Blocks with Straight Logs
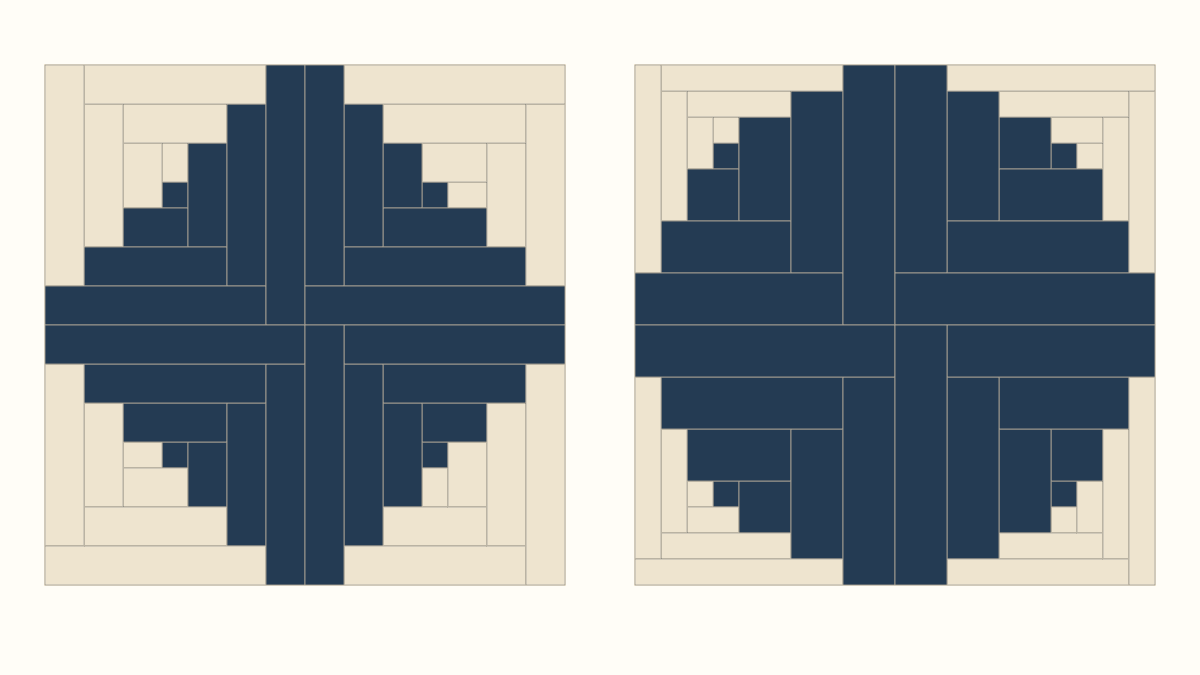
Curved Log Cabin blocks use narrow logs on two neighboring sides and wider logs on the other two. The seams stay straight; unequal widths change the light-and-dark outline. For a first comparison, use one light and one dark fabric, then arrange four blocks with the wider dark sides facing the middle.
Mary Go Round Quilts' curved Log Cabin tutorial shows the idea with light strips cut at 1-1/2 inches and dark strips cut at 2-1/2 inches. That is a useful example of unequal widths, rather than a required ratio for every version. Below, we'll compare two blocks that finish at the same size so you can see what the widths change.
Keep the two width groups on adjacent sides
A Log Cabin grows one rectangular log at a time around a center. In our drawing, the light logs sit on the left and bottom of that growing square. The dark logs sit on the right and top. Each complete round has two light logs and two dark logs.
Those positions matter. Alternating a narrow log and a wide log on every successive side would give opposite sides the same width. Here, the two narrow sides meet at one corner, and the two wide sides meet at the opposite corner.
The narrower side of the block occupies less space as the rounds grow. The center shifts toward that narrow corner, and the two value groups form unequal steps. Turn four blocks together and those steps can suggest a rounded outline.
Keep this question separate from simply choosing a narrower strip for an ordinary block. Our Log Cabin strip-width guide compares equal-width logs and the resulting block sizes. This lesson changes the widths inside each block.
Compare two blocks at ten inches finished
Both studies have a 1-inch finished center, three full rounds and the same light-and-dark positions. The center is dark. There are 12 logs plus the center, or thirteen pieces in either version.
For the control, every log finishes at 1-1/2 inches wide. Each round adds 1-1/2 inches at both opposite edges, growing the square by three inches.
For the unequal version, each light log finishes at 1 inch wide and each dark log at 2 inches wide. A narrow side and a wide side still add three inches in each direction.
| Study | Finished light log | Finished dark log | Finished block |
|---|---|---|---|
| Equal-width control | 1-1/2 inches | 1-1/2 inches | 10 inches |
| Unequal-width study | 1 inch | 2 inches | 10 inches |
The unequal block's finished side is 1 + 3 x (1 + 2) = 10 inches. The control gives the same result: 1 + 3 x (1-1/2 + 1-1/2) = 10 inches. Neither comparison gets its effect by enlarging the whole block.
We drew these finished-geometry studies and haven't sewn them. They show the design decision; use your selected pattern or tool's construction instructions for cutting, allowances and trimming.
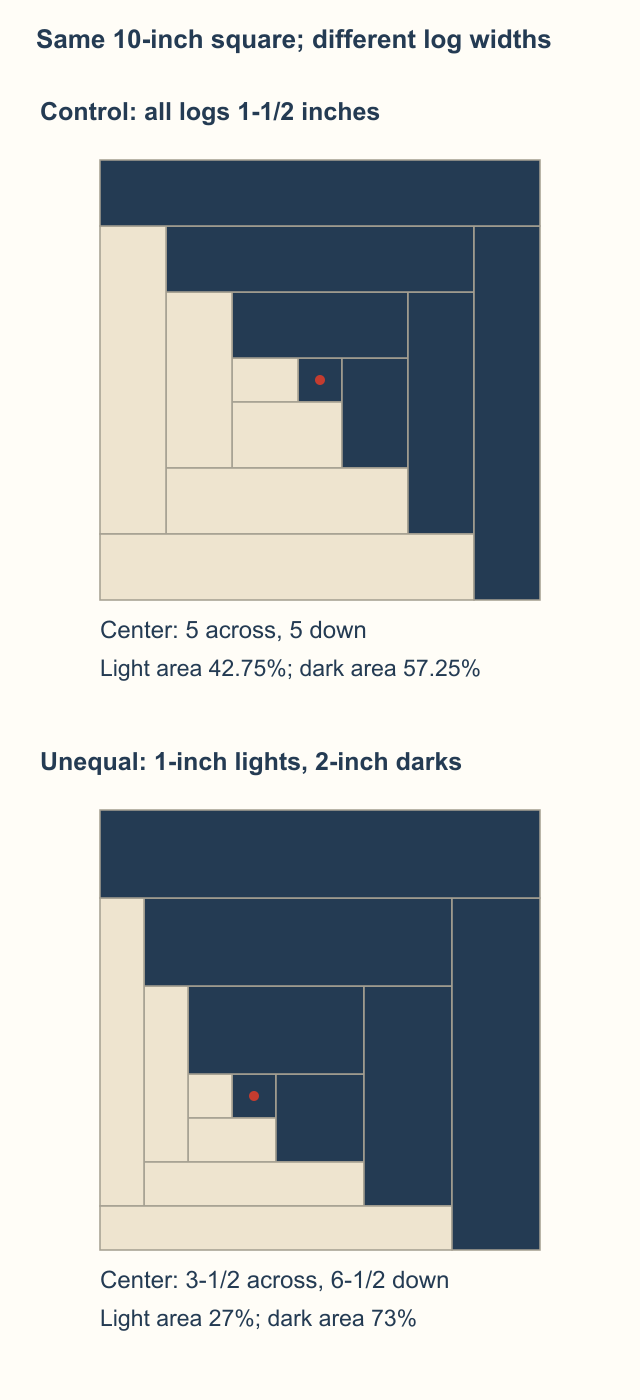
Read every position from the drawing's top left. The control's center lands 5 inches across and 5 inches down. In the unequal block, it lands 3-1/2 inches across and 6-1/2 inches down. That is a shift of 1-1/2 inches left and 1-1/2 inches down, toward the narrow light corner.
You can check the shift without estimating from a picture. Three 1-inch light logs accumulate on the left of the 1-inch center. Three 2-inch dark logs accumulate above it. Add half the center's width to either distance to locate the red dot.
Notice how much dark fabric is on view
Changing widths also changes the amount of each value. Keeping the same number of light and dark logs does not give equal light and dark areas.
The thirteen rectangles in the control cover 100 square inches: 42.75 light and 57.25 dark. In the unequal block, they cover the same total but split into 27 light and 73 dark. Those dark totals include the one-square-inch center.
So the second study has a broader dark shape as well as different steps. Spread out more dark fabric when you audition it. A fabric stack showing equal light and dark amounts would understate how dark this version will look.
These are finished design areas, not shopping quantities. Follow the pattern's fabric requirements once you choose a construction method and final layout.
Deb Tucker's written Log Cabin introduction discusses both planned light/dark pairs and scrappy groups. If you use several prints, keep each group doing the same job. One unusually dark light print can interrupt the pale corner, even when every strip has the right width.
For the first sample, solids or quiet prints make the geometry easier to inspect. Try a more varied pull after the two sides read clearly.
Turn four wide corners toward the middle
A single block explains the widths. Four blocks show why the variation is called curved.
Our starting block has its wide dark corner at the top right. Arrange the group with wide dark corners pointing like this:
| Position in group | Wide dark corner | Clockwise turn from the starting block |
|---|---|---|
| Top left | Bottom right | 90 degrees |
| Top right | Bottom left | 180 degrees |
| Bottom left | Top right | No turn |
| Bottom right | Top left | 270 degrees |
Two ten-inch blocks across and two down make a 20-inch finished square. Four blocks use 4 x 13 = 52 pieces. We keep the same turns in the control and unequal-width groups below.
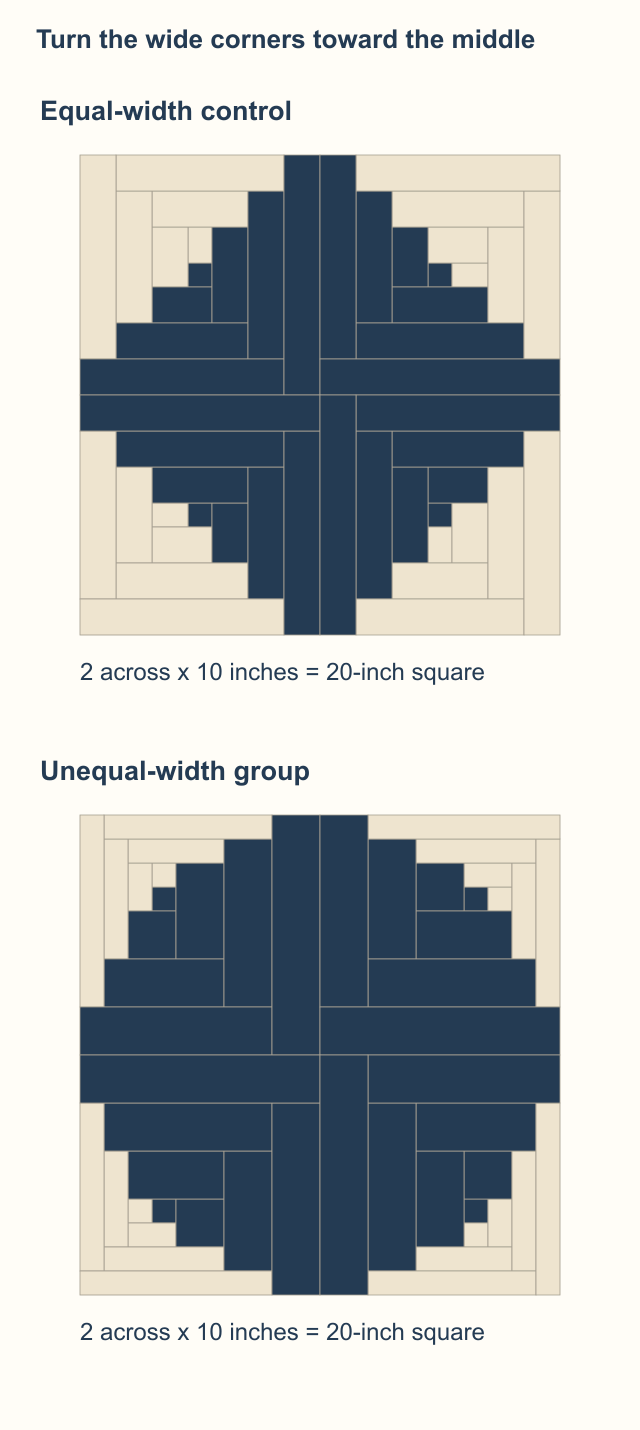
The equal-width group makes a stepped diamond. In the unequal group, navy reaches farther toward the sides, and the cream corners shrink. Step back and compare the whole navy outline before examining individual seams.
You can still see the rectangular steps. An apparent curve does not require the edge to be a mathematically circular arc. Jean Ann Wright's Creative Grids instructions also use four curvy blocks to suggest a circle, with dimensions and trimming specific to that tool.
For more standard rotations of equal-width blocks, use our separate Log Cabin layout maps. Keep this first unequal-width test to one four-block arrangement so you can judge the block itself.
Choose the construction method after the drawing
Finished rectangles help you decide whether you like the proportions. The sewing method determines how those rectangles become accurate pieces.
Some methods cut to specified dimensions. Others intentionally oversize the logs and trim each round. Deb Tucker's curved Log Cabin method, for example, describes oversized logs and its Tucker Trimmer III. Don't borrow its starting sizes and combine them with another tool's trimming lines.
Before preparing a batch, read the chosen instructions and identify which measurements are cut, unfinished and finished. Check the narrowest logs especially: a small width error takes a larger share of a narrow log. Measure the first assembled block at the stages the pattern specifies.
Then place four blocks together before sewing their joins. Confirm the narrow corners, wide corners and top edge against your map. If one block looks different, check its orientation before changing the fabric choices.
Make the next comparison a small one
Choose whether you prefer the equal-width diamond or the broader unequal-width outline. Write down the finished center, both finished log widths, the round count and the four-block map beside that choice.
If you want to explore another width balance, redraw one block while holding the outside size in mind. Recalculate the center or rounds when necessary; changing one log group alone changes the final dimensions too. Compare the new group beside this one at the same scale.
You can keep that measured drawing on paper, or use the Block Editor guide for drawing pieces and adjusting selected-piece dimensions in QuiltLab. Keep the construction instructions beside whichever drawing you choose.
Start with four blocks' worth of planning, then make the pattern's first sample. Check the outline, the measurements and the light/dark balance before cutting for a whole quilt.
Related posts
How to Design a Bargello Quilt: Plan the Wave on Paper
A bargello wave is a staircase of stepped columns. Number your strips, write one row per column, and see how column width turns a zigzag into a curve.
How to Design a Medallion Quilt So Every Border Fits
Plan a medallion ring by ring: check that each pieced border divides its side, add a plain spacer when it doesn't, and grow a 12 in star to a 48 in quilt.
Straight Set vs On Point Quilts: Which Suits Your Blocks?
Compare the same eight blocks in two settings. See how turning them changes the motif direction, finished footprint and triangles needed at the edges.