


How to Chain Piece Quilt Rows in Layout Order

To chain piece quilt rows without losing your layout, label the rows, stack each with its leftmost piece on top, and sew in the same row order on every pass. Keep the connecting threads until the rows are complete, and compare the opened pieces with your map before adding the next column.
This lesson shows how to chain piece quilt rows with twelve labeled squares. The color layout is already settled; the job is to carry it from the table to the machine and back without swapping or turning a piece.
Give every position a name before stacking
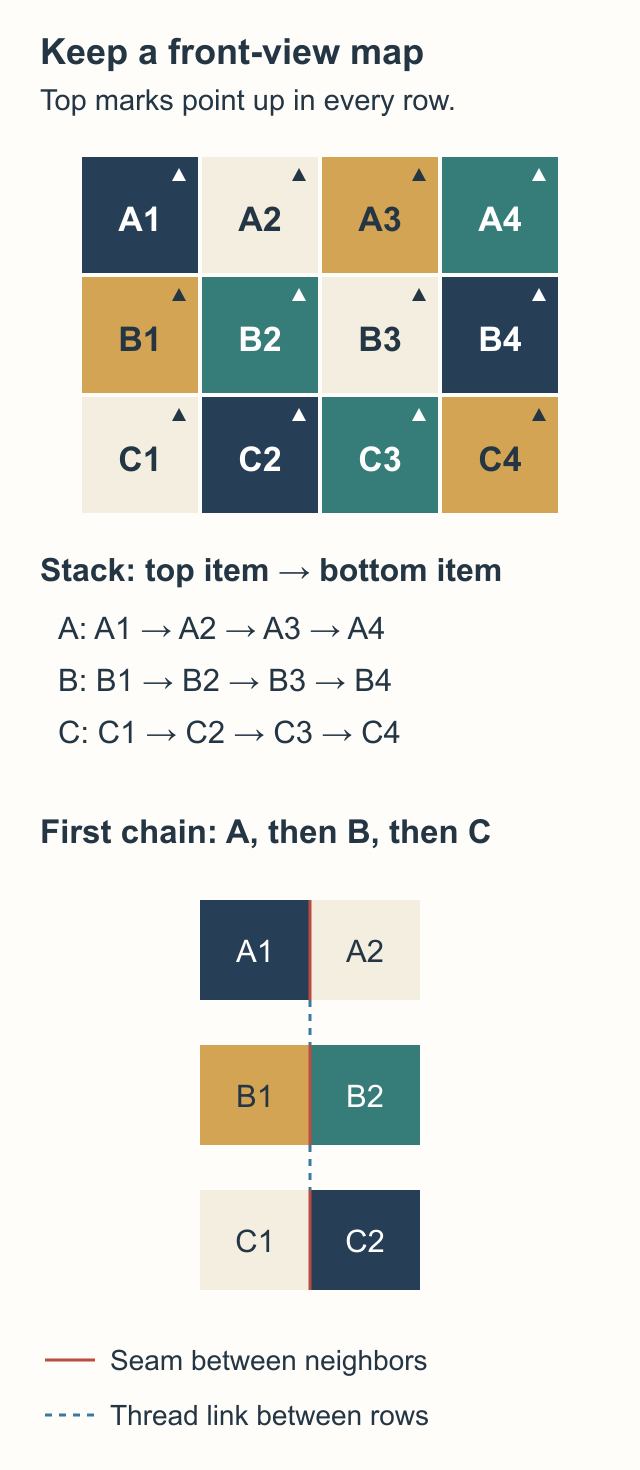
Lay out the pieces face up in their final arrangement. Take a clear reference photo and keep the pattern's assembly diagram beside it. For this example, name the three rows A, B and C, top to bottom, and the four columns 1 through 4, left to right.
The upper-left square is A1. The square to its right is A2. Directly below A2 is B2. Every position has one address, even when several squares use the same fabric.
Mark which edge is the top before moving directional pieces. Our directional-print lesson covers choosing those turns. Here, the top mark simply preserves the choice you've already made.
Use removable labels suited to your fabric, or clips that you remove before stitching. Keep them clear of the sewing path. Put a row label on the first piece and another beside its stack at the machine. A quick fabric count won't catch A3 and B3 trading places; position names will.
Make three row stacks with the first piece on top
For row A, place A1 on top of A2. Lift those two together onto A3, then place that whole stack on A4. Keep all faces and top edges oriented as they were on the table.
The stack reads A1, A2, A3, A4 from top to bottom. Make B and C stacks the same way and place them beside their row labels. Don't turn a whole stack over to move it.
Juli Vignola's Emergence chain-piecing tutorial demonstrates this leftmost-on-top method, duplicate row labels and clear top marks. Her retained first-block label is especially useful when a stack becomes a longer row.
Before sewing, lift the top two pieces of each stack and compare their IDs with the map. You should have A1/A2, B1/B2 and C1/C2, leaving positions 3 and 4 below. If the stack is backward, rebuild it now while every piece is still loose.
Sew the first pair in A, B, C order
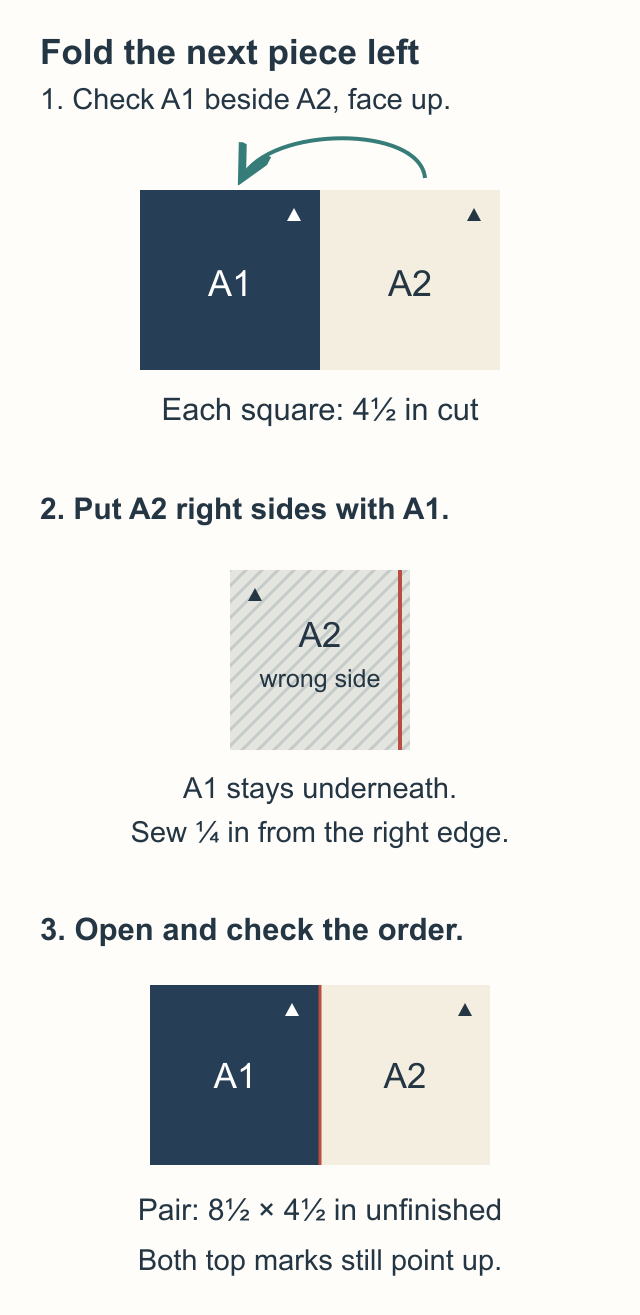
Place A1 and A2 beside each other face up, matching the map. Fold A2 left over A1 like closing a book. Their right sides now face each other, with A1 underneath. Sew the right-hand edge using the pattern's seam allowance; this example uses 1/4 inch.
Repeat with B1/B2 and then C1/C2 in one chain, leaving the thread between pairs intact. Each pair remains a separate fabric unit. The short thread links preserve the sequence A, B, C; they aren't seams joining the rows together.
Brittany Lloyd's written chain-piecing lesson walks through checking the layout, joining the first two columns and adding later pieces while keeping those links. Keep adjacent pairs separate as they feed through; overlap would sew one pair into another.
At the end of this pass, cut the machine thread after the last pair so you can bring the chain back to the work surface. Open each pair gently. Place A above B above C, with their first pieces on the left and their top marks pointing up. Don't rely on whichever way the sewn units happened to fall behind the machine.
Add one column, then check the opened rows
The next loose piece in each stack should be position 3. Work through A, B, C again:
- Put A3 to the right of the opened A1/A2 pair. Check its face and top mark, fold it left onto A2, and sew the right edge.
- Add B3 to the right of B1/B2 the same way.
- Add C3 to the right of C1/C2, keeping the links between rows intact.
Return the chain to its A/B/C arrangement and open it. Read each row left to right against the map before picking up position 4. Then repeat the pass with A4, B4 and C4.
| Pass | Pieces added in feed order | Opened row A |
|---|---|---|
| First pairs | A2, B2, C2 beside their first pieces | A1, A2 |
| Third column | A3, B3, C3 | A1, A2, A3 |
| Fourth column | A4, B4, C4 | A1, A2, A3, A4 |
Rows B and C grow to the same column count on each pass. After the final pass, all twelve positions should be present once, with no loose squares remaining in the stacks.
Catch a wrong pickup before its seam
Suppose the third-column pieces arrive at the machine in A3, C3, B3 order. The count is still three, so counting alone gives you no warning.
The first addition, A3, matches row A. At row B, the next piece says C3. Stop there. Put C3 with row C and retrieve B3 before folding anything onto row B. Compare the remaining stacks with the map so the next pass starts correctly.
If you notice the swap after stitching, lay the chain down in its labeled row order and identify the affected seams. Undo those additions carefully and restore their pieces to the correct positions before continuing. Keep the row labels with their original first pieces throughout the correction.
For an interruption, leave a note that describes the actual state: "Column 3 complete; next is A4, then B4, then C4." Put the map with the stacks. On returning, open the last additions and check that note before sewing.
Check row size, then join the rows
For the example, twelve 4-1/2-inch cut squares form three rows of four. With quarter-inch seams, the planned unfinished sizes are:
| Assembly | Width | Height |
|---|---|---|
| Two-square pair | 8-1/2 inches | 4-1/2 inches |
| Three-square row | 12-1/2 inches | 4-1/2 inches |
| Four-square row | 16-1/2 inches | 4-1/2 inches |
| Three rows joined | 16-1/2 inches | 12-1/2 inches |
A row starts with 18 inches of cut width. Its three seams each consume 1/2 inch across two allowances, leaving 16-1/2 inches. The three row heights total 13-1/2 inches; two joining seams consume another inch, leaving 12-1/2 inches.
Inside the outer quarter-inch edges, the top finishes at 16 by 12 inches. If your rows don't match their expected size, use our scant quarter-inch seam check before joining them. Layout order and seam accuracy are separate checks.
Once the opened rows match the map, snip the thread links if needed to handle and press the rows. Keep the labels attached and follow your pattern's pressing directions. Andrea Tsang Jackson's web-piecing lesson shows the same progression from column-wise chains to joining completed rows.
Place A above B, check their shared edge, and join them right sides together. Open that assembly and compare it with the map before adding C below B. Keep checking from the front so an upside-down row can't quietly become the new reference.
Start with a short, checked chain
For a larger layout, practice the pickup route on a manageable section before moving every stack to the machine. Choose section boundaries from the pattern's assembly plan and label where each section belongs in the whole quilt.
This organization follows pieces within one project. If you want a second project beside the machine, our leaders-and-enders plan tracks that separate work.
For your next chain, prepare just the first two pieces from each labeled row. Check the map, sew A then B then C, and open the pairs before reaching for the next column. Keep that same order until the rows are complete.
Related posts
Freezer Paper Foundation Paper Piecing or Sew-Through?
Compare sewing through a foundation with sewing beside folded freezer paper, using one simple unit and a realistic plan for sixteen repeats.
Pinked Edges on Precuts: Where to Measure the Seam
Peaks or valleys? Compare Moda and C&T guidance, then use a three-strip check to choose a consistent seam reference for your actual precuts.
Wonky Log Cabin Quilt Blocks That Trim to One Size
Keep the irregular strips and still make blocks that fit. Plan an 8-inch finished block, check the trimming square and protect the outer seams.