


Nested Star Quilt Design: Keep Every Ring Visible
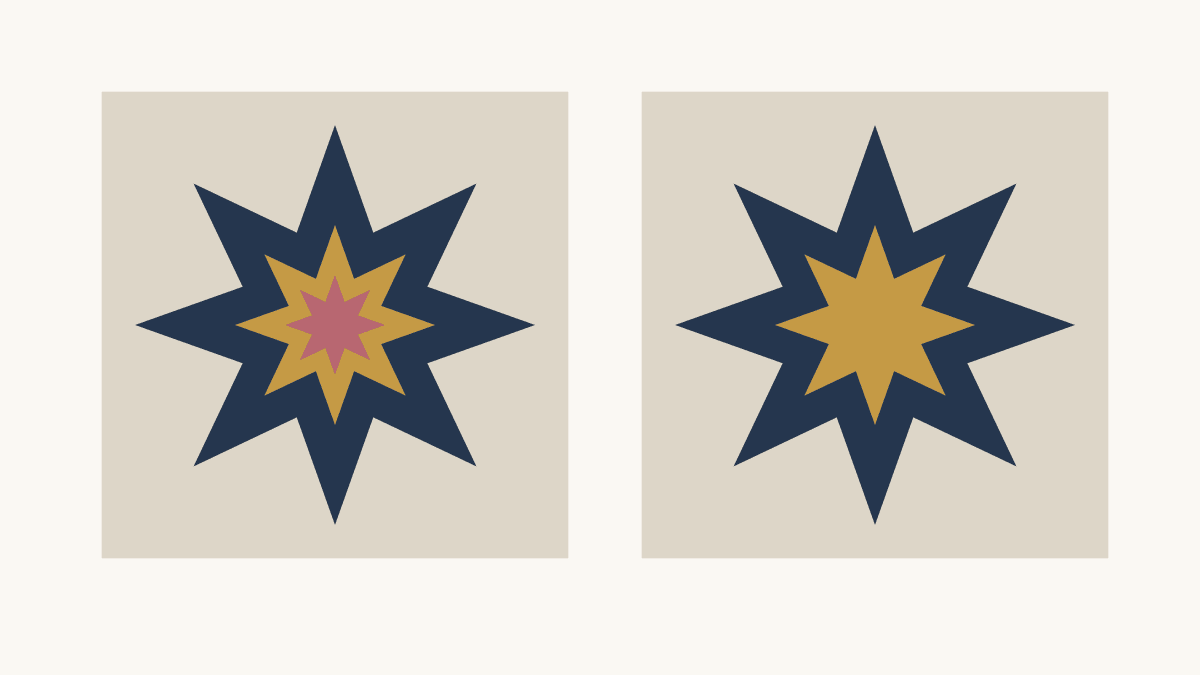
Give neighboring star rings different values if you want each one to read separately. Start with the narrowest visible ring: a fabric that looks distinct as a whole swatch can disappear when only a sliver remains between two larger shapes.
You can also let two rings merge on purpose. That produces a simpler silhouette with a quieter center. The useful choice is which boundaries you want a viewer to see, before you choose a color for every piece.
Count the visible shapes
A nested star contains smaller stars inside larger ones. Some of the large star is covered, so its full outline and its visible fabric area are different things.
Sam Hunter's Five Stars pattern is a real example of nested, off-center stars. Its arrangement shows how nesting can become the subject of a quilt. For your own design, name the visible rings before borrowing a color plan from a single-star block. A familiar point/background division may no longer describe all the boundaries.
Write a short list: background, outer ring, middle ring, center star. Then draw a line between every pair that touches. In a centered three-star study, the important pairs are background/outer, outer/middle and middle/center. Two fabrics that never touch need less direct separation.
For a conventional block's point and center roles, use our Sawtooth Star color-placement example. Here, the shared ring boundaries do the work.
Hold the geometry still
Our study uses three eight-point stars on a 28-inch square. Each star alternates a long radius at a point with a shorter radius in the valley. All three share the same center and orientation.
| Shape | Point radius | Valley radius | Full width |
|---|---|---|---|
| Outer star | 12 in | 6 in | 24 in |
| Middle star | 6 in | 3 in | 12 in |
| Center star | 3 in | 1.5 in | 6 in |
The smaller stars are exact scaled copies. That keeps one inside the next and lets us compare fabric changes without changing the drawing.
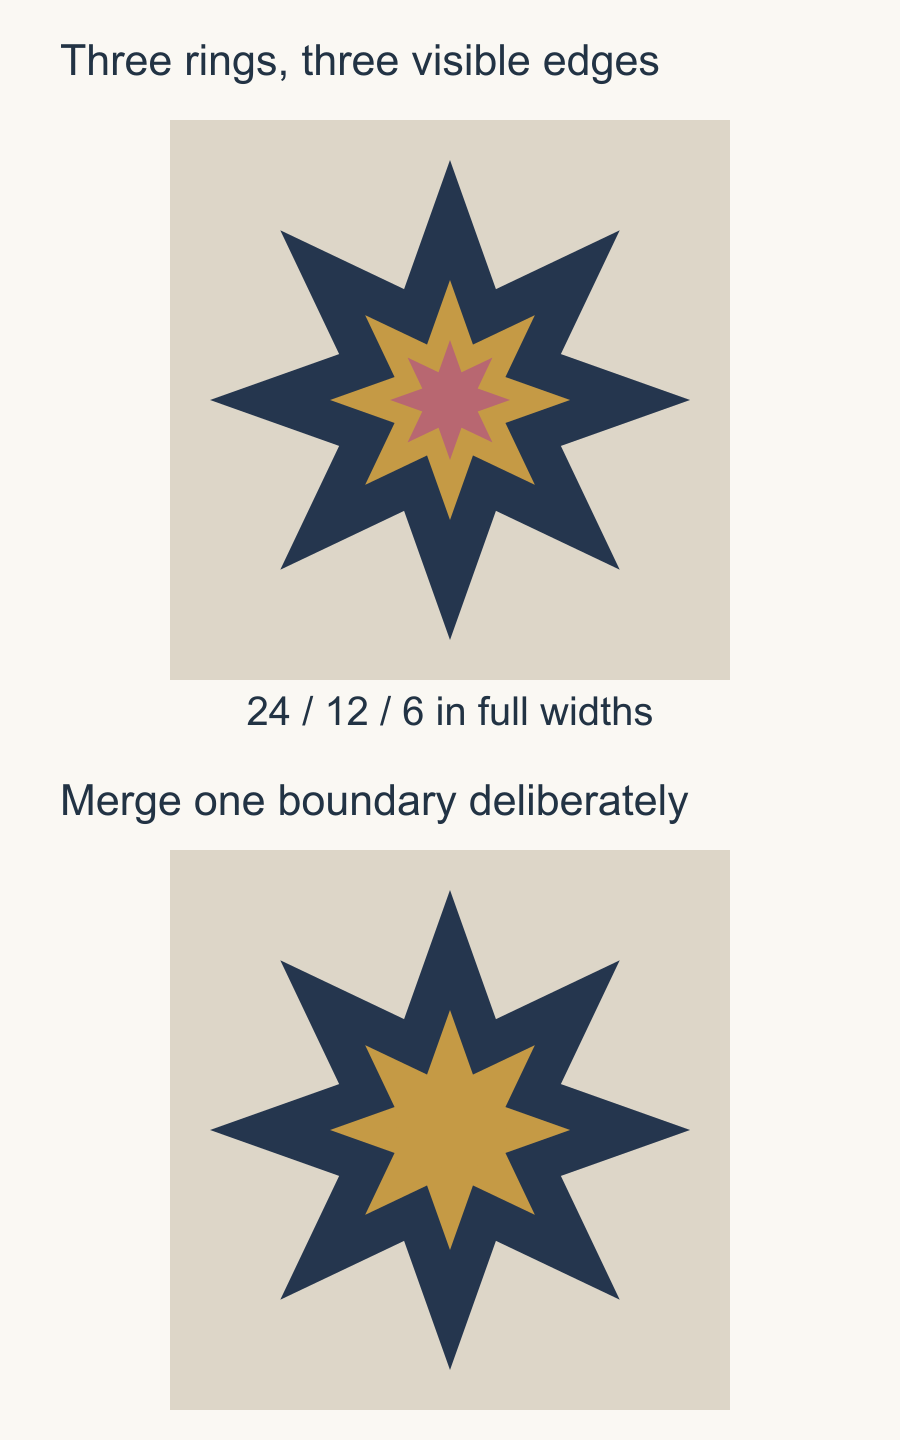
Start with one version and duplicate it on paper. Keep the star sizes, orientation and background unchanged. If you also move the center or widen a ring, you won't know which change made the color plan clearer.
Compare what remains visible
The outer star covers about 220.43 square inches before the middle star covers part of it. The middle covers about 55.11, and the center covers about 13.78.
Subtract the covered areas to get the fabric the viewer sees:
| Visible region | Area | Share of outer-star footprint |
|---|---|---|
| Outer ring | 165.32 sq in | 75% |
| Middle ring | 41.33 sq in | 18.75% |
| Center star | 13.78 sq in | 6.25% |
Those shares explain why equal-sized swatches can mislead you. Three swatches on a table look equally important. In this drawing, the visible outer ring has twelve times the area of the center.
Use that difference when choosing a strong print. A busy outer fabric will occupy much more of the quilt than a busy center fabric. Conversely, a tiny center may need a clearer value or a simpler motif to hold attention.
These are visible-area figures. They do not calculate fabric purchases, seams or waste. Use the construction pattern's piece list for those decisions.
Choose a value sequence
For a first comparison, try dark outer ring, light middle ring and dark center on a medium background. Then reverse the three star colors while leaving the background alone.
Shannon Brinkley's explanation of value separates lightness and darkness from hue. That distinction matters here: blue and red can be different colors yet close enough in value to soften their shared edge.
Look at the outer/middle boundary first. If those fabrics merge, the center can appear to float in one large star. Next inspect the middle/center boundary. If that merges instead, the center and middle may become one compact shape.
A grayscale photograph can help you compare lightness, but return to the actual cloth before deciding. Printed highlights, shadows and small motifs may create edges that a tiny photograph hides.
Audition a narrow window
Do more than place four fabric squares beside one another. Trace the visible ring shapes from your full-size construction pattern and cut paper windows for auditioning fabric. Put each window over several parts of its fabric.
The rings in our drawing have changing widths. Along a ray from the center through a star point, the middle ring extends from 3 to 6 inches: a 3-inch difference. Along a ray through a valley, it extends from 1.5 to 3 inches: a 1.5-inch difference. Those ray measurements are neither the shortest gaps between edges nor cutting widths. A single straight strip window would miss some of the shape you need to check.
A scattered print may show a dark flower in one window and mostly pale ground in another. Your color plan needs to work with the pieces you can actually cut. If the whole ring depends on finding one rare dark patch, note that requirement before buying or cutting.
Check a star point and a valley separately. The opening may narrow near the tip, making a large motif unreadable even when it looks good along a broader section. Choose a smaller print, use a quieter fabric or deliberately accept a changing edge.
For hue relationships after the values work, our color-theory guide gives a broader framework. Keep the ring test beside that broader fabric pull.
Merge one boundary on purpose
Now give the middle ring and center the same fabric. Their shared edge disappears, leaving a dark/light relationship with fewer distinct parts. Compare that version with the alternating-value version from across the room.
Ask a concrete question: do you want three nested stars, or one star with a smaller accent? Both can work. The second arrangement simply needs fewer visible boundaries.
Jeni Baker's Giant Vintage Star tutorial includes different color arrangements within one large star. It is useful context for how fabric grouping changes a star's reading. Our nested study uses different geometry, so use her tutorial for her construction and keep this comparison as your color-planning exercise.
Save the reason for your choice
Label the selected version with the boundary you most want to preserve. For example: "Keep the pale middle ring visible at every point; let the center share the outer fabric."
Add the actual fabric names or swatches and note any window that needs selective cutting. That gives you a decision you can carry to the cutting table, rather than a picture whose success depends on remembering why you liked it.
Your next step is small: audition the narrowest ring in actual cloth. Once that edge works, choose the broader fabric areas around it.
Plan your next quilt
Lay out blocks and try colors in QuiltLab's grid editor before you cut.
Free forever, no card needed.
Get quilting tips by email
QuiltLab updates, tips and quilting inspiration. Unsubscribe anytime.
Related posts
Large Star Quilt Planning: Choose the Star Before the Margins
Compare 36-inch and 48-inch stars on one quilt top, then check the center print, background and fabric-width constraints.
Pieced Quilt Border Math: Fit Whole Motifs
Fit complete border motifs around a measured center, compare end caps with resizing, and keep repeat phase clear at the corners.
Working in a Quilt Series: Change One Choice
Compare three band studies with the same size, colors and colored area, then choose one question to carry into a small quilt series.