


Large Star Quilt Planning: Choose the Star Before the Margins
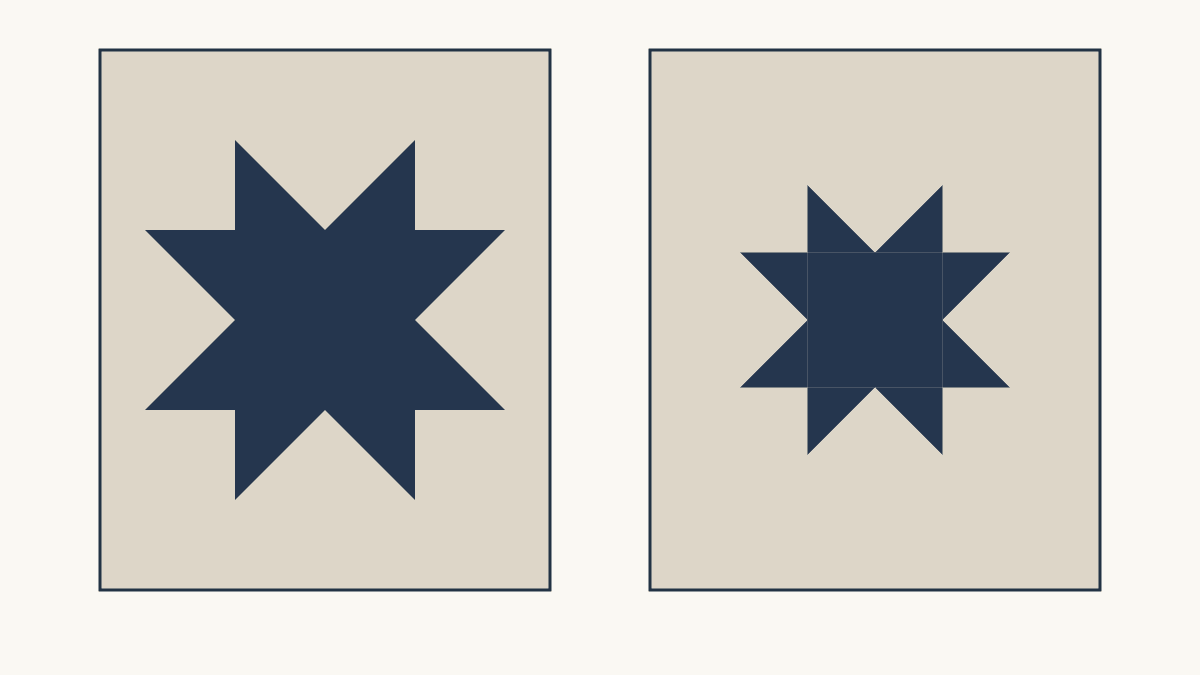
Choose the finished star size before setting the surrounding margins. On a 60 by 72-inch top, a centered 48-inch star leaves 6-inch side margins and 12-inch end margins. A 36-inch star leaves 12 inches at the sides and 18 inches at the ends. Compare those two balances before buying fabric for oversized pieces.
For a single-star quilt, compare two star sizes on one fixed canvas. Then inspect the actual construction pattern's largest pieces. A drawing can fit the bed while a planned background strip still exceeds your fabric width.
Fix the quilt size first
Our planning canvas is 60 by 72 inches. We will center a 48-inch star and compare it with a 36-inch star, keeping the quilt size and orientation unchanged.
That fixed canvas makes the tradeoff visible. If you enlarge the quilt and star together, you may preserve the same proportion without learning which version suits the space.
Jeni Baker's Giant Vintage Star tutorial enlarges a single Starflower block. Laura Piland's Giant Star tutorial also demonstrates a whole-quilt star, using large half-square triangles and plain corners. Their quilts show the appeal of large shapes. Follow their own instructions if you choose their construction; the sizes below are a separate Sawtooth planning study.
Compare both footprints at one scale
A centered star leaves half the spare width on each side and half the spare height at each end.
| Star footprint | Side margins | Top/bottom margins | Quilt top |
|---|---|---|---|
| 48 by 48 in | 6 in each | 12 in each | 60 by 72 in |
| 36 by 36 in | 12 in each | 18 in each | 60 by 72 in |
The 48-inch block occupies 2,304 of the quilt's 4,320 square inches, about 53.33%. The 36-inch block occupies 1,296 square inches, or 30%.
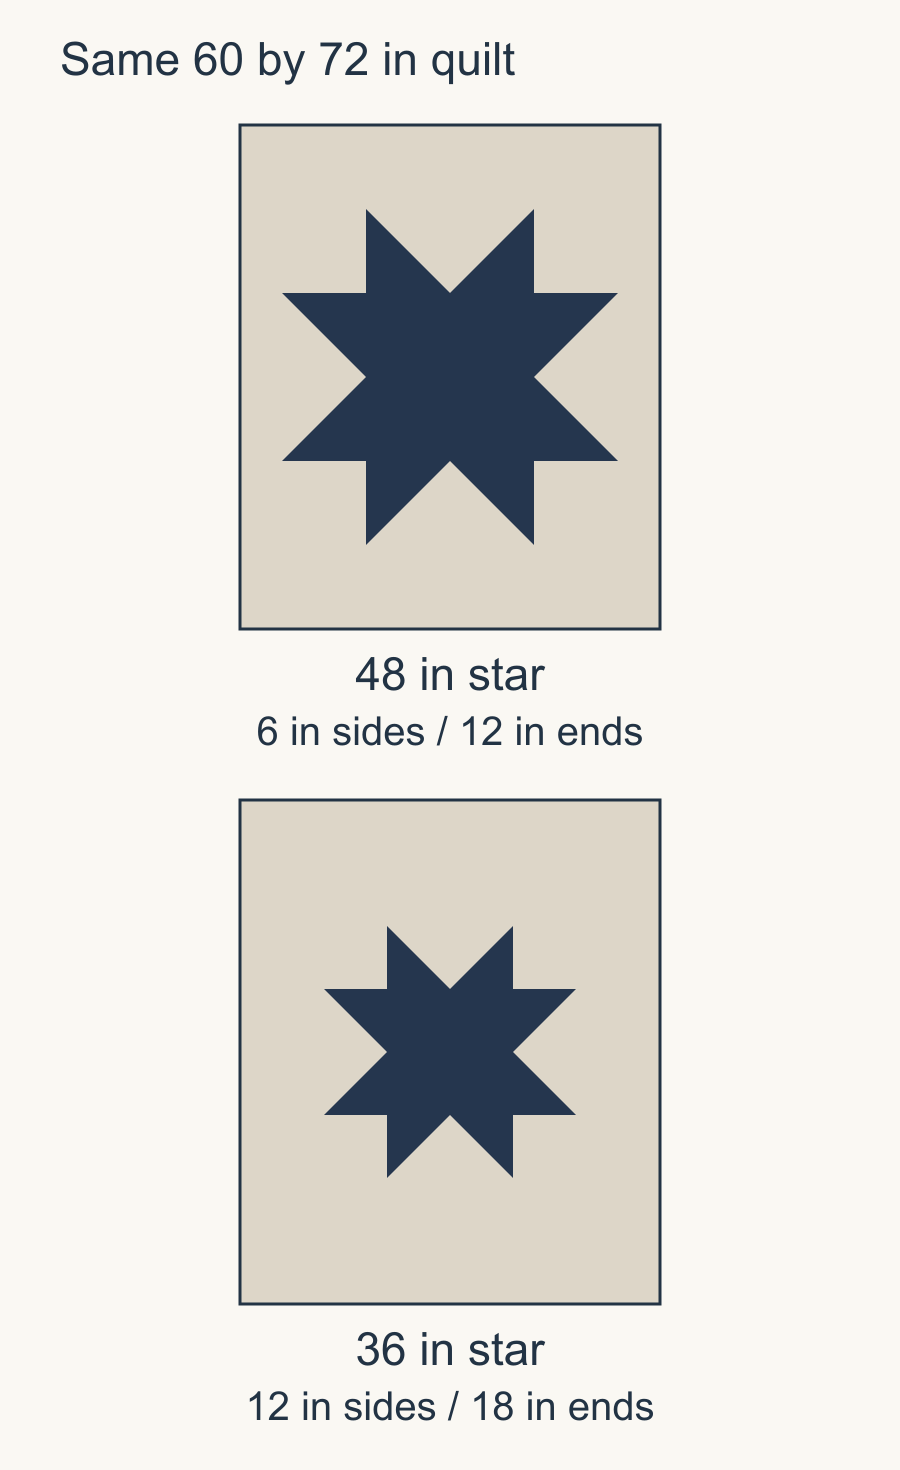
The larger option feels more like a star filling the quilt. The smaller gives the surrounding field a larger role. Neither needs a border simply because there is spare space.
Separate the footprint from the star fabric
A block footprint includes background patches. In a standard Sawtooth layout, the colored center and points occupy half of that square.
For the 48-inch study, the center is 24 inches square. Its points add another 576 square inches, making 1,152 colored square inches in total. That is about 26.67% of the whole 60 by 72-inch quilt.
The 36-inch study has an 18-inch center and 648 colored square inches in total, or 15% of the quilt.
This distinction matters when planning color. A star can have a large footprint while its background still covers most of the top. If you want a strong single shape, the relationship between star fabric and background deserves more attention than adding another border color.
For the smaller unit relationships, our Sawtooth Star color-placement article shows which center and point areas belong to each fabric role.
Audition the center at its actual size
A small swatch cannot show what a 24-inch center will do. Spread enough cloth to cover that area, or make a full-size paper window and move it over the fabric.
A large floral may show several motifs in the 24-inch center but only part of one in the 18-inch center. A directional scene may need a specific crop. A tiny repeated print may read almost like a texture from across the room.
Check the points separately. Their narrowing tips expose the print differently from the square center. If you intend the same fabric throughout the star, decide whether those changes in visible motif size are welcome.
Shannon Brinkley's value lesson explains how lightness and darkness help shapes stand apart. Test the star and background from a distance before choosing extra accent colors. A weak shared edge will not become clearer simply because its pieces are bigger.
Check the largest raw pieces
The visual grid in the 48-inch Sawtooth study has 12-inch finished cells. The 36-inch study has 9-inch cells. Those dimensions describe the drawing; the construction pattern determines the cut sizes and methods.
Now consider a hypothetical background band running across the entire 60-inch width. If it needs quarter-inch joining allowances at both ends, its raw length would be 60.5 inches.
That exceeds an assumed 40-inch usable crossgrain fabric width. You would need a deliberate join, a lengthwise cut from sufficient yardage, or a different background arrangement. Write that decision on the plan before treating the clean drawing as a cutting list.
Measure your actual usable width after allowing for selvages and any preparation you intend. A nominal width printed on a listing is not a promise about the uninterrupted area available for this particular cut.
Give the background a purpose
The smaller star creates 12-inch side fields and 18-inch end fields. Consider what you want those spaces to do. They might stay quiet, carry a planned quilting design or give the star room to sit off the edge of a bed's central view.
Our negative-space design article explains how empty-looking areas become part of the composition. Try the star lower or higher only after comparing the two centered sizes; moving it and shrinking it at once obscures the reason for the change.
The larger star leaves less side space but still has twice as much margin at the ends as at the sides. If that feels awkward, adjust the overall quilt proportions or place the star deliberately. Adding equal-width borders to all four sides will not erase the original rectangular difference.
Make a practical choice
Choose the 48-inch version when you want broad patches and the star to dominate the field. Choose the 36-inch version when the background needs a larger role or the intended print works better in an 18-inch center.
For a quick graph-paper comparison, let one square stand for 3 inches. Draw the same 20-by-24-square quilt outline twice. The 48-inch star fills a 16-by-16-square footprint, with two squares at each side and four at each end. The 36-inch star fills a 12-by-12-square footprint, with four squares at each side and six at each end.
Mark the center windows on those sketches too: eight squares across for the larger star and six for the smaller. Hold the actual 24-inch and 18-inch fabric windows beside the drawings. Choose the overall balance and the print crop together, rather than selecting a favorite little swatch and hoping it behaves the same at quilt scale.
Record the selected footprint, the four margins, the center size and the largest-piece questions. Then attach a real construction pattern and check its cutting plan. If you are enlarging an existing pattern, use our pattern-resizing guide before cutting from the drawing.
Your next step is to make two same-scale sketches with actual fabric windows beside them. Pick the star/background balance first, then settle every oversized cut it requires.
Plan your next quilt
Lay out blocks and try colors in QuiltLab's grid editor before you cut.
Free forever, no card needed.
Get quilting tips by email
QuiltLab updates, tips and quilting inspiration. Unsubscribe anytime.
Related posts
Nested Star Quilt Design: Keep Every Ring Visible
Compare three nested star sizes, choose contrast at each shared edge, and check which fabric survives in the narrowest ring.
Pieced Quilt Border Math: Fit Whole Motifs
Fit complete border motifs around a measured center, compare end caps with resizing, and keep repeat phase clear at the corners.
Working in a Quilt Series: Change One Choice
Compare three band studies with the same size, colors and colored area, then choose one question to carry into a small quilt series.