


Pack a Portable English Paper Piecing Kit You Can Pick Up Again
Pack already basted shapes, a small map showing their next joins, and the tools you use for hand sewing. For a kit you'll use away from the cutting table, choose one manageable unit from your pattern and prepare it at home. You can start sewing when you open the pouch, and see where to resume when you return.
English paper piecing wraps fabric around temporary paper shapes, then joins those covered shapes by hand. Paper Pieces' beginner guide explains that process and its basic tools. Here, we'll turn a handful of prepared pieces into a kit with a clear stopping point.
Choose the unit before the pouch
Find a small unit in your pattern that you can sew separately: a chain, a partial block or another clearly defined group. Check the assembly order before separating pieces from the larger layout. A bag of attractive hexagons becomes useful when you know which edges should meet.
Teacher Jodi Godfrey describes working in small units before joining the larger quilt in EPP.101 - Planning and Stitching. She also shows how laying out pieces and collecting them by row reduces the choices she has to make while sewing. Use that idea to decide what belongs in this kit.
Choose one task for the outing. Joining prepared pieces is a different task from cutting fabric or basting papers. If you want to baste instead, pack for that stage and keep the pieces awaiting basting separate from those ready to join.
If you're still deciding which paper-piecing method suits your project, start with our English versus foundation paper piecing comparison.
Make a nine-piece packing map
Imagine your pattern calls for three straight chains, each made from three prepared hexagons. We'll call the chains A, B and C. This is the small portion of the project you're taking along; the pattern will tell you how those chains join the rest later.
Give each piece a position on a paper map:
| Packet | Prepared pieces | Planned joins |
|---|---|---|
| A | A1, A2, A3 | A1 to A2; A2 to A3 |
| B | B1, B2, B3 | B1 to B2; B2 to B3 |
| C | C1, C2, C3 | C1 to C2; C2 to C3 |
| Total | 9 pieces | 6 joins |
Each three-piece chain needs two joins, so 3 x 2 = 6 joins. A join here means one complete shared edge between two shapes. It doesn't mean one stitch or one length of thread.
Draw the pieces in their intended positions and mark the edges that meet. If a print has a right way up, put that direction on the map too. Take a photo of the fabric side before stacking the pieces.
Your own pattern may use a different unit. Keep its arrangement and count the shared edges on that map. Don't carry the six-join total over to a flower or another shape with extra neighbors.
We drew the diagrams for this article and haven't sewn these example chains; use your pattern for shape sizes, seam allowances and final assembly.
Prepare and label at home
Baste the fabric around the papers using your chosen method before packing this joining kit. Check that the pieces have the same intended shape size and that their fabric folds follow the paper edges. Set aside anything that needs fixing while your preparation tools are still nearby.
Jodi Godfrey's basting guide compares thread and glue basting. Follow the method that fits your pattern and materials; this kit doesn't require switching methods.
Put each unit in its own small packet. Label the packet project name, pattern step, unit A/B/C and piece count. Use a loose label card or mark the paper back where it will stay readable and clear of stitching. Keep adhesive labels away from the fabric and sewing edges.
Add the same project name to the map. If you've changed the arrangement, date the map and remove the superseded copy from the pouch. Two maps with different color placements are an easy way to sew the wrong edge.
Before closing each packet, compare every position with the layout photo. Count A1 through A3, rather than counting any three pieces. The count catches a missing shape; the position check catches a swapped one.
Pack for the sewing you'll actually do
For this prepared joining session, keep the following together:
- The three labeled piece packets and their map or layout photo.
- Your working needle, a spare, and a closed needle case for putting them away.
- The thread you already use with these fabrics and needle.
- A thread-trimming tool with a protected edge, plus a small container for clippings.
- Your thimble or clips if they're part of your usual method.
Use a pouch or box that closes fully and holds the packets without crushing them. Put tools in a separate compartment so a loose point can't catch a prepared shape. Start by packing what you own; add something only when the chosen task needs it.
Ellen March's EPP travel-kit guide at Sulky suggests preparing pieces ahead and using smaller storage bags. Our example takes that further by separating the pieces by their next assembly step. The packet label should answer what you'll sew when you open it.
For this joining task, rulers, loose yardage and cutting equipment can stay at home. If you discover that a piece needs recutting, put it in a clearly marked repair packet and bring it back to your preparation space.
Open one packet at a time
Keep B and C closed while working on A. Lay the first two pieces beside the map, check their fabric sides and intended shared edge, then bring those edges together for sewing. In her stitching tutorial, Godfrey recommends checking the next shape beside the unit before stitching it on; it's easy to join the wrong edge when the pieces are folded together.
Finish the current seam and secure the thread before putting the work away. Return the needle to its case. If you have to stop partway along an edge, mark that unfinished edge on the map so it won't be mistaken for a completed join.
Keep the papers in these open-edged chains. Finishing one packet doesn't mean its paper shapes are ready to come out. Follow your pattern's paper-removal stage when the larger assembly has progressed.
Count pieces and completed joins when you return
Suppose you finish chain A and join B1 to B2, then stop with B3 still loose. Packet C is untouched. Your check should look like this:
| Packet | What is in it now | Joins done | Joins left |
|---|---|---|---|
| A | One three-piece chain | 2 | 0 |
| B | One pair and loose B3 | 1 | 1 |
| C | Three loose pieces | 0 | 2 |
| Total | All 9 pieces | 3 | 3 |
The piece count is 3 + 2 + 1 + 3 = 9. Joining pieces changes how many groups you can pick up; it doesn't change how many fabric-covered shapes you have. Look for the labels as well as the total.
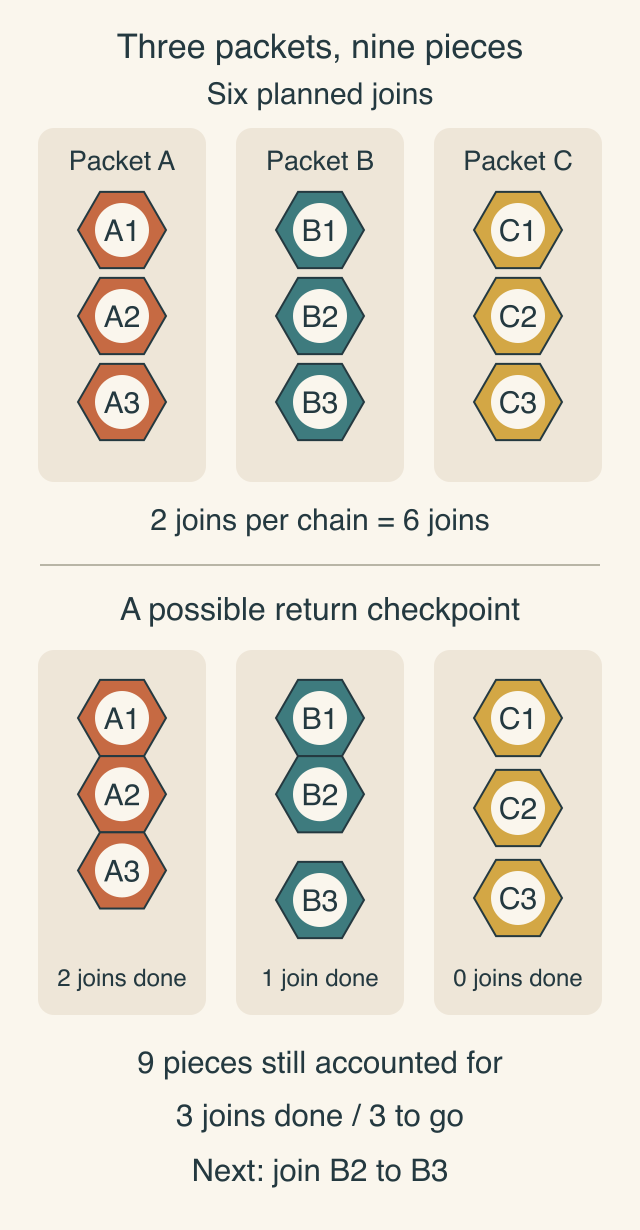
Check each completed join against the map, then write one line: Next: join B2 to B3. Put completed A in a finished-unit packet and return B's pair and loose piece together. Keep C closed until you're ready for it.
If something is missing, work through the position labels before preparing a replacement. Check whether the shape is already part of a joined unit or sitting in another packet. A second B3 won't fix a mislabeled B2.
Pack the next session before you put the kit away
Choose one unit from your current pattern, label its positions and prepare only the pieces that belong to that step. Put the map on top, write the first join on its label, and close the rest of the pieces in their packets.
If you'd like a digital companion, the Canvas Editor can keep a layout image and text notes together. Keep a paper copy in the pouch so your next join is still clear when you sit down to sew.
Related posts

How to Design a Bargello Quilt: Plan the Wave on Paper
A bargello wave is a staircase of stepped columns. Number your strips, write one row per column, and see how column width turns a zigzag into a curve.

Borderless Quilt Design: Plan an Edge That Looks Finished
With no border, the outer blocks and the binding make the edge. Compare whole and halved motifs on one 48 x 60 inch quilt, then pick the binding color.

Crosshatch Quilting: How to Make the Lines Meet at the Edges
Space a 45-degree crosshatch so the lines meet in a V at every edge and corner. Choose the edge step first, mark dots around the quilt, then connect them.