


Basting a Quilt on a Small Table, One Section at a Time
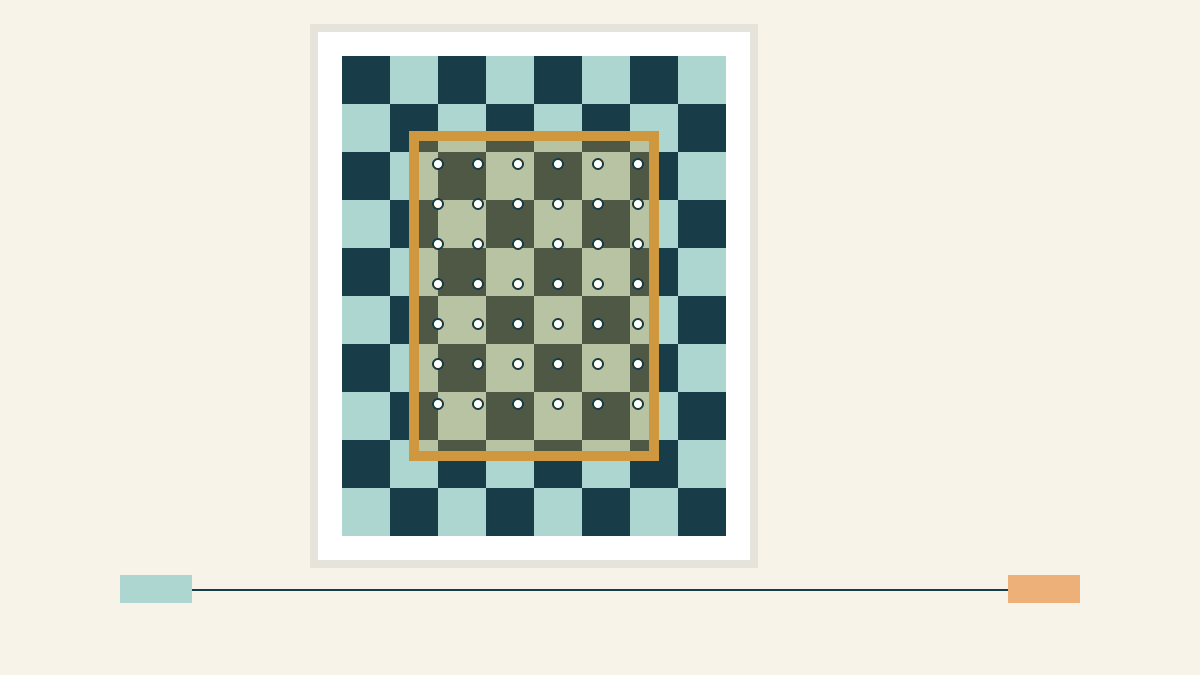
To baste a quilt on a small table, pin the smooth center section first. Then shift the sandwich while keeping some already-pinned fabric on the table. Secure and smooth the loose backing, batting and top separately before pinning the next section. That pinned overlap is what keeps you connected to the area you've finished.
Nifty Quilts' table-basting lesson makes that overlap explicit: leave a row of the pinned area on the table when you move the quilt. Below, a 48 x 60-inch top on a 30 x 40-inch table shows how to carry that idea around all four corners. We drew these diagrams and haven't basted this example.
This is for a quilt you'll quilt yourself. If you're sending it to a longarm quilter, follow their preparation instructions instead; our longarm preparation checklist explains why the layers usually go separately.
Prepare one flat section, with room around it
Start with a clear, stable table and protect its finish from pin points. Nifty Quilts suggests a protective mat when using a dining table. Check that your clips fit the table edge without forcing them. If you use tape, check that it suits the surface before covering the table with your quilt.
Prepare the backing and top so they lie flat. Let the batting relax and follow its own handling instructions. Fold each layer in quarters to locate its center. Lori Kennedy's pin-basting tutorial uses the quartered layers to bring their centers to the same spot on the table.
For this example, use these measured pieces:
| Layer | Size | Extra beyond each top edge |
|---|---|---|
| Quilt top | 48 x 60 inches | Starting size |
| Batting | 54 x 66 inches | 3 inches |
| Backing | 56 x 68 inches | 4 inches |
The margins come from subtracting the top size and dividing by two. Across the backing, 56 minus 48 leaves 8 inches, or 4 on each side. The same calculation works along its length. These are example allowances; use the requirements for your own finishing method and materials.
Put the backing right side down with its center over the table's center. Smooth and secure it. Add the batting, then the top right side up, matching their centers. Leave the extra batting and backing visible wherever an outer edge is on the table.
Aim for smooth fabric without stretching it. Brittany Lloyd's pin-basting guide at Lo & Behold Stitchery distinguishes a taut backing from one pulled tight enough to distort it. Her table method also works in chunks, quadrants or smaller sections as the table allows.
Pin the center before moving anything
With the 30-inch side of the table across the 48-inch top, the centered working area leaves 9 inches of top off each side. Along the 60-inch length, a centered 40-inch table leaves 10 inches at each end.
Pin the flat area from the center outward, checking that each pin goes through all three layers. Close the pins before moving the sandwich. Use the pin spacing appropriate to the basting method you're following; our pin-versus-spray comparison covers that separate choice.
Finish the section you can reach without pulling the fabric toward you. A table's full area and your useful working area may differ. If you can't comfortably reach part of the rectangle, work from another side or use smaller sections.
Before the first shift, identify a band that contains actual closed pins. Keep some of that band on the table in the next position. An overlap on a paper map is useful only when the fabric in it has been pinned.
Use five positions to reach the corners
Think of the top as a map: 0 is its upper-left corner, 48 is the right edge and 60 is the bottom. The numbers below describe which part of the top rests on the table. You don't need to mark a coordinate grid on the fabric.
| Position | Across the top | Down the top | What comes next |
|---|---|---|---|
| Center | 9-39 inches | 10-50 inches | Pin the starting section |
| Upper left | 0-30 inches | 0-40 inches | Reach the top and left edges |
| Upper right | 18-48 inches | 0-40 inches | Reach the top-right corner |
| Lower right | 18-48 inches | 20-60 inches | Reach the bottom-right corner |
| Lower left | 0-30 inches | 20-60 inches | Finish the bottom-left corner |

The two corner positions across the top overlap by 12 inches: the left window ends at 30, and the right starts at 18. The upper and lower corner positions overlap by 20 inches, from 20 to 40 down the top. Together, the corner windows cover the full 48 x 60 inches, including the center you've already pinned.
These generous overlaps make it easier to see where you are. Add a position wherever your reach, table shape or fabric needs it.
Reset the loose layers after every shift
Repeat the same routine at each position. Kennedy secures the already-pinned side after shifting, then exposes and secures the remaining layers one at a time. Nifty Quilts similarly folds back the loose top and batting before resetting the backing.
- Release the table clips or tape. Leave the basting pins closed. Shift the layers together, keeping a pinned overlap supported on the table.
- Fold back the loose top and batting. Keep the pinned area together. Expose the backing in the new working area.
- Smooth and secure the backing. Check underneath for a fold caught against the table edge before covering it again.
- Smooth the batting, then the top. Work outward from the pinned area. Secure each layer as needed, keeping the top's seams flat.
- Check the revealed margins, then pin. Make sure batting and backing still extend beyond the top where you've reached an outer edge.
Start with the upper-left position after the center. It retains a 21 x 30-inch rectangle of the pinned center on the table. You can keep that area intact while smoothing the loose top and left edges.
At the upper-right position, the table still overlaps the previous upper-left position by 12 inches across its full 40-inch length. Keep the pins in that shared band while working toward the right edge. Continue around the lower-right and lower-left corners, using the overlap shown in the diagram.
If you find a fold, stop there and reopen only the pins needed to smooth it. Recheck the backing before repinning the top. Pulling the top harder won't tell you whether a hidden layer lies flat.
Check the final edge before carrying the quilt away
After the last corner, inspect each outer edge for visible backing and batting. Look at the back in sections as well as the front. Close any pin you left open, and remove the table clips or tape before lifting the sandwich away.
Basting holds the layers while you quilt, but it doesn't set the allowed distance between quilting stitches. Read that limit on your batting's packaging; our quilting-distance guide shows how to check it against a stitching plan.
For your own quilt, write down the top and table dimensions, locate the center and choose the first next section. Then pin the center completely and identify the pinned band you'll keep on the table. That makes the first move a repeatable step you can use for the rest of the quilt.
Related posts
Why Is Your Rotary Cutter Skipping Threads?
Stop adding pressure. Use the cutter's exact instructions and a short scrap-check record to decide whether the blade, assembly or cutting surface needs attention.
How to Stop a Quilting Ruler Slipping While You Cut
Check the reference edge, ruler line and holding position before cutting another strip. Compare a tapered cut with a consistent width error.
Pin Basting vs Spray Basting: Which Fits Your Quilt and Room?
Pins 3 to 4 inches apart hold until you remove them; spray is faster but lasts only as long as its label says. Choose by quilt size, surface and can.