


Pin Basting vs Spray Basting: Which Fits Your Quilt and Room?
Pin basting joins the three layers with curved safety pins about 3 to 4 inches apart, and it holds until you take the pins out. Spray basting is quicker, but it holds only as long as the can's label says, and you can use it only where the label allows. Faith Jones, in her pin-basting tutorial on BERNINA's WeAllSew blog, places pins about every 3 inches. She sometimes sprays small items such as pillows and bag panels, but for medium and large quilts she gets her best results with pins.
For a first quilt, or any quilt bigger than a throw, pin. Pins work on any floor or table and hold however long the quilting takes. Choose spray when your space meets the can's label and you'll finish quilting inside its hold time. It pays off most when stopping to pull pins would slow you down.
Below, we work through the choice for a 60 x 72-inch throw and a 90 x 108-inch queen, then give you a setup plan to fill in. We drew the diagrams for this article and haven't basted these quilts.
This is for quilting on your own machine. If a longarm quilter is finishing the quilt, don't baste it: the frame loads each layer separately. Our longarm prep checklist covers what to do instead.
Will the quilt fit on your table?
Start with the backing, because it's the biggest layer. Make it 4 inches larger than the top on every side, the margin used in our backing and binding guide. Jones uses the same 4 inches for the backing and about 3 inches for the batting. If you're piecing the backing, our guide to which way to run a backing seam shows how far two widths of fabric reach.
- A 60 x 72-inch throw needs a 68 x 80-inch backing.
- A 90 x 108-inch queen needs a 98 x 116-inch backing.
Now measure the flat surface you'd baste on. Christa Watson's spray-basting tutorial uses "a couple of long plastic tables pushed together." Two 30 x 72-inch folding tables side by side make a 60 x 72-inch surface, so that's the example here.
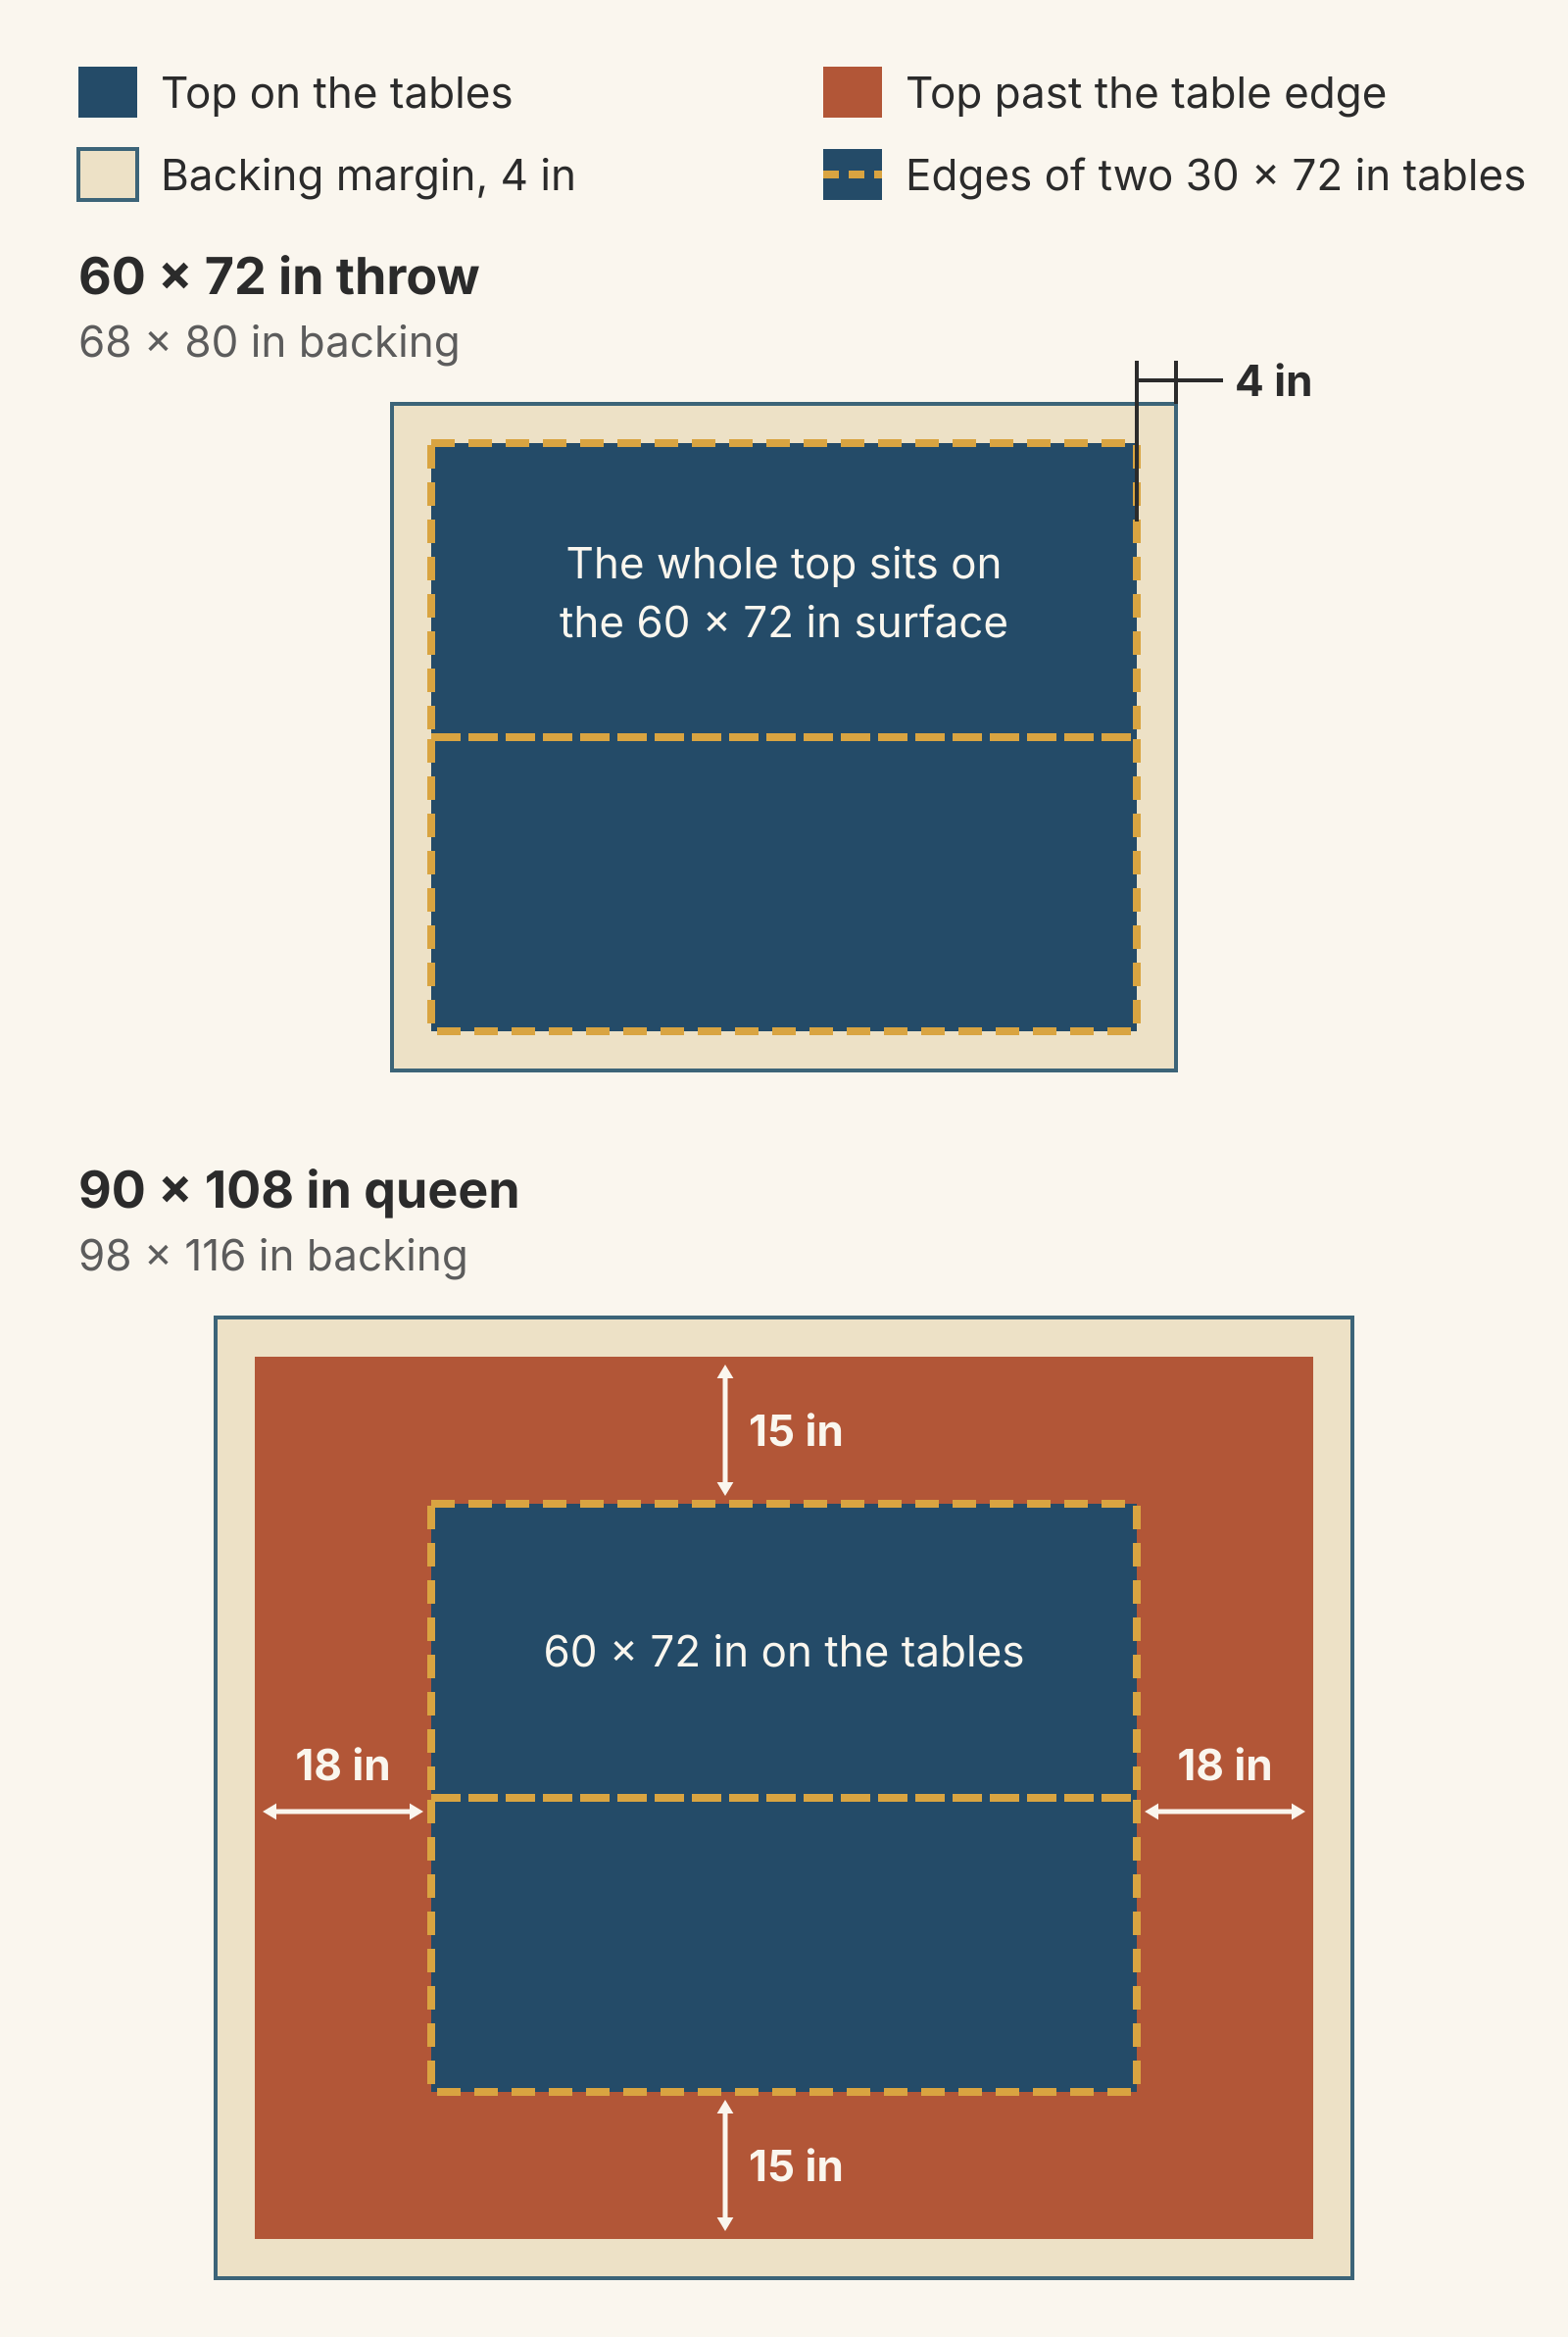
The throw fits. The top covers the 60 x 72-inch surface exactly, and the 4-inch backing margin hangs over the edges, where you can clamp it to the tables. There's no room to spare, so center the backing carefully. A 40 x 50-inch baby quilt, with a 48 x 58-inch backing, fits with 6 inches to spare on each side and 7 inches at each end.
The queen doesn't. Only the center 60 x 72 inches of the top sits on the tables. Another 15 inches hangs off each long side and 18 inches off each end, and the backing hangs farther still. You have two choices:
- Baste on the floor. On carpet, Jones pins the backing's edges into the carpet about every 4 inches. The fabric should have no slack, but it "isn't pulled unnaturally tight like a trampoline." On a hard floor she tapes the edges down with painter's tape instead.
- Baste in sections at the table, moving the quilt along as each part is done. That's a separate technique, with its own way of keeping the layers lined up.
The floor works for either method, but it's hard on the body. Rachel Hauser of Stitched in Color basted on the floor, and in her comparison of the two methods she says the long stretch of "sitting and crawling bent over a quilt" has "physical drawbacks."
How many pins will you need?
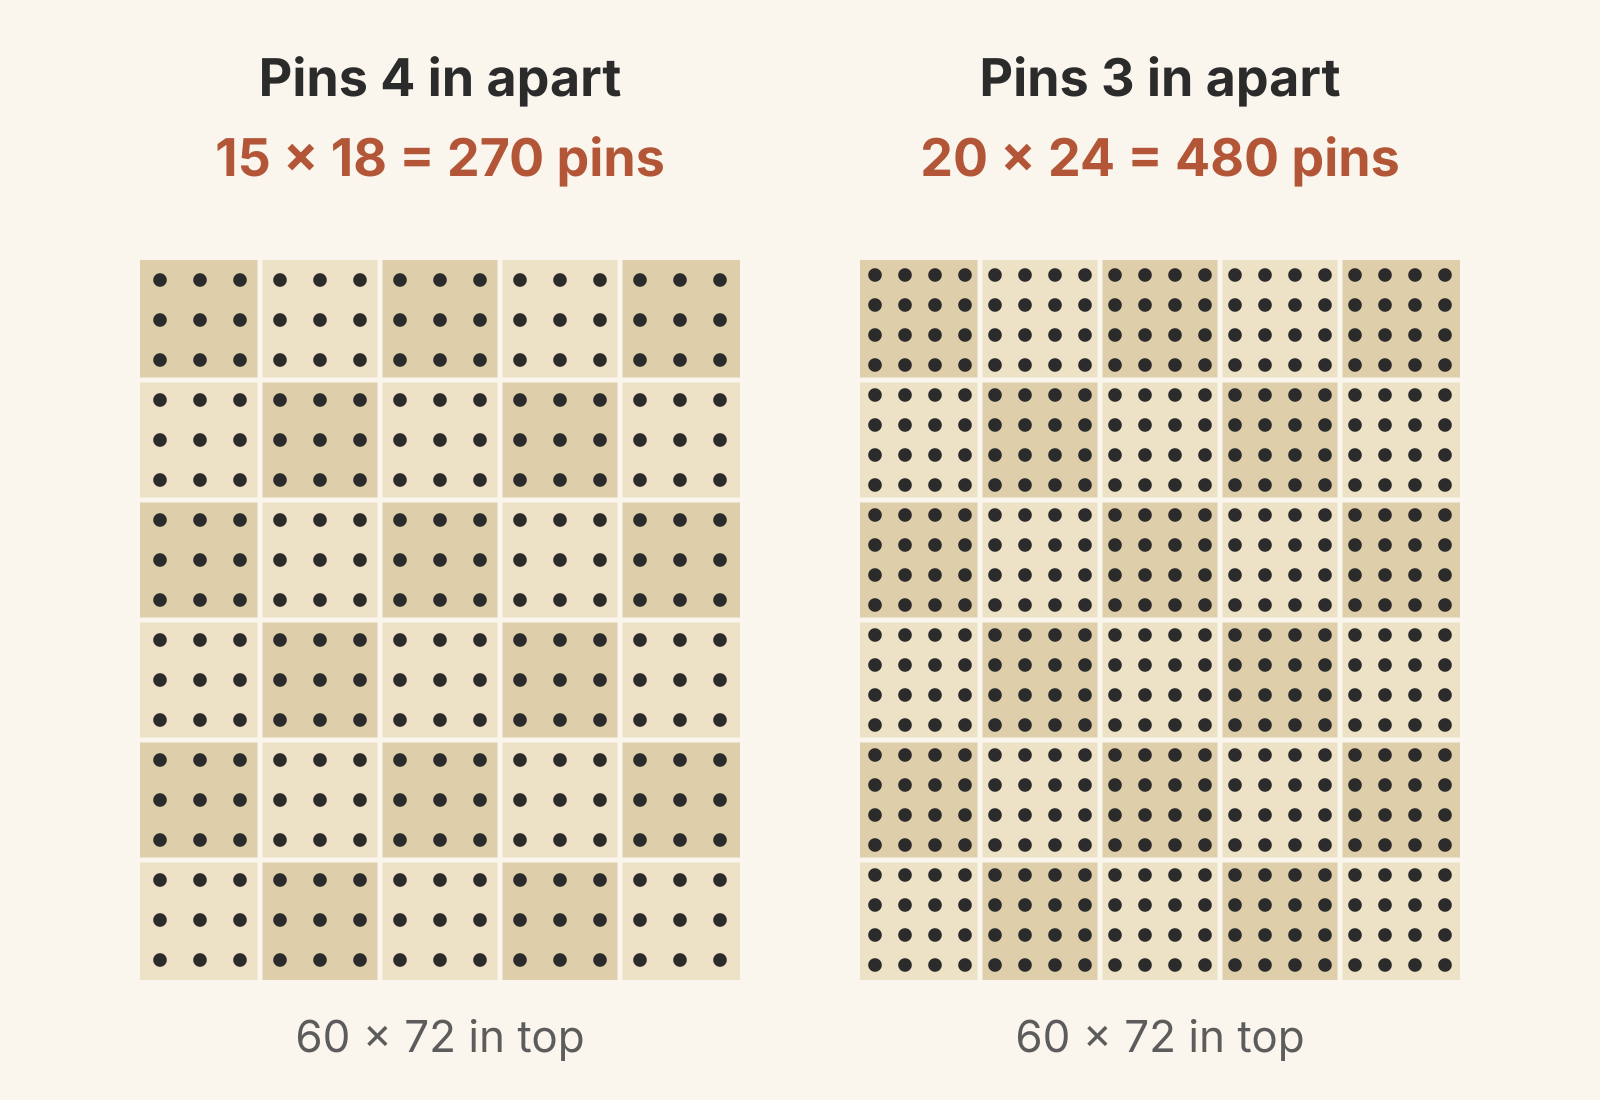
Divide the width by the pin spacing, do the same for the length, and multiply. Hauser passes on a 4-inch grid, the spacing Rita of Red Pepper Quilts recommends; Jones goes to 3 inches. For the 60 x 72-inch throw:
- At 4 inches: 60 ÷ 4 = 15 and 72 ÷ 4 = 18, so 15 x 18 = 270 pins.
- At 3 inches: 60 ÷ 3 = 20 and 72 ÷ 3 = 24, so 20 x 24 = 480 pins.
The same arithmetic for three sizes:
| Finished top | Backing, 4 in per side | Pins at 4 in | Pins at 3 in |
|---|---|---|---|
| 40 x 50 in | 48 x 58 in | About 125 | About 220 |
| 60 x 72 in | 68 x 80 in | 270 | 480 |
| 90 x 108 in | 98 x 116 in | About 610 | 1,080 |
Moving from 4 inches to 3 adds 210 pins to the throw, because the rows get closer in both directions. Hauser, for comparison, figured about 225 pins for a large throw. Jones warns against the temptation to spread pins out to 6, 7 or 8 inches.
The count is also what you'll take out again. Each pin comes out as the needle reaches it. Hauser found that "constant starting and stopping" slowed her down, and she worried the quilt might shift as she released pins. In free motion you move the quilt in every direction, so pins can turn up anywhere in your path. If you're still choosing how you'll quilt, see our walking foot vs free motion comparison.
Pin spacing isn't the same as quilting spacing. Your batting sets its own maximum distance between quilting lines, which you can check with our batting gap check.
What does your spray can's label say?
There's no single spray-basting method, because the products differ. Here are two sprays sold for basting quilts, as their makers describe them online:
| On the maker's page | Odif 505 Temporary Fabric Adhesive | Sulky KK2000XT |
|---|---|---|
| Which layer to spray | Directly onto the batting | Not given |
| Spray distance | 10 inches | Not given |
| How long it holds | About 2 months on polyester; about 4 months on mixed or natural fabrics | Dissipates into the air after about 72 hours |
| Handling | Warns it is extremely flammable, its vapors may cause flash fire and its contents are under pressure | "Use only in a well-ventilated area." Keep away from heat, sparks and open flames |
The 505 details come from Odif's product page and its FAQ, which adds "Sew the fabrics during this interval." The KK2000XT details come from Sulky's product page. Formulas and labels change, so the can in your hand has the final word.
Tutorials differ too. Odif's directions spray the batting, lay the top on, turn the sandwich over, spray the batting again and lay the backing on. Watson, who uses 505, sprays the wrong side of the backing and the wrong side of the top instead. Afterward she presses the whole sandwich from the back to set the adhesive, which she says "works best with natural fiber battings."
Fiber matters as well. Watson recommends prewashed 100% cotton fabric and a batting of cotton, silk or wool, "because the adhesive tends to stick better." Odif gives a shorter hold on polyester than on natural fibers. Check the label against the fibers in your batting before choosing a can. If you haven't bought batting yet, our batting guide compares cotton, polyester, wool, bamboo and silk.
The label also decides where you can spray. Watson advises spraying outside, or "in an extremely well ventilated room with the doors and windows open." Hauser sprayed "with windows wide open." If your space can't meet your can's directions, pin.
Protect the surface either way. Odif's directions start with "Protect work surface." Watson puts towels under the ends of the backing, and Hauser uses a drop cloth.
Will the spray outlast your quilting?
Compare the label's hold time with your quilting plan.
Take the 60 x 72-inch throw, basted on a Saturday and quilted over two weekends. The last stitch goes in on the following Sunday, 8 days after basting.
- Sulky KK2000XT: about 72 hours means the adhesive dissipates by Tuesday, with most of the quilting still to do. Either finish within 3 days or pin.
- Odif 505: about 4 months on cotton, a natural fiber, or about 2 months on polyester. Eight days fits easily.
- Pins: 270 at 4 inches, holding for as long as the quilting takes.
Spray saves time when it suits your schedule. Hauser found spray basting took about 15 minutes once the fabrics were ironed and smoothed. Pin basting a throw means opening, placing and closing hundreds of pins.
Your setup plan
Answer each question for your quilt. The first two decide whether spray is possible at all. The third tells you where to baste, and the fourth whether spray is worth it.
| Question | If yes | If no |
|---|---|---|
| Does your space meet your can's label? | Spray is possible | Pin |
| Will you finish quilting inside the label's hold time for your fibers? | Spray is possible | Pin, or choose a can with a longer stated hold |
| Does the whole top fit on your table? | Baste at the table | Baste on the floor, or in sections at the table |
| Would pulling pins slow your quilting? | Lean toward spray | Pins are fine |
For the examples in this article:
- 60 x 72-inch throw, two tables, 505 on cotton, quilted in 8 days, in a space that meets the label: spray.
- The same throw with KK2000XT: pin, using 270 pins at 4 inches, unless you'll finish within 3 days.
- 90 x 108-inch queen: the top doesn't fit on two tables, so baste on the floor or in sections. With pins, that's about 610 at 4 inches.
Before basting day, write down four numbers: the finished size, the backing size, your surface size, and either your pin count or your can's hold time. Then gather the pins, or read the can before you buy it.
QuiltLab doesn't plan basting or work out backing for you, but it gives you the starting number. In the Quilt Editor, the status bar shows the quilt's finished size. Once you add a border, it shows the Overall size as well, and that's the one to use. Add 8 inches to each dimension for the backing, and the rest of this plan follows from there.
Quilt Editor guide →Where the quilt's finished dimensions appearRelated posts
How to Prepare a Quilt for Longarm Quilting
The checklist longarm quilters ask for, with the reason behind each step, then one 64 x 80 inch top checked against two real service sheets.
Should You Prewash Quilt Fabric? Decide by Precuts, Yardage and Color
Most quilters can skip prewashing good quilting cotton as long as every fabric in the quilt gets the same treatment. Here's when precuts, flannel, a wide backing or a deep red change the answer.
Starch vs Sizing for Quilting: Which Should You Use Before Cutting?
Starch gives quilting cotton a crisp hold for bias edges and small pieces; sizing adds light body. See which to use, when to skip both, and a worked star quilt plan.