


Centering Fussy Cut Motifs: Fix the Shift First
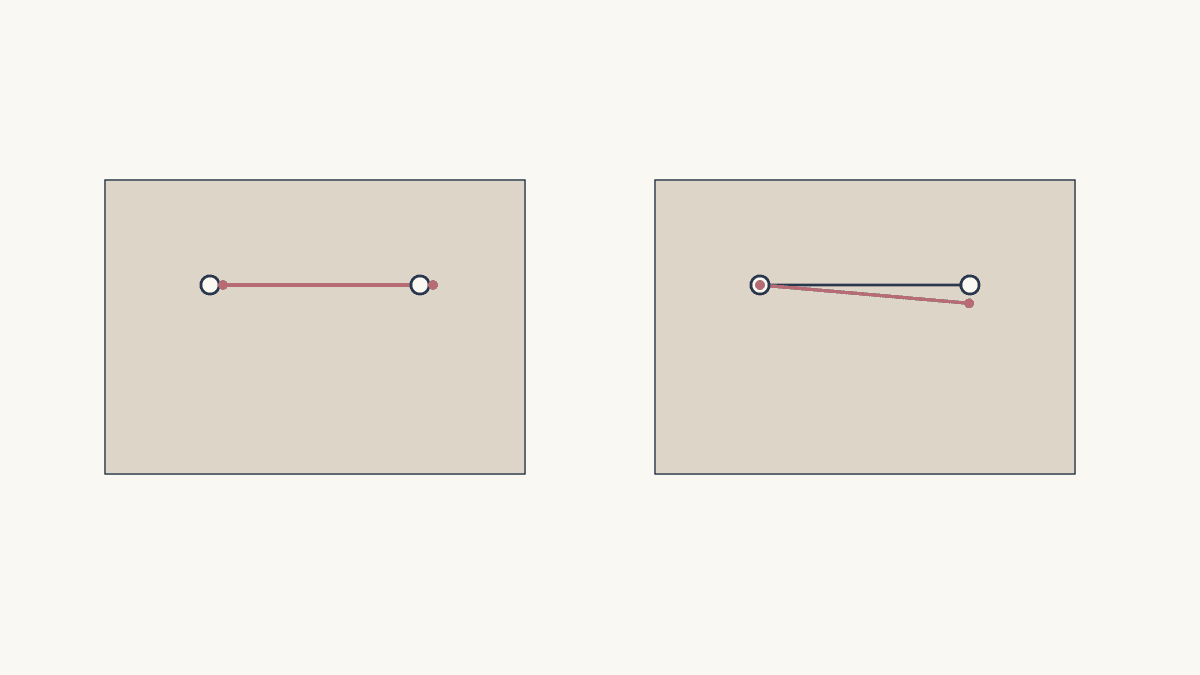
Compare two print landmarks when a fussy-cut motif looks off-center. If both landmarks move the same amount in the same direction, shift the window. If one agrees and the other swings away, rotate the window. If their spacing changes, you may be looking at a different or distorted print occurrence.
Make that diagnosis while the full cutting boundary still fits on the cloth. Correcting the picture is useful only if you can also preserve the seam allowances and the intended visible patch.
Keep the accepted crop as the reference
Choose one successful window and label its top. Mark the finished outline and the cutting outline separately. Then select two unmistakable landmarks in the print.
For a flower, you might use a petal tip and the point where a leaf joins the stem. Avoid two fuzzy areas whose positions are hard to repeat. Widely separated details make a small rotation easier to spot.
American Patchwork & Quilting's fussy-cutting guidance uses print details traced onto a template to register later cuts. It also notes variation in printed motifs. Treat the accepted window as the target, then inspect each later occurrence instead of assuming the fabric is a perfect grid.
If you need the basic viewing-window setup, start with our fussy-cutting guide. This check begins after you have chosen the crop you want.
Read a simple shift
Imagine a finished 4-inch square. In our reference drawing, landmark A is at (1,1) and landmark B is at (3,1), measured from the window's upper-left corner.
In the next occurrence, they appear at (1.125,1) and (3.125,1). Both have moved one-eighth inch to the right. Their separation and angle are unchanged.
That is a translation. Keep the cloth still and move the physical window right by 1/8 inch. The print details then sit 1/8 inch farther left within the window, back at the reference positions. Moving the window left would increase this mismatch.
Check both landmarks again after moving. It is easy to fix the first and stop looking before noticing a second error.
| Landmark | Reference | Next occurrence |
|---|---|---|
| A | (1,1) | (1.125,1) |
| B | (3,1) | (3.125,1) |
| Difference | — | Both move right 1/8 in |
The numbers describe a drawing, not an acceptable cutting tolerance. Your visible motif, piece size and surrounding design determine whether a real difference matters.
Recognize a rotation
Now keep landmark A at (1,1), but place B at approximately (2.9924,1.1743). The landmarks remain 2 inches apart, yet their connecting line slopes down by 5 degrees in our front-view drawing.
Sliding the whole window can make either landmark agree, but it cannot align both at once. With the cloth still, turn the window clockwise around A until its B mark covers the print detail. Recheck the finished edges and the full cutting boundary afterward. If that turn breaks your pattern's grain requirements, choose another occurrence.
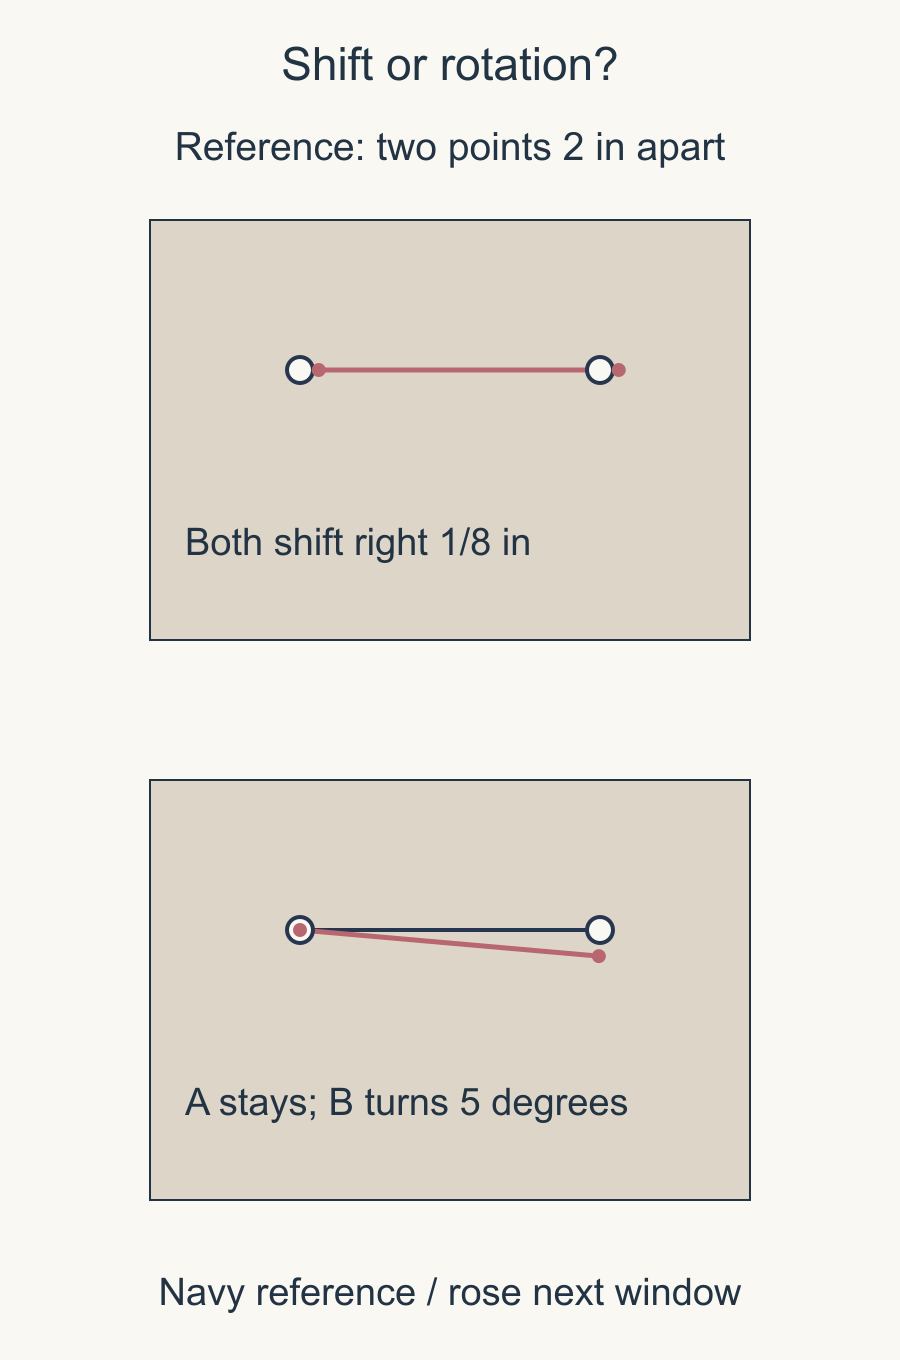
Use the line between the two landmarks as a quick direction check. You don't need to measure five degrees in ordinary cutting. The useful observation is that the second point moves around the first rather than sharing the same displacement.
Notice when moving the window cannot help
If the second pair is 2.1 inches apart while the reference pair is 2 inches apart, shifting and rotating will not make both points match. Their spacing differs by 5%.
Look for a different repeat first. Check whether you accidentally selected a similar-looking flower rather than the same flower in the repeat. Also inspect how the cloth is lying; pulling it while aligning a ruler can change the view you are judging.
Do not force the fabric into agreement merely to satisfy the marks. Let it rest flat, reassess the print and choose whether the variation works in the finished design. A deliberately varied motif can be attractive, but it should not enter a supposedly identical batch unnoticed.
This is especially useful for the repeated rotations in a fussy-cut hexagon arrangement. One unusual occurrence can interrupt a ring even when its main flower looks close enough by itself.
Return to the cutting boundary
Our finished window is 4 inches square. With quarter-inch allowances on all sides, the separate cutting outline would be 4.5 inches square.
After correcting a shift or rotation, inspect that larger boundary. Does it run into a previous cut? Is the intended image still inside the finished outline? Is there enough actual fabric at every corner?
Happy Hour Stitches' ordinary-ruler method makes the hidden seam area visible while using an ordinary acrylic ruler. That is the helpful distinction here: you judge the image through the finished window but cut around the allowance.
Arbee Designs' fussy-cutting lesson also combines position references with the required allowances. Use the method suited to your ruler and template, while keeping those two boundaries easy to recognize.
Make a small batch log
Check the motif near the finished edges too. Two central landmarks can agree while a peripheral leaf falls differently because the print itself varies. If that edge detail contributes to a repeating ring or seam match, add it as a third check before accepting the occurrence.
For a repeated set, give each intended window a number before cutting. Record the mismatch and the next check. A log for the three drawn examples could look like this:
| Example | Mismatch | Next check |
|---|---|---|
| Shift | Both landmarks 1/8 in right | Move the window right 1/8 in, then compare both marks |
| Turn | A agrees; B changes angle | Turn around A, then check edges and grain requirements |
| Spacing | Landmarks 2.1 in apart instead of 2 in | Compare another occurrence without stretching the cloth |
Mark a window accepted only after the landmarks, edge details and complete cutting outline all pass. Keep an unresolved occurrence outside the matching set.
Keep a photograph of the accepted crop with its top marked. Add the two landmarks to your working template or reference drawing. A photograph without orientation can be confusing when the pieces later rotate around a center.
Cut only after the final check, then keep matching pieces together. If the arrangement depends on a particular rotation, lay the first set out before proceeding to the next batch.
Our print-matching article takes registration into joined pieces. This two-landmark check solves the earlier problem: whether each selected window contains the same picture in the same place.
Choose one accepted crop and two clear landmarks now. Compare the next occurrence against both. Naming the kind of mismatch is usually faster than repeatedly nudging a ruler without knowing what you are trying to correct.
Plan your next quilt
Lay out blocks and try colors in QuiltLab's grid editor before you cut.
Free forever, no card needed.
Get quilting tips by email
QuiltLab updates, tips and quilting inspiration. Unsubscribe anytime.
Related posts
Directional Quilt Border Corners: Upright or Around?
Choose whether border motifs stay upright or turn around the quilt, then check every corner before cutting matching print bands.
Fussy Cutting Border Prints: Keep the Whole Band
Choose a border print by its finished visible band, preserve calm margins, and check repeat phase before cutting long strips.

Kaleidoscope Quilt Fabric Repeats: Plan Eight Wedges
Find eight matching print windows, keep the same wedge reference, and preview the octagon before cutting a batch.