


How to Choose Fat Eighth Quilt Patterns for Your Bundle
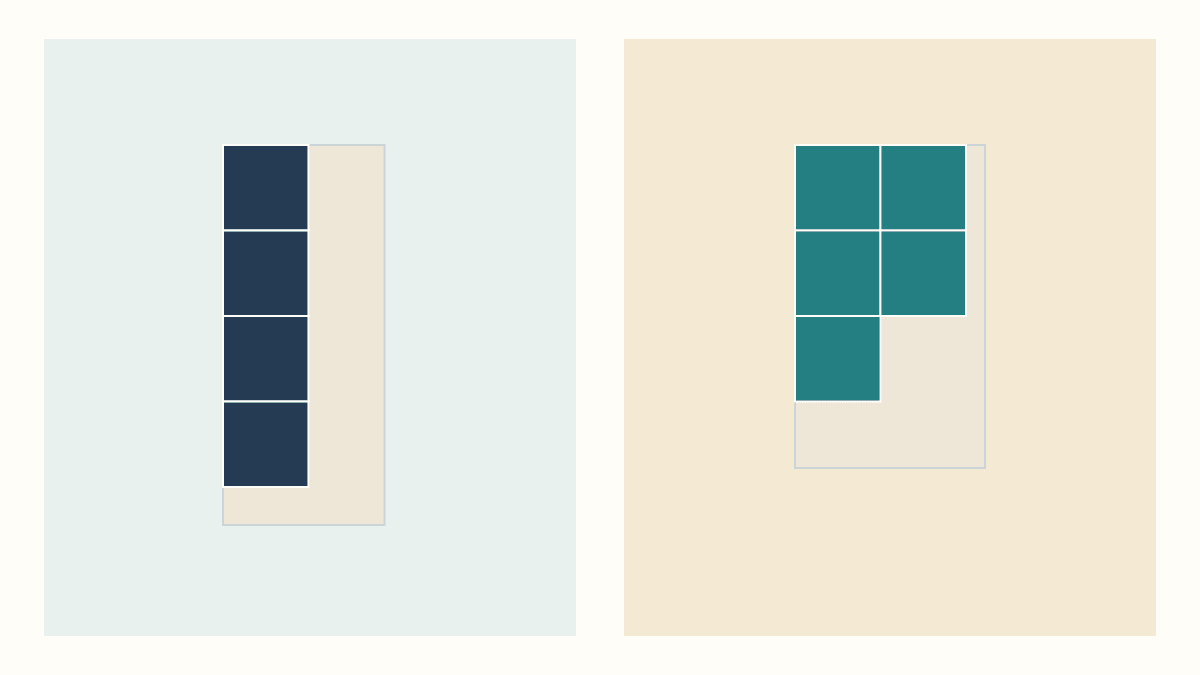
Choose a fat eighth quilt pattern by checking the dimensions it expects and every piece it needs from each print. Match those requirements to your usable fabric before cutting. Two pieces sold as fat eighths can have different shapes, and equal fabric area doesn't mean they can supply the same block.
For a bundle you already own, start with its shape. A short, wide piece may suit a group of squares, while a narrower, longer piece may supply the bars another pattern needs. Here's how to make that choice without discovering a missing print square halfway through a block.
Read the dimensions beside the pattern name
"Fat eighth" isn't enough information to choose a cutting plan. Becky Jorgensen's fat-eighth explanation at Patchwork Posse describes both 9 x 22-inch and 18 x 11-inch formats. The Sewing & Craft Alliance's precut guide lists an 11 x 18-inch fat eighth and notes that names and sizes can vary by brand.
A pattern may be more specific. For example, Brittany Lloyd's Rhythm pattern at Lo & Behold Stitchery defines its fat eighth as 9 x 21 inches in the public fabric requirements. That's the sort of detail to find before pairing a pattern with a bundle.
Read the package label and the pattern's requirements together. If their dimensions differ, pause before treating the pieces as interchangeable. A pattern described as fat-eighth friendly still needs the format and quantities its designer used.
If you're choosing between bundles and larger cuts, our precuts versus yardage comparison covers that purchasing decision. Here, keep your attention on whether each print can provide its required pieces.
Make a complete cutting list for one print
Before checking a whole bundle, work through the pieces needed from a single print. Use the cutting instructions for the quilt size you actually plan to make.
Write down:
- Each shape's cut size, including the allowances specified by the pattern.
- How many of that shape must come from the same print.
- Any long bars, direction requirements or pieces reserved for another part of the block.
- Whether the designer permits turning a piece or substituting another fabric.
Then measure the usable rectangle after the preparation and straightening your project requires. Leave the selvage outside that measurement. Keep the shorter and longer dimensions separate; multiplying them into one area hides the problem we're about to check.
For the drawn studies below, we use hypothetical usable rectangles and haven't cut or sewn them. They show how to qualify the print pieces; follow your selected pattern for its full cutting list and construction.
Five squares fit one shape but fail the other
Suppose a checkerboard Nine Patch needs five 4-1/2-inch cut squares from one print and four background squares supplied separately. With quarter-inch seams, each square finishes at 4 inches and the block finishes at 12 inches.
Compare these usable print rectangles:
| Usable piece | Area | Can it supply all five print squares? |
|---|---|---|
| 8-1/2 x 20 inches | 170 square inches | No: at most four fit |
| 10 x 17 inches | 170 square inches | Yes: five fit |
On the long piece, two 4-1/2-inch squares would need 9 inches across. You have only 8-1/2. The squares therefore need separate positions along the length, and five would need 22-1/2 inches. The fabric is only 20 inches long.
Staggering the squares doesn't solve that short-side problem. Any two squares overlap across the width, so they must occupy different spans along the length. Four fit; the fifth is still missing.
On the wide piece, two squares fit across 9 inches. Three rows would use 13-1/2 inches of the 17-inch length. That arrangement has room for six squares, so you can take the required five and leave the sixth position as a spare.
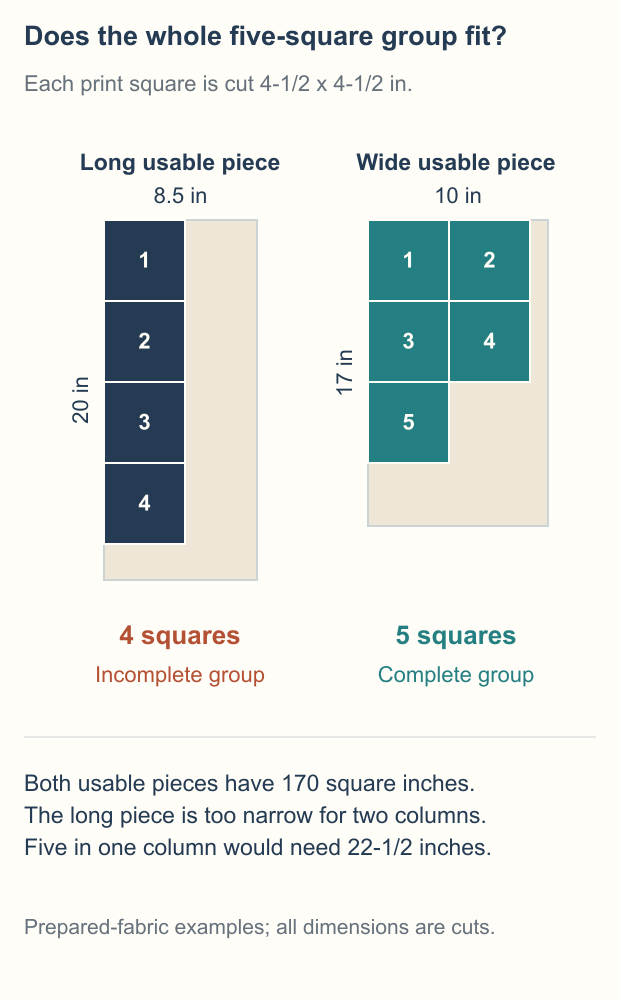
The five squares contain 101-1/4 square inches of fabric. Both rectangles have more area than that, yet only one supplies the group. This is why an area calculation alone can give you a reassuring answer that the cutting layout can't deliver.
Long bars reverse the choice
Now consider a different design that needs two 2-1/2 x 18-1/2-inch print bars for opposite edges of a frame. Its center and remaining pieces come from the selected pattern's other requirements.
The 8-1/2 x 20-inch piece works. Put the bars side by side: together they use 5 inches across and 18-1/2 inches along the length. Both bars come from the same print.
The 10 x 17-inch piece fails. Its longest side is 17 inches, shorter than the required 18-1/2-inch bar. Turning the bar 90 degrees only puts that long dimension against the 10-inch side.
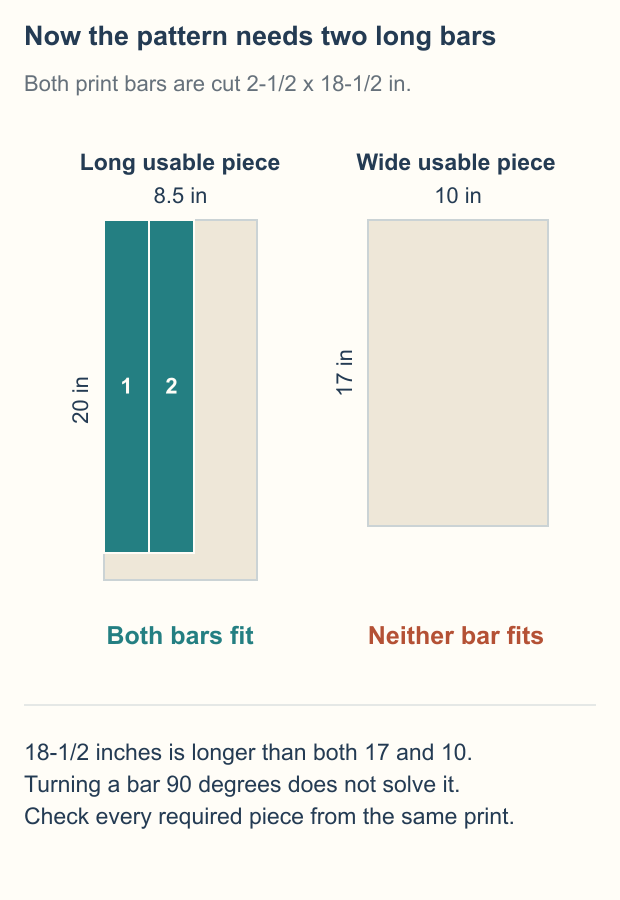
The pair uses 92-1/2 square inches, less than either rectangle contains. Once again, plenty of area can't replace the missing length.
For these two studies, the choice is clear: favor the wider piece for the five-square group and the longer piece for the bar pair. A real pattern may need both kinds of pieces from each print, so check its entire list together.
Count usable print groups across the bundle
After one print passes, repeat the check for every print you intend to use. Don't assume all pieces in a mixed stash bundle have the same usable dimensions.
Suppose your chosen layout needs eight matching-print groups. Eight pieces that each supply a full five-square group meet that part of the requirement. Seven complete groups and a pile of assorted spare squares leave one print group short.
That distinction matters when the print repeats within a block. A spare from another fabric may change the design rather than finish the intended group. If the pattern offers a scrappy variation, use its directions for that variation. Otherwise, choose a replacement print that can supply the whole group.
Mark each print on a simple list: full group fits, needs a substitute, or needs a different plan. Keep background, border and binding requirements alongside it. Passing the print-group check doesn't account for those other fabrics.
Keep direction and grain in the decision
A layout may fit geometrically while turning a flower or stripe the wrong way. Before rotating a rectangle to save space, compare its intended position with the print direction and the pattern's grain guidance.
Our directional-print block guide shows why the same print can read differently as units turn. Use a direction arrow on your cutting sketch when that matters. A square's outline stays the same after a quarter-turn; its printed bird may not.
For a complicated mixed-piece inventory, the fat-quarter cutting-layout lesson shows how to keep all required pieces visible while comparing cutting orders. Carry the same habit into a smaller cut: reserve the complete group before spending its leftovers.
Choose the pattern before the first cut
For your next bundle, pick one promising pattern and find its stated fat-eighth dimensions. Measure one prepared piece, then sketch all the cuts needed from that print at a single scale.
Check the longest piece first, followed by the complete group count and any direction restrictions. Repeat for the remaining prints. When every group fits, you can choose the pattern knowing what the bundle actually supplies.
Related posts
Freezer Paper Foundation Paper Piecing or Sew-Through?
Compare sewing through a foundation with sewing beside folded freezer paper, using one simple unit and a realistic plan for sixteen repeats.
Pinked Edges on Precuts: Where to Measure the Seam
Peaks or valleys? Compare Moda and C&T guidance, then use a three-strip check to choose a consistent seam reference for your actual precuts.
Wonky Log Cabin Quilt Blocks That Trim to One Size
Keep the irregular strips and still make blocks that fit. Plan an 8-inch finished block, check the trimming square and protect the outer seams.