


Choosing Quilt Block Size: Which Size Fits Your Quilt?
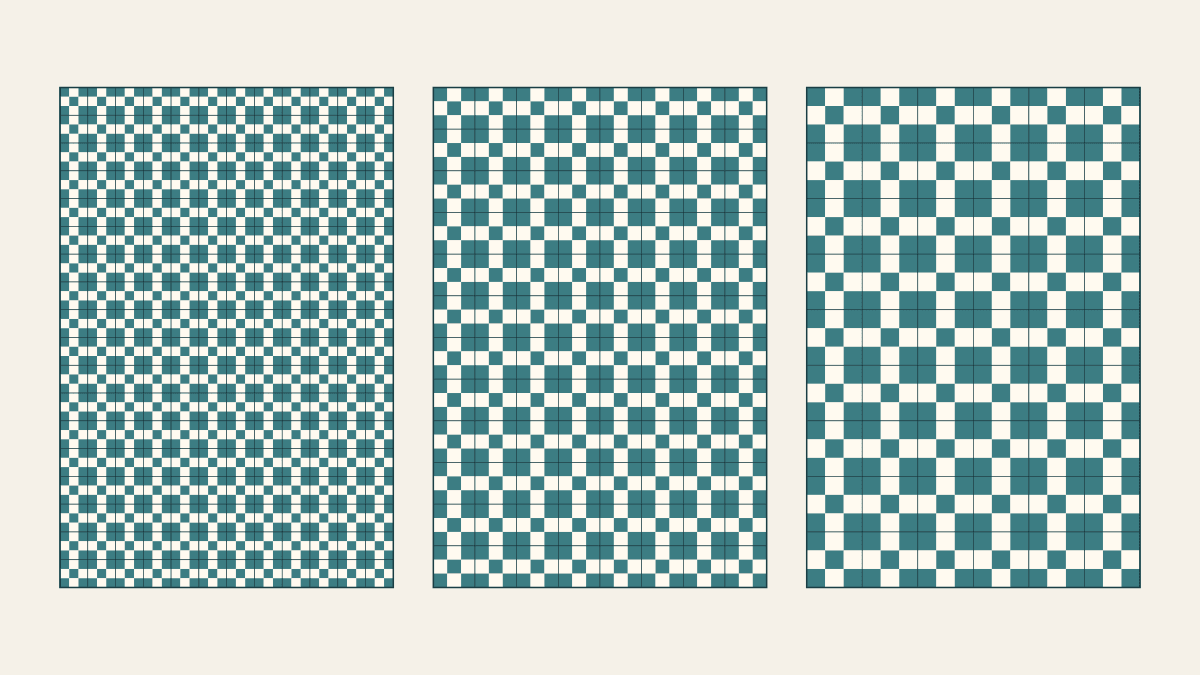
For fewer, larger pieces in the Nine Patch quilt below, choose 12-inch finished blocks. They need 54 blocks with 4-inch finished squares. Choose a smaller scale if you want a denser rhythm or smaller print windows. Look inside the block, too: a large block divided into many units can still have tiny patches.
We keep a 72 x 108-inch finished target and the same Nine Patch arrangement while comparing 6, 9 and 12-inch blocks. The diagrams show the counts and visible patch sizes so you can choose a scale before choosing a construction plan.
Separate block size from patch size
The finished block measurement describes the area between its eventual outside seam lines. The internal grid determines the size of the shapes within that area. Our Nine Patch has three equal squares across and three down, so each square's finished width is block width divided by three.
Julie Baird's grid explanation at Generations Quilt Patterns connects a block's finished size to its grid units. It also gives the ordinary square-and-rectangle cutting relationship: add 1/2 inch to a finished dimension when allowing 1/4 inch on each opposing edge. For this study:
| Finished block | Finished square | Cut square | Unfinished block |
|---|---|---|---|
| 6 inches | 2 inches | 2-1/2 inches | 6-1/2 inches |
| 9 inches | 3 inches | 3-1/2 inches | 9-1/2 inches |
| 12 inches | 4 inches | 4-1/2 inches | 12-1/2 inches |
Those cut sizes apply to our ordinary squares and nominal quarter-inch seam allowances. Triangles, curved templates and oversize-and-trim methods have their own cutting requirements. If you are using a published pattern, its cutting chart normally already includes the required allowances. Our pattern-reading audit explains how to distinguish finished, unfinished and cut numbers before changing anything.
A 12-inch block divided into six units across would have 2-inch units, matching the patch width in our 6-inch Nine Patch. Block size alone therefore cannot tell you whether a favorite print will remain recognizable or how small the pieces are to handle.
Hold the quilt footprint constant
For the comparison, use square blocks in a straight grid with no sashing or borders. Divide 72 by the block width to find columns, and 108 by the same size to find rows. Each chosen size divides both dimensions exactly.
| Finished block | Columns x rows | Total blocks | Total individual squares |
|---|---|---|---|
| 6 inches | 12 x 18 | 216 | 1,944 |
| 9 inches | 8 x 12 | 96 | 864 |
| 12 inches | 6 x 9 | 54 | 486 |
For example, 8 x 9 = 72 inches across, 12 x 9 = 108 inches down, and 8 x 12 = 96 blocks. Each of those blocks contains nine squares, giving 96 x 9 = 864 pieces.
Reference charts can help suggest a starting grid, but inspect their assumptions. Superior Threads' block-dimension chart explicitly includes pillow-tuck and long-drop assumptions in its listed averages. Our comparison answers a different question: which scale suits a footprint you have already chosen? The quilt-design overview puts that decision within the broader fabric, layout and finishing plan.
If you later add sashing, recalculate the footprint rather than keeping this table's finished size. The sashing-width comparison shows how space between blocks changes both dimensions and the visual rhythm.
Count joining steps for one stated method
Piece counts become more useful when connected to a construction sequence. Here we assume that you cut all nine squares separately, join them into three rows, join those rows into a block, and finally assemble the blocks in quilt rows.
One joining step means joining two existing fabric pieces or units along one edge. It does not mean one machine pass: chain piecing can connect many separate joins without stopping, and strip piecing changes which units are assembled first.
For each Nine Patch:
- Join three individual squares into a row: two joins.
- Make three such rows: 3 x 2 = 6 joins.
- Join the three rows: two more joins.
That gives eight joins per block. To assemble a grid with C columns and R rows, joining blocks within rows takes (C - 1) x R steps. Joining the completed rows takes R - 1 more. Together, that is C x R - 1, or one fewer than the number of blocks.
| Block option | Inside-block joins | Block-grid joins | Total joining steps |
|---|---|---|---|
| 6 inches | 216 x 8 = 1,728 | 215 | 1,943 |
| 9 inches | 96 x 8 = 768 | 95 | 863 |
| 12 inches | 54 x 8 = 432 | 53 | 485 |
Check the 9-inch option independently: (8 - 1) x 12 = 84 joins within quilt rows, plus 12 - 1 = 11 between rows. Add those 95 to the 768 inside blocks to reach 863.
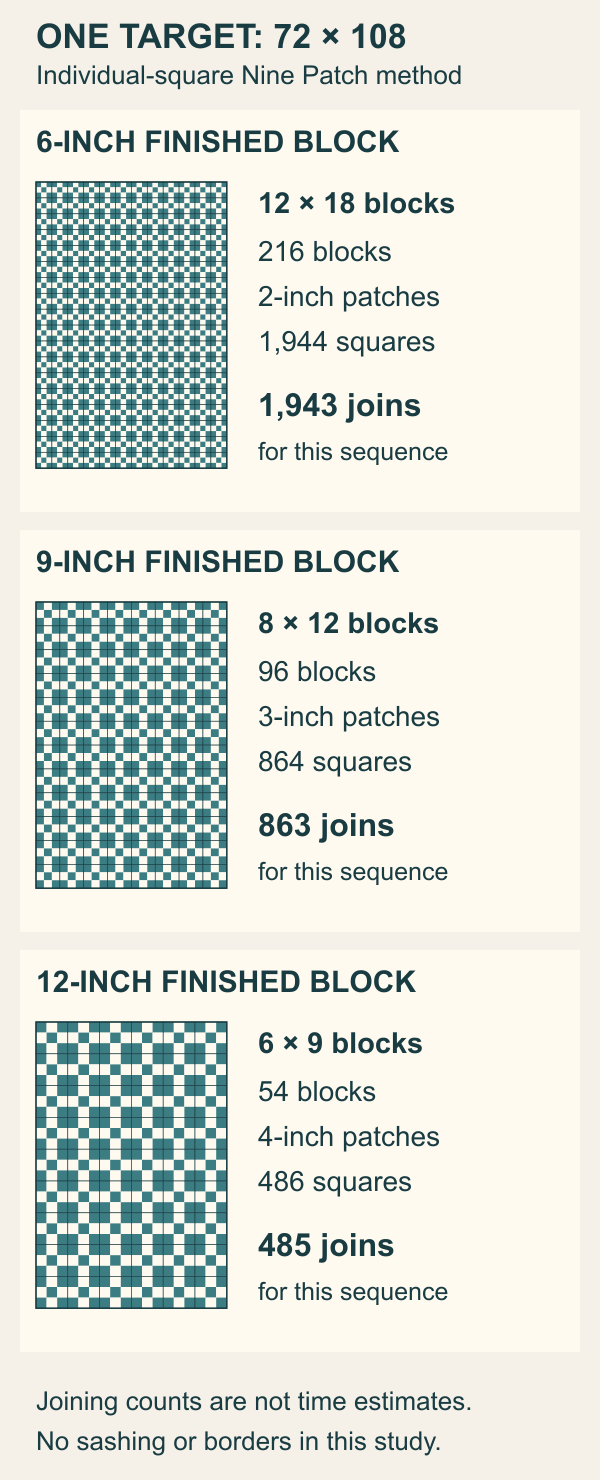
Use the worksheet to compare repeated operations. Also consider cutting setup, pressing, matching intersections and handling large rows. A pattern built from strip sets needs its own sequence count.
Audition fabric at the finished patch window
Make paper windows with openings of 2, 3 and 4 inches square. Lay them over the actual fabric you are considering. The opening represents the visible finished patch, while the surrounding cut fabric includes material intended for seams.
Suppose a printed flower is approximately 3-1/2 inches wide. It cannot fit completely inside a 2-inch or 3-inch square opening. It may fit inside the 4-inch opening if its placement leaves the desired margin. Then check motif spacing and fabric quantity to see how many of those windows you can cut.
View several windows together in the intended block arrangement. In our diagrams, five dark squares occupy the corners and center, and four light squares occupy the other positions. At 6-inch block scale, that repeated arrangement creates many small visual changes. At 12-inch scale, each dark or light region is larger even though the design is identical.
You might prefer the small-scale rhythm for mixed scraps, or the larger window for a print you want to read from across the room. Record the specific reason. "I want the entire flower visible in these patches" is a decision you can inspect; a general label such as "large blocks are easier" misses the internal construction.
Check one block before committing to the batch
The arithmetic assumes that the assembled blocks reach the specified unfinished measurement. For the 9-inch option, three 3-1/2-inch squares initially total 10-1/2 inches across. Two joins each consume 1/2 inch across neighboring pieces, leaving a nominal 9-1/2-inch row length. Joining three rows similarly produces a 9-1/2-inch unfinished block.
Actual seams and pressing deserve a sample check. The American Patchwork & Quilting editors' quarter-inch seam guide explains how fabric taken into the pressed fold can affect the assembled size and recommends checking a sample. Follow your pattern's instructions, use the intended materials and inspect the measurement before repeating the block hundreds of times.
A larger chosen scale does not fix an inconsistent seam allowance. Nor should you round a difficult patch dimension silently: changing each unit changes the block. Keep any adjustment explicit and recheck the design.
Write down the tradeoff you chose
A useful decision note contains the target footprint, finished block and patch sizes, construction method, block count, and one reason for accepting that combination. For example:
72 x 108 target; 9-inch Nine Patch; 3-inch finished squares; 96 blocks; individual-square method; 863 planned joining steps. Chosen for a middle-sized print window while reducing repetition from the 6-inch option.
Cut a paper window at your chosen finished patch size and try it on your fabric. Then check one sewn block against the required unfinished size before cutting the whole batch. If you later enlarge an existing layout, use the three-strategy enlargement guide to compare the construction options.
Related posts
How Long Does It Take to Make a Quilt? Work Out Your Own Time
A simple throw often takes two to four weeks of spare-time sewing. Here's how to time one batch of blocks and turn it into hours and a finish date.
How to Make a Quilt Pattern Smaller Without Losing the Center
Drop whole rows and columns first. Here's how we'd shrink a 48 x 60-inch throw to a 26 x 38-inch wall quilt and keep its 12-inch center.
Planning a Bed Quilt That Fits Your Bed
Build a measured bed worksheet with unequal drops, pillow allowance, floor clearance and orientation checks before choosing a quilt pattern.