


How to Read a Quilt Pattern Before Cutting
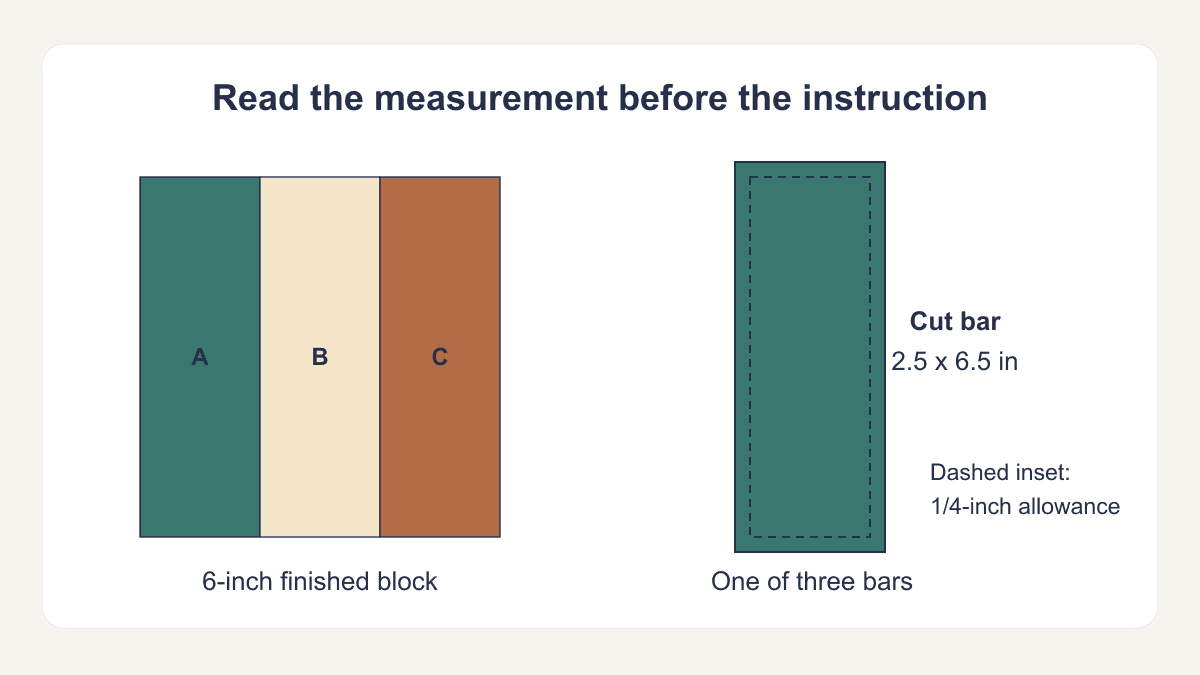
Learning how to read a quilt pattern starts with matching each number to its job. The quilt's finished dimensions, a block's unfinished measurement and a patch's cutting size can all be correct while describing different stages. Before buying fabric or cutting a stack of pieces, identify which stage each instruction means.
We'll audit an original miniature pattern page for a small three-bar practice top. Its numbers and diagrams are teaching material, not a complete sew-tested pattern. The useful result is a reader's project sheet: one chosen size, a fabric-role key, reconciled quantities and a sequence of measurement checks.
Read the overview and choose one size
Find the designer's name, pattern title, version or date, measurement units, finished quilt dimensions and construction methods. Then read the complete instructions once. Amber Elliot's pattern-reading guide at Alderwood Studio emphasizes reading ahead and identifying assumptions about cutting, seams and pressing. Use that first pass to find questions rather than trying to memorize the project.
If the pattern offers multiple sizes, mark one consistently across the materials, cutting and assembly pages. A cutting count from the throw column and a backing requirement from the wall-hanging column do not make a coherent plan. Write the size name and its dimensions at the top of your notes.
Do not treat a skill-level label as a list of techniques. Scan the instructions for unfamiliar units, templates, curves, partial seams or foundation piecing. Find the designer's linked lesson or ask for clarification before buying supplies that depend on the method.
For our reading study, the chosen option is a practice top: 18 x 24 inches finished, using 12 blocks in three columns and four rows. There is no border or sashing. Each block has three bars and finishes at 6 x 6 inches. Those facts are the overview you will check against every later count.
Separate finished, unfinished and cut measurements
Keep these three terms distinct:
| Measurement | What it describes | Our study's example |
|---|---|---|
| Finished | Intended size inside the completed seam boundaries | Block: 6 x 6 inches |
| Unfinished | Assembled unit with its outside seam allowances still present | Block: 6-1/2 x 6-1/2 inches |
| Cut | Starting fabric before the specified seams are sewn | Bar: 2-1/2 x 6-1/2 inches |
For ordinary squares and rectangles with 1/4-inch allowances on all edges, a finished dimension needs an additional 1/2 inch for cutting: 1/4 inch on each opposing edge. Julie Baird's grid-and-patch explanation at Generations Quilt Patterns gives this square-and-rectangle relationship. Our bar finishes at 2 x 6 inches, so its cut size is 2-1/2 x 6-1/2.
A published pattern's cutting chart normally already includes the allowances required by its method. Do not add another half inch simply because you recognize the word "seam." First read the chart heading and the construction notes. A diagram of finished geometry serves a different purpose from a full-size cutting template.
The square-and-rectangle rule does not establish starting sizes for triangles, oversize-and-trim units or curved templates. If the pattern makes half-square triangles, preserve its method and trimming instructions; our two-at-a-time HST guide illustrates why starting fabric and finished units need separate measurements.
Finished layout dimensions also do not guarantee an exact measurement after quilting and washing. Use them to understand the plan, then check the actual fabric and work as you proceed.
Give each fabric label one stable meaning
A letter is a role, not a requirement to buy the cover quilt's exact color. Assign your fabric to the pattern's labels before reading the cutting chart. For our example, use A = dark teal, B = light cream, and C = copper accent. Each block contains one bar of each role.
Write that key beside the materials page and keep a small fabric reference with your labeled pieces. If two fabrics look similar, identifying them by role is more reliable than remembering which was "the lighter blue." Check directional prints against every orientation used in the layout; rotating a block also rotates its printed motif.
HollyAnne Knight's String & Story pattern-reading walkthrough explains charts that list final pieces versus charts that first list width-of-fabric strips and then subcuts. Read the noun after the quantity. "Cut 12 rectangles" and "cut 12 strips, then subcut rectangles" describe very different amounts of fabric.
In a glossary, WOF usually means width of fabric and RST means right sides together. HST identifies a half-square-triangle unit. Let the pattern's own glossary settle its abbreviations and any special use of arrows. A pressing arrow, grainline and rotation marker should not be assumed to mean the same action.
Audit an original miniature pattern page
Here is our sample page in compact form. Read its overview, cutting chart and assembly checkpoint together rather than treating them as independent lists.
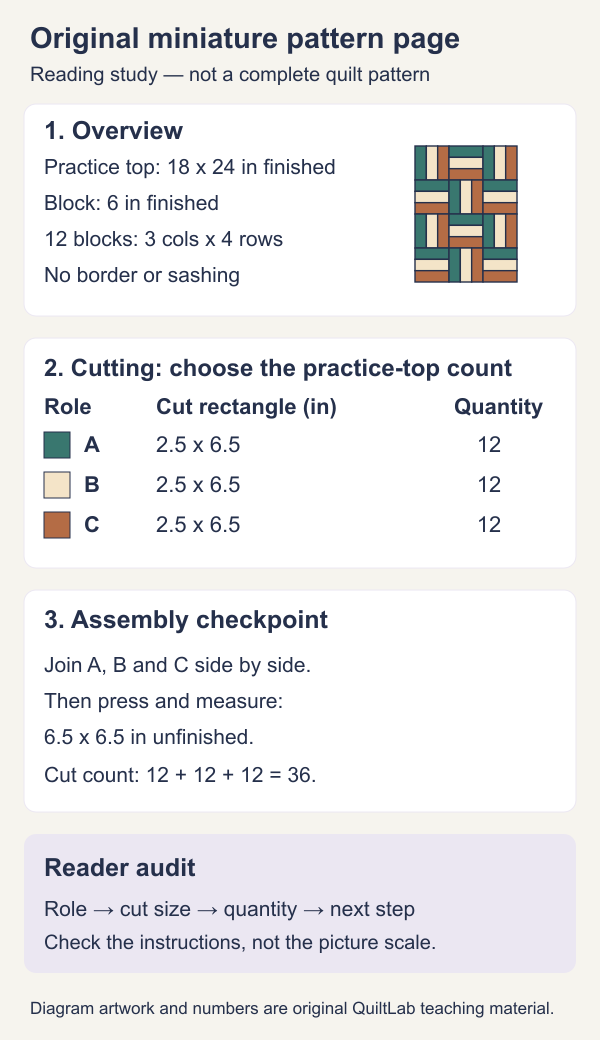
Suppose the pattern offers a single practice block as well as the small top. Its cutting chart could show the following:
| Fabric role | One block | Practice top | Cut size for each bar |
|---|---|---|---|
| A: dark | 1 | 12 | 2-1/2 x 6-1/2 inches |
| B: light | 1 | 12 | 2-1/2 x 6-1/2 inches |
| C: accent | 1 | 12 | 2-1/2 x 6-1/2 inches |
The practice-top column produces 12 + 12 + 12 = 36 bars. Independently, 12 blocks x 3 bars per block = 36 bars. The two counts agree. If quantities were written as 1 (12), the size key would need to establish that the first number means one block and the parenthesized number means the practice top.
Now check the layout: 3 x 6 = 18 inches across and 4 x 6 = 24 inches down. Multiplying the 6-1/2-inch unfinished block measurement by the row count would leave the joining allowances in the result and overstate the finished layout.
This sample page deliberately does not supply purchase yardage, backing, batting or binding instructions. Recognizing those missing sections is part of the audit. Piece counts alone are not a complete shopping list; fabric width, cutting arrangement and other allowances still matter. Our fat-quarter cutting-layout example shows how the shapes of required cuts affect what can actually be obtained from one measured piece.
Follow the sequence and inspect its checkpoints
The sample's first action is to join A, B and C side by side along their long edges, using the specified 1/4-inch seams. Three 2-1/2-inch widths initially total 7-1/2 inches. Two joins each consume 1/2 inch across the pair of neighboring pieces:
7-1/2 - 1/2 - 1/2 = 6-1/2 inches unfinished.
The bars' length remains 6-1/2 inches, so the expected assembled block is square. That checkpoint belongs after assembly and pressing, before joining twelve blocks. It is an expectation to check with cloth, not a sewing result reported here.
If these blocks are joined in the stated grid, the nominal raw top is 18-1/2 x 24-1/2 inches before its outside allowances are taken into finishing. Across, three 6-1/2-inch blocks minus two 1/2-inch joins give 18-1/2. Down, four blocks minus three joins give 24-1/2. The planned finished 18 x 24-inch dimensions and these raw measurements describe different boundaries.
For a real pattern, note every "make," "repeat," "trim" and "reserve" instruction. A count of units to make may already be included in the cutting totals. Do not multiply it again without checking. Resolve a wrong-sized first unit before repeating the same discrepancy through the remaining fabric.
Check corrections before making an irreversible cut
Claudia Porter recommends checking the designer's website for errata in her 18 tips for reading a quilt pattern. Look for the exact title and edition, record any applicable correction, and keep it with your working copy. A similarly named pattern or a correction for another size may not apply.
When text, chart and diagram disagree, write down the page, step, chosen size, fabric role and conflicting measurements. Recount the relevant units, then ask the designer a precise question. Avoid silently replacing a number and cutting the entire project on that assumption.
Before shopping, confirm which materials the stated requirements include, the assumed usable fabric width, and any notes about directional prints or prewashing. Before cutting, confirm your fabric key, one chosen size column, the cutting units and the first assembly checkpoint. That reader's sheet is the bridge between the pattern and your project.
If the chosen size does not suit your project, compare three ways to make a quilt pattern bigger after this audit. Adding blocks, scaling finished units and adding a frame require different changes to the cutting and assembly plan.
If you are creating instructions rather than interpreting someone else's, how to write a quilt pattern covers the separate work of documenting, checking and testing them.
Related posts
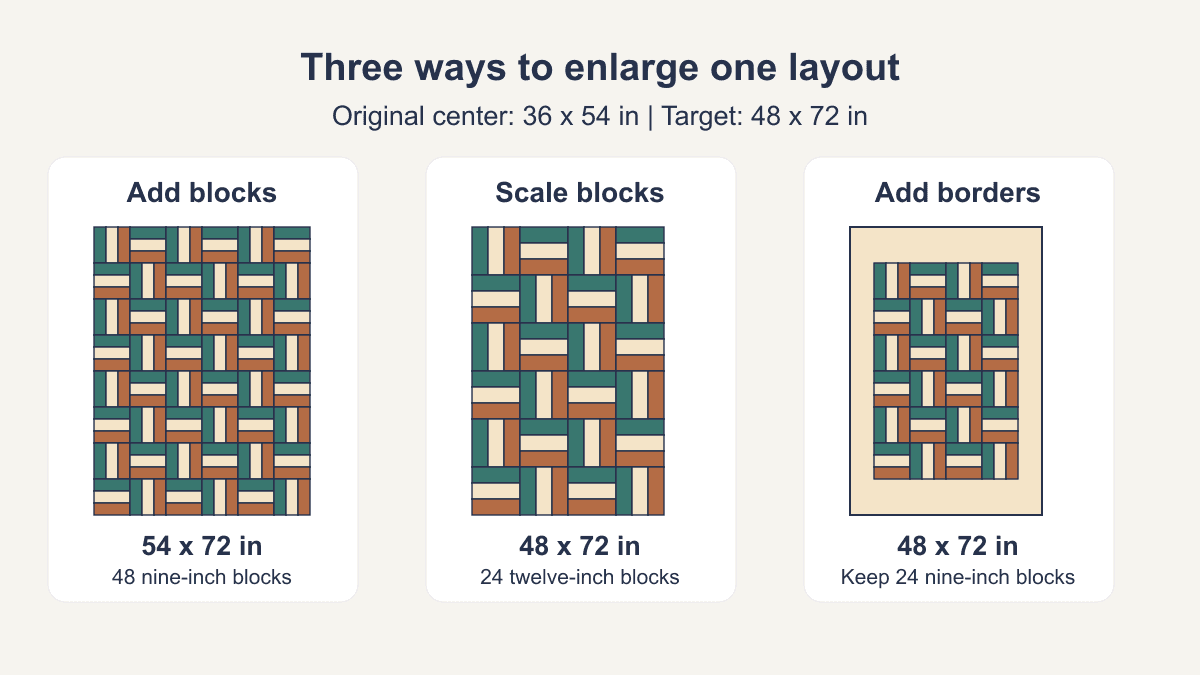
How to Make a Quilt Pattern Bigger: Three Plans
Compare extra blocks, larger blocks and borders on one original layout, with checked dimensions and fresh seam allowances.
How to Design a Quilt: Size, Layout, Blocks and Fabric
Plan a quilt you can actually make: choose its finished size, compare block counts, assign fabric roles and check the design before cutting.
How to Design a Quilt Block: Grids, Units and Measurements
Draw an original block on a grid, check its assembly order, and turn finished measurements into a manual cutting plan with an 8-inch example.