


Negative Space Quilt Design: How Much Room Should a Focal Block Get?
There's no standard percentage of negative space for a quilt. In many modern quilts there's simply more background than design, as Christa Watson notes in her article on quilting negative space. The rule of thumb quilters share is about placement: the rule of thirds. In Adventures in Design, quilt artist Joen Wolfrom says to divide the design into thirds each way and place the focal point near one of the four points where those lines cross; Jaye's design notes on the Artquiltmaker Blog quote the passage.
For a single focal block, we suggest a quilt at least three block widths wide and three tall, with the block's center near a thirds crossing. That leaves half a block or more of background on the tight sides and a block and a half or more on the open sides. The block then covers a ninth of the top or less. Below, one 16-inch Sawtooth Star goes into three quilt sizes and two positions so you can see what those numbers do. We drew these diagrams for this article and haven't sewn them.
Measure the space in block widths
Sylvia Schaefer, in an excerpt from The Quilter's Negative Space Handbook on C&T Publishing's blog, describes negative space as the space around or between the subject. Its job is to give the eye a place to rest and to draw attention to the main subject. Our modern vs. traditional quilts guide covers where the idea sits in each style.
Inches alone don't tell you much. Ten inches of background around a 6-inch block is a wide field. Around a 30-inch medallion, the same 10 inches looks like a border. So measure the focal shape first: the block it sits in, or the smallest rectangle that encloses an appliqué or an odd shape. Then divide each side gap by the shape's width, and each top and bottom gap by its height. A gap of 0.5 is half a block; a gap of 2 is two blocks.
Same star, three amounts of space
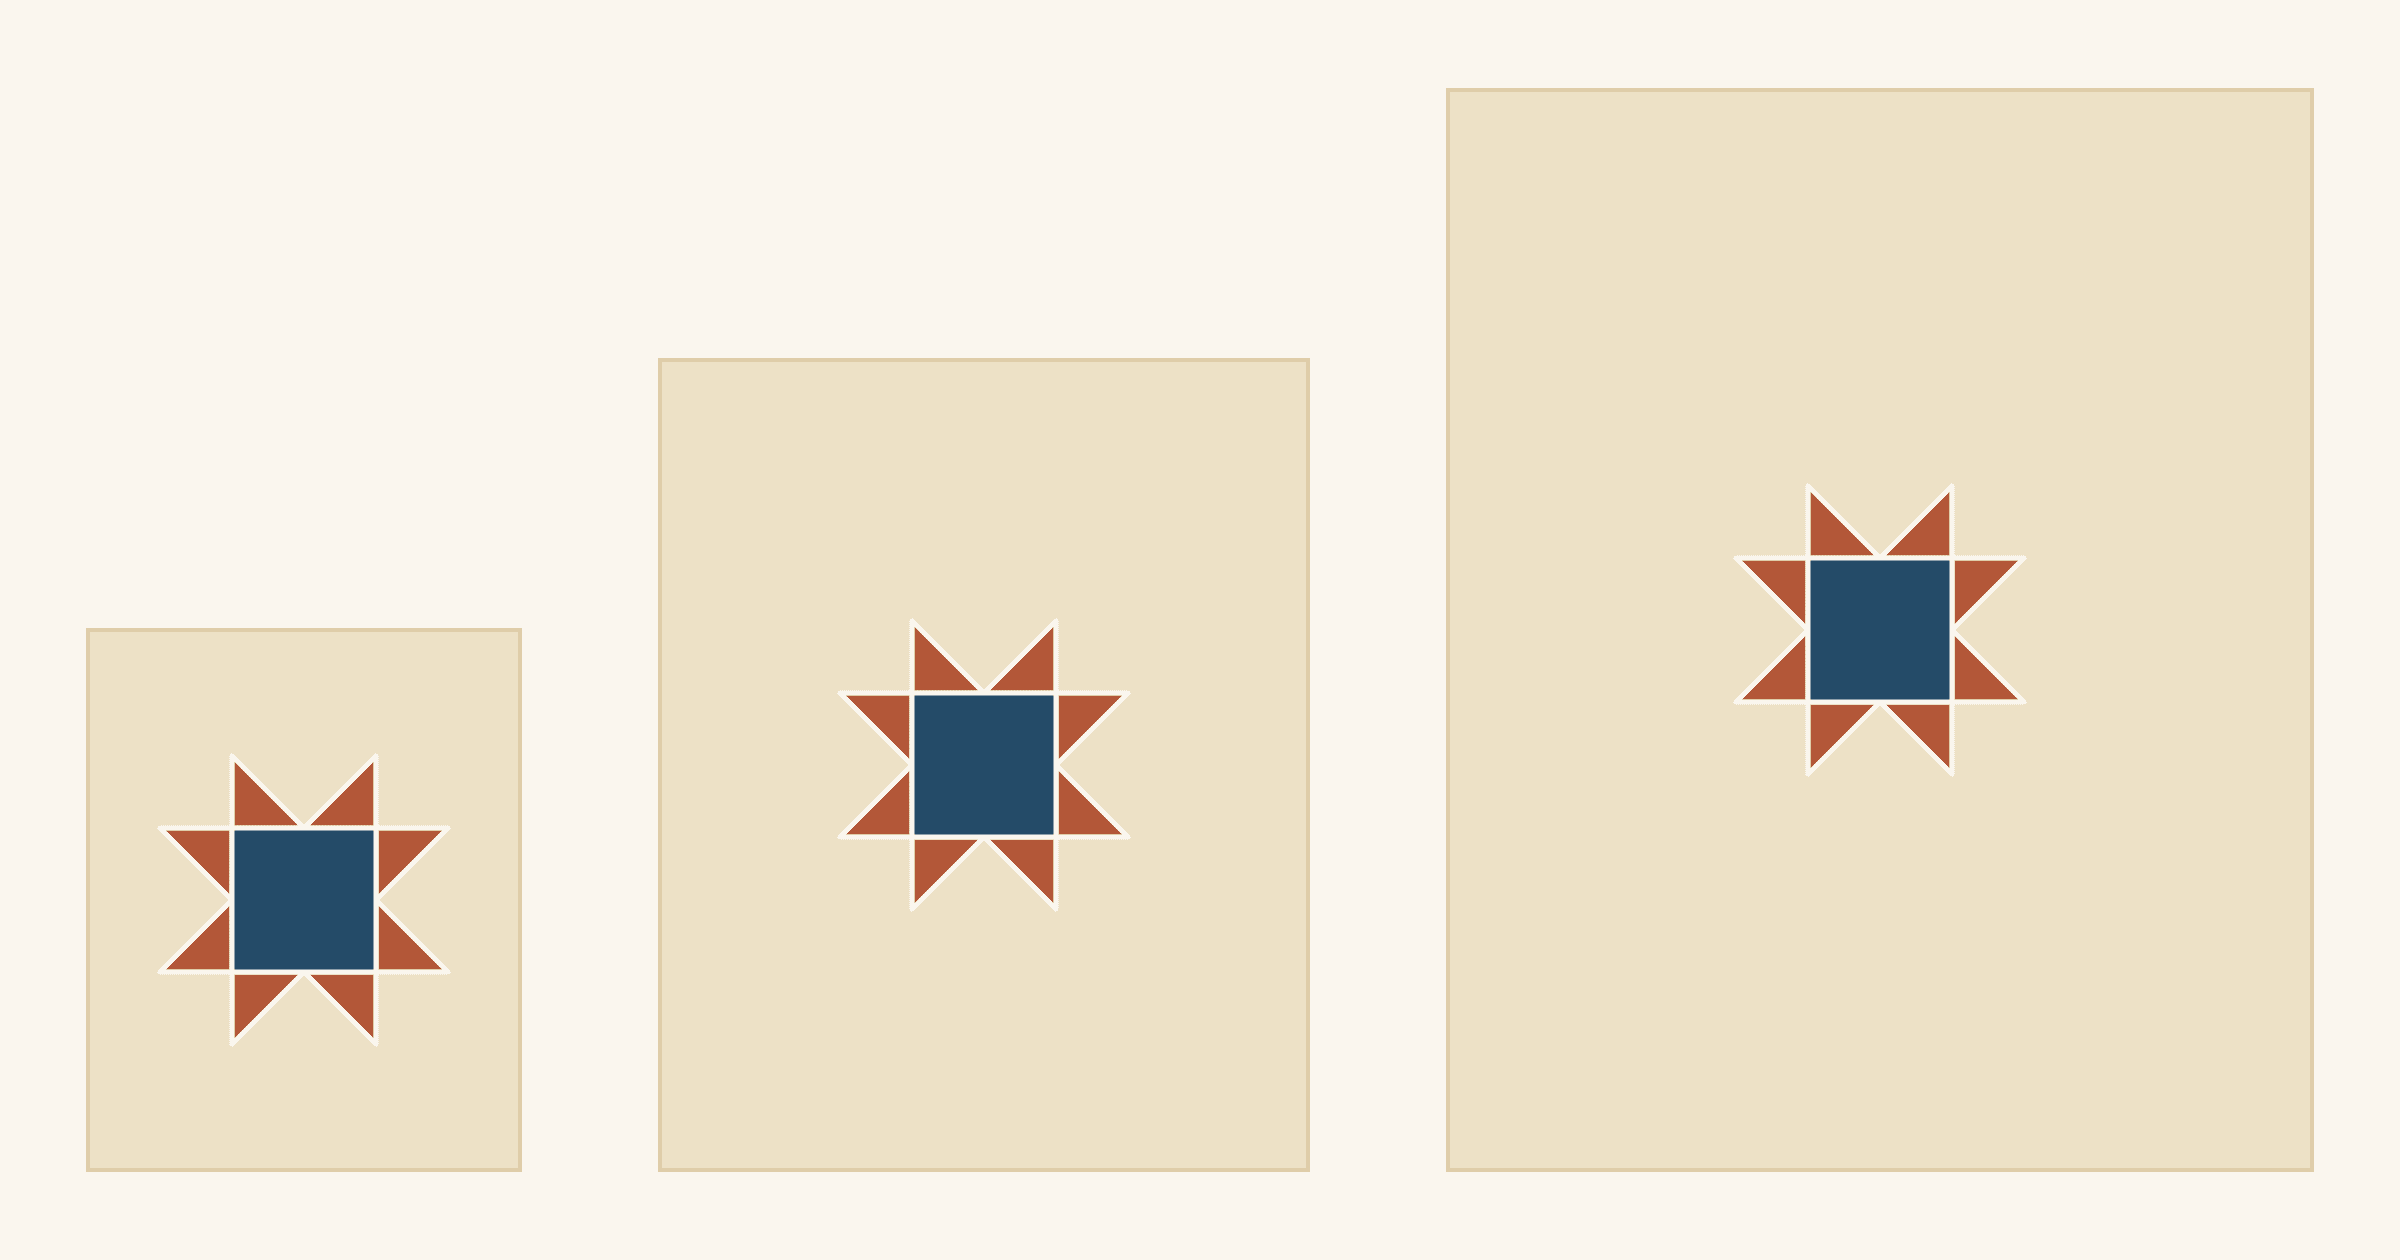
Each top below has the same 4:5 proportions and the same 16-inch star in the middle. The star block's corners and goose triangles are cut from the same cream as the field, so the navy and rust star is the shape you see. Only the amount of cream changes.
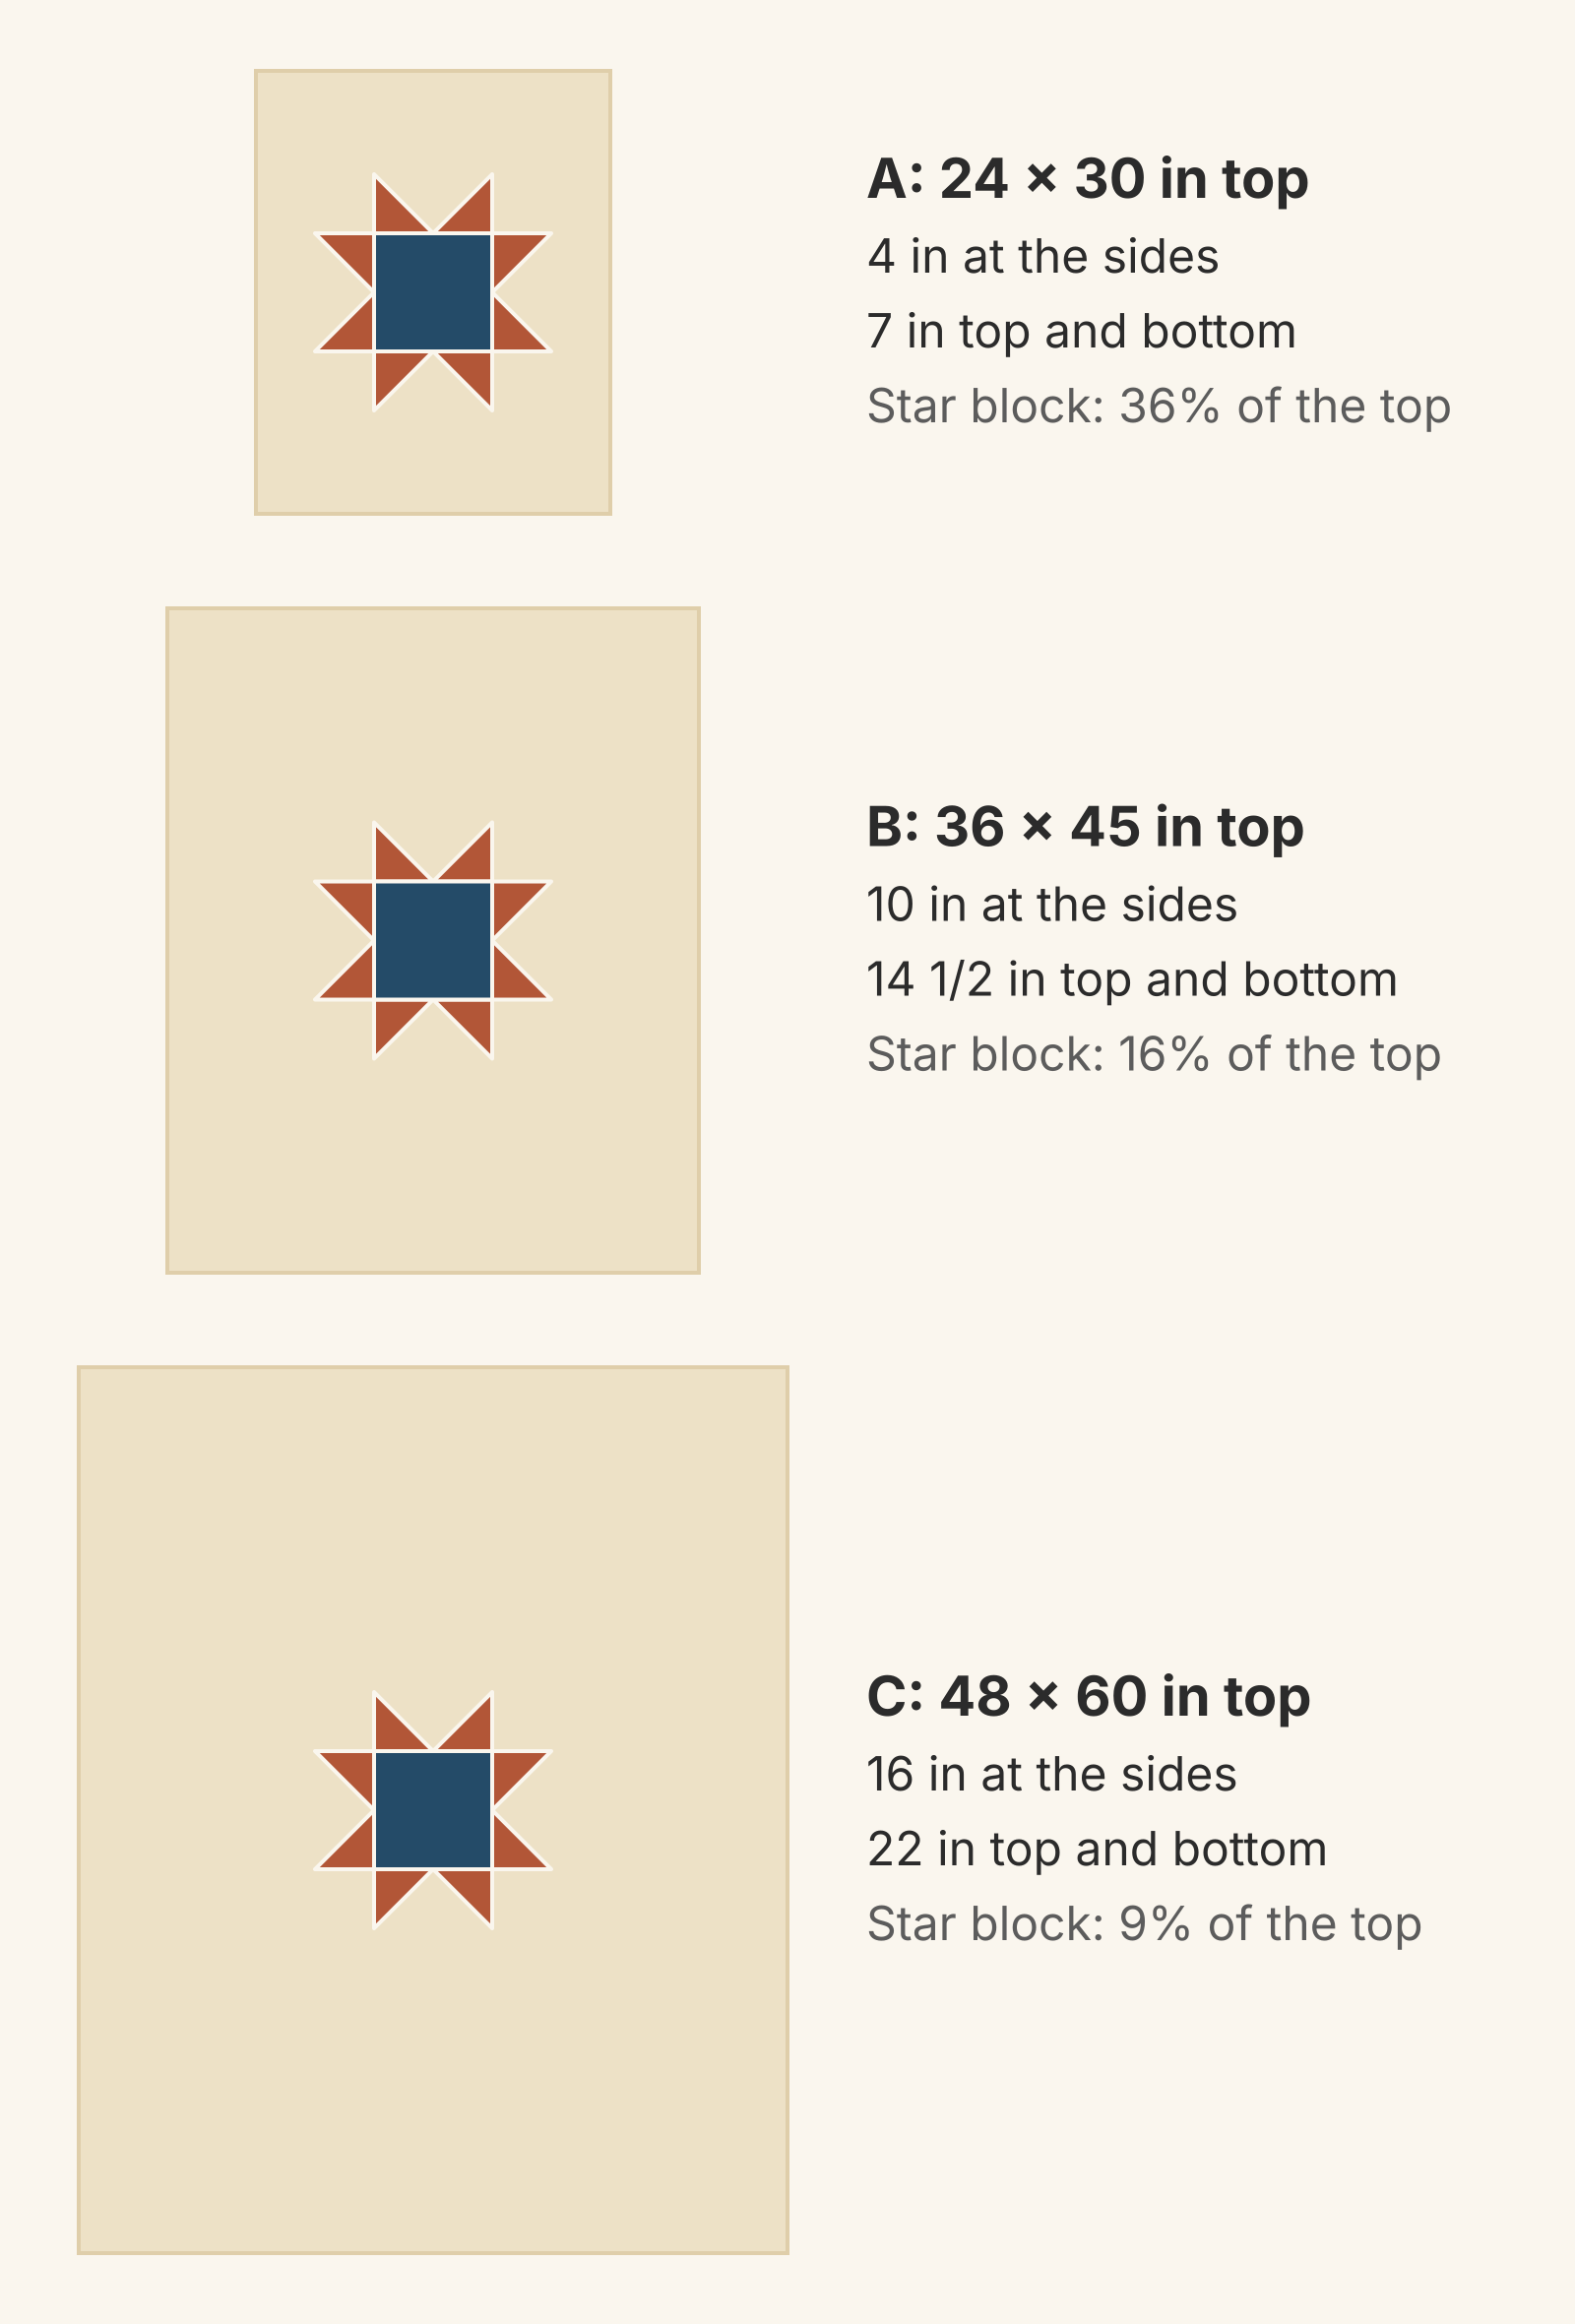
| Top | Side and top gaps | In block widths | Star block's share |
|---|---|---|---|
| A: 24 x 30 in | 4 in and 7 in | 0.25 and 0.44 | 36% |
| B: 36 x 45 in | 10 in and 14 1/2 in | 0.63 and 0.91 | 16% |
| C: 48 x 60 in | 16 in and 22 in | 1.0 and 1.38 | 9% |
Top A reads as a block with a border. The 4-inch side gaps match the star's own 4-inch corner squares, so the cream looks like more of the block. That can suit a mini quilt, but the star fills the space instead of sitting in it.
Top B gives the star a field. There's more than half a block of cream on every side, balanced around the star. Your eye goes to the middle and stays there.
Top C has a full block width of cream at each side. Here the background reads as open space around the star rather than as a frame. It's still centered, though, and that's what the next comparison changes.
Move the focal block onto the thirds
Keep the 48 x 60-inch top and slide the star. On a 48-inch width, the thirds lines fall at 16 and 32 inches. On a 60-inch length, they fall at 20 and 40. Put the star's center on the upper-left crossing, 16 inches in and 20 inches down. Its block edges then sit 8 inches from the left and 12 inches from the top.
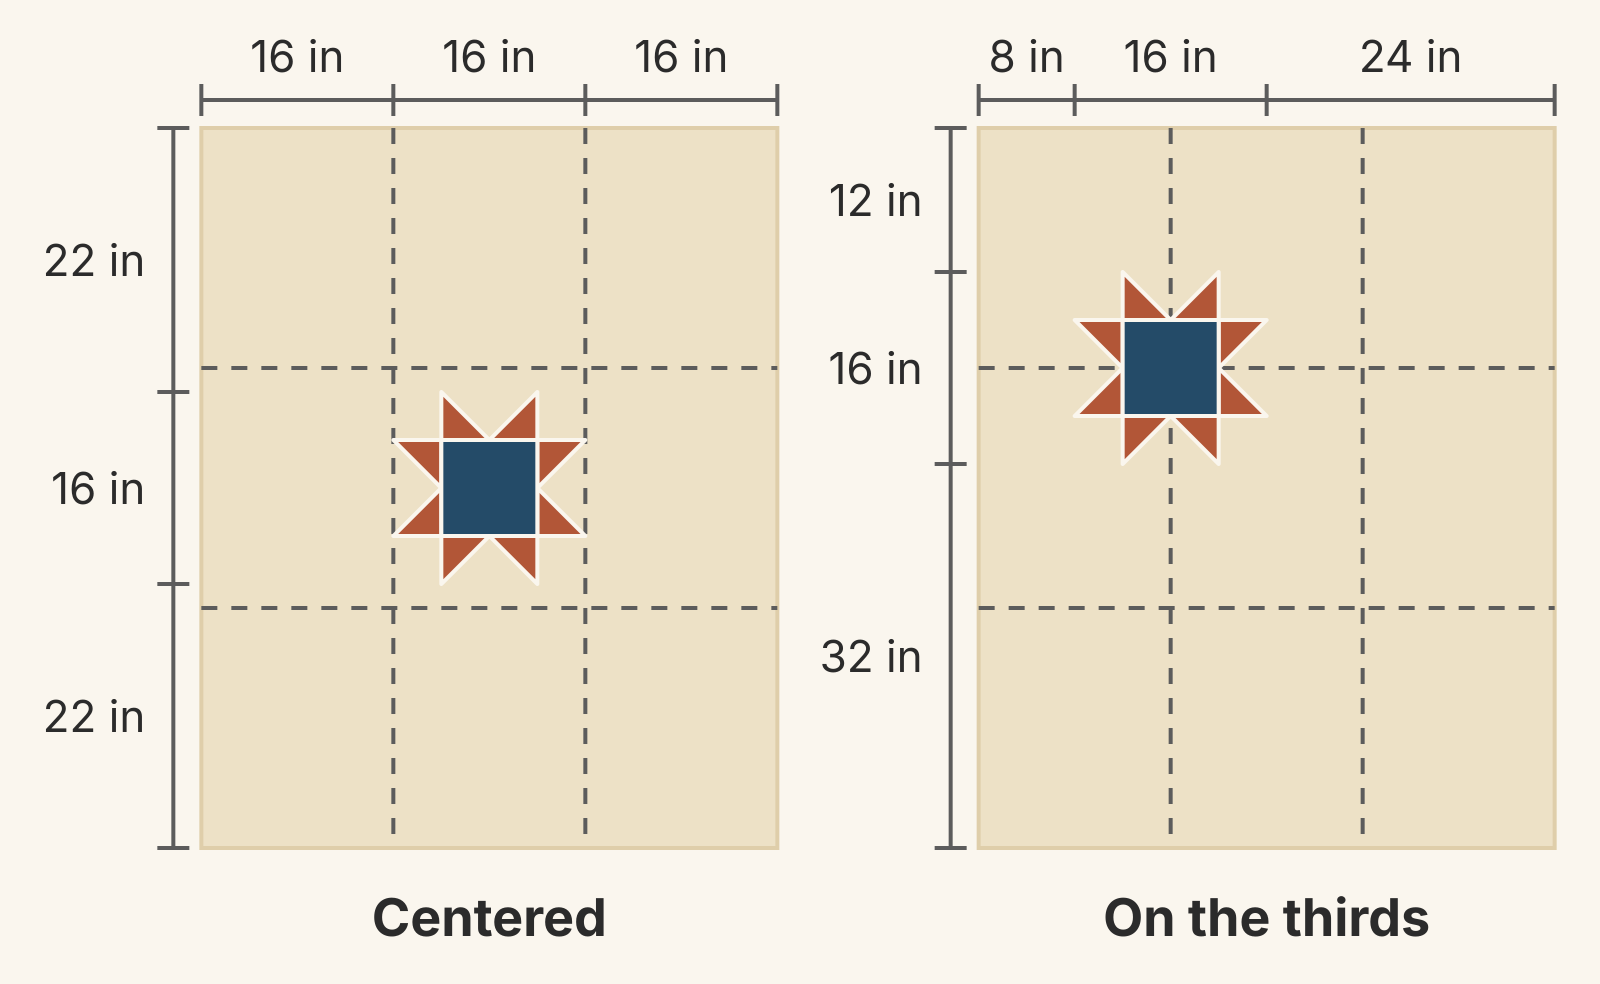
| Gap | Centered | On the thirds |
|---|---|---|
| Left | 16 in (1 block) | 8 in (1/2 block) |
| Right | 16 in (1 block) | 24 in (1 1/2 blocks) |
| Top | 22 in (1 3/8 blocks) | 12 in (3/4 block) |
| Bottom | 22 in (1 3/8 blocks) | 32 in (2 blocks) |
The amount of background hasn't changed: 2,624 square inches around the block either way. What changes is where it sits. Centered, every side gets a similar share and the quilt feels settled. On the thirds, the star has a tight corner and a big open field below and to the right, which gives your eye somewhere to travel.
In the same C&T excerpt, Schaefer notes that a quilt with extensive negative space tends to read as modern, especially when that space is arranged asymmetrically. One of the eight techniques in her book is called Standing Alone, and C&T's Change How You Design post pairs it with her Icy Feathered Star quilt. The blog tour post for the book describes that quilt as a traditional feathered star motif set at a jaunty angle, with negative space added on the sides.
Wolfrom's wording is "in the vicinity of" a crossing, so treat the crossing as a target and nudge from there. Any of the four crossings works. Pick the one that suits how the quilt will hang or lie. On a bed, the focal block usually belongs on the mattress top, and our bed quilt planning guide shows how to find where that falls.
Is the quilt big enough for the thirds?
The thirds position keeps half a block at the tight side only when the quilt is at least three block widths in that direction. Here's the arithmetic. The tight gap is one third of the quilt's width minus half the block. For a 16-inch block on a 48-inch width, that's 16 - 8 = 8 inches, exactly half a block.
Try the same move on top B, which is 36 x 45 inches. It leaves 12 - 8 = 4 inches at the side and 15 - 8 = 7 inches at the top. That's top A's crowding again, now on two sides. On a smaller quilt, nudge the star toward the center until the tight gaps reach about half a block, or choose a smaller block.
The check also works in reverse. Divide the quilt's shorter side by three to find the largest focal block that still keeps half a block of space on the thirds. A 60 x 72-inch throw can take a block up to 20 inches.
Why keep half a block from the edge?
Partly for looks. Jaye's notes quote Pentak and Lauer's Design Basics: a focal point too close to an edge tends to pull the viewer's eye right out of the picture. Partly for finishing. Squaring up after quilting can trim a little from each edge, so a star point you planned 2 inches from the edge can end up closer and look like a near miss.
If you want the shape at the edge, run it off on purpose so the binding clearly crops it. A shape that almost touches the edge tends to look accidental.
When to give the block more or less space
Half a block at the tight sides and three blocks across are starting numbers. Give the focal block more space when:
- It contrasts strongly in value with the background, as the navy and rust star does with cream.
- You plan to quilt the field as a feature of its own.
Give it less space, or use a bigger block, when:
- The shape is pale, close in value to the field, or full of fine detail.
- The background is a print that competes with the motif. Our background fabric guide covers that test.
- The block looks lost when you squint at the sketch.
Value matters most here. A low-contrast star doesn't get easier to see when you add more cream around it. Run the checks in our color theory guide for quilters before you settle the space.
With two or three focal shapes, measure the outer rectangle of the group as one shape and apply the same checks. Keep the gaps inside the group smaller than the space around it, so the shapes read as one cluster. If every block in the quilt needs room, our guide to floating quilt blocks sizes the gap between blocks and at the edge.
Worked example: a 48 x 60-inch throw with one star
Here's the thirds plan as pieces. Sew the middle row first, with the left piece, star block and right piece. Then add the top and bottom bands. Cut sizes add a quarter-inch seam allowance on every side.
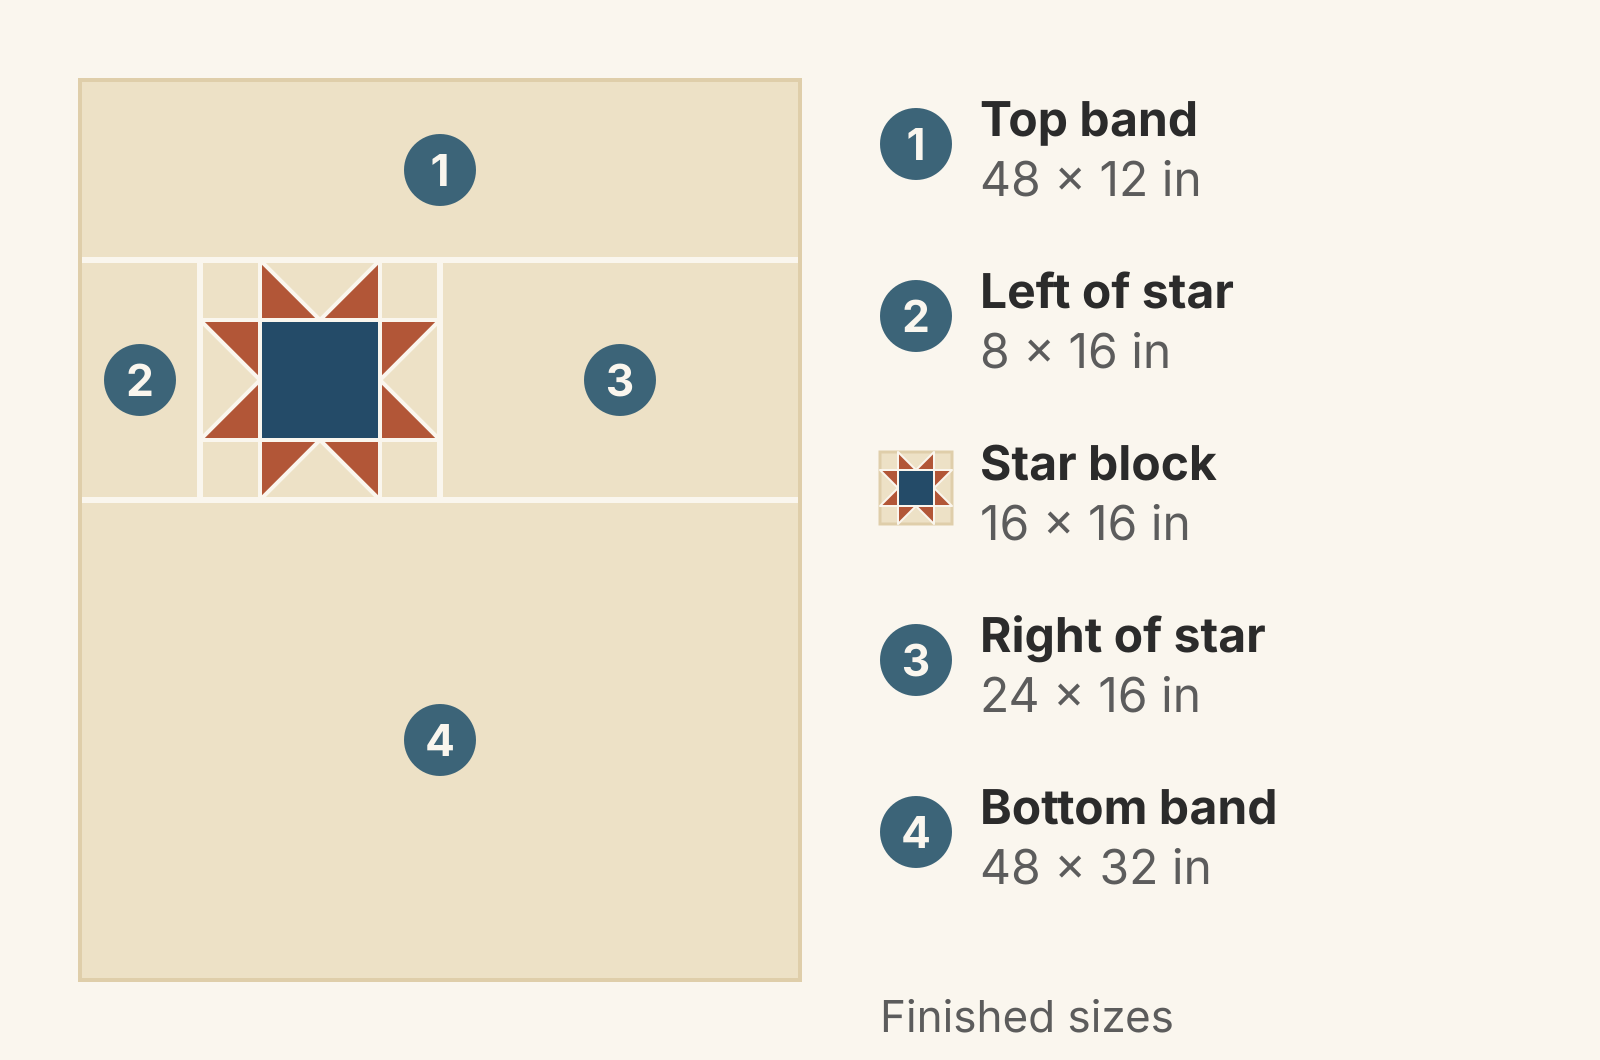
| Piece | Finished | Cut |
|---|---|---|
| 1. Top band | 48 x 12 in | 48 1/2 x 12 1/2 in |
| 2. Left of star | 8 x 16 in | 8 1/2 x 16 1/2 in |
| Star block | 16 x 16 in | 16 1/2 x 16 1/2 in |
| 3. Right of star | 24 x 16 in | 24 1/2 x 16 1/2 in |
| 4. Bottom band | 48 x 32 in | 48 1/2 x 32 1/2 in |
Check the sums: 12 + 16 + 32 = 60 inches down, and 8 + 16 + 24 = 48 inches across the middle row. The four background pieces cover 2,624 of the top's 2,880 square inches, or 91%. Add the star block's own cream corners and goose triangles and 95.6% of the top is cream. The navy and rust cover just 128 square inches.
Both bands are 48 1/2 inches long, more than the width of standard 42- to 44-inch quilting cotton. Cut them along the lengthwise grain, parallel to the selvage, or plan a join. A seam shows in a plain field, and Mrs. Quilty's guide to negative space in minimalist quilts suggests planning your piecing order with that in mind. If you join a band, put the seam 24 inches from the left edge, in line with the star block's right side. Each half is then cut 24 1/2 inches wide, and the seam continues a line that's already there.
Quilt the open space
The field still needs enough quilting to hold the layers together. Check your batting's maximum quilting distance; our batting distance guide shows how to find the widest gap in a plan. For ideas, Christa Watson's article suggests an allover linear design, or repeating elements from the block out into the negative space. On this star, lines that carry the block's 4-inch grid across the field would tie the two together. To pick a line spacing that fits that grid, see our straight line quilting spacing guide.
Try two versions before you cut
Draw the top on graph paper at one square to 4 inches. The 48 x 60 top is 12 squares by 15, and the star is 4 squares wide. Cut out a paper star and slide it between the centered and thirds positions. Mrs. Quilty's guide suggests squinting at a sketch to spot crowded areas and drawing more than one version with different amounts of space. Do both, then measure the gaps of the version you like in block widths.
You can make the same comparison on screen in QuiltLab. In the Quilt Editor, choose New, then Freeform, and set Width to 48 and Height to 60 under Measurements. Choose Draw rectangle and drag out a 16-inch square for the star's footprint; the outline shows its dimensions as you drag. Then use Select to give it a fabric and move it between positions. QuiltLab doesn't total background yardage, so work that out from your cut sizes.
Quilt Editor guide →Start a Freeform quilt, draw rectangles and assign fabricOnce you've chosen a position, write down the four gaps in inches and in block widths. Then cut all four background pieces from one bolt, so the whole field matches.
Related posts

How to Design a Bargello Quilt: Plan the Wave on Paper
A bargello wave is a staircase of stepped columns. Number your strips, write one row per column, and see how column width turns a zigzag into a curve.
Floating Quilt Blocks: How Much Space Should You Leave?
Leave a gap half the block's width between motifs and the same space at the edge. Twenty 6-inch stars show the frame, border and size math.
Irish Chain Quilt Colors: Which Fabric Goes Where?
Most Irish Chains put darker chain fabrics on a light background. Compare single and double chain value maps and see which fabric shapes the diamonds.