


Straight Line Quilting Spacing: How Far Apart Should Lines Be?
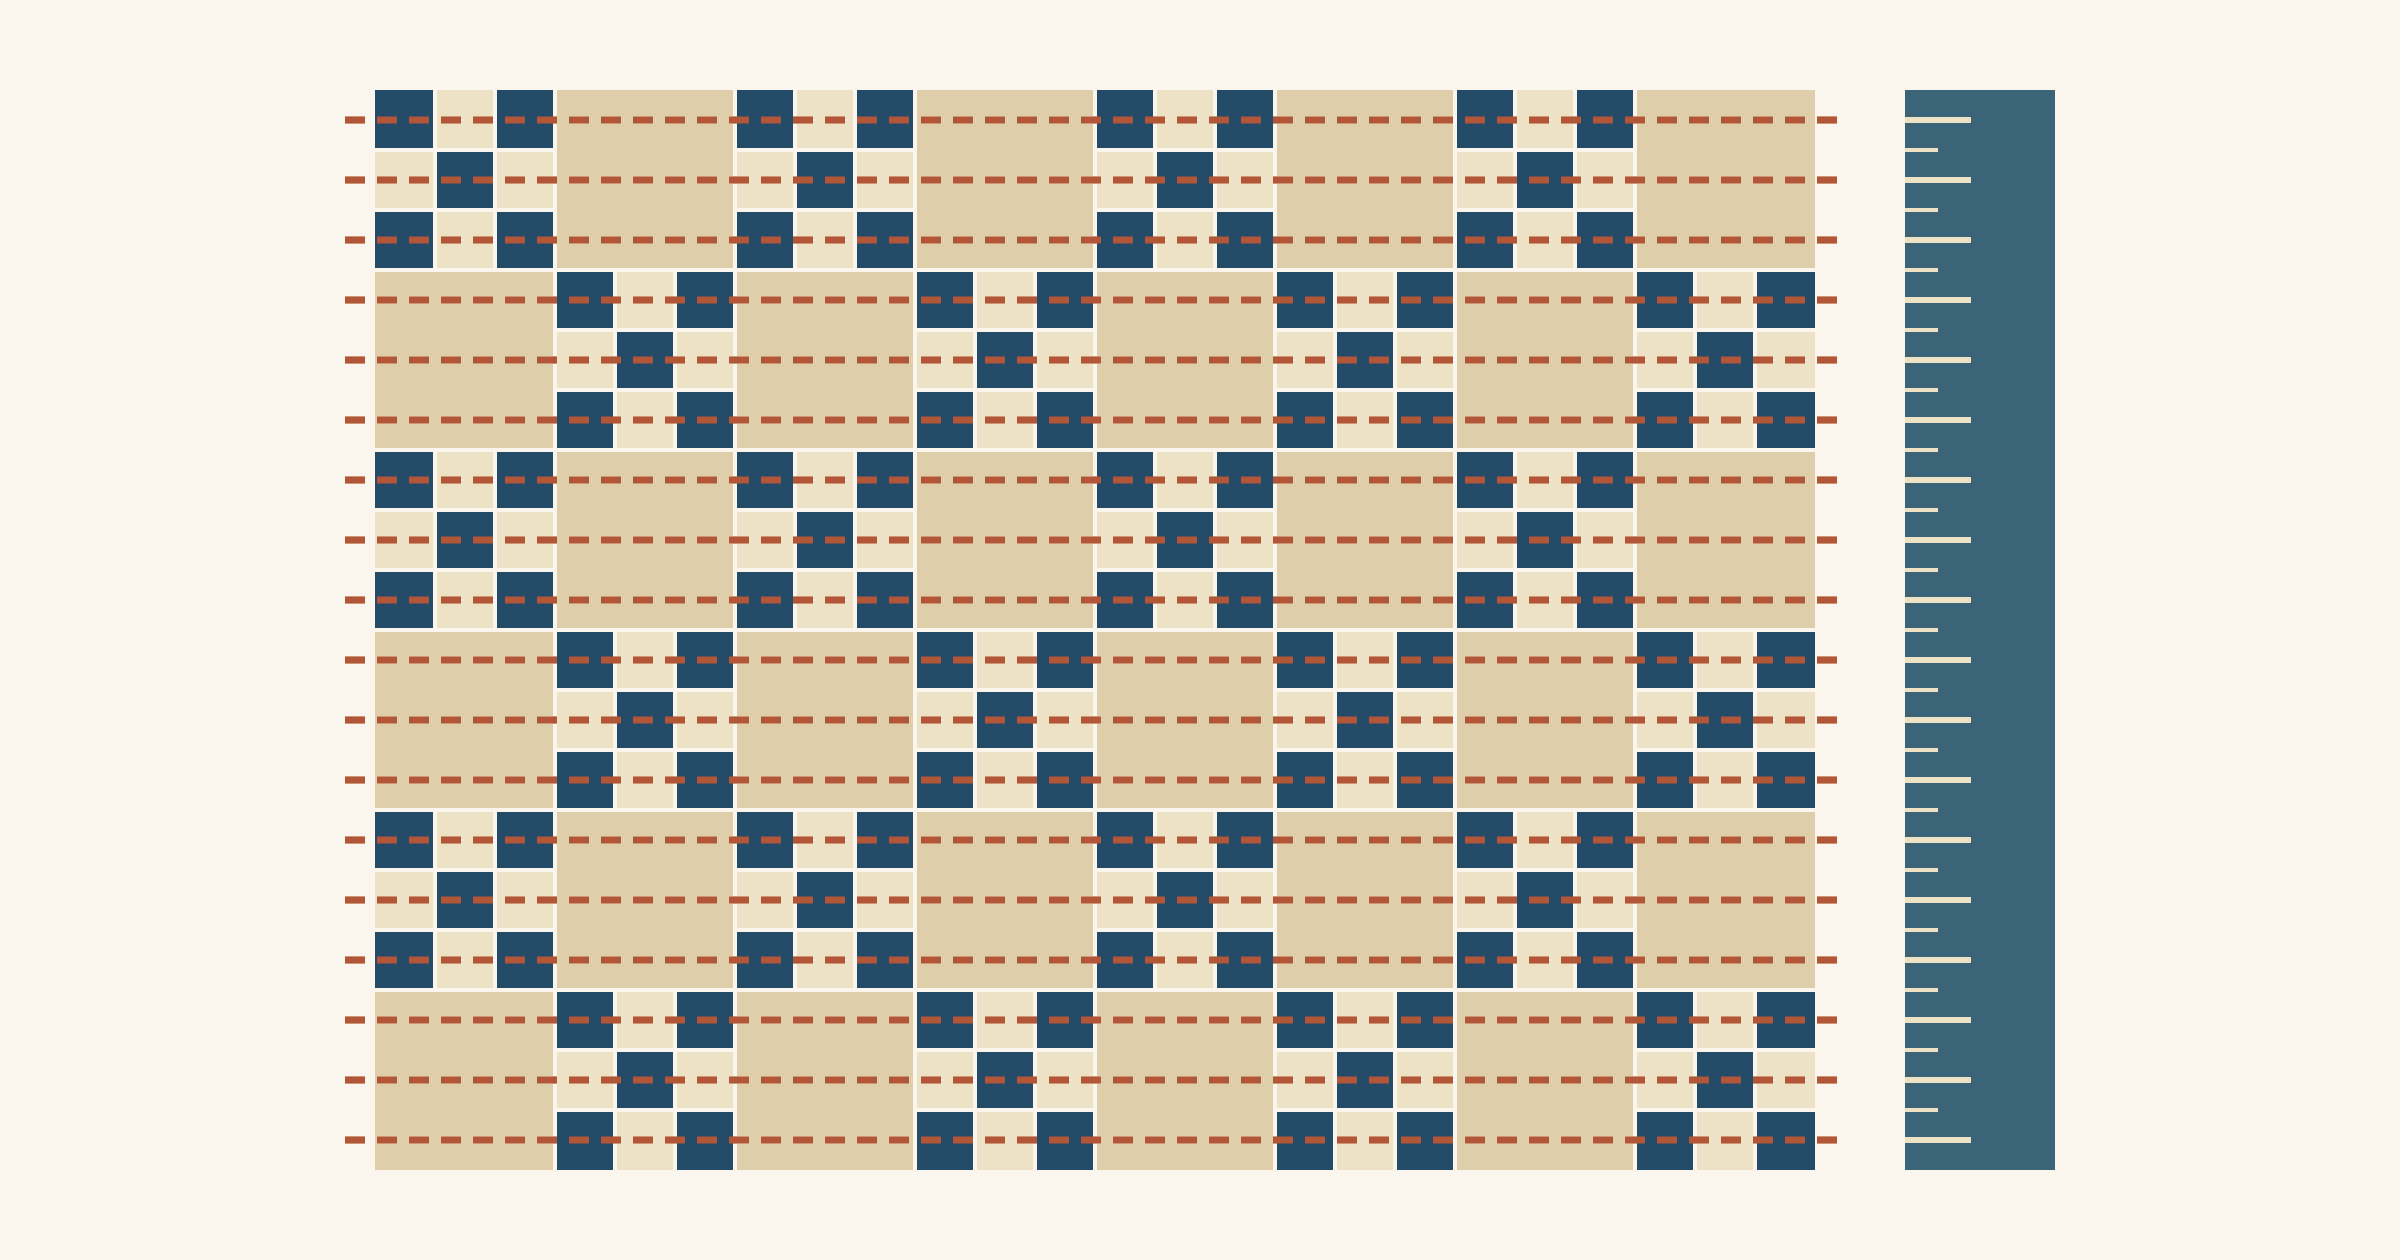
Straight-line quilting is usually spaced 1 to 3 inches apart. Brittany Lloyd of Lo & Behold Stitchery likes lines in one direction 1 to 1 1/2 inches apart and crosshatching 2 to 3 inches apart. Melissa Mortenson's straight-line guide at The Polka Dot Chair names 1 and 3 inches as favorite distances. Your batting sets the widest gap you can leave, and your patchwork decides where the lines should fall.
For a first straight-line quilt, choose a spacing that divides evenly into your finished block size. If you're not sure, start at 2 in. It sits in the middle of the common range and fits 6, 8, 10 and 12 in. blocks. Then shift the whole set of lines until none of them sits on a seam. On 6 in. blocks with 2 in. patches, lines 2 in. apart that start 1 in. from the edge land in the same place in every block and never ride a seam. The worked example below compares that plan with four others on the same top.
How far apart should straight line quilting be?
Three things set the number: how you want the quilt to look and feel, how long you want to sew, and what the batting allows.
- Look and feel. Closer lines flatten the quilt. Hobbs says of its Heirloom Premium 80/20 batting that close quilting gives a flat, low-loft look, while more space between lines gives a slightly higher loft.
- Time. Halving the spacing doubles the lines. On the 36 x 48 in. top below, 2 in. spacing takes 18 lines and 1 in. spacing takes 36.
- Very close lines. Lines about 1/8 in. apart are called matchstick quilting, as The Quilt Show's Quiltipedia explains. That's a deliberate texture with 16 times the lines of 2 in. spacing.
- The batting's limit. The package states the widest gap the batting can take. Hobbs asks for stitching every 4 in. or closer on Heirloom Premium 80/20. The Warm Company says Warm & Natural can be quilted up to 10 in. apart. Our batting gap check walks through reading those limits.
Inside those limits, pick by look and time. Then fit the number to your blocks. If you plan a diagonal crosshatch, our crosshatch layout guide shows how to space the lines so they meet at the edges.
Pick a spacing that repeats in every block
Lloyd spaced the rows on her tutorial quilt 2 in. apart because she wanted them "to fall in the same place from block to block," and she tells readers to take their block sizes into account. That happens when the spacing divides the finished block size with nothing left over.
| Finished block | Spacings that repeat in every block |
|---|---|
| 6 in. | 1, 1 1/2, 2 or 3 in. |
| 8 in. | 1, 2 or 4 in. |
| 10 in. | 1, 1 1/4, 2 or 2 1/2 in. |
| 12 in. | 1, 1 1/2, 2, 3 or 4 in. |
The table sticks to spacings from 1 to 4 in. that you can read on an ordinary ruler. Measure finished sizes, without seam allowances. If the quilt has sashing, the repeat is the block plus one sashing strip: 6 in. blocks with 1 in. sashing repeat every 7 in.
You can still use a spacing that doesn't divide the block, but the lines shift from block to block. With 2 1/2 in. lines on 6 in. blocks, the arrangement repeats only every 30 in., or every fifth block. Each block in between gets a different set of lines.
Keep the lines off the seams
Mortenson cautions against putting lines on the patchwork seams. A line on a seam becomes close to stitch in the ditch, which she calls "harder than it seems," so she picks a distance that falls between seams. Any wobble off a seam shows, while a line in the middle of a patch has room to waver a little.
To check, write down where the seams fall across one block, then where your lines fall. If any line lands on a seam, slide every line over by half the spacing.
Mortenson's starting rule does this for you. She sews the first line down the center of the quilt. If the center is a seam, she puts the first two lines half a spacing on either side of it instead. Her example: for 3 in. spacing, the two central lines sit 1 1/2 in. either side of the center.
Lines very close to a seam read as outlining it. Mortenson's seam-bordering design quilts 1/4 in. on each side of the main seams, and she notes that anything wider than 1/2 in. starts to look like plain vertical or horizontal lines. So a line 1/4 to 1/2 in. from a seam is a design choice. Make it on purpose. To compare that outline with a line sewn right in the seam, see our stitch in the ditch vs echo quilting guide.
Worked example: five spacing plans on one top
The top is 36 x 48 in. It has 6 in. finished blocks, 6 across and 8 down. Nine Patches with 2 in. finished patches alternate with plain 6 in. squares, 24 of each. The quilting lines run the 48 in. length, so each plan is a list of positions across the 36 in. width.
Inside each Nine Patch, a seam falls every 2 in., at 2 and 4 in. from its left side. The block seams fall every 6 in. The center of the width, 18 in., is a block seam.
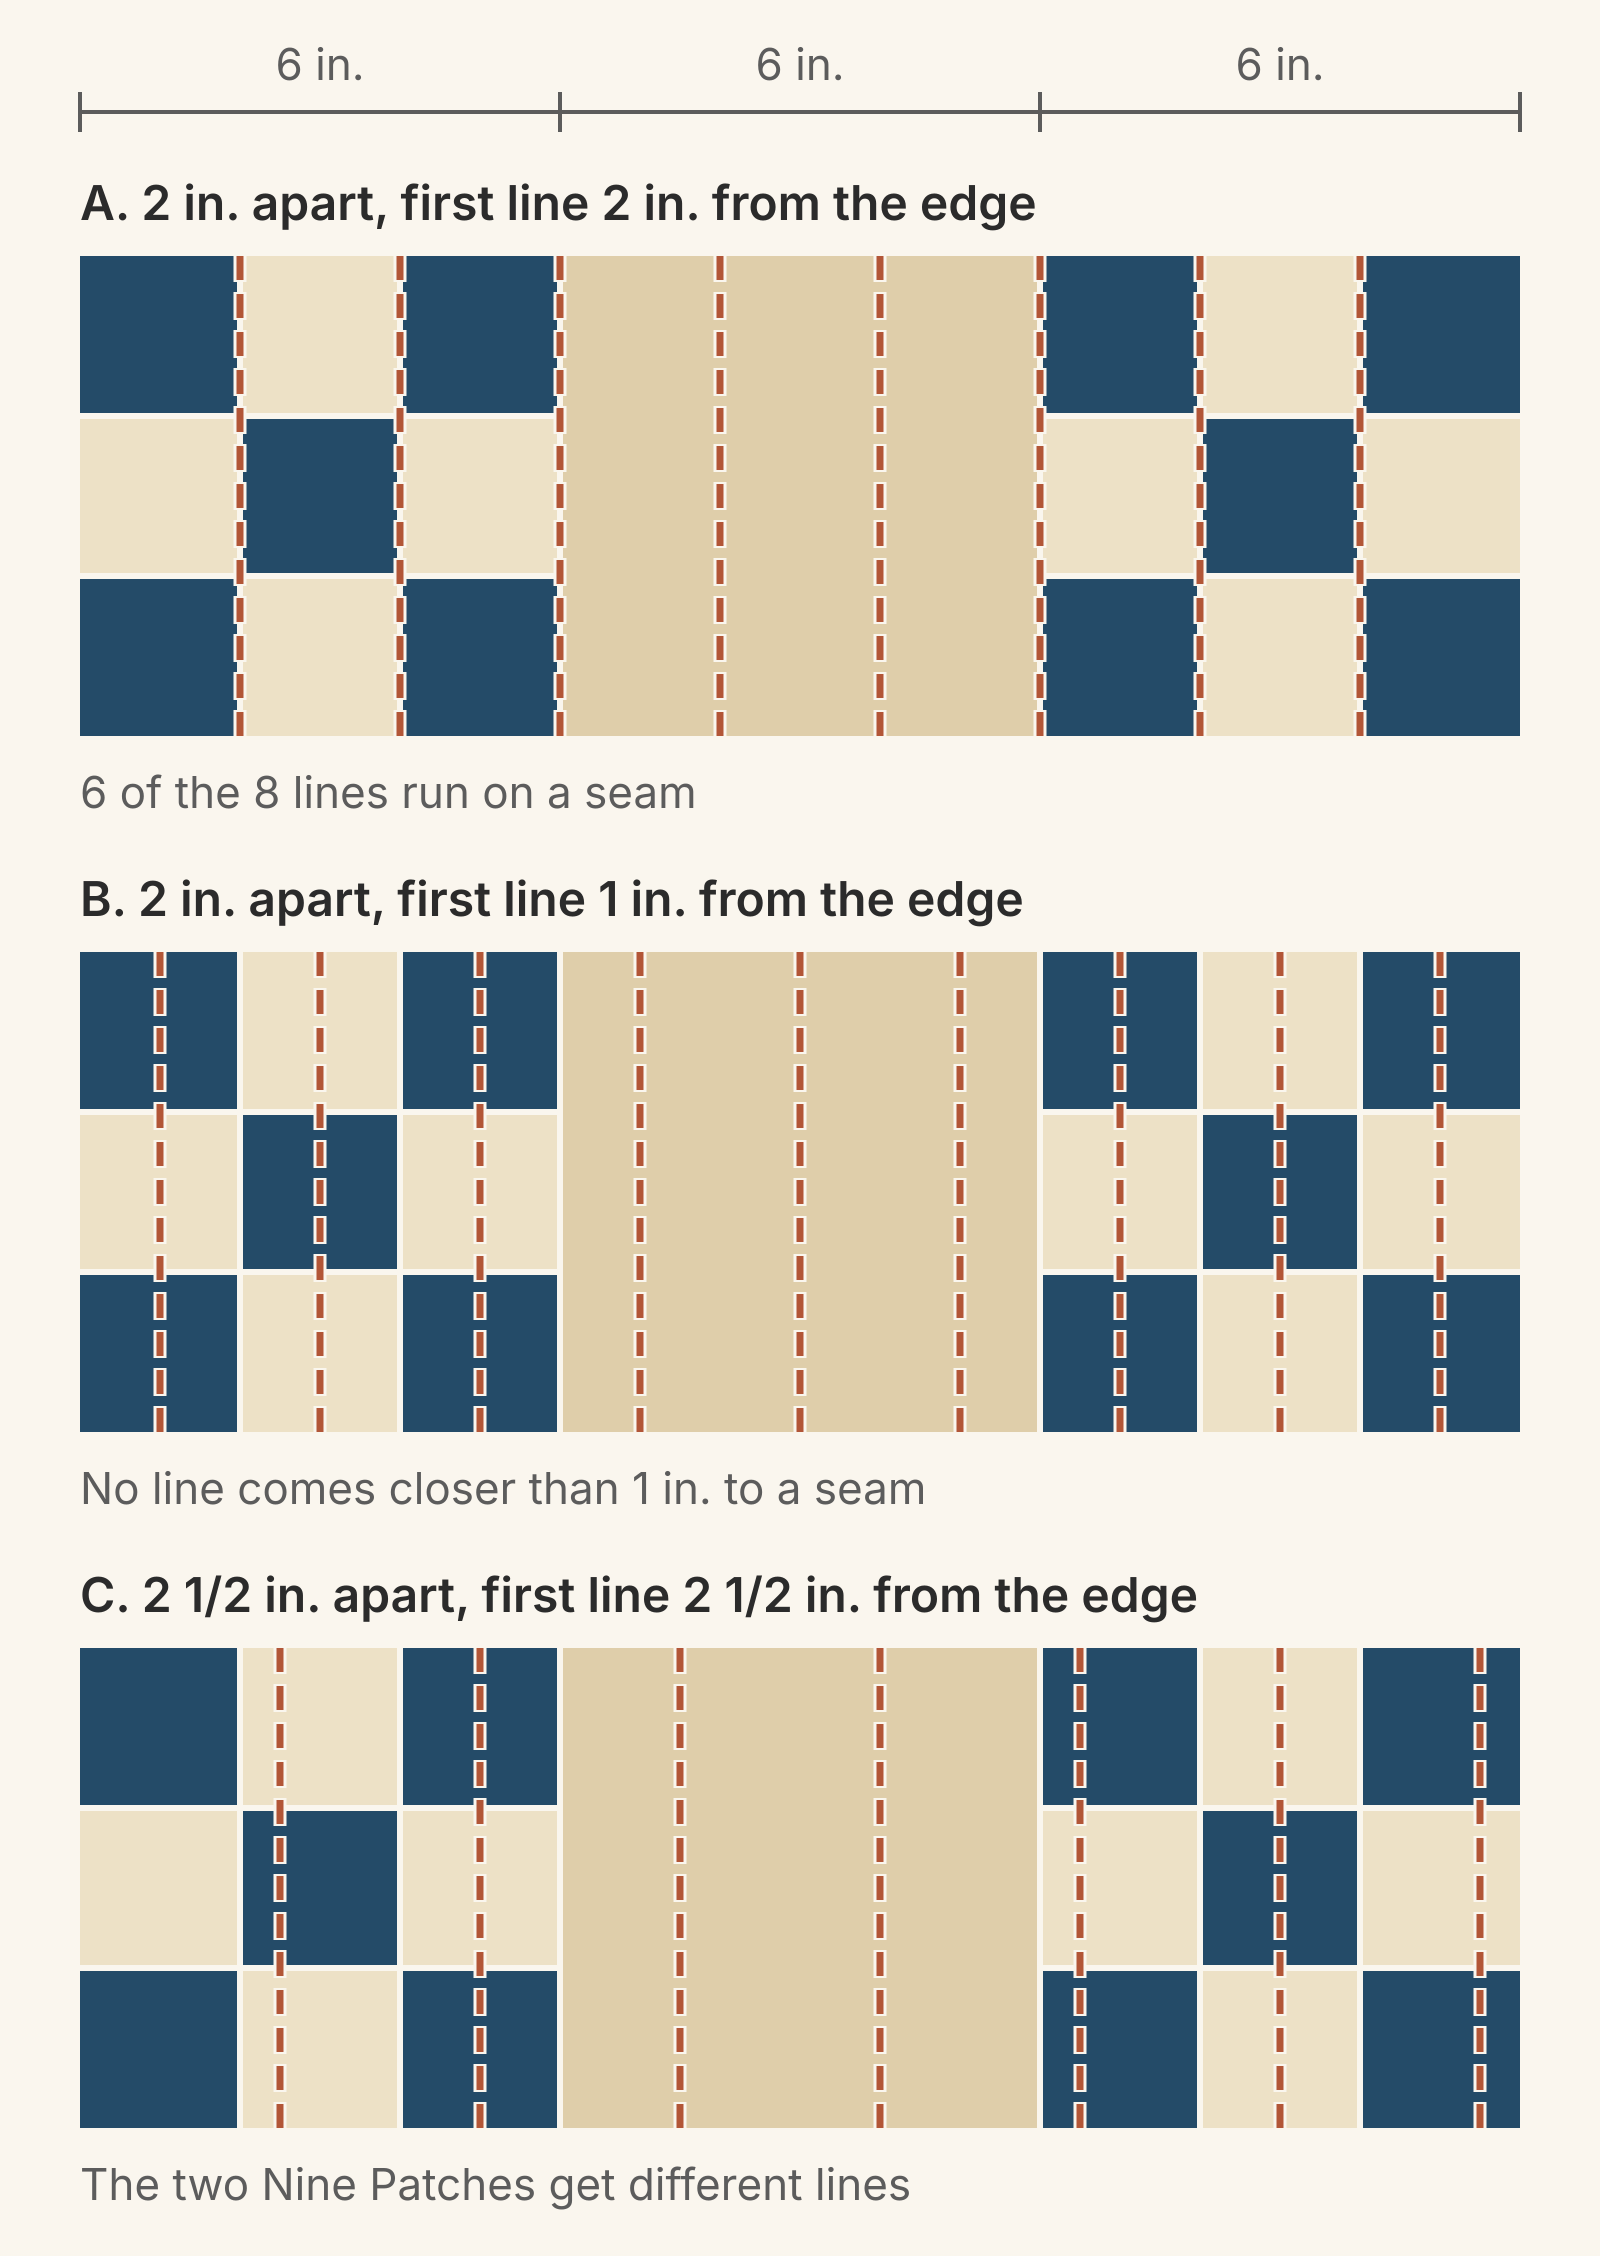
Each line is 48 in. long, so the stitching is the line count times 48 in.
| Plan | Where the lines fall | Lines | Stitching |
|---|---|---|---|
| A: 2 in., first line 2 in. from the edge | On a seam in every Nine Patch | 17 | 816 in. (about 23 yd) |
| B: 2 in., first line 1 in. from the edge | Down the middle of every patch column | 18 | 864 in. (24 yd) |
| C: 2 1/2 in., first line 2 1/2 in. from the edge | Different in each block | 14 | 672 in. (about 19 yd) |
| D: 1 in., first line 1/2 in. from the edge | Two per patch column, 1/2 in. from each seam | 36 | 1,728 in. (48 yd) |
| E: 3 in., first line 1 1/2 in. from the edge | 1/2 in. outside each Nine Patch's center column | 12 | 576 in. (16 yd) |
Plan A puts every line on a seam wherever it crosses a Nine Patch. Five of its 17 lines follow block seams for the full 48 in. That's ditch work across the whole quilt.
Plan B is plan A moved over 1 in. Every line runs down the middle of a patch column, 1 in. from the Nine Patch seams on either side, and every block is quilted the same way. It's also what Mortenson's center rule gives you: the center seam is at 18 in., so the first two lines go at 17 and 19 in.
Plan C never settles. Three of its 14 lines, at 10, 20 and 30 in., run on seams where they cross a Nine Patch. The rest sit either 1/2 in. or 1 in. from the nearest Nine Patch seam, depending on the block. It also leaves 2 1/2 in. at the left edge and 1 in. at the right.
Plan D halves the spacing: twice as many lines as plan B, twice the sewing and a flatter quilt. Every line sits 1/2 in. from a seam. Plan E puts a line 1/2 in. outside each side of every Nine Patch's center column, so the quilting outlines that column. It's Mortenson's center rule at her 3 in. spacing: lines at 16 1/2 and 19 1/2 in., then every 3 in. out to the edges.
For this top, sew plan B. It repeats in every block, no line comes closer than 1 in. to a seam, and its widest gap is 2 in.
Choose the final spacing before you fill in
Mortenson suggests that for close spacing such as 1 in., you quilt every other line first to secure the quilt, then go back and fill the gaps. That works well if you plan the final spacing first.
It goes wrong if you sew plan B and decide later that you want 1 in. lines. The new lines go halfway between the old ones, at 2, 4, 6 in. and so on, and every one of them lands on a seam.
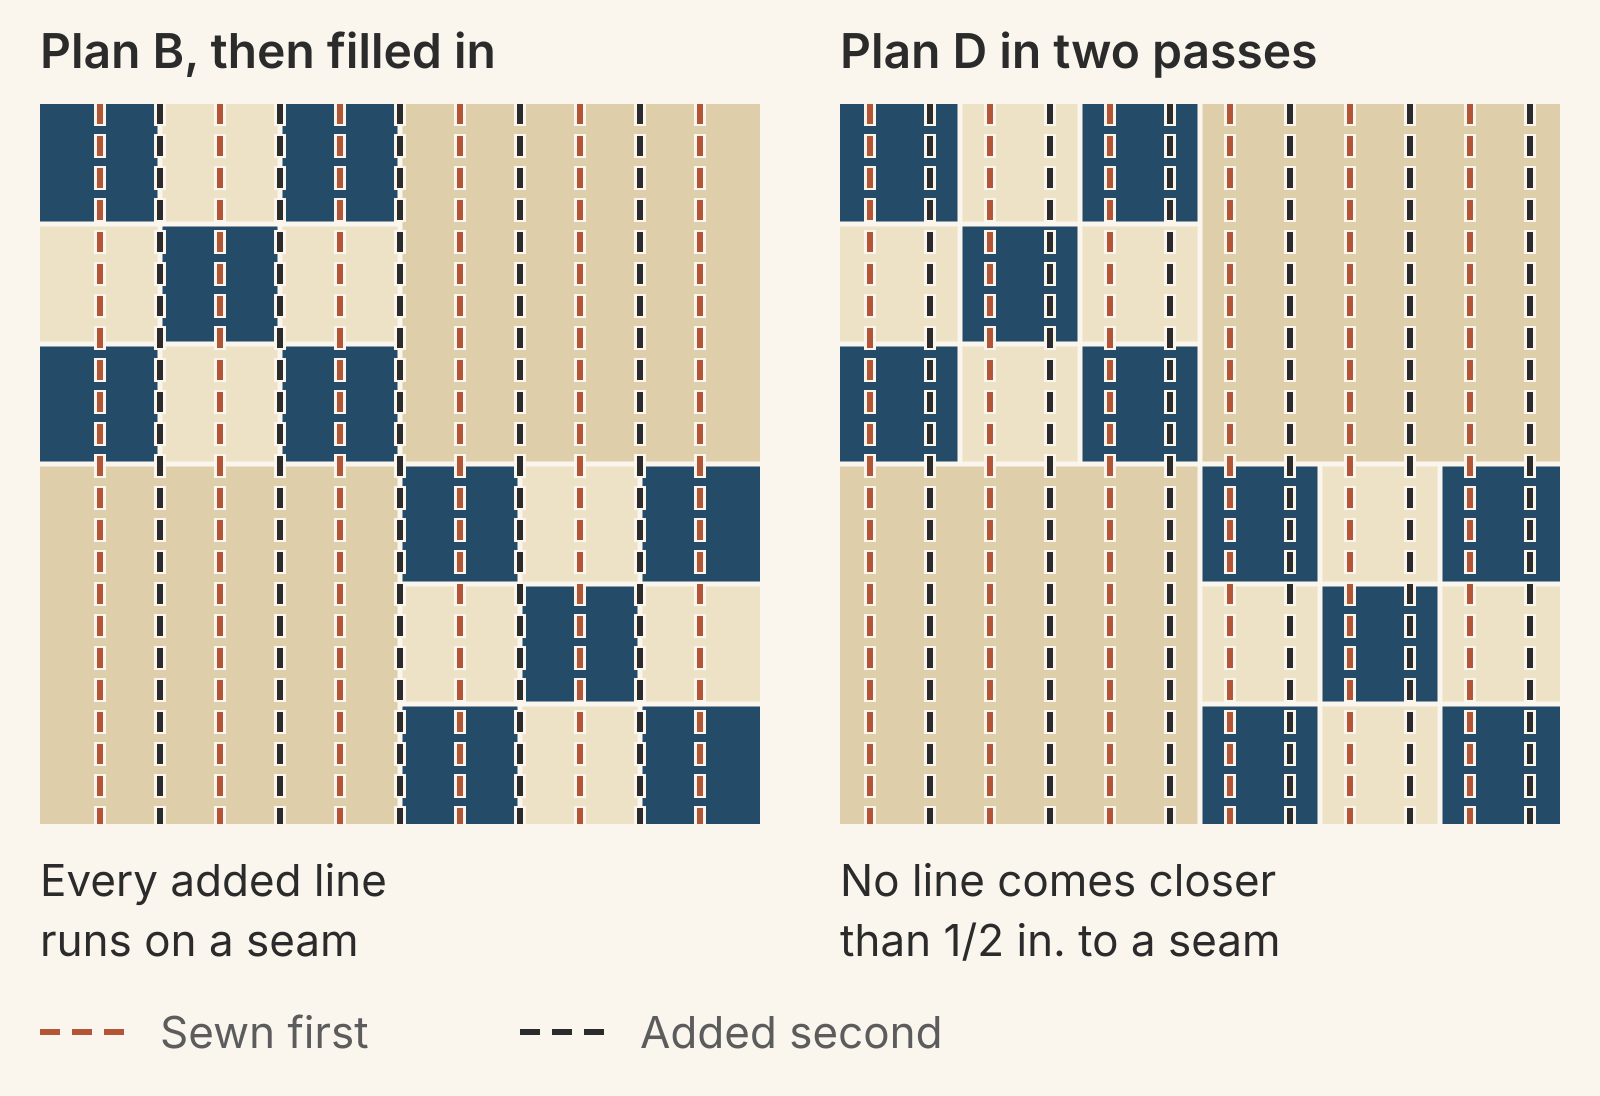
If 1 in. is the goal, start with plan D's every other line: 2 in. apart, beginning 1/2 in. from the edge (at 1/2, 2 1/2 and 4 1/2 in.). The fill lines then go at 1 1/2, 3 1/2 and 5 1/2 in., and no line comes closer than 1/2 in. to a seam.
Check the widest gap, edges included
All five plans have a widest gap of 3 in. or less. That fits inside Hobbs's 4 in. and Warm & Natural's 10 in. Quilting only the vertical seams between blocks is a different story. On this top, that's 5 lines at 6, 12, 18, 24 and 30 in., with 6 in. gaps: over the 4 in. Hobbs allows, and inside the 10 in. Warm & Natural allows.
Count the space between the outermost line and the edge of the quilt as a gap too. A plan built out from the center gives both edges the same gap: plan B leaves 1 in. on each side. Plan C, started from the left edge, leaves 2 1/2 in. on one side and 1 in. on the other.
Mark the first line, then use the guide bar
In her straight-line tips on Janome's site, Fran of Cotton and Joy sets the walking foot's guide bar to the spacing, measured from the needle. She then sews each new line with the bar following the last one. She uses a long, straight seam as the reference for the first line. Near sashing or block edges, she uses those seams to straighten the quilting again. If a top has no long seams, she marks a guide line every six inches or so with a hera marker or a marking pencil.
For plan B, mark the first two lines 1 in. either side of the center seam with a ruler and a hera marker. Then set the guide bar to 2 in. and work out toward each edge. Lloyd also starts in the center and works out, with the rolled quilt running parallel to the lines.
Because the spacing fits the blocks, the seams become checkpoints. Each line should sit 1 in. from the nearest Nine Patch seam. If one has drifted, mark the next line from the seam rather than from the line you just sewed.
If you're still choosing how to sew the lines, our walking foot vs free motion comparison covers what each method asks of your hands.
Your next step
Measure your block's finished size and write down where the seams fall across one block. Pick a spacing from the table that divides the block, and slide it half a space if the lines land on seams. Check the widest gap, edges included, against your batting's label. Then mark the two center lines and start sewing.
If you designed the top in QuiltLab, the numbers you need are already there. The Quilt Editor's Layout section shows the finished quilt size and block size, and the Block Editor shows each piece's width and height when you select it. QuiltLab doesn't plan quilting lines, so take those measurements to paper and draw your lines there. The Nine Patch reference shows the block used in this example.
Quilt Editor guide →Set block size and grid counts, and read your quilt's finished dimensionsRelated posts

How to Design a Bargello Quilt: Plan the Wave on Paper
A bargello wave is a staircase of stepped columns. Number your strips, write one row per column, and see how column width turns a zigzag into a curve.

Borderless Quilt Design: Plan an Edge That Looks Finished
With no border, the outer blocks and the binding make the edge. Compare whole and halved motifs on one 48 x 60 inch quilt, then pick the binding color.

Crosshatch Quilting: How to Make the Lines Meet at the Edges
Space a 45-degree crosshatch so the lines meet in a V at every edge and corner. Choose the edge step first, mark dots around the quilt, then connect them.