


How to Get Perfect Points in Quilting: Sew Through the X
To keep a point when you join two units or blocks, sew straight through the X. That's the spot on the back where the earlier stitching lines cross. In a unit trimmed with a 1/4 in seam allowance, the X sits 1/4 in from the raw edge. On the front, it's the tip of the point. Ashley Hough's lesson at National Quilters Circle sums it up as "X marks the spot." Lee Monroe's guest post on Amy Smart's Diary of a Quilter starts a step earlier: trim flying geese so the point sits exactly 1/4 in from the edge, and a 1/4 in seam lands right on it.
If you can't hit the X exactly, miss toward the raw edge by a thread. That's the scant quarter inch, a seam just a thread inside the true 1/4 in. Becky Jorgensen of Patchwork Posse calls it the number one way to save your points, because it gives each point a little room so the seam doesn't swallow it.
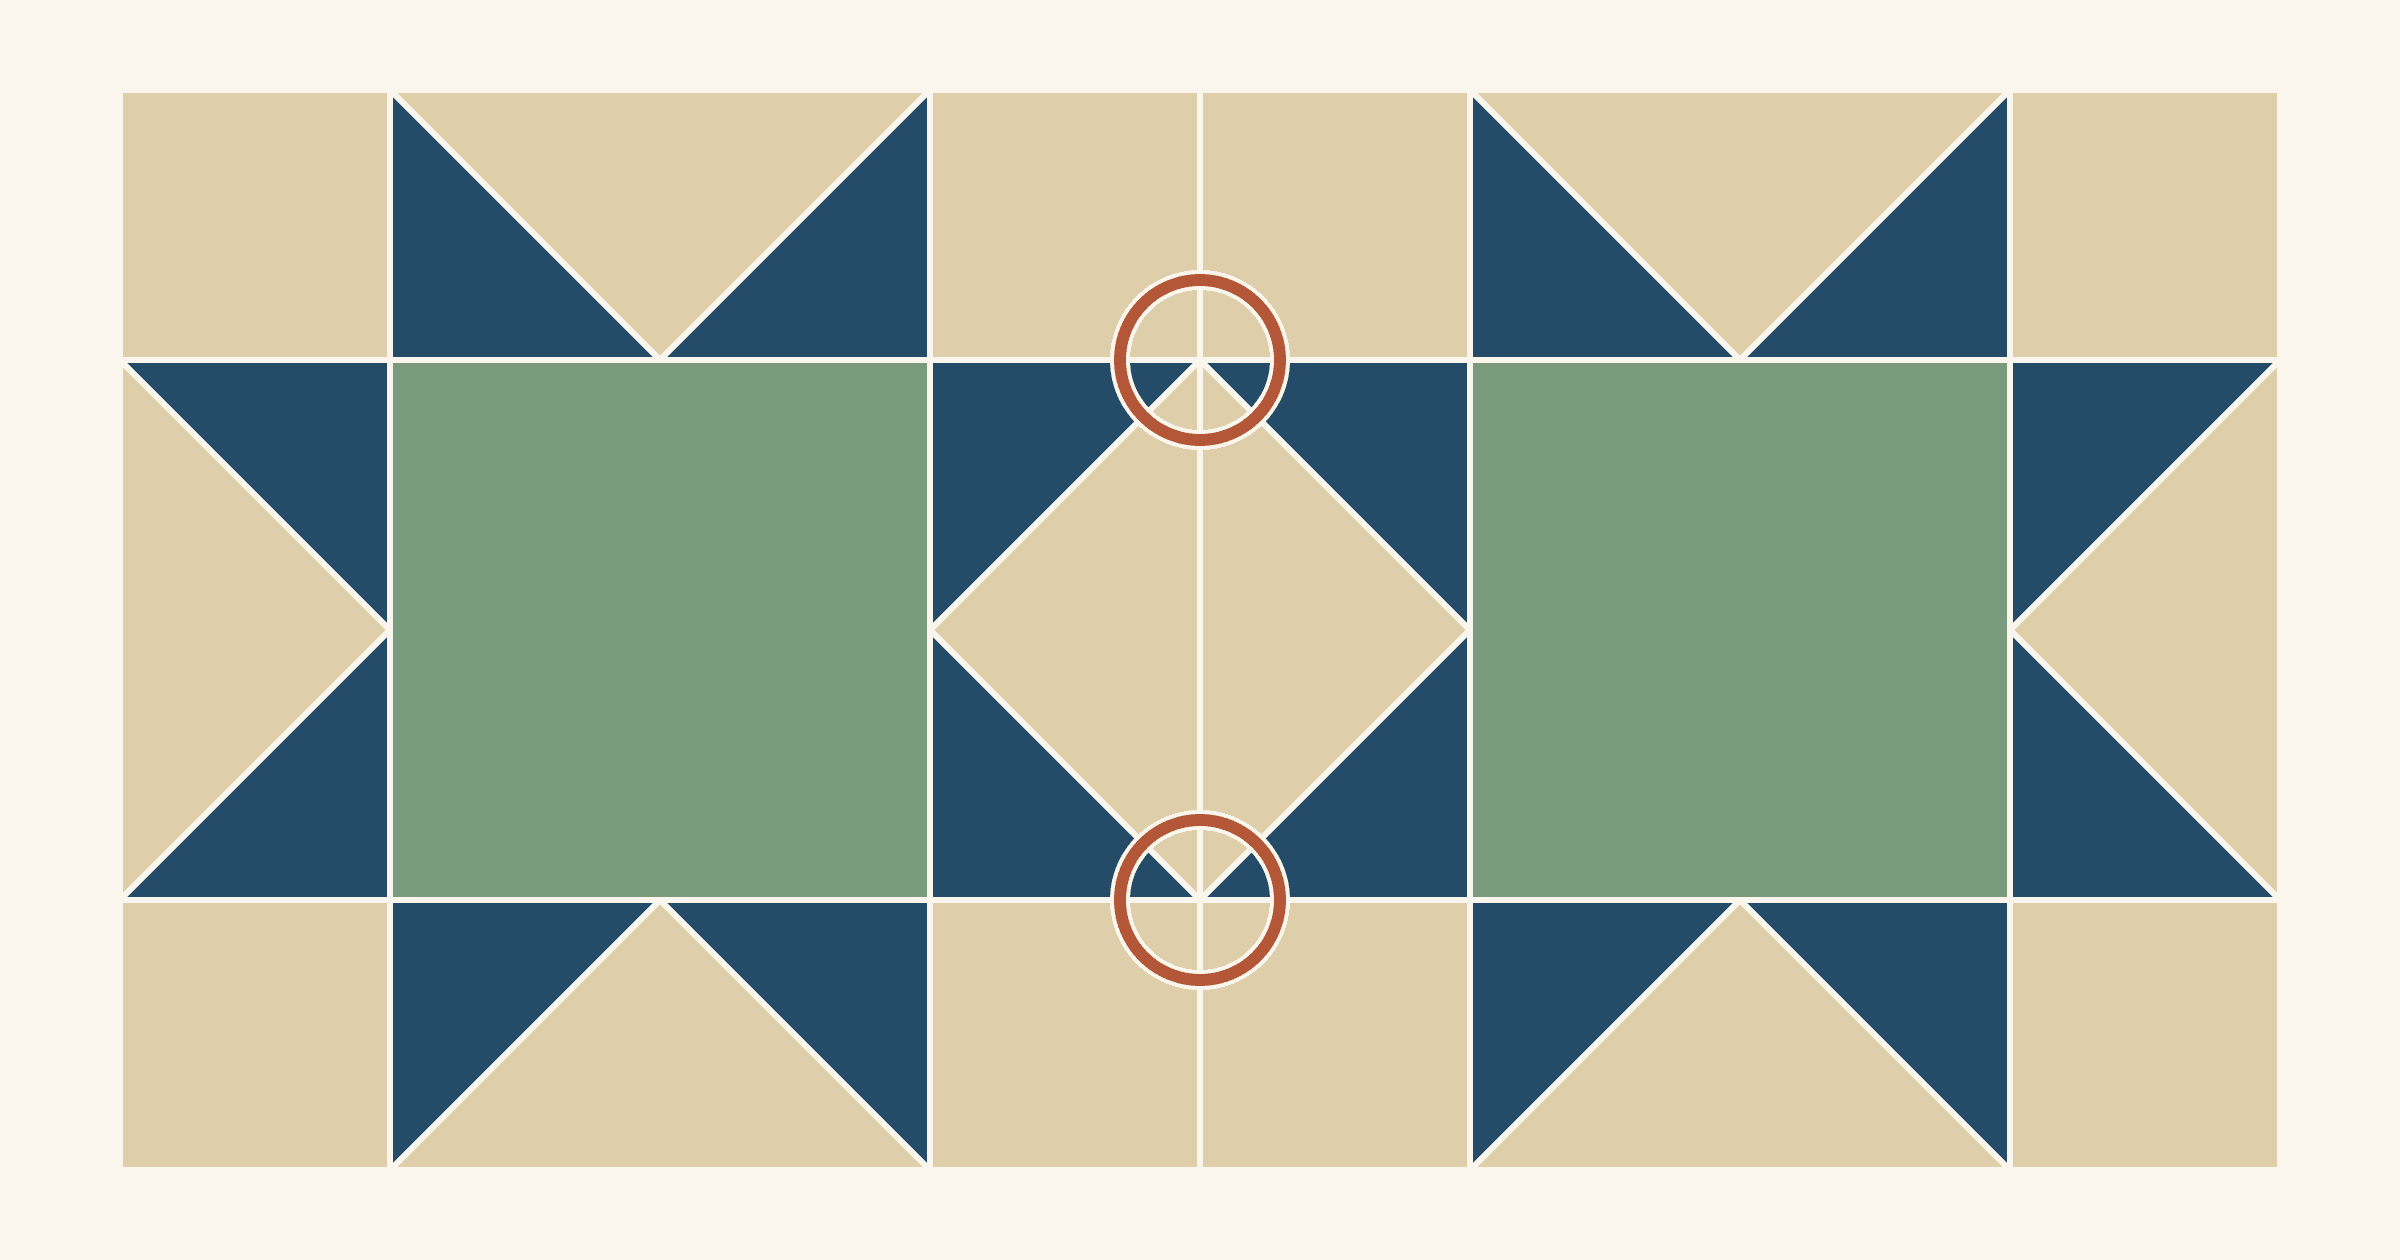
Below, a 12-inch Sawtooth Star shows where its X marks sit and what a 1/8 in miss does at a block join. Then four stars get pinned into a 24-inch square. We drew these diagrams for this article and haven't sewn them.
Where is the X on a flying geese unit?
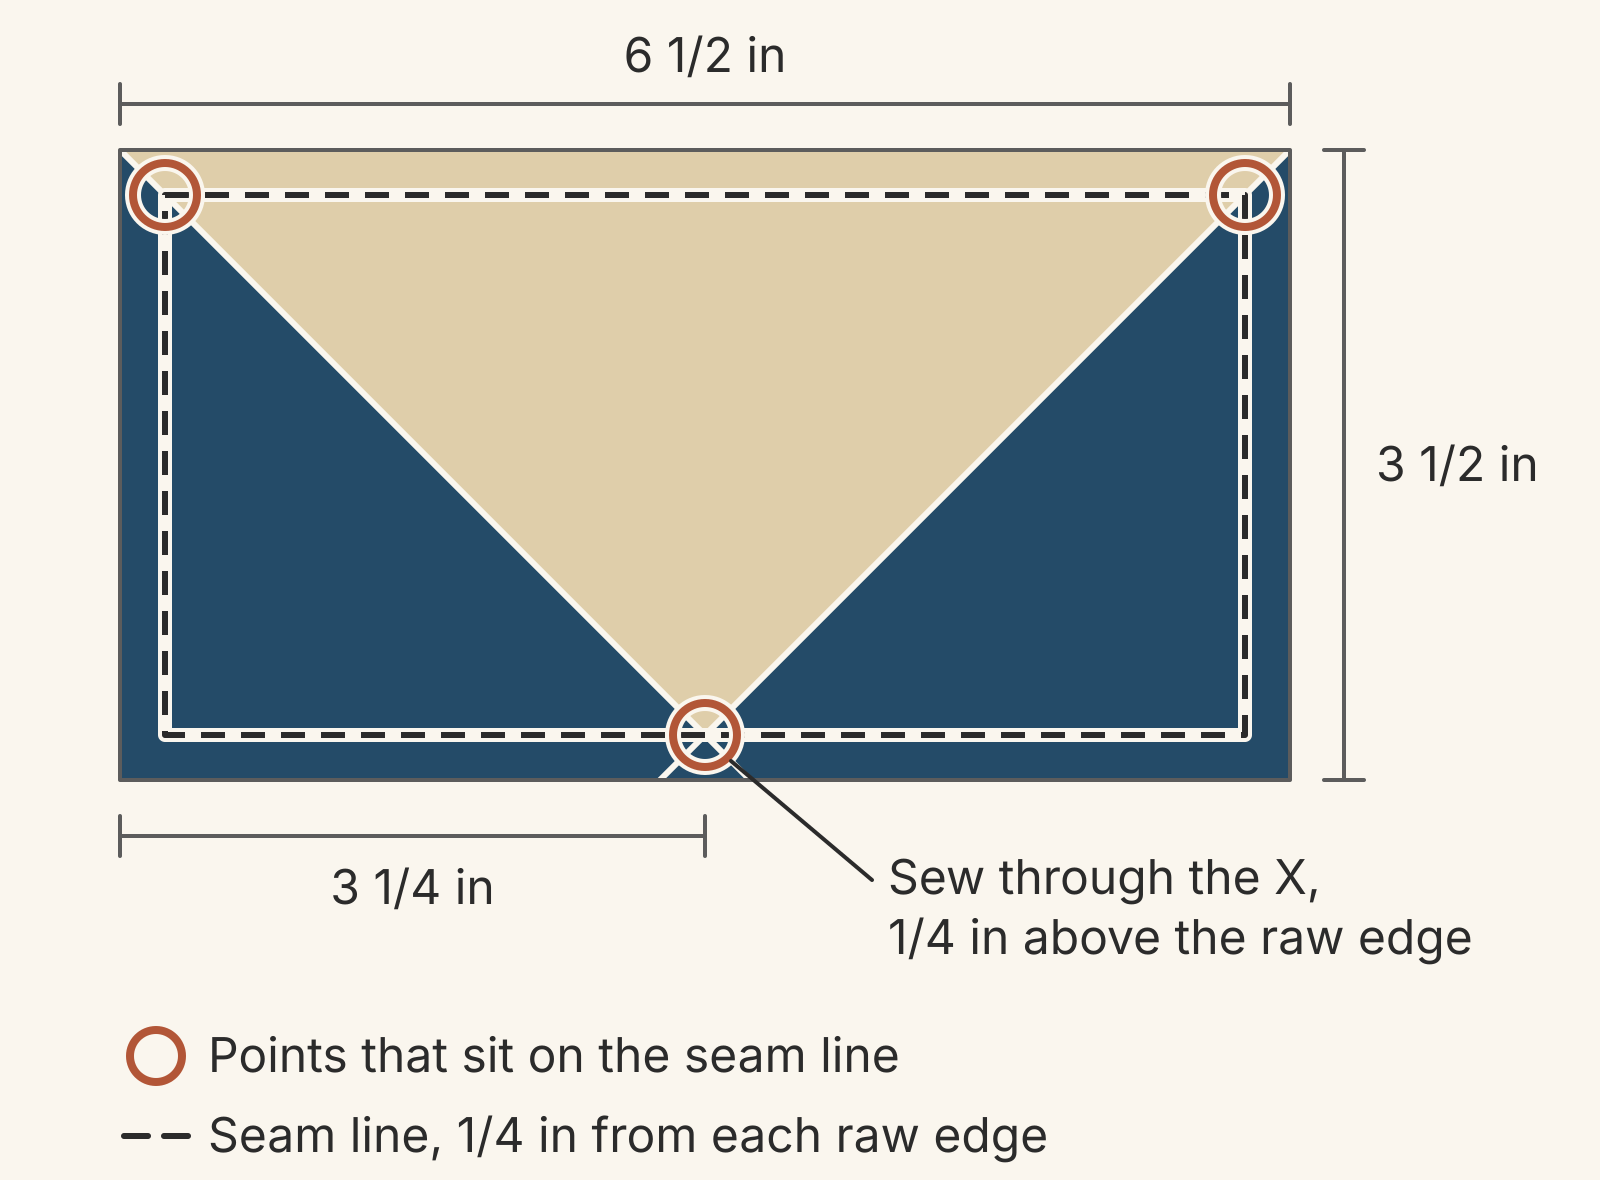
A Sawtooth Star is four flying geese, four corner squares and a center square. In a 12-inch star, each goose finishes 3 x 6 in and is trimmed to 3 1/2 x 6 1/2 in. Its two diagonal seams cross at the goose's tip, 1/4 in from the long raw edge and 3 1/4 in from each end. That crossing is the X.
The star points are the two small triangles in each goose. Their outer tips sit at the corners of the finished area along the other long edge. That puts them on the 1/4 in seam line too. So one goose carries three points, and each one depends on a later seam passing right through it.
Check each goose before you sew it to anything:
- Tip to edge: the goose's tip sits exactly 1/4 in from the long raw edge.
- Tip to ends: it measures 3 1/4 in from each short end.
- Diagonals: each diagonal seam runs straight into a corner on the opposite long edge. That puts each star tip on the seam line.
If the tip sits closer than 1/4 in, the next seam will take some of it. Becky Jorgensen warns that trimming even 1/8 in too much from the wrong spot can bring the seam allowance right to the tip. A goose that fails these checks is easier to remake now than to rescue once it's in a block. Our comparison of flying geese methods shows how cutting the squares a little oversized lets you trim each goose so its tip sits 1/4 in from the edge.
Where do the star points land when blocks meet?
Sewn up, the star measures 12 1/2 in square. Its eight star tips sit on the outer seam line, two per side. Each tip is 3 1/4 in from the nearer raw corner and 9 1/4 in from the far one. On the back, each tip is an X where a goose's diagonal seam crosses the seam that joins the goose to its corner square. If a block comes out larger than 12 1/2 in, our guide to squaring up a block without cutting off the points trims this same star so every tip sits 1/4 in from the edge.
Set two stars side by side and those tips meet tip to tip. At each one, two things have to go right. The seam has to pass through the X on both blocks, and block A's X has to sit right on top of block B's.
How do points get lost at a join?
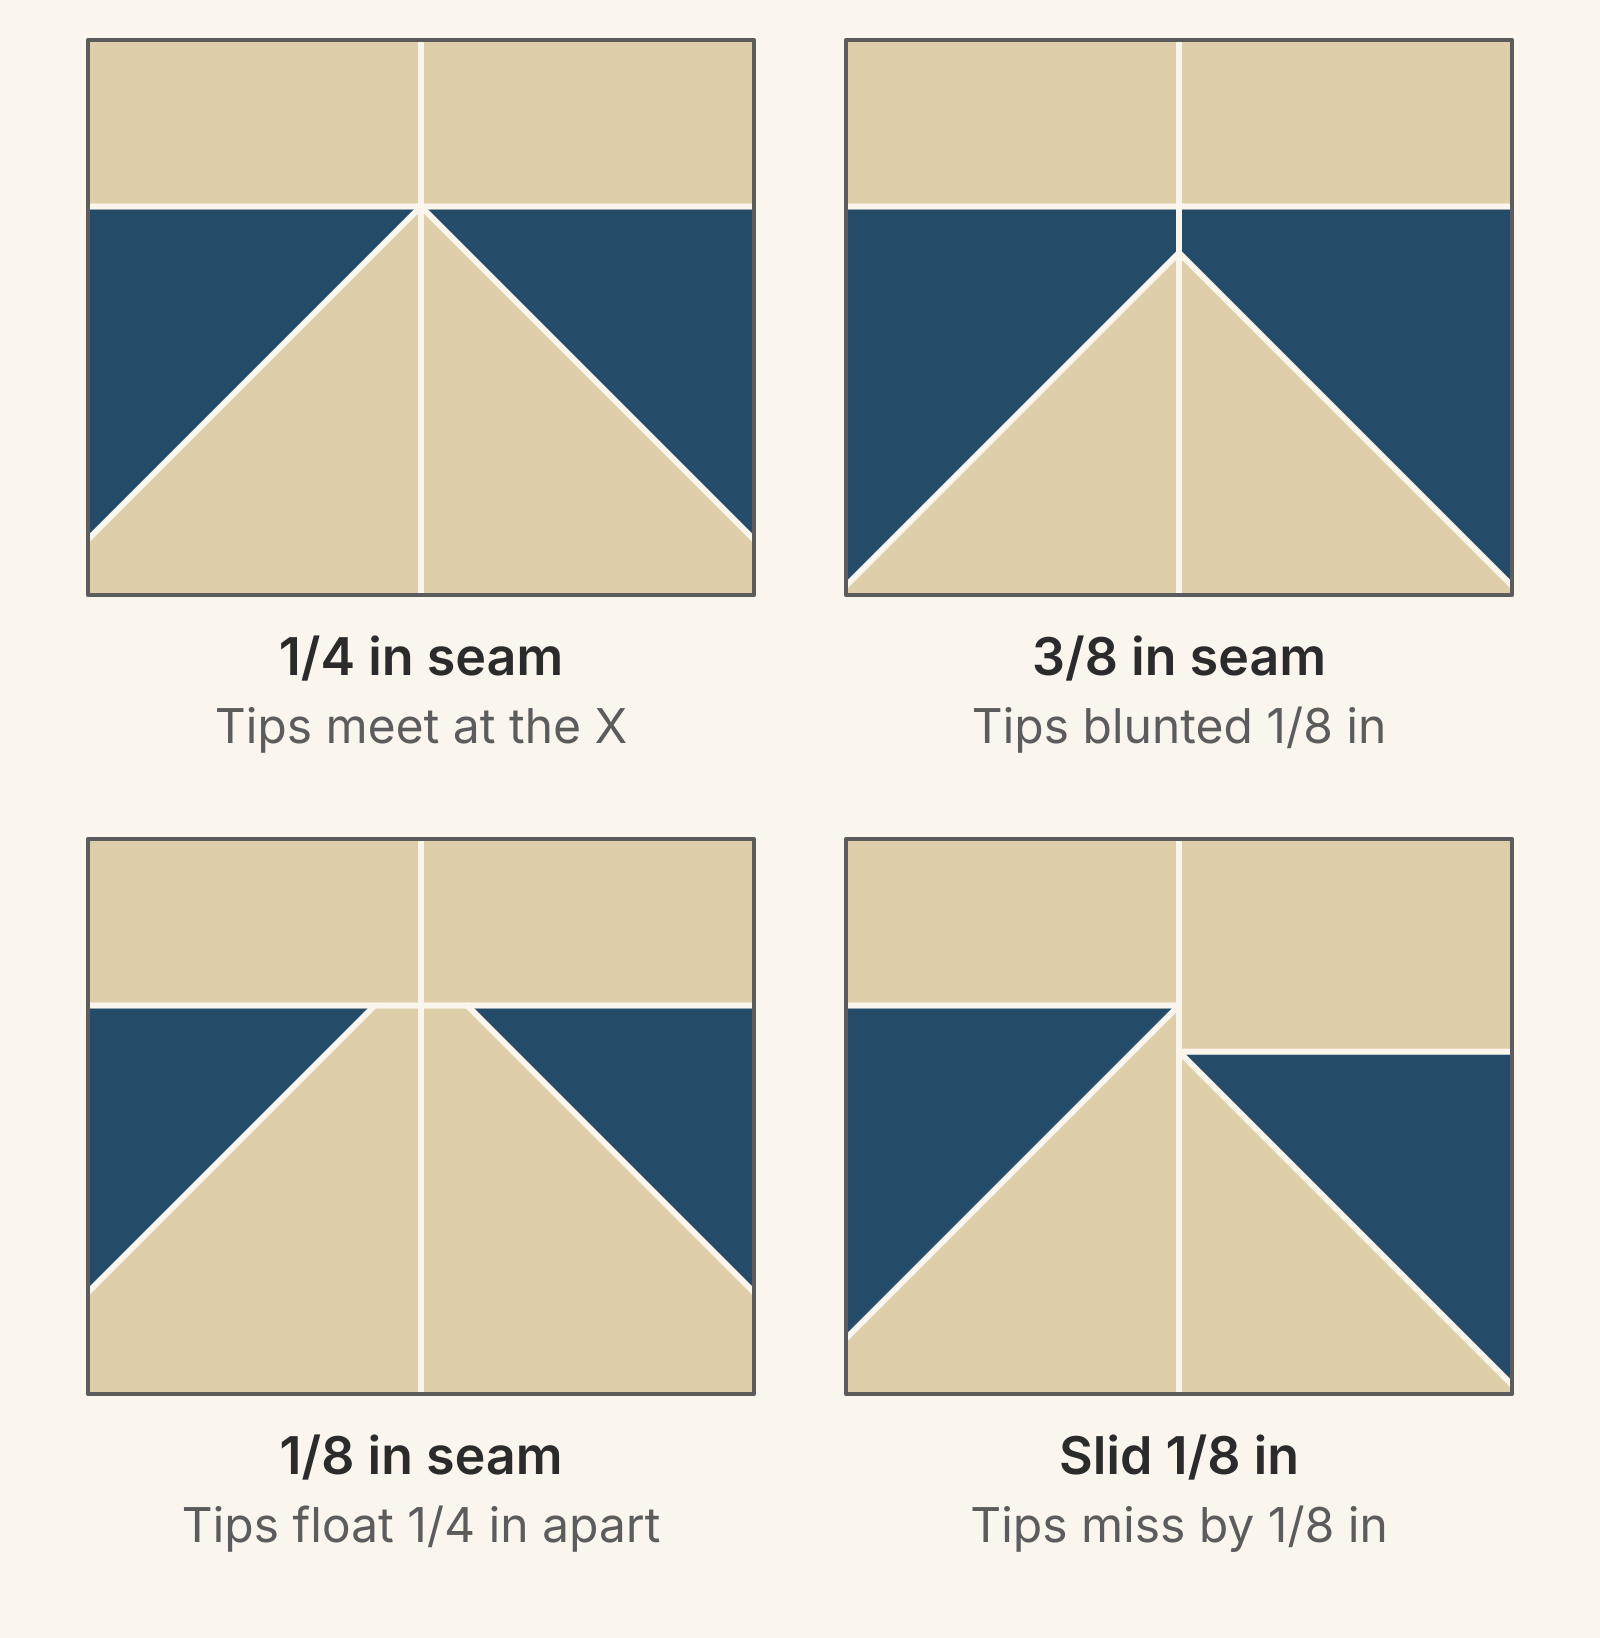
The National Quilters Circle lesson sorts lost points into three kinds. A seam that's too deep blunts the point, a seam that's too shallow leaves it floating, and pieces that slide side to side leave the points out of line. Here's each one where two 12-inch stars meet, with a 1/8 in error every time.
| Seam at the join | What you see at the tips | Two blocks measure |
|---|---|---|
| 1/4 in | Tips meet in one point | 24 1/2 in wide |
| 3/8 in, 1/8 in too deep | Each tip ends in a flat 1/8 in wide | 24 1/4 in wide |
| 1/8 in, 1/8 in too shallow | Each tip stops 1/8 in short, 1/4 in apart | 24 3/4 in wide |
| 1/4 in, one block slid 1/8 in | Tips reach the seam 1/8 in apart | Edges 1/8 in uneven |
Your tape measure can help here. A seam that's too deep also makes the pair 1/4 in narrower, and one that's too shallow makes it 1/4 in wider. If a joined row comes out short or long, check the points along that seam first.
The same miss costs more at a goose's own tip, where it meets the center square. That tip is a 90-degree corner, so a seam 1/8 in too deep there leaves a flat 1/4 in wide. That's twice the flat you get at a star tip, which is a 45-degree point.
Two more things to know:
- A blunted tip isn't gone. It's hidden in the seam allowance. Unpick a few inches on either side, resew through the X, and the tip comes back.
- Stretch moves the X. Becky Jorgensen points out that triangles have bias edges, and a stretched bias edge shifts the point. Handle the geese gently and press rather than iron.
How do you pin and sew through the X?
This is Ashley Hough's pin method with Lee Monroe's short test seam added:
- On the back of block A, push a straight pin through the X. Peek at the front: the pin should come out right at the tip.
- Lay B face up and push the point of the same pin into B's tip, so it comes out through B's X on the back.
- Keep that pin standing straight up and lower A onto B, right sides together, with the raw edges even. Pin on either side of the point, then pull the upright pin out.
- Sew with the side that shows the most seam allowances on top, as Ashley Hough does, so you can see an X as you go.
- Stitch just 1/2 in on either side of the point first, as Lee Monroe suggests. Open the seam and look.
- If the tips meet, sew the full seam right over your test stitches. If they don't, unpick that inch and adjust before you go on.
Sometimes the X you need is on the bottom block. Ashley Hough turns the pinned pair over and sews two or three stitches right through that X first. Turn the pair back, and those bobbin stitches show on top, so you can line up with them as you sew the full seam.
Then press. Becky Jorgensen suggests pressing the seam away from the point when you can, so the point doesn't fold under the bulk. When the block won't allow that, pressing open is fine.
Worked example: four 12-inch stars in a 2 x 2 square
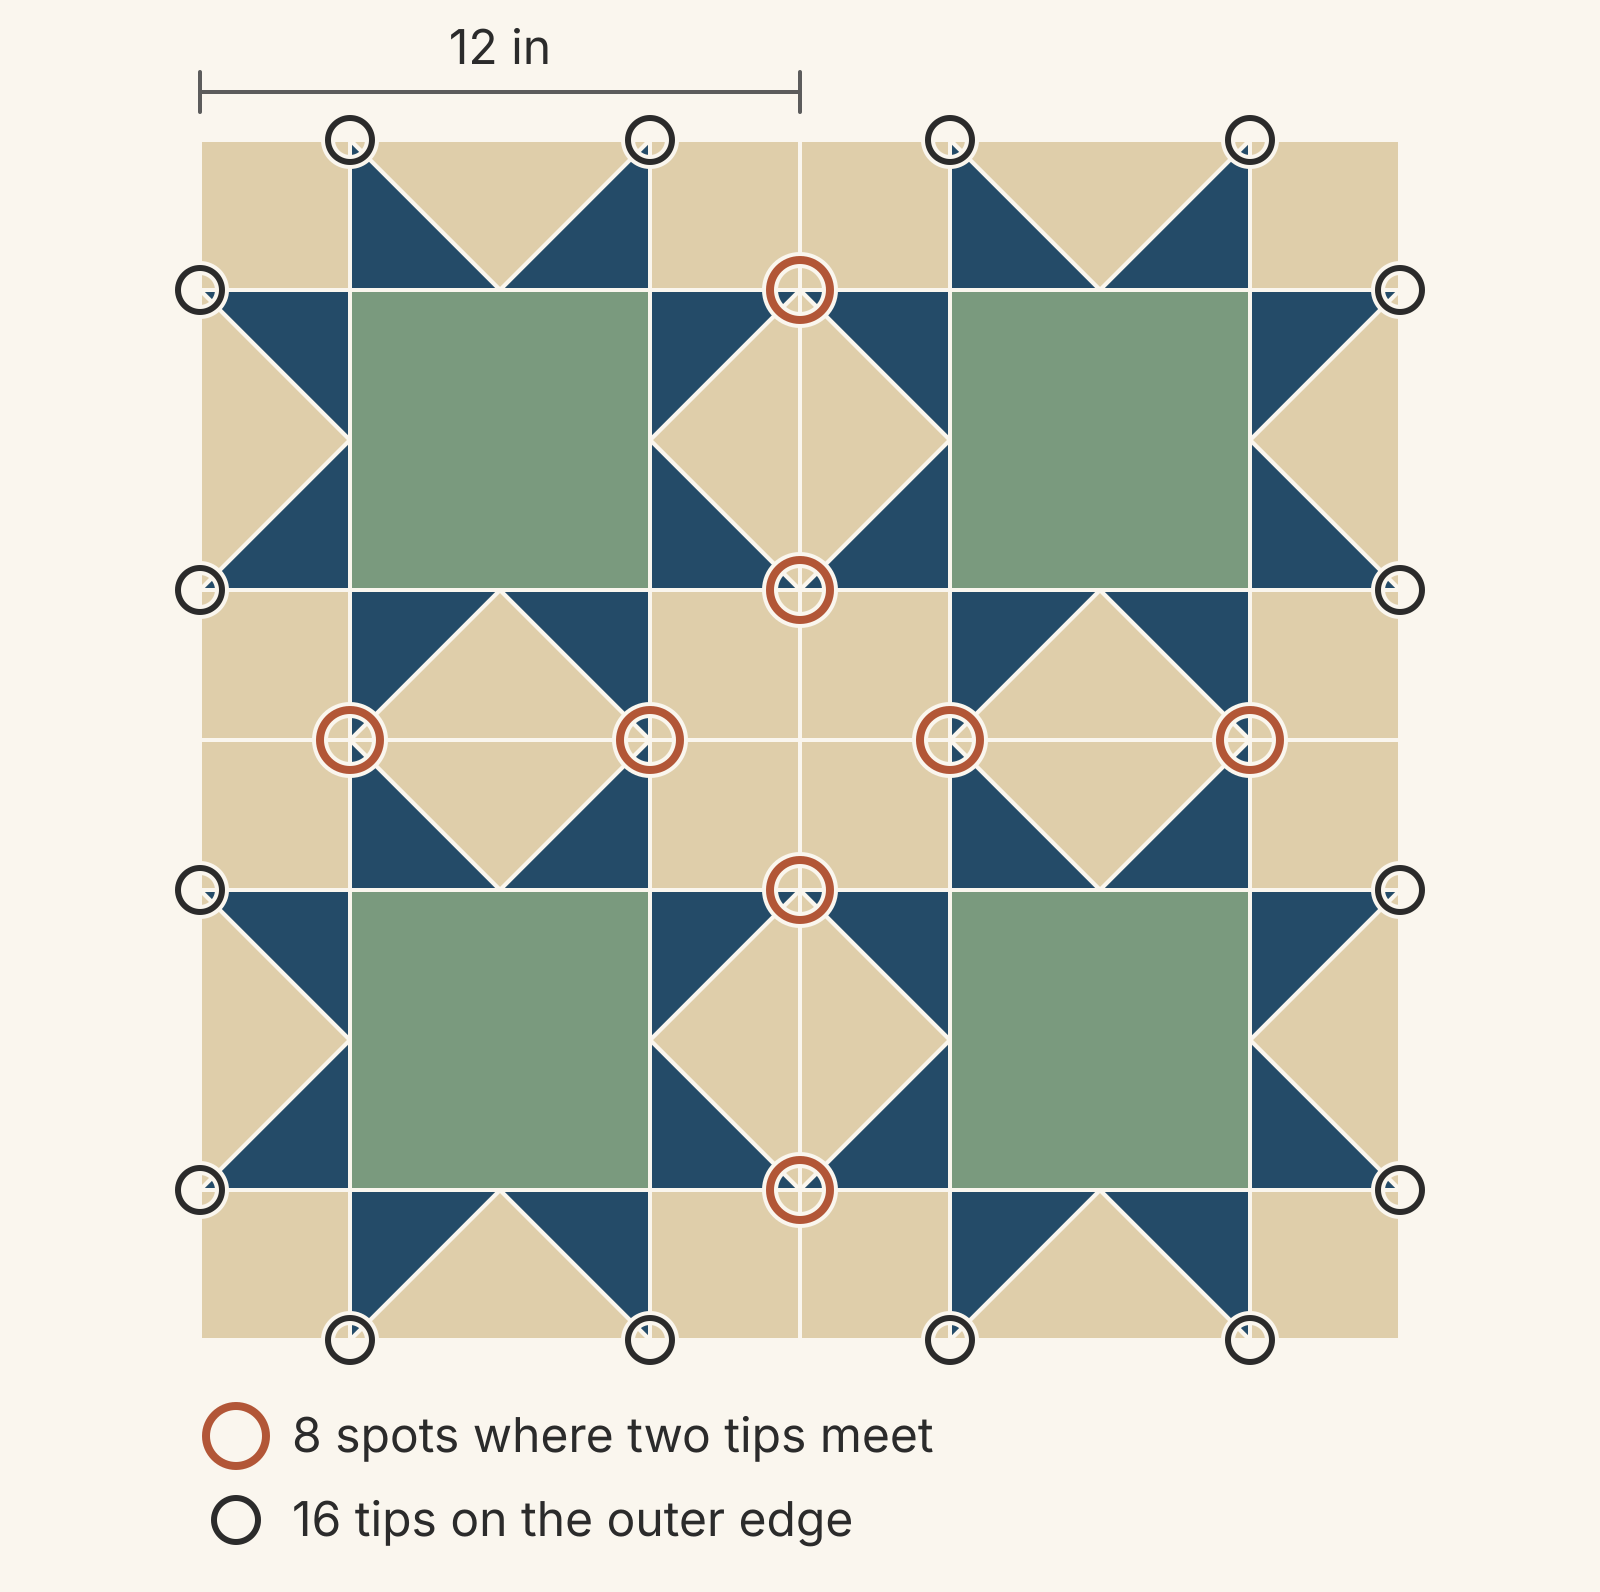
Four stars set 2 x 2 with no sashing make a 24-inch finished square, 24 1/2 in across before you add anything around it. Count the points before you start:
- 4 blocks x 8 tips = 32 star tips.
- 16 sit on the four inside seams, where they meet in pairs at 8 spots.
- The other 16 sit on the outer edge.
Sew it in this order:
- Top row: join A to B. Pin the 2 spots, 3 1/4 in and 9 1/4 in down from the top raw edge. The row should measure 24 1/2 x 12 1/2 in.
- Bottom row: join C to D the same way.
- Rows together: pin the 4 spots at 3 1/4, 9 1/4, 15 1/4 and 21 1/4 in from the left raw edge. The center, where four corner squares meet, has no points. It's a plain four-way crossing.
- Outer edge: each of the 16 outer tips sits 1/4 in from the raw edge. The next seam has to cross its X too, whether that's a border or the binding.
If pinning eight tip-to-tip joins sounds like too much, alternate the stars with plain squares. Each tip then meets a plain edge. The seam still has to cross the X, but there's no second tip to line up.
Can you float the points on purpose?
Yes. Trim the units so the tips sit a little farther from the raw edge, and a seam that runs a little deep can't reach them. An American Quilter's Society tip from reader Diane Williams, edited by pattern editor Marje Rhine, does this for a 9-inch Friendship Star. Its half-square triangles start from 4 1/4 in squares. They're trimmed to 3 1/2 in with the ruler shifted, so the tips land about 3/8 in from the raw edge. After a 1/4 in seam, each tip clears the seam by about 1/8 in. Where two floated tips meet, that leaves the 1/4 in gap you saw in the third close-up above.
The article says the method works only with half-square triangles cut slightly oversized. Its units are sewn two at a time, then trimmed. The tradeoff is a thin line of background beyond every tip. Choose it when you'd rather have whole points than points that reach the seam.
Plan the joins before you sew
For your next star quilt, sew two blocks first. Run the three goose checks, measure each block (12 1/2 in for a 12-inch star), and pin and sew one join through the X before you make the rest. Then count where tips will meet so you know how many joins need a pin.
You can see those meeting spots in QuiltLab before you cut. Draw the star in the Block Editor, then place it in a Grid quilt in the Quilt Editor and set the rows and columns. The layout shows every edge where two stars touch, so you can count the tip-to-tip joins. To compare a setting with plain alternate squares, draw a one-piece block and place it in alternate cells. Under Borders, Add border sets a finished width. If you add one, every outer tip meets that border seam. QuiltLab doesn't calculate cutting lists, so take cut sizes from your pattern.
Quilt Editor guide →Arrange blocks in a measured grid and add bordersStill choosing fabrics? Our Sawtooth Star color placement guide compares three ways to split the center, points and background.
Related posts

How to Design a Bargello Quilt: Plan the Wave on Paper
A bargello wave is a staircase of stepped columns. Number your strips, write one row per column, and see how column width turns a zigzag into a curve.

Borderless Quilt Design: Plan an Edge That Looks Finished
With no border, the outer blocks and the binding make the edge. Compare whole and halved motifs on one 48 x 60 inch quilt, then pick the binding color.

Crosshatch Quilting: How to Make the Lines Meet at the Edges
Space a 45-degree crosshatch so the lines meet in a V at every edge and corner. Choose the edge step first, mark dots around the quilt, then connect them.