


How Many Squares in a Jelly Roll Strip? Plan the Whole Roll
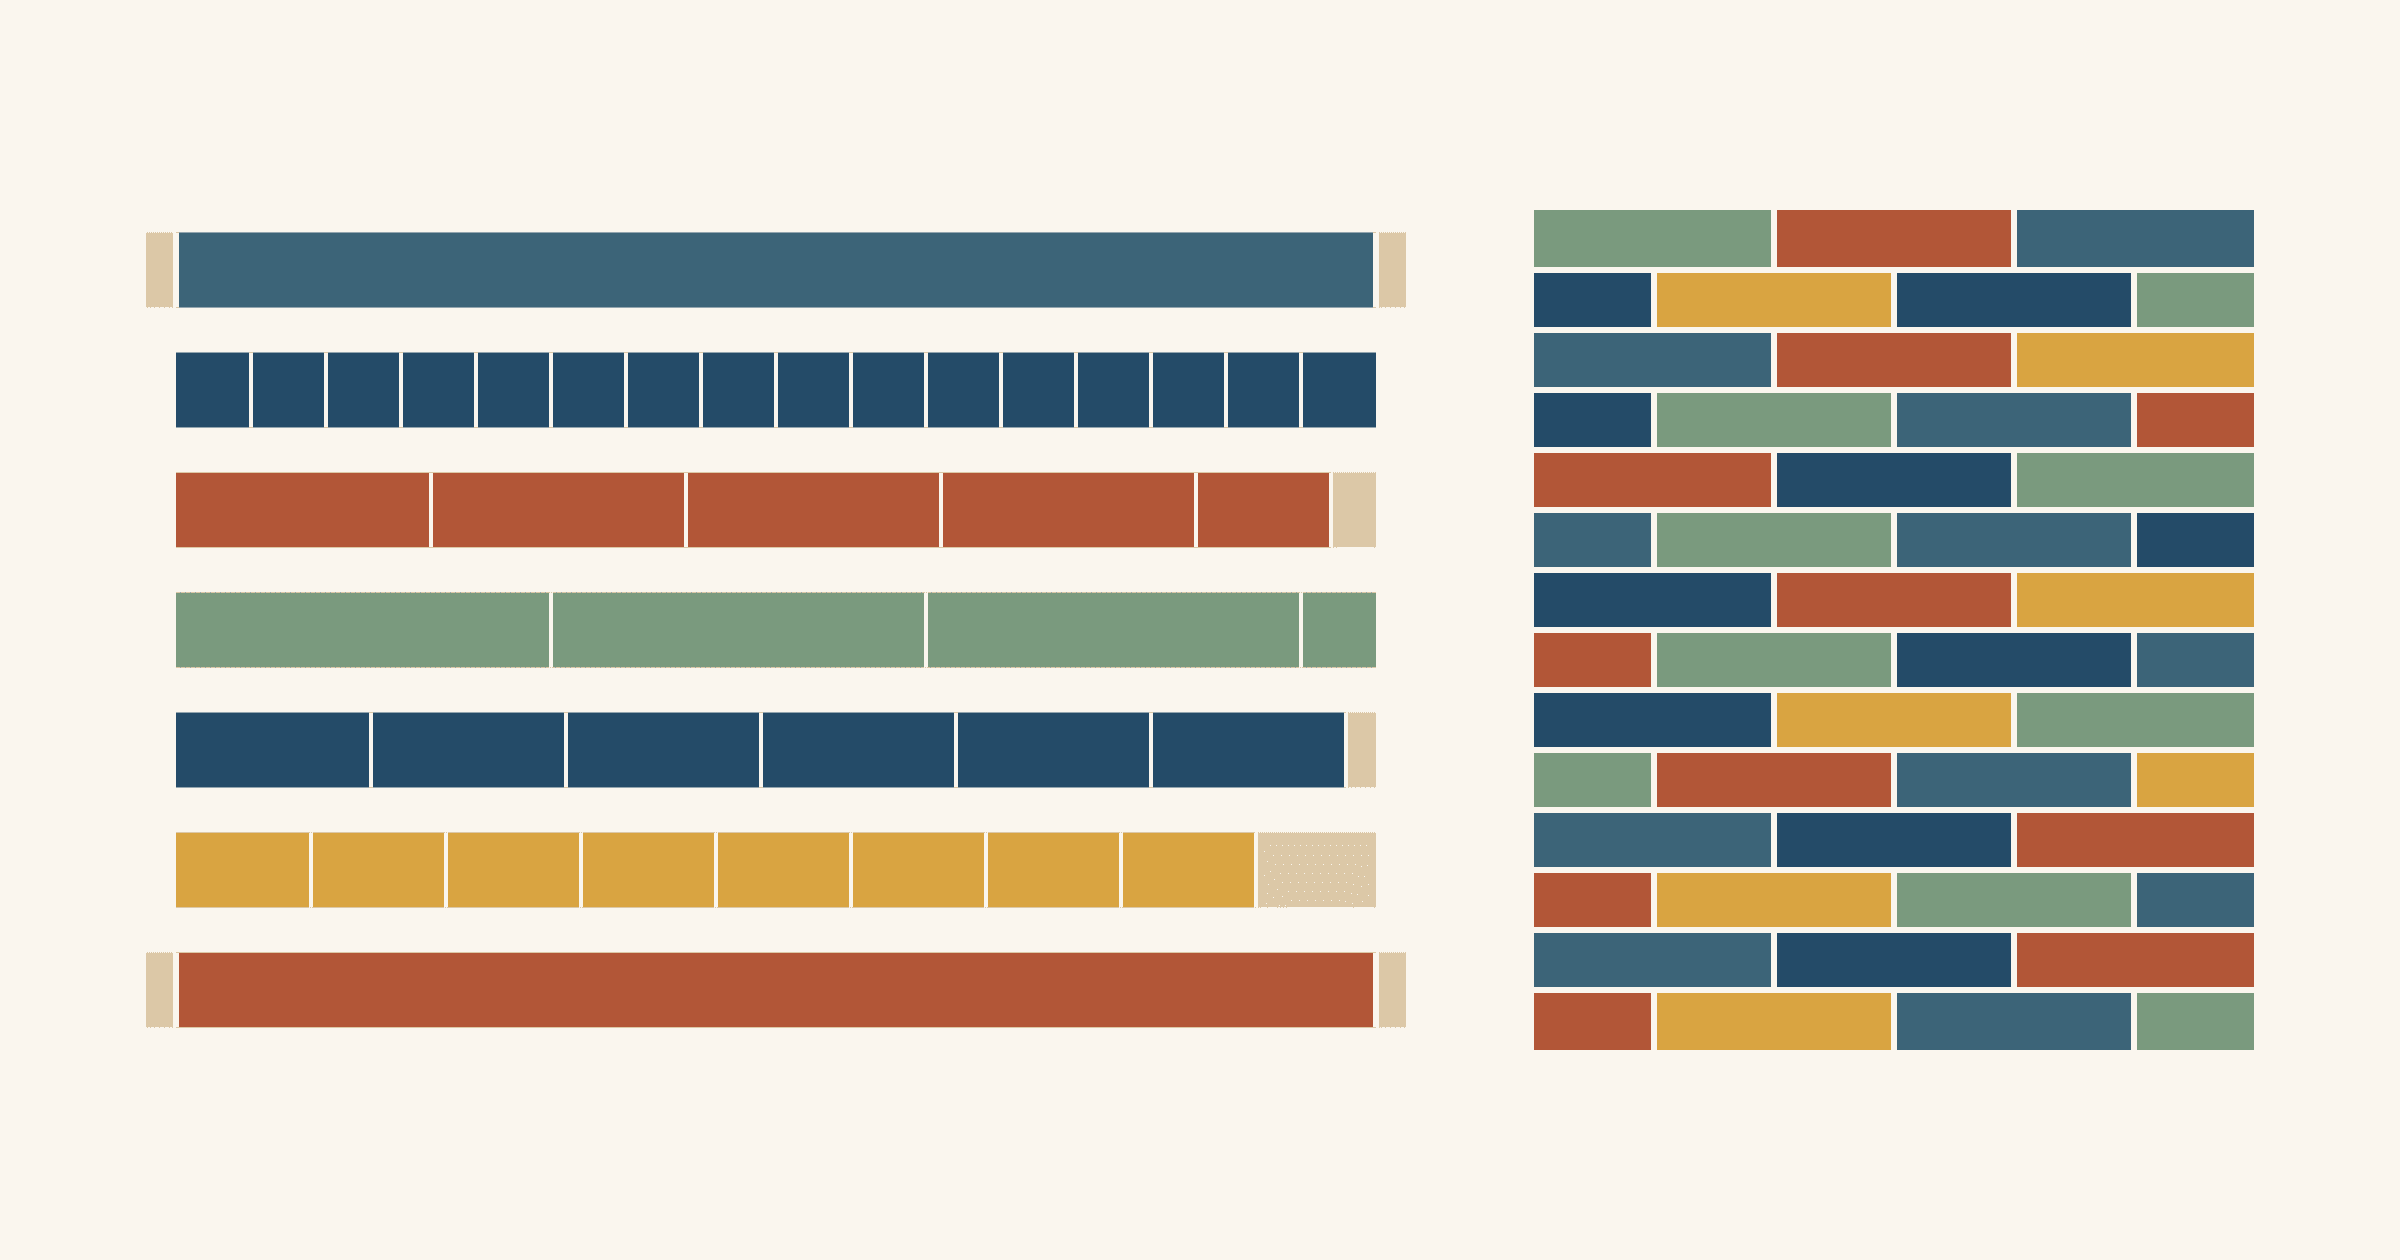
A jelly roll strip gives you 16 squares cut 2 1/2 inches, as long as 40 inches are left after you trim the selvages. Jelly roll strips are 2 1/2 inches wide and as long as the fabric is wide. Missouri Star Quilt Company's jelly roll quilt tutorial gives that as about 44 inches, with 40 to 42 strips in a roll. Michelle at Wee Folk Art starts from strips of around 42 inches and rounds each one down to 40 for her jelly roll race math, allowing for selvages and seams. Plan on 40 inches until you've measured your own roll.
The same math works for every piece you cut from a strip: divide the usable length by the piece's length and round down. The leftover tells you whether a smaller piece fits too. Below are the counts for common subcuts, then a brick quilt planned from a single roll, down to the last brick.
How long is a jelly roll strip once the selvages are off?
Kris O'Neill's jelly roll guide at Sew The Distance puts strip length at 42 to 44 inches. Each strip is cut selvage to selvage, she explains, and the width of fabric can vary slightly from print to print. She also points out that the strips come folded in half, selvage to selvage, and that the selvages have to come off at some point.
That trim sets your count. To find your planning length:
- Unroll the strips and press out the center fold.
- Take three or four strips, trim the selvage from both ends and square them.
- Measure each one. Use the shortest as the length for every strip in your plan.
If you haven't measured yet, use 40 inches. That leaves 2 to 4 inches of a 42- to 44-inch strip for the selvages and squaring up, and any extra length can only add pieces.
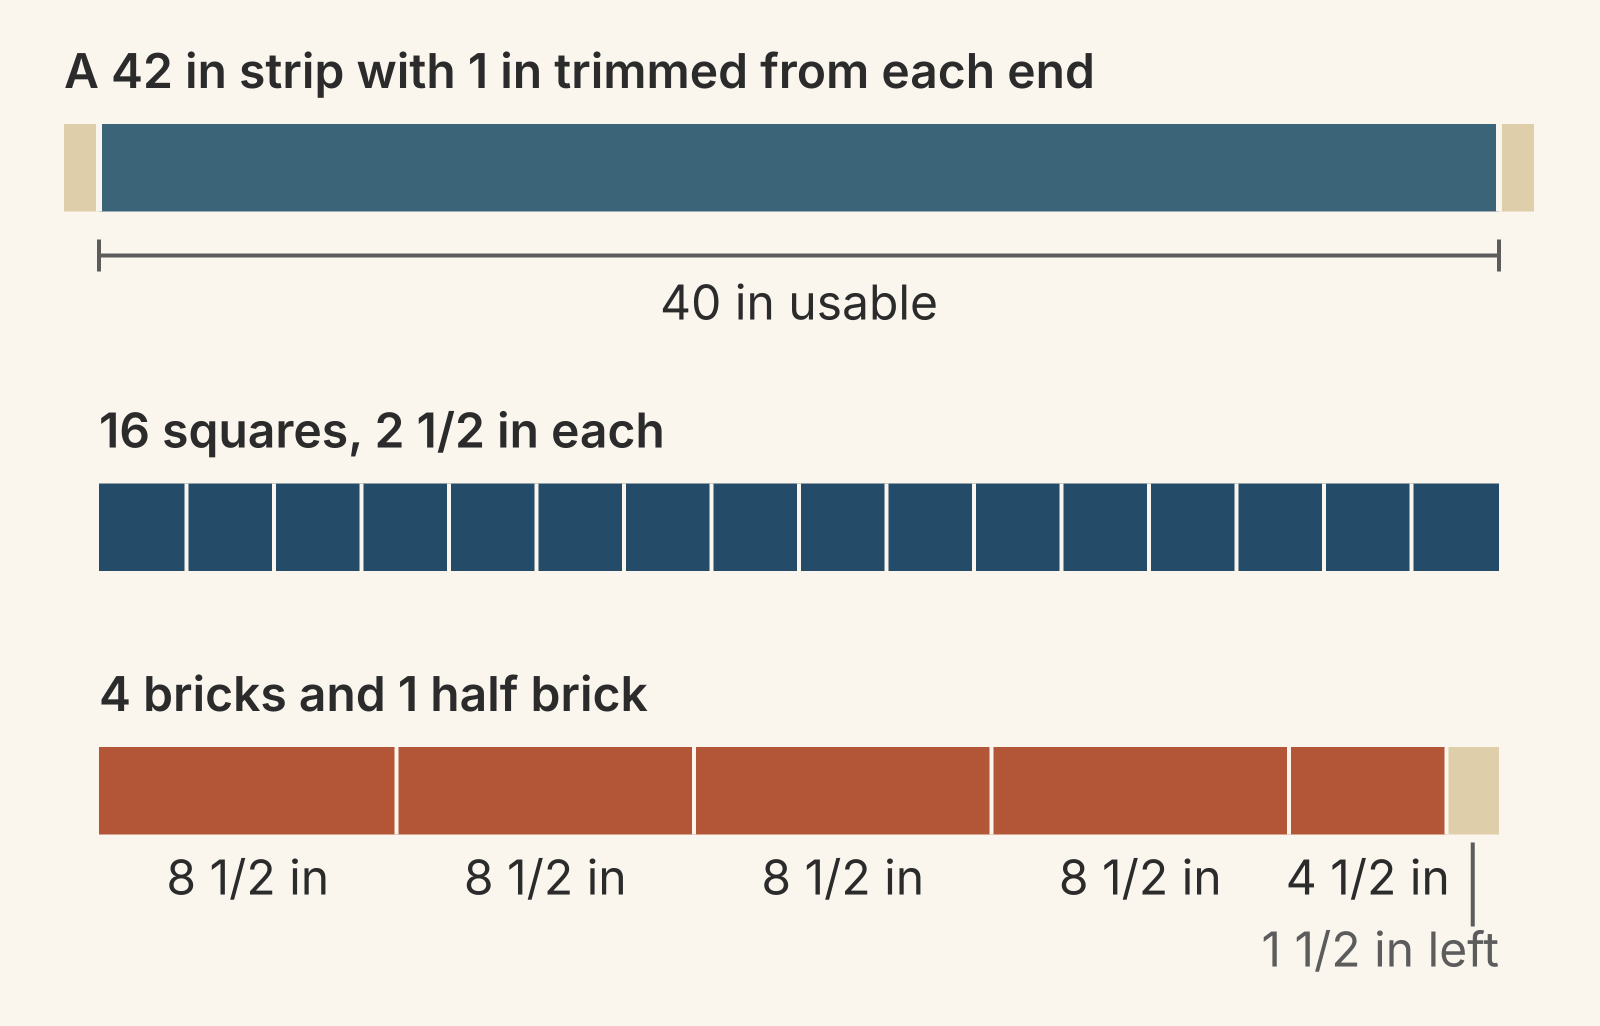
Pieces per strip: divide and round down
Every piece you cut from a strip is 2 1/2 inches on one side, so only its length changes. For any piece:
Pieces per strip = usable length divided by the cut length, rounded down.
Multiply the pieces by their length and subtract from the usable length to find what's left. Here are the common cuts at 40 and 42 usable inches. The finished sizes assume 1/4-inch seams on every side.
| Cut piece | Finishes at | From 40 in | From 42 in |
|---|---|---|---|
| 2 1/2 x 2 1/2 in | 2 x 2 in | 16, none left | 16, 2 in left |
| 2 1/2 x 4 1/2 in | 2 x 4 in | 8, 4 in left | 9, 1 1/2 in left |
| 2 1/2 x 6 1/2 in | 2 x 6 in | 6, 1 in left | 6, 3 in left |
| 2 1/2 x 8 1/2 in | 2 x 8 in | 4, 6 in left | 4, 8 in left |
| 2 1/2 x 10 1/2 in | 2 x 10 in | 3, 8 1/2 in left | 4, none left |
| 2 1/2 x 12 1/2 in | 2 x 12 in | 3, 2 1/2 in left | 3, 4 1/2 in left |
Two more inches of strip add a ninth 4 1/2-inch rectangle and a fourth 10 1/2-inch bar, but no extra square. The 17th square needs 42 1/2 inches. Whether a little extra length pays off depends on the piece, so measure before you count.
For the whole roll, multiply by the number of strips. Forty strips at 16 squares each give 640 squares cut 2 1/2 inches.
Squares and short rectangles are the everyday cuts. Sherri McConnell's 10 tips for using jelly roll strips at A Quilting Life include cutting 2 1/2-inch squares straight from the strips, and 2 1/2 x 4 1/2-inch segments for flying geese. Sew a square onto each end of one of those rectangles and you have a 2 x 4-inch goose, as our flying geese methods guide shows. Our jelly roll guide covers the precut itself: the brands, the other names it's sold under and what it suits.
Use the leftover for a piece you need
A leftover of 2 1/2 inches or more holds a square. At 4 1/2 inches it holds a 2 x 4-inch finished rectangle. If your quilt needs a smaller piece anyway, plan it into the strip and the scrap becomes part of the quilt.
The 12 1/2-inch bar shows how neatly this can work. Three bars use 37 1/2 inches of a 40-inch strip, and the last 2 1/2 inches is exactly one square. Christine Baker plans this way in her jelly roll table runner on QUILTsocial. She cut four 2 1/2-inch squares from the end of each of her five block strips for a pieced border, then sewed the shortened strips together for the blocks.
Write the plan for one strip as a sum and check that it fits your usable length. The brick plan in the diagram is 8 1/2 + 8 1/2 + 8 1/2 + 8 1/2 + 4 1/2 = 38 1/2 inches. Any strip that measures at least that gives the same five pieces.
Worked example: a brick quilt from one 40-strip roll
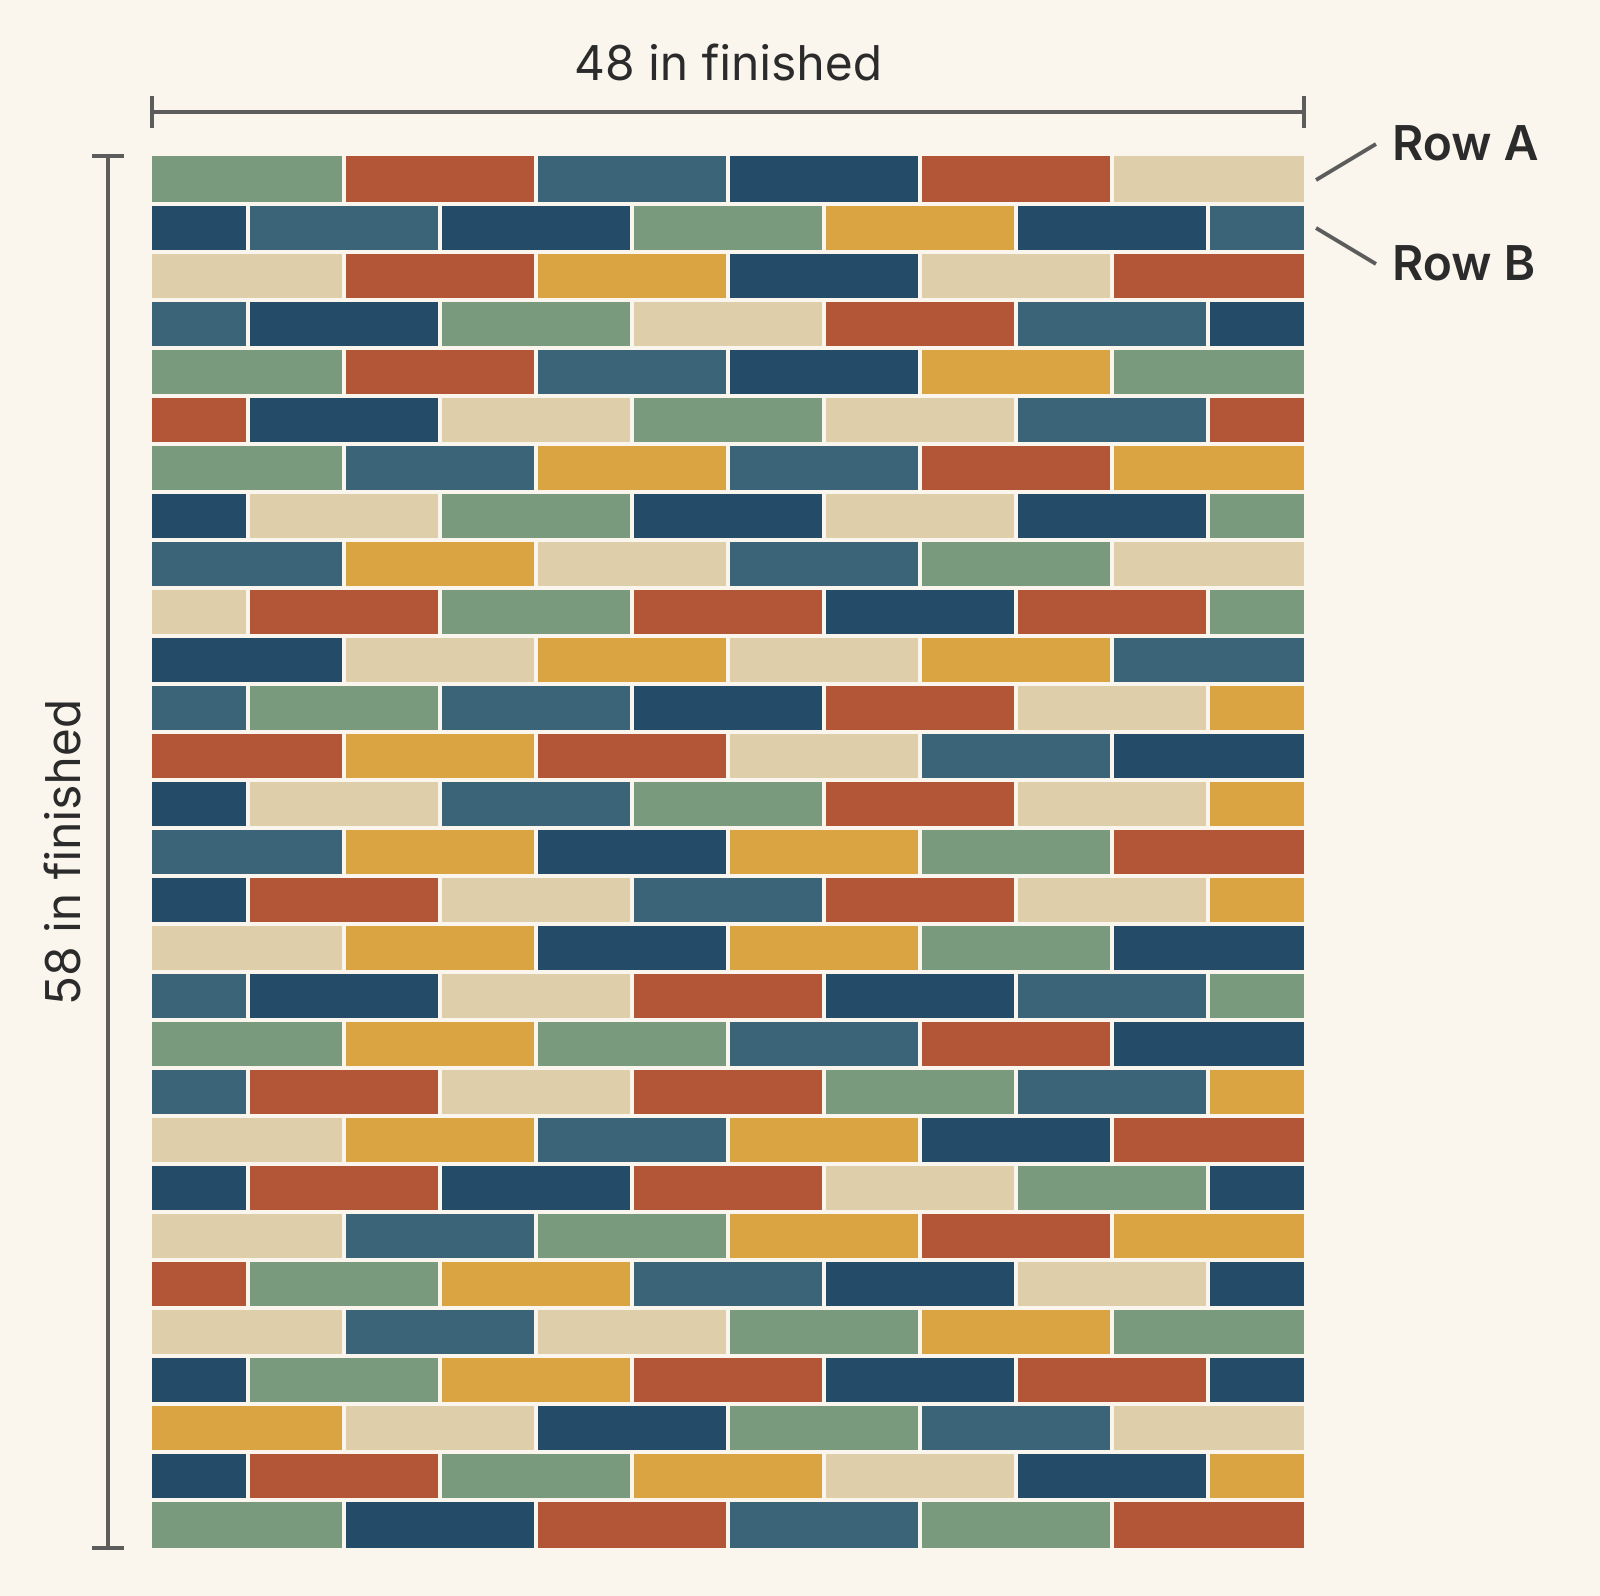
Here's that plan carried through a whole quilt. The bricks finish 2 x 8 inches (cut 2 1/2 x 8 1/2), and the half bricks at the ends of every other row finish 2 x 4 (cut 2 1/2 x 4 1/2).
- Write the strip plan. From 40 usable inches, each strip gives 4 bricks and 1 half brick. That uses 38 1/2 inches, and the last 1 1/2 inches is scrap.
- Count the roll. Forty strips give 160 bricks and 40 half bricks.
- Write the rows. Both rows finish 48 inches wide. Row A is 6 bricks: 6 x 8 = 48. Row B is a half brick, 5 bricks and a half brick: 4 + 40 + 4 = 48. A pair of rows uses 11 bricks and 2 half bricks.
- Divide. The bricks run out first. 160 bricks make 14 pairs, which use 154 bricks and 28 half bricks. The 6 bricks left make one more Row A, so the top has 29 rows: 15 A rows and 14 B rows.
- Find the size. 29 rows x 2 inches = 58 inches. The top finishes 48 x 58 inches, or 48 1/2 x 58 1/2 inches before it's quilted and bound, with 12 half bricks to spare.
That's a little smaller than the 50 x 65-inch throw in our quilt size chart. A 4-inch border cut from yardage would bring it to 56 x 66 inches.
Counting fabric area would have promised a bigger quilt. The roll holds 4,000 square inches of usable strip, but this top finishes at 2,784. Seam allowances take most of the difference, and the scrap ends and spare half bricks take the rest. That's why you count pieces, not square inches.
What changes the count
Strips you set aside. Decide what else the roll has to cover before you count. If you hold back 6 strips for a scrappy binding, the other 34 give 136 bricks. That's 12 row pairs with 4 bricks left over, too few for another row, so the top drops to 24 rows: 48 x 48 inches.
A bigger roll. Count the strips in yours. A 42-strip roll gives 168 bricks and 42 half bricks, enough for 15 row pairs, and the top grows to 48 x 60 inches.
Longer strips. Five bricks need 42 1/2 inches. If your shortest trimmed strip measures at least that, each strip can give 5 bricks instead of 4 bricks and a half brick, and you'd cut the half bricks from a few separate strips. That plan leaves no room for a crooked cut, so check several strips before you switch.
Work backward from a quilt size
To find how many jelly roll strips a quilt needs, run the same steps in reverse and round up at each division. Say you want the brick quilt 64 inches long:
- 64 inches divided by 2-inch rows is 32 rows, or 16 row pairs.
- 16 pairs need 16 x 11 = 176 bricks and 16 x 2 = 32 half bricks.
- At 4 bricks per strip, 176 bricks need 44 strips. Those 44 strips also give 44 half bricks, more than the 32 you need.
So a 48 x 64-inch top takes 44 strips: one 40-strip roll and 4 more strips from a second roll or matching yardage. Christine Baker's tip for big jelly roll quilts applies here: buy both rolls at the same time.
Cut one strip first
Before you cut the whole roll, cut one strip to your plan and lay the pieces out. Check that every piece measures true and the leftover is the size you expected. Then cut the rest in batches, keeping each strip's pieces together if you want to control where its print lands.
Save the scrap ends. A 1 1/2-inch tail won't make a brick, but it's just big enough for crumb quilt blocks. Our guide to sorting quilt scraps by size shows how to measure and group leftovers like these so you can find them later. Fat quarters are a different puzzle, because a piece can fit two ways; our fat quarter cutting layout works through one.
Draw the layout in QuiltLab
Measure your shortest strip, write the one-strip plan as a sum and multiply by the strips you'll cut. The Quilt Editor won't turn a drawing into a strip count or a cutting list, so keep that plan beside you. Once the count works, draw the layout to check color placement before you cut the roll.
In the Quilt Editor, use New to start a Freeform quilt. Freeform suits bricks because the Standard grid has no way to offset alternate rows. Choose Draw rectangle and drag out a brick. The outline shows its dimensions as you draw, so release at 2 x 8 inches. Select a shape to pick its fabric. A few rows are enough to see how your colors fall, and then you're ready to cut your first strip.
Draw a brick layout in the Quilt Editor →Draw rectangles in Freeform, see their sizes and assign fabricRelated posts

How to Design a Bargello Quilt: Plan the Wave on Paper
A bargello wave is a staircase of stepped columns. Number your strips, write one row per column, and see how column width turns a zigzag into a curve.

Borderless Quilt Design: Plan an Edge That Looks Finished
With no border, the outer blocks and the binding make the edge. Compare whole and halved motifs on one 48 x 60 inch quilt, then pick the binding color.

Crosshatch Quilting: How to Make the Lines Meet at the Edges
Space a 45-degree crosshatch so the lines meet in a V at every edge and corner. Choose the edge step first, mark dots around the quilt, then connect them.