


Mitered Quilt Borders vs Butted Corners: Which Should You Sew?
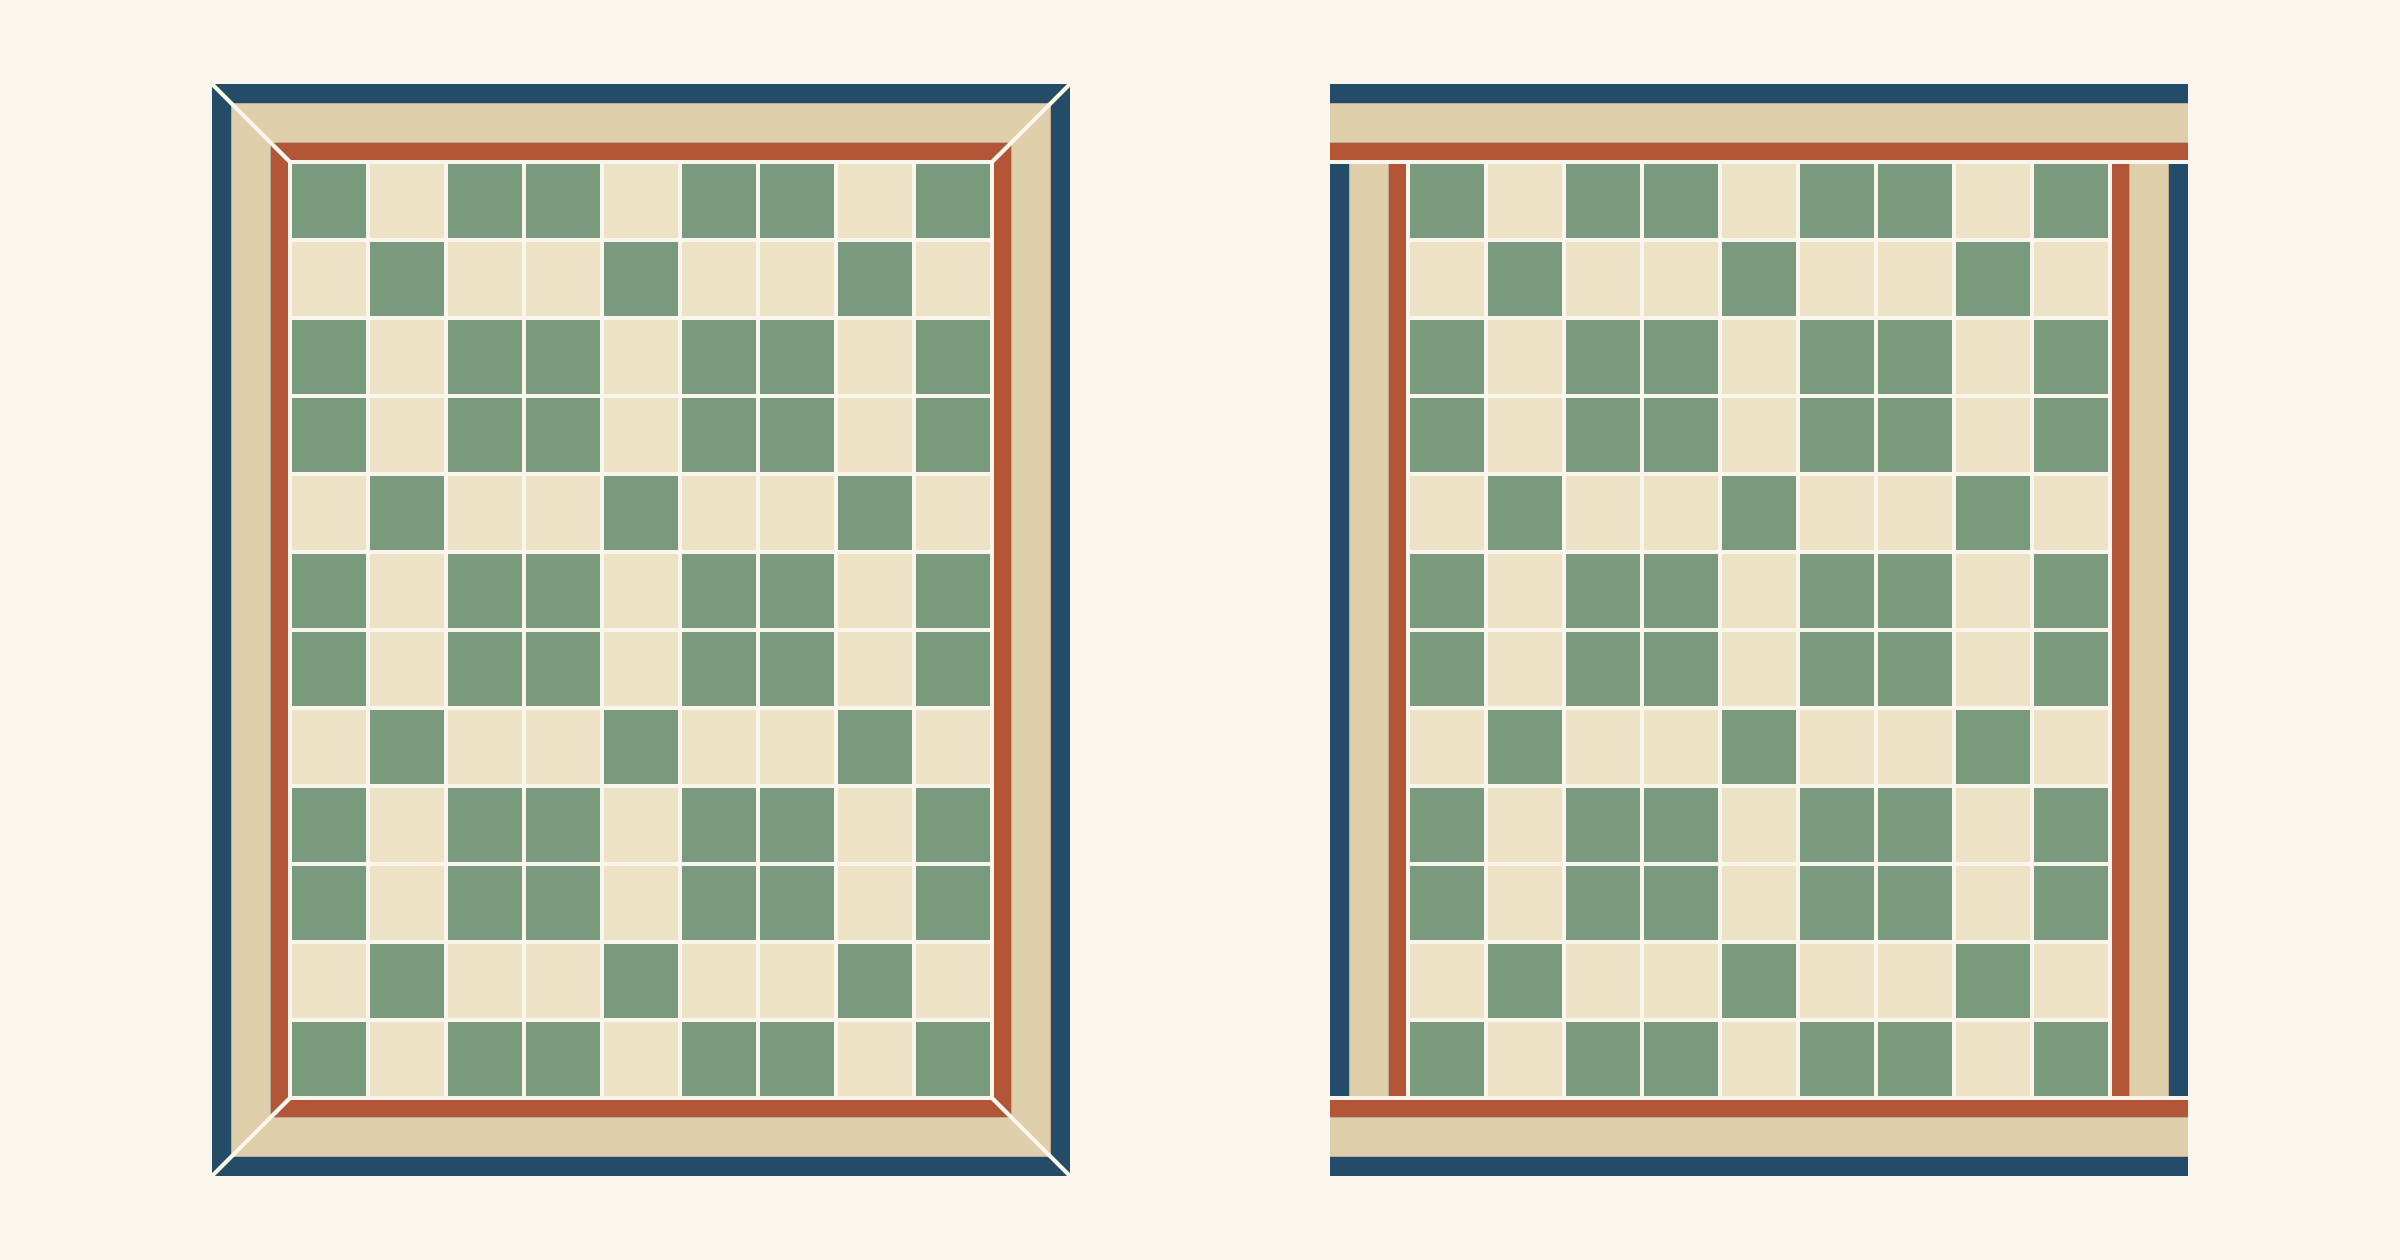
Butt the corners when your border is a solid or a busy allover print. Miter them when it's a stripe or another directional print. That's the split in GE Designs' border guide: butted corners are faster and use less fabric, and mitered corners join at 45 degrees, like a picture frame, so a stripe flows around the corner. Linda Griepentrog, writing for the American Sewing Guild, calls it a matter of preference, but she draws the same line: butted (she says lapped) borders are easier and suit allover prints, while mitered quilt borders look better on stripes.
A miter costs length and care. Each strip has to run past the corner by more than the border's width, and each corner gets a 45-degree seam that has to lie flat. On the 44-by-56-inch quilt worked out below, a mitered 4-inch border takes 214 inches of strip; butted, it takes 186.
So if the fabric is a solid, or this is your first border, butt it. Save the miter for fabric that needs it. We drew these diagrams for this article and haven't sewn them.
What changes at the corner?
A butted border is four rectangles. When you sew the sides on first, the top and bottom strips run the full width and cover the ends of the side strips, so the corner seam runs straight across. A mitered border is four long trapezoids that meet on a 45-degree seam from the inner corner to the outer corner.
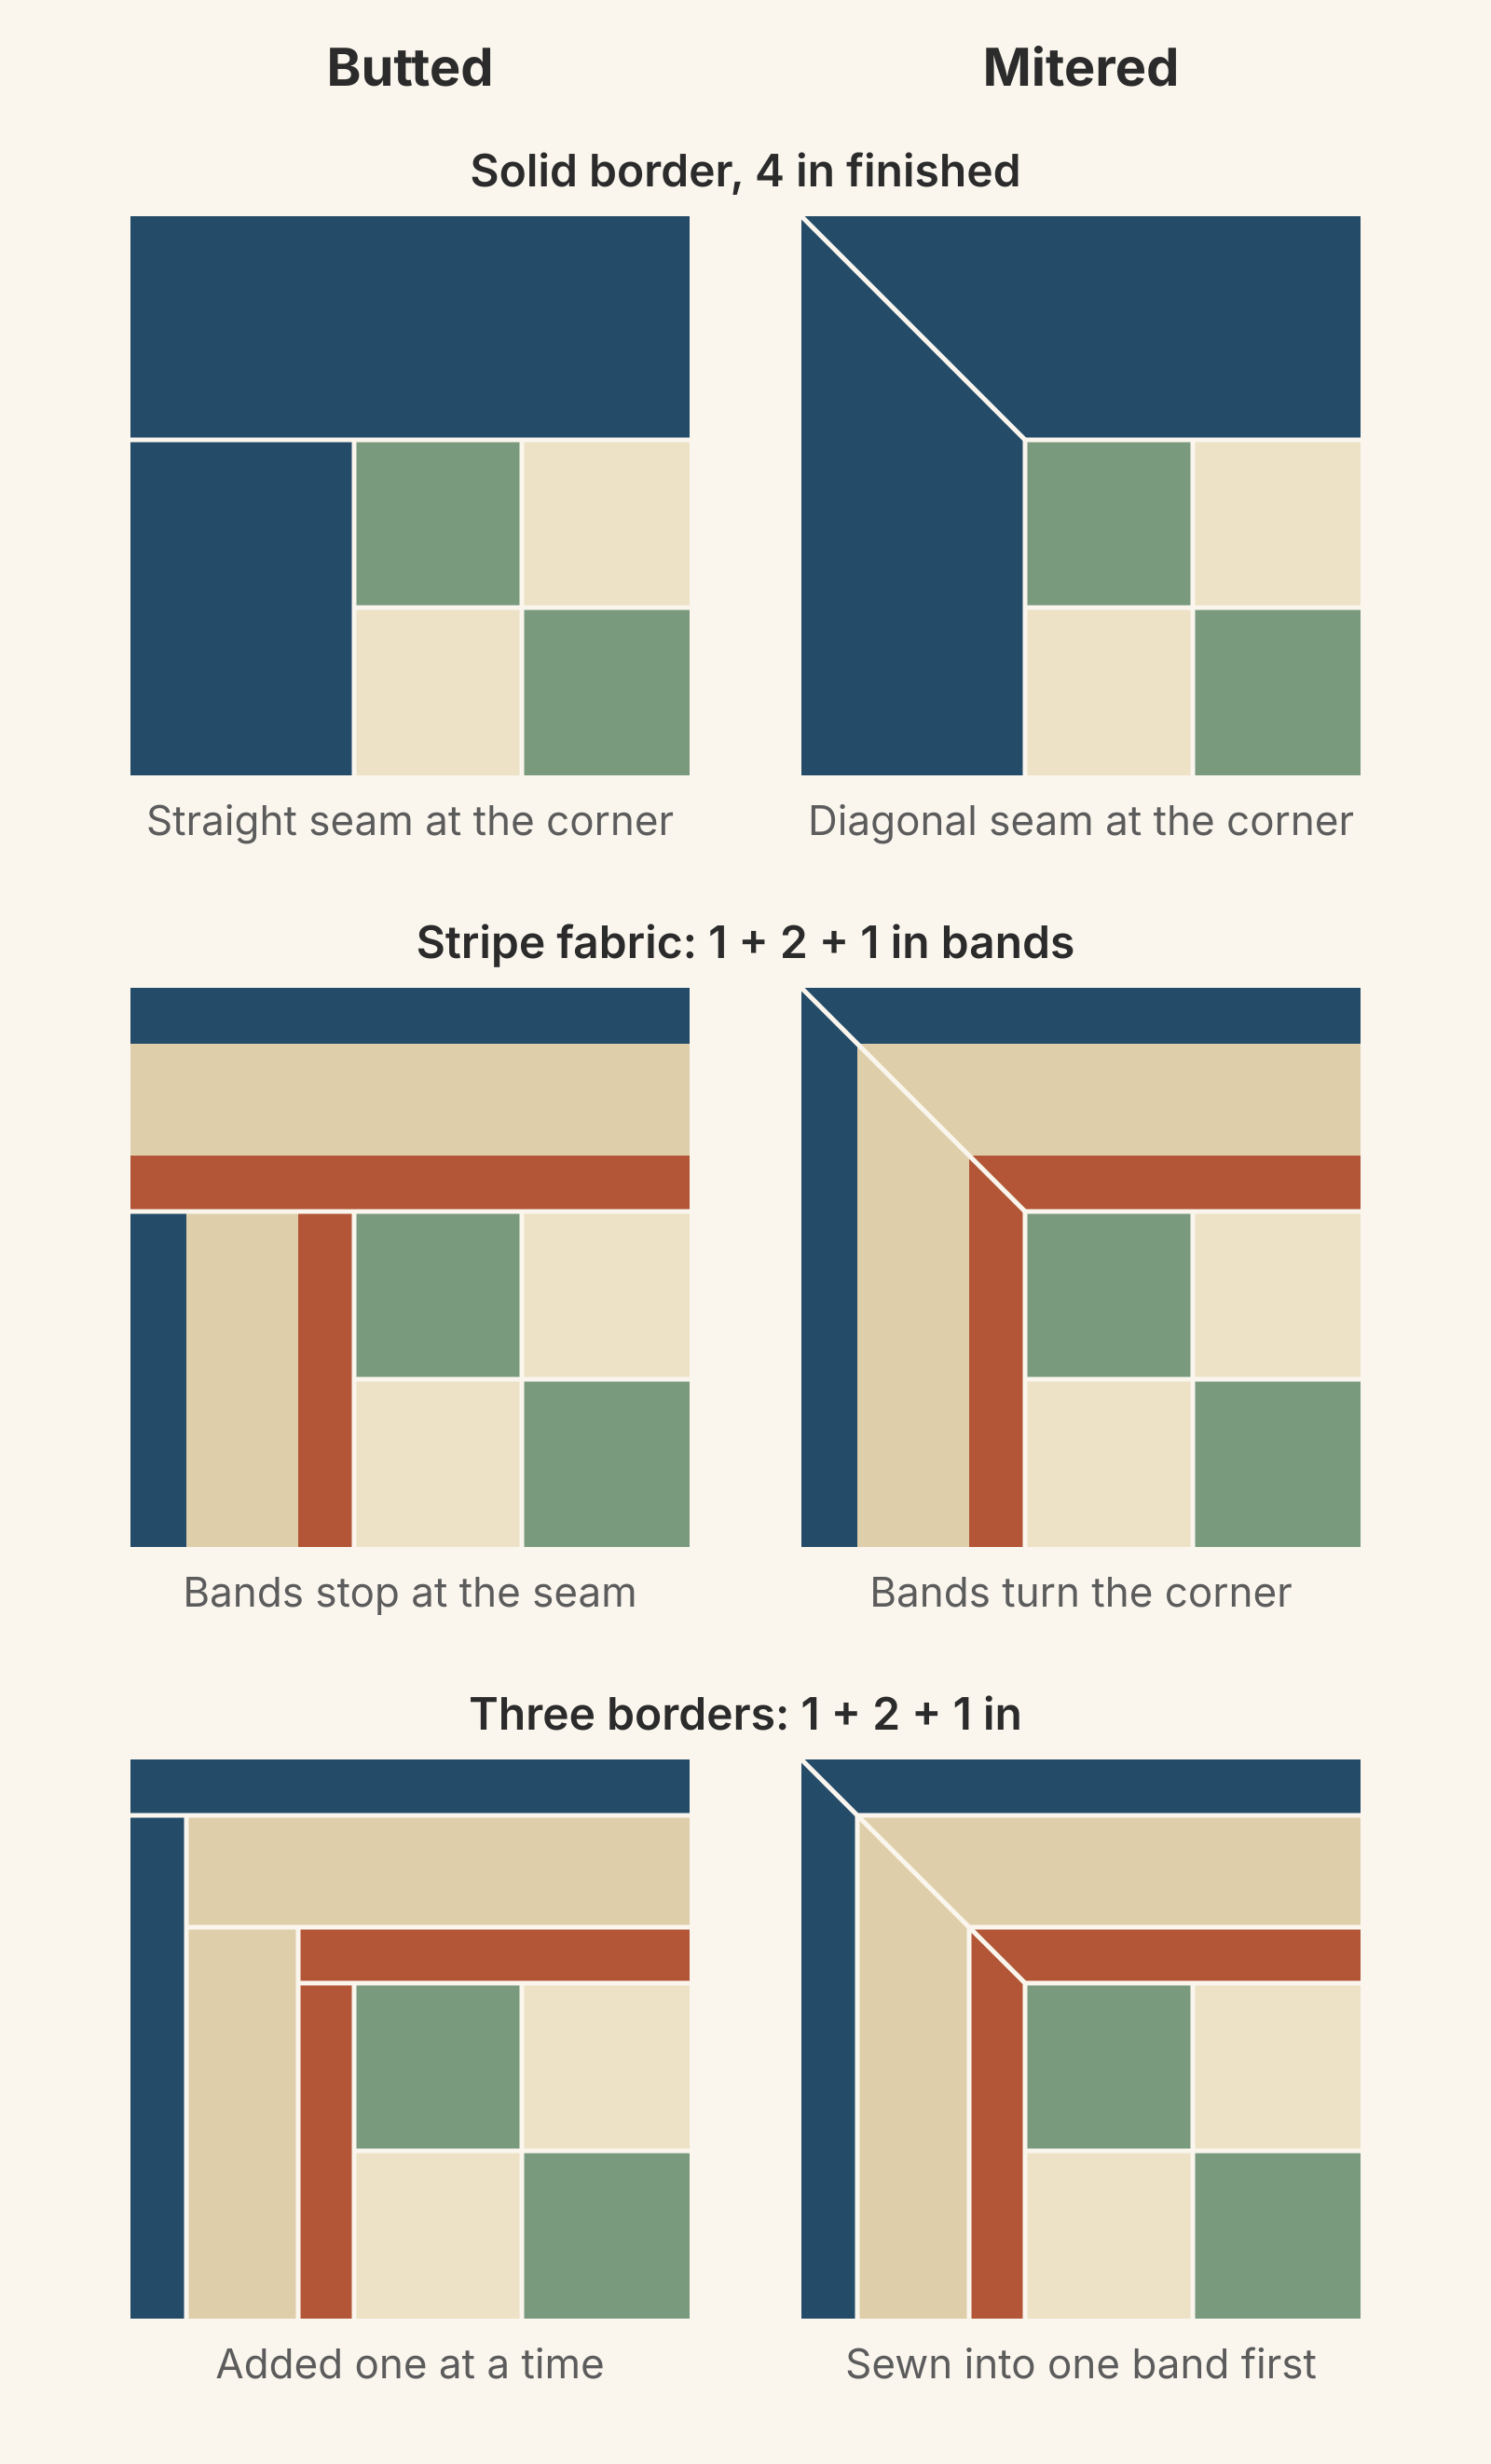
On a solid, the seam is the only difference you'll see, and it's thin. On a stripe, the difference is the whole frame. With several plain borders, the result depends on how you build them; the last row shows both ways.
There's a third option, a separate square at each corner. Our quilt border ideas post covers corner blocks along with border widths.
Solids and busy prints: butt the corners
Butt a solid border. You cut four plain rectangles, sew four straight seams and use the least fabric. It's also the easiest corner to sew well, and GE Designs suggests butted corners for beginner projects.
Busy allover prints are the same. GE Designs recommends butted corners for busy backgrounds where corner details won't read clearly, and Linda Griepentrog calls lapped borders perfect for allover prints. The busier the print, the less any corner seam shows, so a miter's extra work buys you little.
A miter on a solid is a style choice, and some quilters like it. Cottage Quilting lists solid and tone-on-tone borders among its miter candidates, for the clean diagonal line. Choose it when you want that line on purpose. In our example it costs 28 inches of extra strip and four careful corner seams.
Stripes: miter the corners
When stripes run along the border, a butted corner breaks them. The top strip's bands run out to the quilt's edge, and the side strip's bands stop at the seam. Colleen Tauke at National Quilters Circle describes the miter on bold stripes as a continued motion around the angle, "as opposed to butted borders where the pattern is interrupted." A miter turns each band into one unbroken ring.
That only works if all four strips are cut alike. Cottage Quilting says stripes that match at the corner take careful planning when you cut. In practice:
- Pick one line in the stripe as your guide and cut every strip the same distance from it.
- Sew the same edge toward the quilt on all four sides, so the navy band, say, is outermost on every side.
- If the stripe runs parallel to the selvage, cut each strip along the length in one piece. In our example the longest strip is 59 1/2 inches, so buy at least 1 3/4 yards.
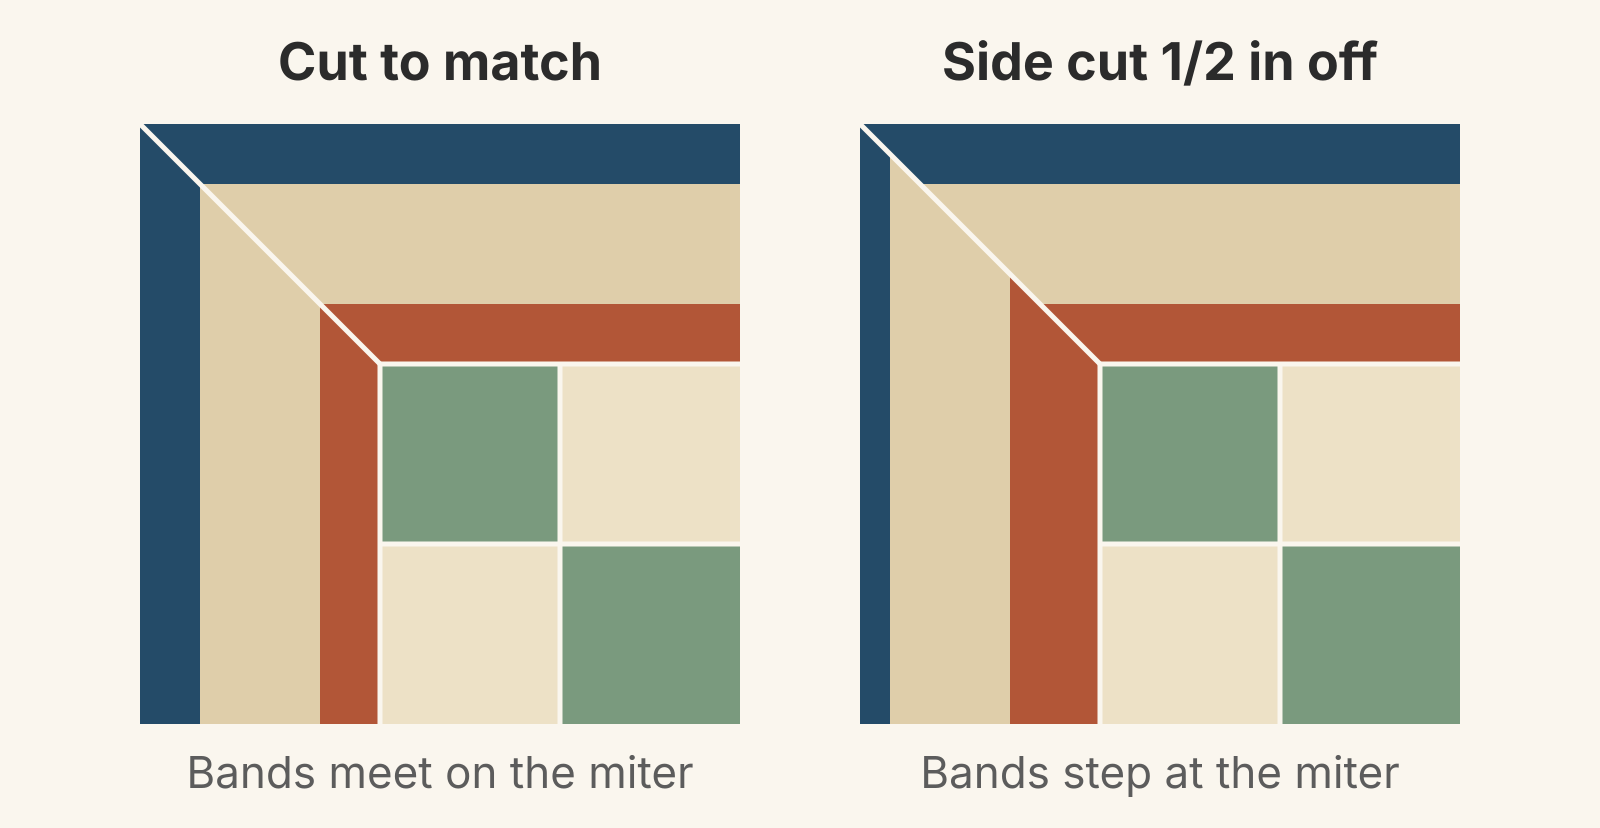
A miter keeps the bands continuous, but it can't keep one-way motifs upright. If the stripe carries a row of trees, they lie on their sides along the side borders whichever corner you choose, so check the print's direction before you buy. Our guide to cutting directional fabric shows how to spot a one-way print and which way it runs in your yardage.
Several plain borders: butt them one at a time, or miter one band
Look at the bottom row of the first diagram. If you add plain borders one at a time, each ring gets its own butted corner and every color still runs unbroken around the quilt. Only the seams step. For an inner border plus an outer border, like the stop border in our narrow inner border guide, that's the quickest route.
If you'd rather sew the strips into one band first, miter it. Jaye at Artquiltmaker and Cottage Quilting both suggest sewing two or more borders together and mitering them as a unit. Cottage Quilting notes that the seams between the borders then line up at the corner.
What you shouldn't do is sew a band and then butt it. A sewn band behaves like a stripe, so its bands stop at the corner seam, as in the stripe row.
How long should you cut mitered border strips?
The tutorials we read start from the same rule: the length of the side, plus twice the border width, plus a margin for trimming. The margins differ. Jaye at Artquiltmaker adds 1 inch "for insurance," Cottage Quilting adds 4 to 5 inches, and Colleen Tauke adds 4 inches to the quilt's finished size, which leaves 2 inches at each corner for trimming.
Here's the worked example. Twelve 12-inch blocks, 3 across and 4 down, make a 36-by-48-inch finished center. Measured raw edge to raw edge, it's 36 1/2 by 48 1/2 inches. The border finishes at 4 inches, so the strips are cut 4 1/2 inches wide, and the quilt finishes at 44 by 56 inches.
Do the geometry and a trimmed mitered strip needs the finished side, plus twice the finished border width, plus about 1 1/4 inches of seam allowance. For the top strip here, that's about 45 1/4 inches. A 1-inch margin on finished numbers (36 + 8 + 1 = 45 inches) comes up short, so the numbers you start from matter. Start from what you measure and cut, and add 2 inches:
Mitered strip length = measured side + (2 x cut width) + 2 inches
- Top and bottom: 36 1/2 + 9 + 2 = 47 1/2 inches.
- Sides: 48 1/2 + 9 + 2 = 59 1/2 inches.
That leaves a little over an inch to trim at each end. Colleen Tauke's method gives 48 and 60 inches for this quilt, within 1/2 inch of ours.
For the butted version, sew the sides first. They're cut to the center's measured length, 48 1/2 inches. With them sewn on, the quilt measures 36 1/2 + 4 1/2 + 4 1/2 - 1 = 44 1/2 inches across, since the two seams take 1/2 inch each. That's the length of the top and bottom strips.
| Strips, 4 1/2 inches wide | Butted | Mitered |
|---|---|---|
| Top and bottom, cut 2 | 44 1/2 inches | 47 1/2 inches |
| Sides, cut 2 | 48 1/2 inches | 59 1/2 inches |
| Total length | 186 inches | 214 inches |
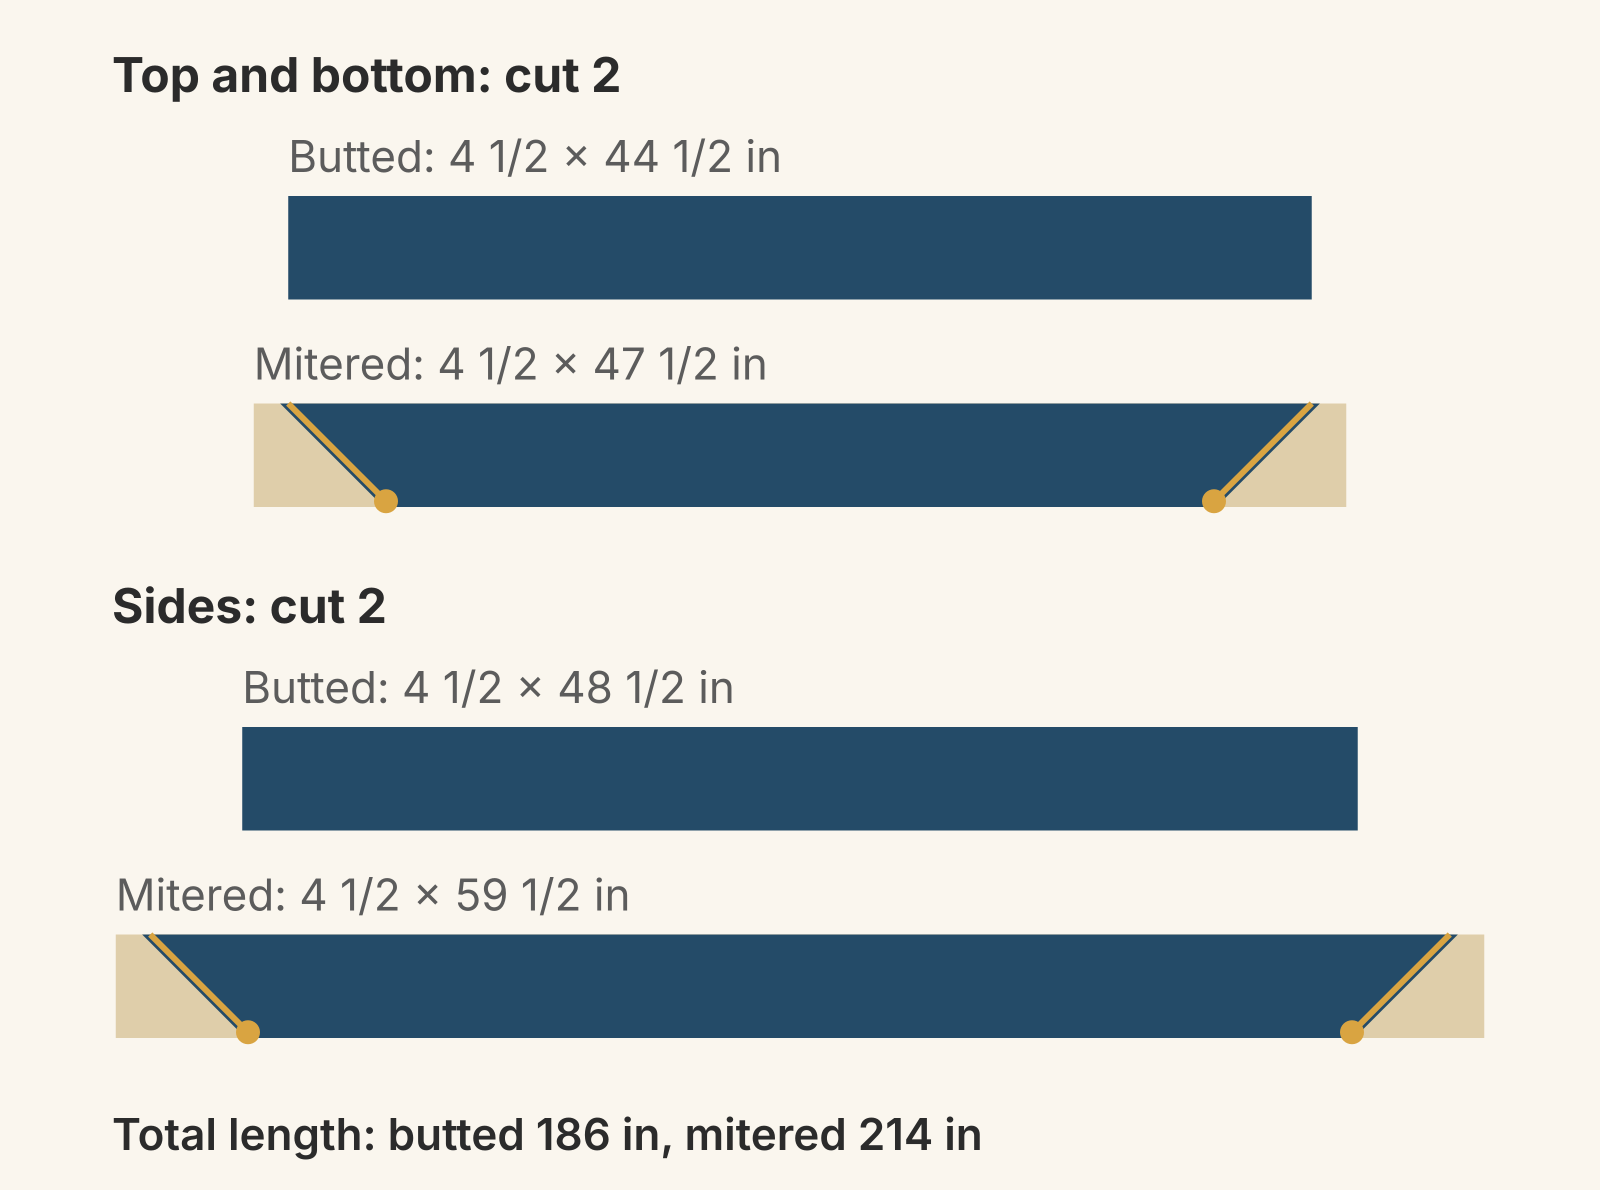
The miter takes 28 inches more strip, about 15 percent. If you cut strips across the fabric width, that's one extra strip at most. For a stripe cut along the length, what matters is the longest strip, because it sets how long a piece you need.
How to sew a butted border
- Measure the sewn center through the middle and cut the two side strips to that length. Our guide to preventing wavy borders shows where to measure.
- Match the centers and ends, pin, sew and press.
- Measure across the quilt, side borders included, and cut the top and bottom strips to that length. Sew and press.
GE Designs puts the top and bottom on first. Either order works, as long as you measure again before cutting the second pair.
How to sew a mitered border
These steps follow Colleen Tauke and Cottage Quilting.
- Mark the center of each strip and each side of the quilt. On the quilt top, mark a dot 1/4 inch in from each corner, where the seam lines cross.
- Pin a strip to each side with the centers matched, so equal tails hang past both ends.
- Sew each strip from dot to dot and backstitch at both dots. Keep the neighboring tails out of the seam, and press the seams toward the border.
- At one corner, fold the quilt diagonally, right sides together, so the two tails lie on top of each other with their edges matched. Line up the 45-degree line of your ruler with the long edge of the strip, slide the ruler until its edge meets the dot, and draw a line from the dot to the outer edge.
- Sew on that line, starting at the dot and backstitching there.
- Open the corner and check that it lies flat before you trim. Then trim the seam allowance to 1/4 inch and press it open.
To see it done, Kimberly Jolly demonstrates her mitering technique in a video on Fat Quarter Shop's blog.
Your next step
Before you cut, audition the corner with the fabric you have. Lay two long pieces of your border fabric along two edges of the quilt so they meet at a corner. For a butt, lay one end square across the other. For a miter, fold one end under at 45 degrees. Step back and look. Then measure your own center and work out the strip lengths with the formula above.
To compare the frame on your design first, open the Quilt Editor. Under Borders in Properties, choose Add border. Each border has a Finished width, a Corners setting (Square is the butted corner, or Mitered) and a solid color or fabric. QuiltLab doesn't work out strip lengths or yardage, so the formula above stays your cutting plan. To try a three-band stripe's colors against your center, add three borders at 1, 2 and 1 inches and set each to Mitered. Set to Square, they show borders added one at a time, as in the bottom row of the first diagram. Either way, the quilt grows to 44 by 56 inches on our 36-by-48-inch example.
Quilt Editor guide →Where the Borders controls live and how border widths add to the quilt sizeRelated posts

How to Design a Bargello Quilt: Plan the Wave on Paper
A bargello wave is a staircase of stepped columns. Number your strips, write one row per column, and see how column width turns a zigzag into a curve.

Borderless Quilt Design: Plan an Edge That Looks Finished
With no border, the outer blocks and the binding make the edge. Compare whole and halved motifs on one 48 x 60 inch quilt, then pick the binding color.

Crosshatch Quilting: How to Make the Lines Meet at the Edges
Space a 45-degree crosshatch so the lines meet in a V at every edge and corner. Choose the edge step first, mark dots around the quilt, then connect them.