


Mixing Fabric Collections for Quilts? Give Each Print a Job
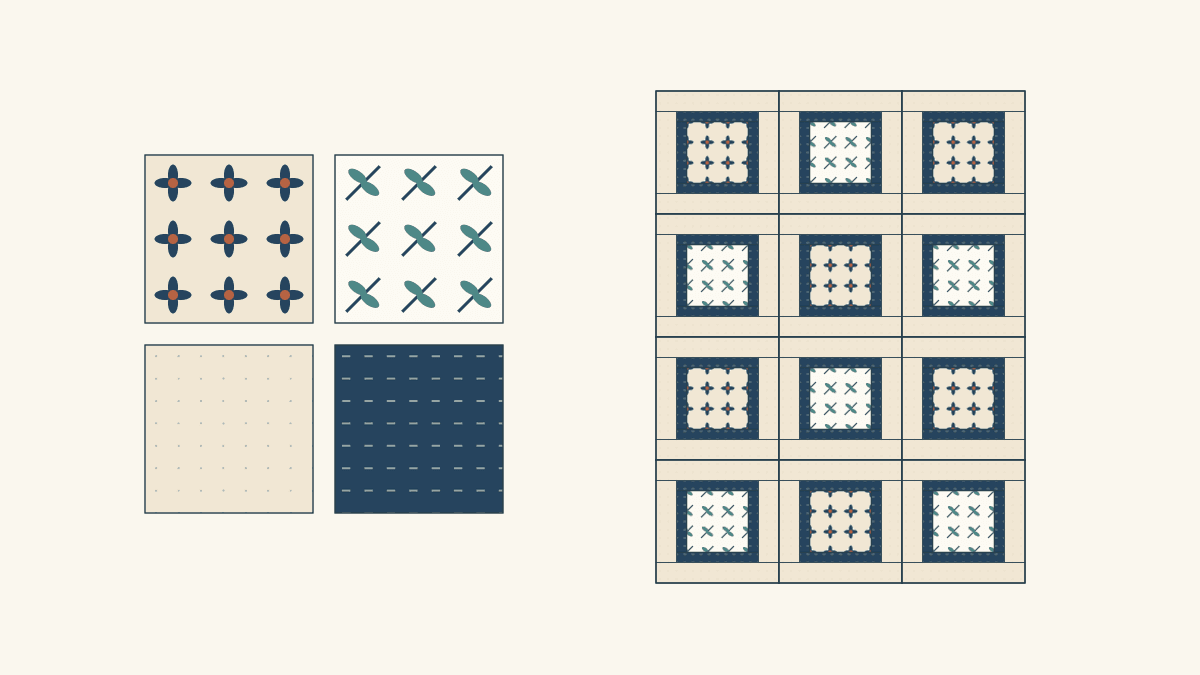
Start with the collection containing the print you most want to use, then choose pieces from another collection to fill specific jobs in your pattern. Look for a shared color, a useful difference in print scale, or a quieter fabric that gives the focal prints room. You can leave several prints from either collection for another project.
For a first mixed pull, keep one anchor print and make every addition answer a question: does it supply a focal piece, a connecting fabric or a quiet field? This makes the choice more manageable than trying to use two complete bundles at once.
Use the collection as a starting point
A coordinated collection offers prints designed to work together. It doesn't require you to use every print in a particular quilt. In her fabric-selection lesson at The Sewing Directory, Kerry Green explicitly discusses choosing some of a collection, then adding fabrics from elsewhere.
Sherri McConnell's collection-mixing tips at A Quilting Life also start from a collection or curated bundle and add outside fabrics. Her examples include useful portions of different collections. Take that as permission to select, rather than an obligation to use every print or make the collection shares equal.
Read the pattern before making the selection. List its visual jobs and the size of the pieces that show each print. A pattern with broad centers and narrow frames asks different things from one built entirely from small triangles.
If you are still deciding on hue, value and print scale, our color-theory guide covers those foundations. Here we'll use them to decide which members of two groups belong in one project.
Give the anchor print a short brief
Imagine the print you want to keep is A1, a navy-and-rust flower on cream. Its colors suggest a brief: navy, rust and a quiet cream field, with room for a little teal. That sentence guides the additions.
The anchor starts the decisions. It doesn't have to cover most of the finished top. A relatively small amount can establish the colors that the rest of the selection repeats.
We drew the hypothetical prints and finished-area plan below and haven't sewn them. These are sample designs for the exercise, not named fabric products or cloth photographs; use your pattern for construction and compare the actual fabrics together.
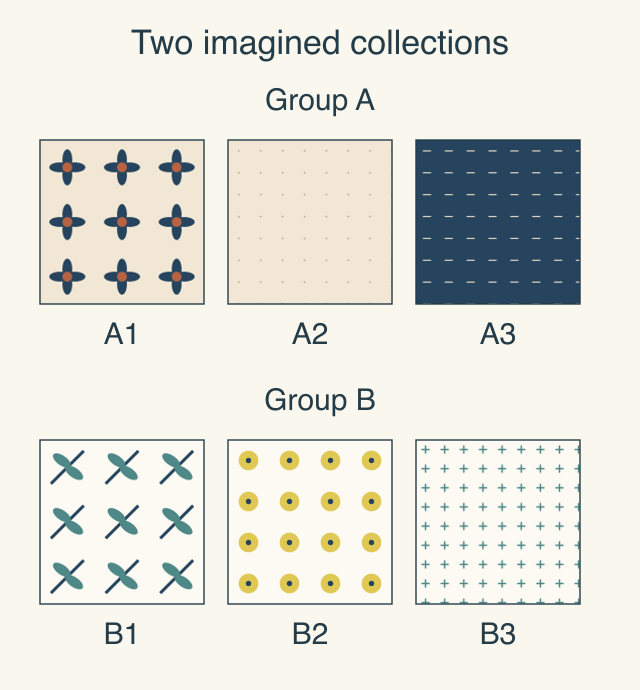
Group A gives us a focal print, a quiet light and a small dark print. Group B shares navy but brings teal, lemon and a whiter ground. We can borrow B1's teal without also taking every other color in B.
Keep a small actual swatch beside each code when you repeat this exercise. A name such as "navy" isn't proof of a dyed-color match between manufacturers or collections.
Make a keep, omit and bridge worksheet
For this project, the pattern's jobs are a focal center, a narrow inner frame and a broader quiet outer frame. The two center prints can alternate, while the frames repeat.
| Decision | Job | Reason for this plan | |
|---|---|---|---|
| A1 | Keep | First focal center | Establishes the navy/rust direction |
| A2 | Keep | Quiet outer frame | Supplies a light field around both centers |
| A3 | Bridge | Repeated inner frame | Carries navy beside both focal prints |
| B1 | Keep | Second focal center | Shares navy and adds the chosen teal |
| B2 | Omit | None assigned | Lemon adds a hue outside this brief |
| B3 | Omit | None assigned | Another teal print repeats a filled job |
An omitted print may be lovely. B2 simply asks for a different color brief, and B3 is unnecessary for the four jobs we've chosen. Save them, or test one as a replacement for a selected print. Adding both would change the plan again.
The worksheet also exposes a missing job. If both collections contain only busy focal prints, look for a quiet light or dark before adding another favorite floral. Underground Crafter's fabric guide discusses basics and small all-over designs that can work beside different collections. Judge the particular candidate at the size it will occupy.
Let the bridge appear beside both collections
A3 is our bridge because navy appears in both focal prints and the same small navy print frames each one. We haven't tried to make every detail of A1 match every detail of B1. We've chosen one connection and repeated it.
Here is a finished-area study of that decision:
- A focal center finishes at 6 x 6 inches.
- A 1-inch-wide inner frame brings it to 8 x 8 inches.
- A 2-inch-wide outer frame brings the whole block to 12 x 12 inches.
Use A3 for every inner frame and A2 for every outer frame. Use A1 in six centers and B1 in six more. Alternate those centers in a 3-column by 4-row layout for a 36 x 48-inch finished top.
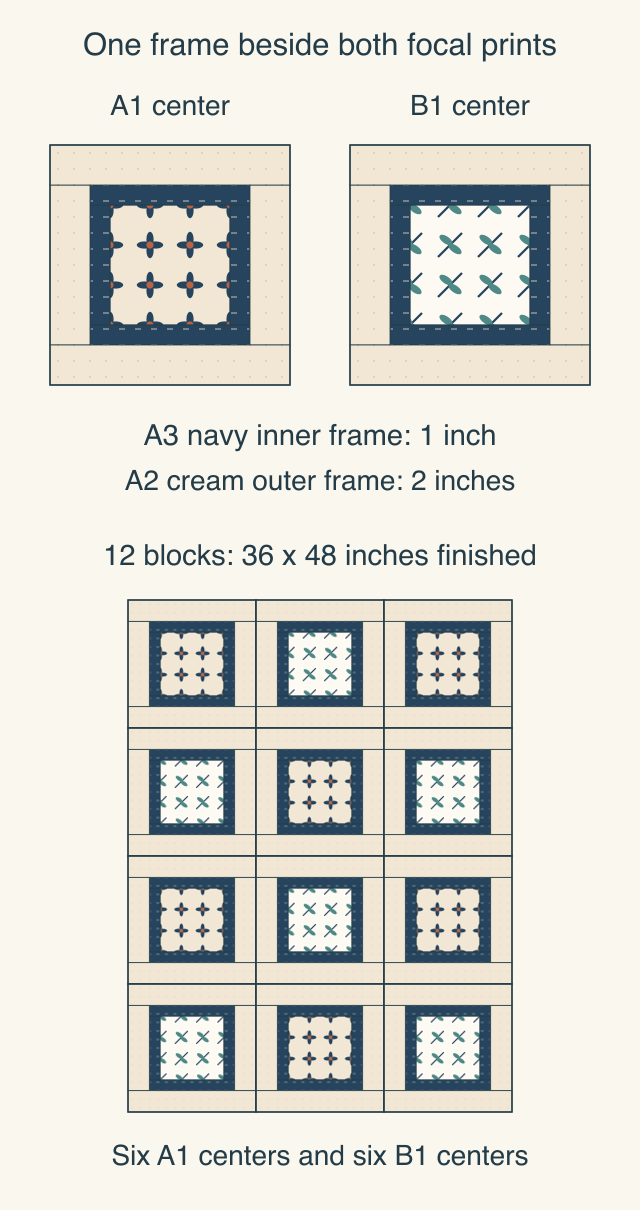
The frame remains the same beside A's cream-ground floral and B's whiter leaf print. That lets you judge whether you like the combined group without also changing the background at every block. With actual cloth, inspect both center-to-frame pairings before committing to all twelve.
If your chosen pattern has no framed center, find an existing recurring piece that can carry the connecting fabric. Don't insert new strips into its instructions merely to imitate this drawing.
Count the selected roles, then check the amount on view
One block covers 12 x 12 = 144 square inches. Its center takes 6 x 6 = 36. The inner frame takes 8 x 8 - 6 x 6 = 28. The outer frame takes 12 x 12 - 8 x 8 = 80.
The whole-top worksheet is:
| Print and role | Repetitions | Area each | Finished area total |
|---|---|---|---|
| A1 focal center | 6 centers | 36 sq in | 216 sq in |
| B1 focal center | 6 centers | 36 sq in | 216 sq in |
| A3 bridge | 12 inner frames | 28 sq in | 336 sq in |
| A2 quiet field | 12 outer frames | 80 sq in | 960 sq in |
The totals are 216 + 216 + 336 + 960 = 1,728 square inches, matching 36 x 48. A1 and B1 each occupy 12.5% of the top. The navy bridge occupies about 19.4%, and the quiet cream about 55.6%.
So the anchor print starts the palette while another print covers more than half the surface. Spread out A2 generously when auditioning the pull. A tiny cream sliver beneath two large folded florals would give the wrong impression of this plan.
These are finished areas, not a yardage split. Cutting sizes, fabric width, repeat placement and waste determine the amounts to obtain. Use the chosen pattern's requirements after the role decisions are settled.
Change one candidate, then repeat the same check
Lay out an A1 center with the bridge and outer-field fabrics, then replace only the center with B1. Check the printed marks where each meets navy. Step back to see the group rather than judging individual motifs alone.
Next, audition B3 as a possible replacement for B1 while keeping both frames fixed. If you prefer it, update the worksheet to make B3 the second focal print and move B1 out. The exercise stays clear because one candidate changes.
If the frames need changing too, make that a second comparison. Try one new bridge beside both centers, then judge it across several blocks. A print that works beautifully within its original collection still needs to pass the job you've assigned in this mixed group.
Kerry Green's lesson describes a selection developing through adding and taking away. Keep that flexibility without losing the record of which version you chose.
Keep the decision with the swatches
Write the anchor, brief, selected print codes and omitted candidates on one sheet. Add the pattern's role names and note what to test in the first sewn block. Confirm the two center pairings before preparing the full set.
The Canvas Editor can hold a layout image and text notes together, so it can accompany that worksheet. Keep the actual cloth swatches for color decisions and the pattern for construction quantities.
Start with the one print you most want to use. Give the next print a job, test it in that position, and let the unused members of both collections wait for another quilt.
Related posts
Monochromatic Quilts: Choose Prints That Stand Apart
Choose four blue prints by their jobs, then compare value and print scale separately. An equal-coverage dot swap shows why both matter.
How to Plan Sampler Quilt Fabric Placement
Connect six different blocks by repeating one fabric's role. Compare two placement maps, their fabric areas and the seams between blocks.
Freezer Paper Foundation Paper Piecing or Sew-Through?
Compare sewing through a foundation with sewing beside folded freezer paper, using one simple unit and a realistic plan for sixteen repeats.