


Squaring Up Quilt Blocks Without Cutting Off the Points
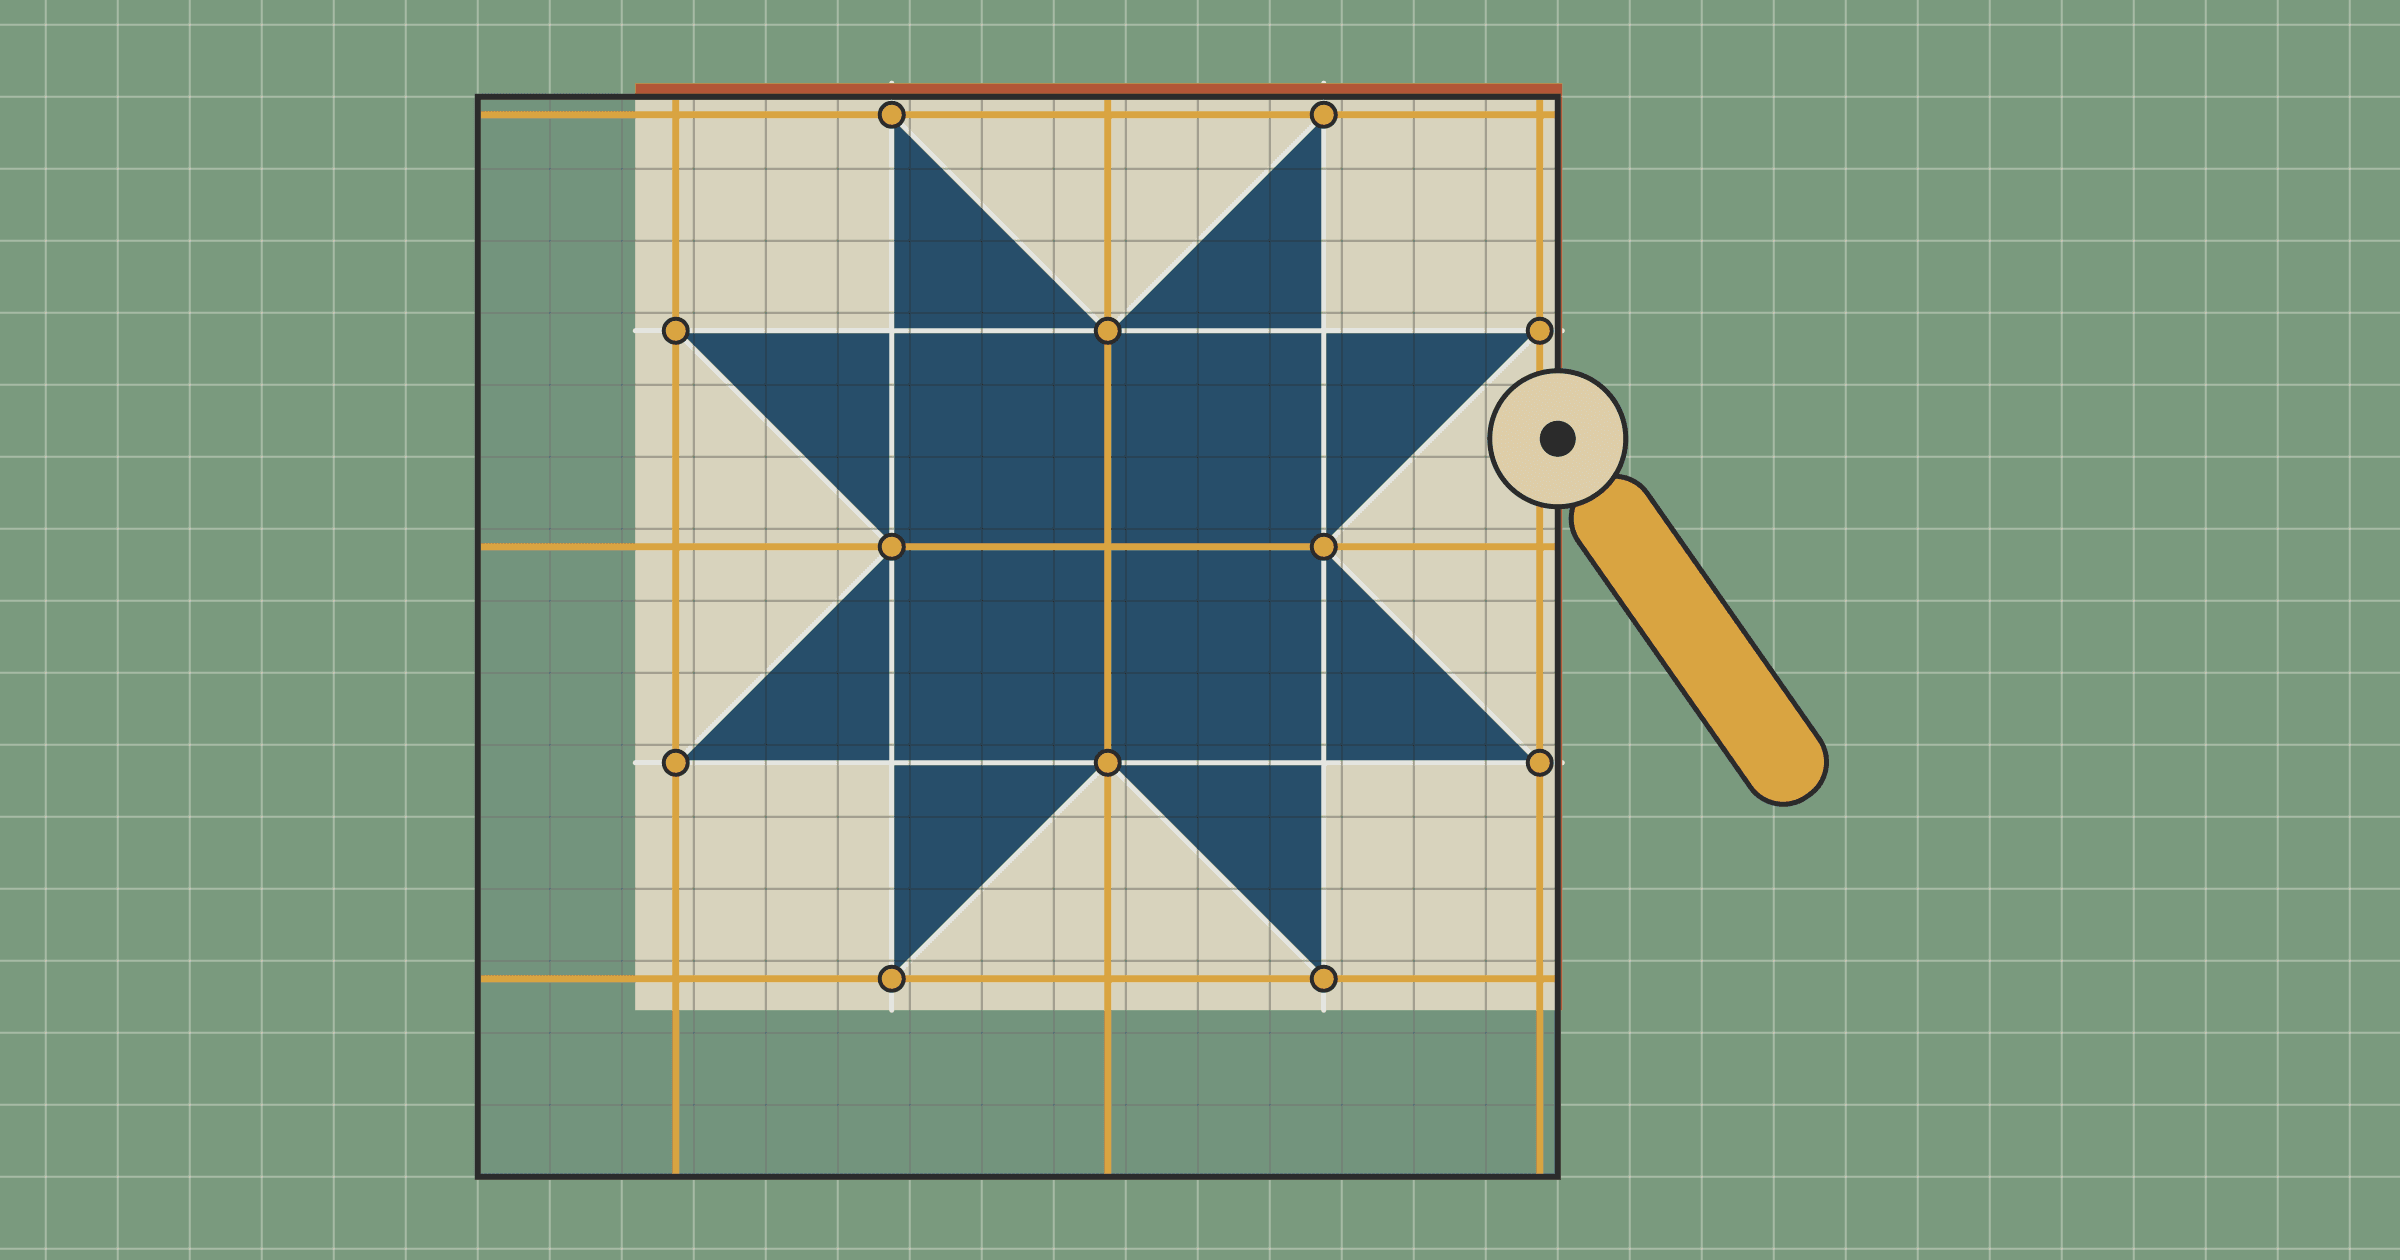
To square up a quilt block, trim it to its unfinished size: the finished size plus 1/2 inch, so 12 1/2 inches for a 12-inch block. In the method Nancy Johnson-Srebro shows at C&T Publishing, you put the spot where a square ruler's 6 1/4-inch lines cross on the block's center and trim the two sides past the ruler. Then turn the mat 180 degrees and do the same again. Before each cut, check that the seams and points sit on the ruler lines where they belong. Becky Jorgensen at Patchwork Posse sums up that habit as "use lines, not edges": line up the seam intersections with the ruler's printed lines.
The harder part of squaring up quilt blocks is deciding where the center is, and what to do when the block doesn't agree with itself. For most blocks, the long seams set the angle, the center sets the position, and the points have the final say on the trim line. Below, a 12-inch Sawtooth Star that came out 12 7/8 inches shows each landmark on the ruler. We drew these diagrams for this article and haven't sewn them.
What size should you trim a block to?
Trim to the block's unfinished size, which is the finished size plus 1/2 inch. That half inch is a 1/4-inch seam allowance on each side. A 12-inch block trims to 12 1/2 inches, and a 6-inch block trims to 6 1/2. Divide the trim size by 2 to find the ruler mark that goes on the center: 6 1/4 inches for a 12 1/2-inch block.
Measure a few blocks before you trim any. If they vary, trim the whole batch to the smallest one that still keeps its points. Missouri Star Quilt Co.'s squaring-up tutorial suggests this even if that size is 1/8 inch under the pattern. Blocks that match each other go together more easily than blocks that each miss the pattern size in a different way.
If you have one, use a square ruler at least as big as the trimmed block; Jorgensen calls that size or bigger ideal. A 12 1/2-inch square just covers a 12-inch block. Johnson-Srebro uses a 15-inch square on her 12 1/2-inch LeMoyne Star, which leaves room to spare. Our quilting ruler guide compares sizes, and the last section below covers blocks bigger than your ruler.
Which landmarks should place the ruler?
A pieced block gives you three kinds of landmarks. Find them before the ruler goes down.
- Long straight seams set the angle. The seams that run across the block should lie along the ruler's lines. If they don't, turn the ruler to match the seams, even if the raw edges then look crooked.
- The center sets the position. In a Four Patch or a Pinwheel, the center is where the seams cross. When one piece covers the middle, as in a Nine Patch or a Sawtooth Star, find the center from that piece's corners or from the points that touch its sides. Julie Cefalu at The Crafty Quilter notes that, depending on how a block is built, its seams or points may mark the center. If yours has none, fold it in half both ways and crease it.
- Points at the edge mark the trim line. Any point that should reach the finished edge, like a star tip or the corner of a diamond, needs to sit 1/4 inch inside the cut. Johnson-Srebro's second method uses only this landmark: she sets the star points on the ruler's first 1/4-inch line and trims. For square-in-a-square units, Brittany Lloyd at Lo & Behold Stitchery divides the unit's unfinished size in half and puts the four diamond corners on those ruler lines, 2 1/4 inches for a 4 1/2-inch unit. Then she checks for 1/4 inch between each corner and the ruler's edge.
The raw edges aren't on the list. Fabric stretches, dog ears stick out, and one side may have been cut a little generously. A raw edge only tells you whether there's enough fabric to cut where the landmarks say.
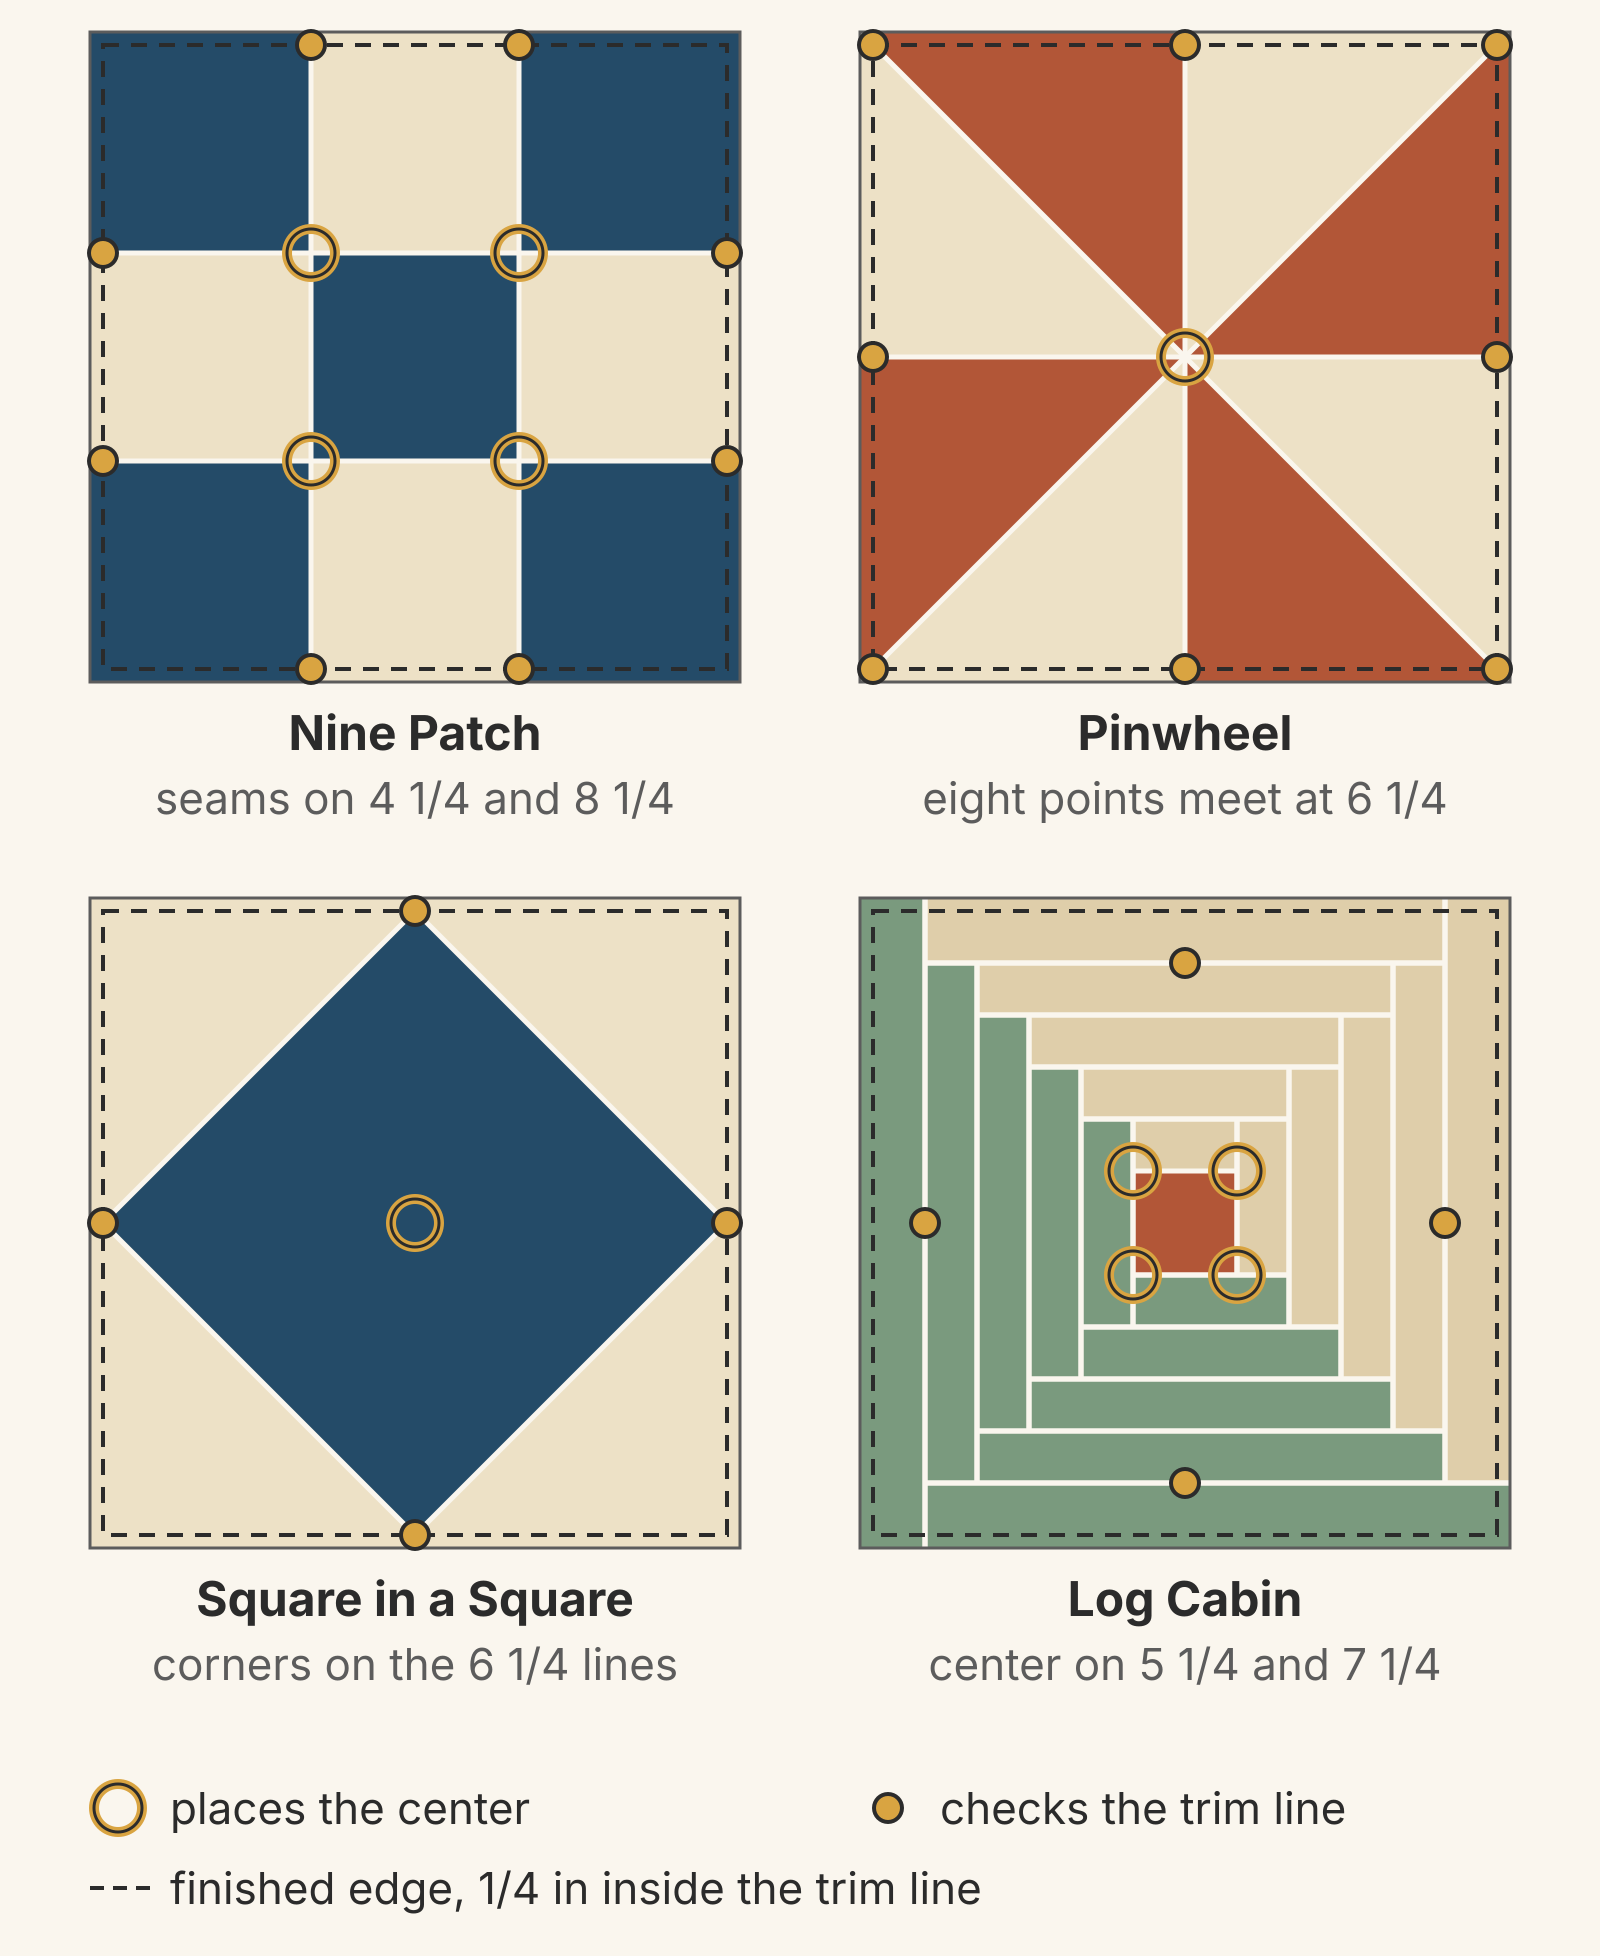
Here's what to line up on four common 12-inch blocks trimmed to 12 1/2 inches:
- Nine Patch: the seams sit on the 4 1/4- and 8 1/4-inch lines in both directions. The center square's four corners set the center.
- Pinwheel: all eight points meet where the 6 1/4-inch lines cross. Each diagonal seam runs straight to a corner, so the ruler's 45-degree line can follow one of them.
- Square in a Square: the diamond's four corners sit on the 6 1/4-inch lines, 1/4 inch from each cut edge.
- Log Cabin: with a 2-inch center and 1-inch logs, the center square sits between the 5 1/4- and 7 1/4-inch lines. There are no points, so the outer logs mark the edge. Each should measure 1 1/4 inches from the cut to its seam.
Worked example: a 12-inch Sawtooth Star that measures 12 7/8 inches
Our example is a 12-inch Sawtooth Star on a 3-inch grid. It has a 6-inch center square, four 3 x 6-inch flying geese and four 3-inch corner squares, all finished sizes. Our Sawtooth Star color guide names each part. It should trim to 12 1/2 inches, but say yours measures 12 7/8 inches each way.
Top to bottom, the extra is even: 7/16 inch beyond the star tips at the top and the same at the bottom. Side to side it isn't. The left tips sit 9/16 inch from the raw edge, and the right tips only 5/16, perhaps because the left-hand pieces were cut a little long.
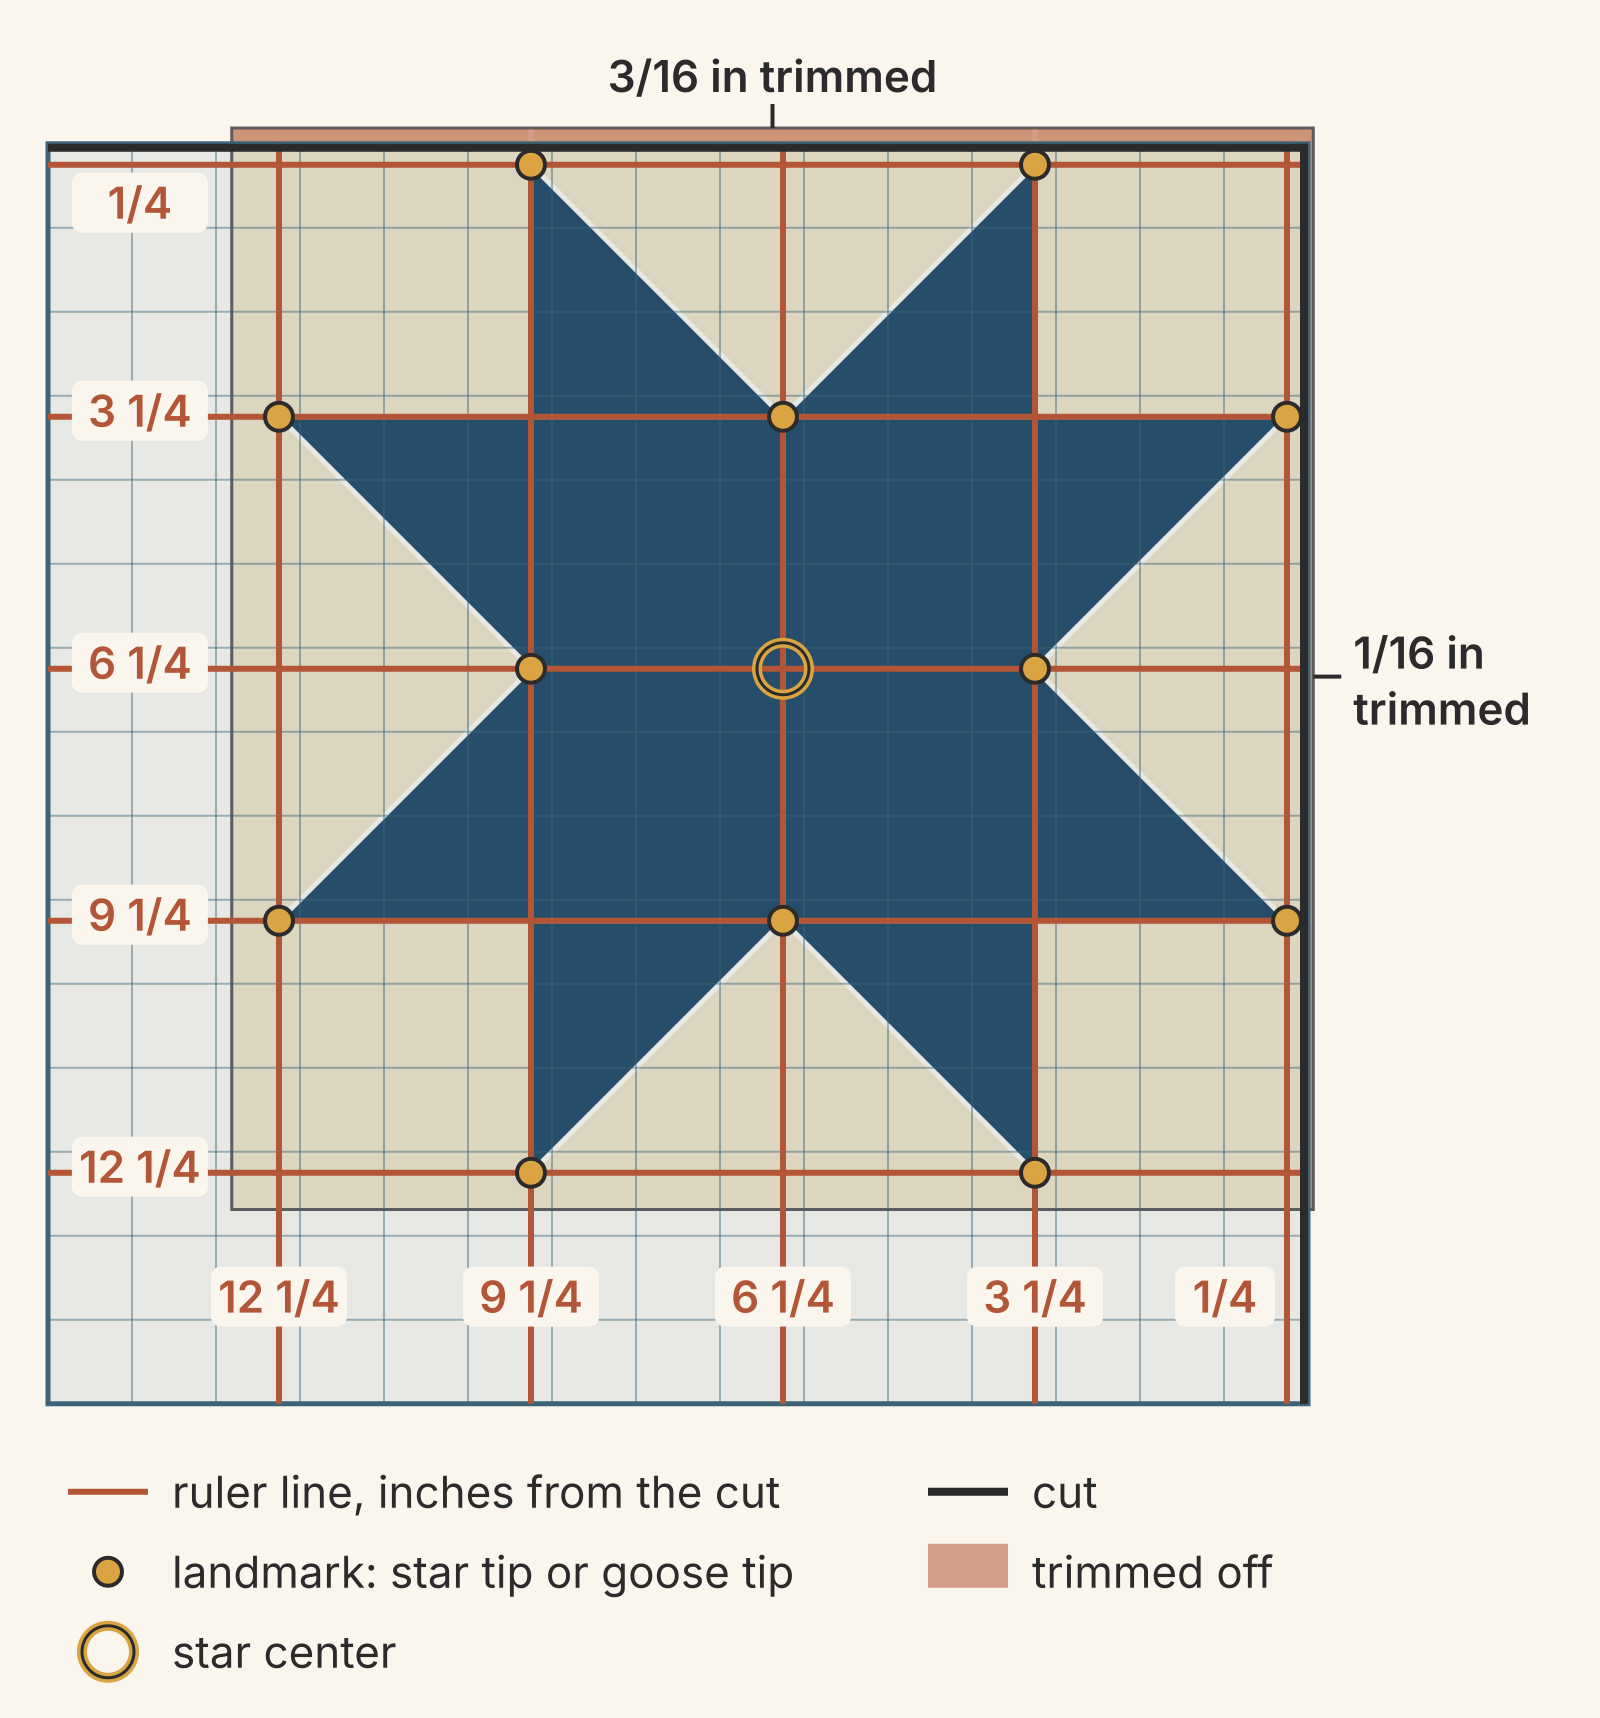
These are the ruler lines that matter, measured from the cut edges:
| Ruler line | What should sit on it |
|---|---|
| 1/4 in and 12 1/4 in | The eight star tips |
| 3 1/4 in and 9 1/4 in | The center square's seams |
| 6 1/4 in | The four goose tips, where each goose touches the center square |
First pass
If you're right-handed, you'll cut along the ruler's top and right edges. If you're left-handed, mirror the setup and cut along the top and left.
- Press the block flat.
- Lay the ruler so its 6 1/4-inch lines cross at the star's center. The vertical 6 1/4 line runs through the tips of the top and bottom geese. The horizontal one runs through the tips of the left and right geese.
- Check the other lines: the center square's seams on 3 1/4 and 9 1/4, and the top and right star tips on the 1/4-inch lines.
- Cut along the top and right edges. On this block, that takes 3/16 inch off the top and only 1/16 inch off the right.
Second pass
- Turn the block, or the mat under it, 180 degrees. The two fresh edges are now at the left and bottom.
- Set those edges on the ruler's 12 1/2-inch lines. The 6 1/4-inch lines should cross at the center again, and the star tips should sit on the 1/4-inch lines.
- Cut the top and right. This pass takes 5/16 inch from the side that started on the left and 3/16 inch from the old bottom.
The block now measures 12 1/2 inches square, with every star tip 1/4 inch from its edge. You removed 3/8 inch each way, but unevenly from side to side: 5/16 inch on one side and 1/16 on the other.
Why centering on the raw edges loses points
The tempting shortcut is to split the extra evenly. Subtract 12 1/2 from 12 7/8 and you get 3/8 inch, so you'd take 3/16 off each side. On this block, that leaves the left tips 3/8 inch from the edge and the right tips 1/8 inch away. When you sew the next 1/4-inch seam, the right points lose 1/8 inch into the seam allowance. The left points stop 1/8 inch short of the seam, so a sliver of background shows past each tip.
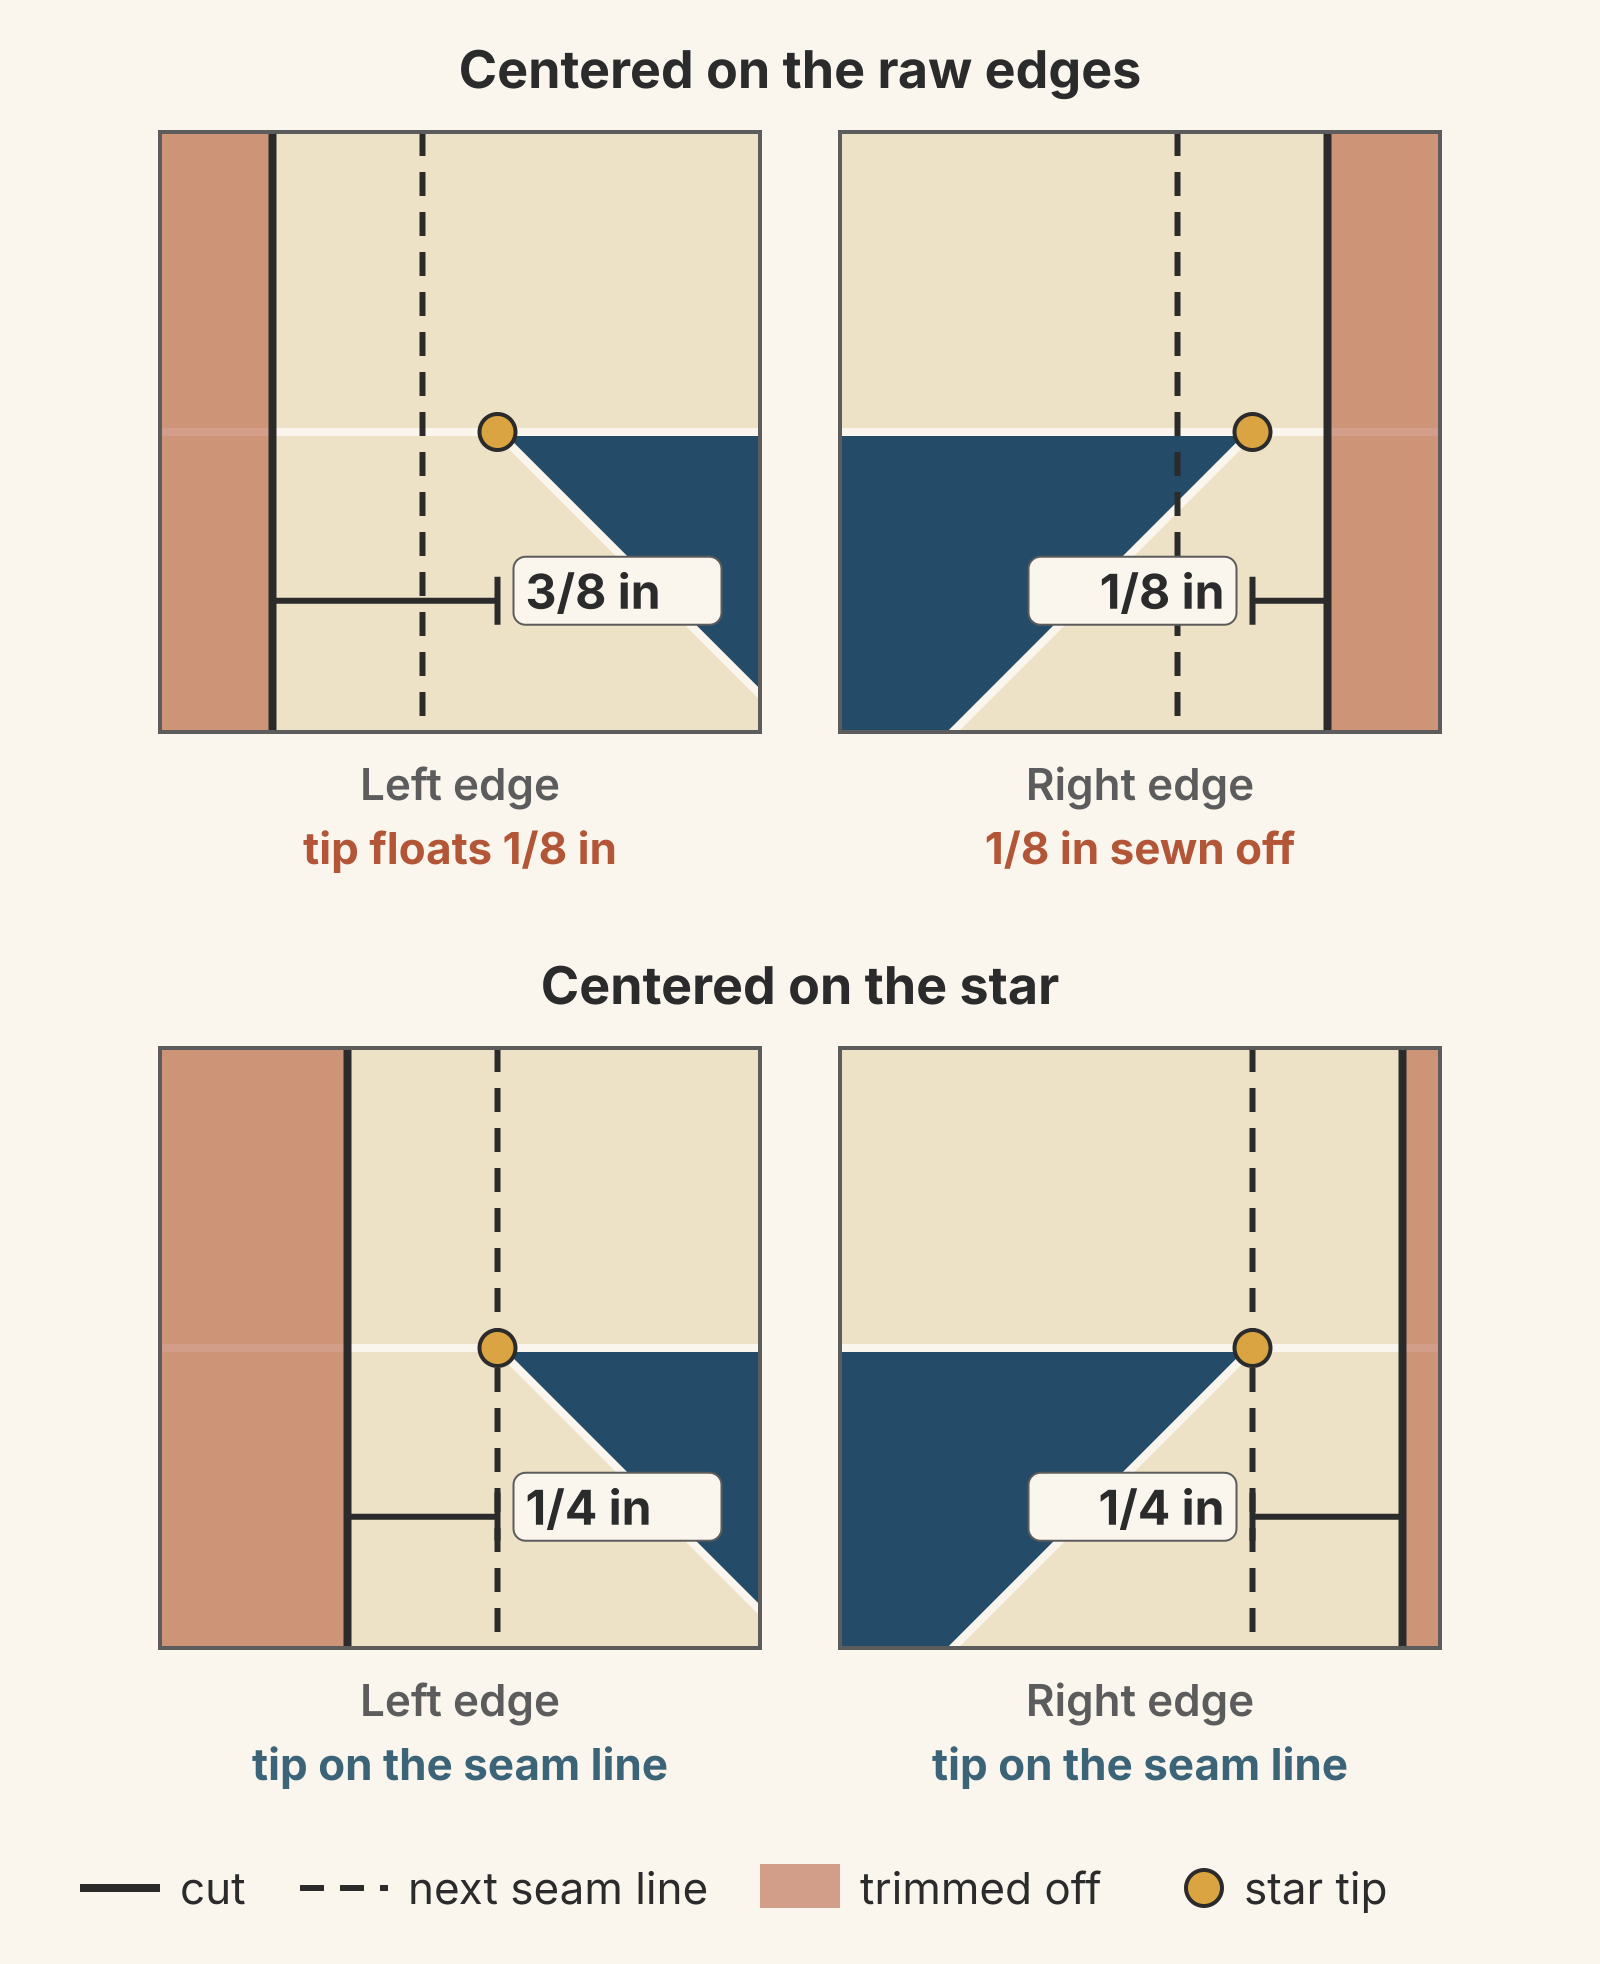
Centering on the star removes the same 3/8 inch, just from different sides, and every tip ends up on the seam line. Our guide to keeping perfect points at a block join picks up from there, sewing two of these stars together without losing a tip.
What if the center and the points disagree?
Sometimes they will. Say the ruler is centered, but the left tips sit 3/16 inch from the cut line and the right tips sit 5/16. The center is right; the star itself is a little lopsided.
Favor the points. Slide the ruler 1/16 inch toward the side whose tips are too close, and both sides land at 1/4 inch. The center is now 1/16 inch off, which nobody will see on a 6-inch square. A blunt point shows. Missouri Star's tutorial gives similar advice for pinwheels: center the ruler, then "split the difference" to keep all four points equal.
Before you slide, check that there's fabric under the cut you're moving. If there isn't, the block can't reach 12 1/2 inches with its points intact. Trim the batch to a smaller common size, as above, or fix the block first. Our guide to quilt blocks that come out too small shows how to find the cause and what to do with blocks you've already sewn.
How to square up a block bigger than your ruler
A ruler smaller than the block still works. Cefalu's method needs a square ruler at least half the block's size and a sheet of freezer paper. Fold the paper in half and in half again. Lay the ruler with its 6 1/4-inch lines (half of 12 1/2) on the two folds, and cut along the ruler's edges. Unfolded, that's a full-size square template.
She then folds the template corner to corner both ways for more guidelines. Iron it shiny side down onto the front of the block, using the folds to center it on the block's landmarks. Trim along the paper's edges with a long ruler and peel it off.
Without freezer paper, lay a long ruler's 6 1/4-inch line down the block's center, and butt a second ruler beside it if the first isn't wide enough. Cefalu also suggests chalking all four cut lines and checking them before you cut anything.
Next step: list your block's landmark lines
Before you cut your next block, list its landmark lines on the pattern. Measure the finished distance from the edge to each seam and point, then add 1/4 inch. For the Sawtooth Star, that's 1/4, 3 1/4, 6 1/4, 9 1/4 and 12 1/4. Keep the list beside the cutting mat and check each block against it before the first cut. Our guide to designing a quilt block shows how to work out a block's finished and unfinished checkpoints from its grid.
QuiltLab's Block Editor can show you those finished distances. Draw the block at its finished size, turn on Show grid and Show rulers in the View menu, and set Grid spacing to the block's grid unit (3 inches for this star). Select a piece to see its width and height under Shape Dimensions. The Block Editor draws finished sizes with no seam allowance, so add the 1/4 inch yourself.
Draw your block at its finished size →Draw pieces, check their dimensions and save the block in the Block Editor.Related posts

How to Design a Bargello Quilt: Plan the Wave on Paper
A bargello wave is a staircase of stepped columns. Number your strips, write one row per column, and see how column width turns a zigzag into a curve.

Borderless Quilt Design: Plan an Edge That Looks Finished
With no border, the outer blocks and the binding make the edge. Compare whole and halved motifs on one 48 x 60 inch quilt, then pick the binding color.

Crosshatch Quilting: How to Make the Lines Meet at the Edges
Space a 45-degree crosshatch so the lines meet in a V at every edge and corner. Choose the edge step first, mark dots around the quilt, then connect them.