


Quilt Facing vs Binding: When to Skip the Frame
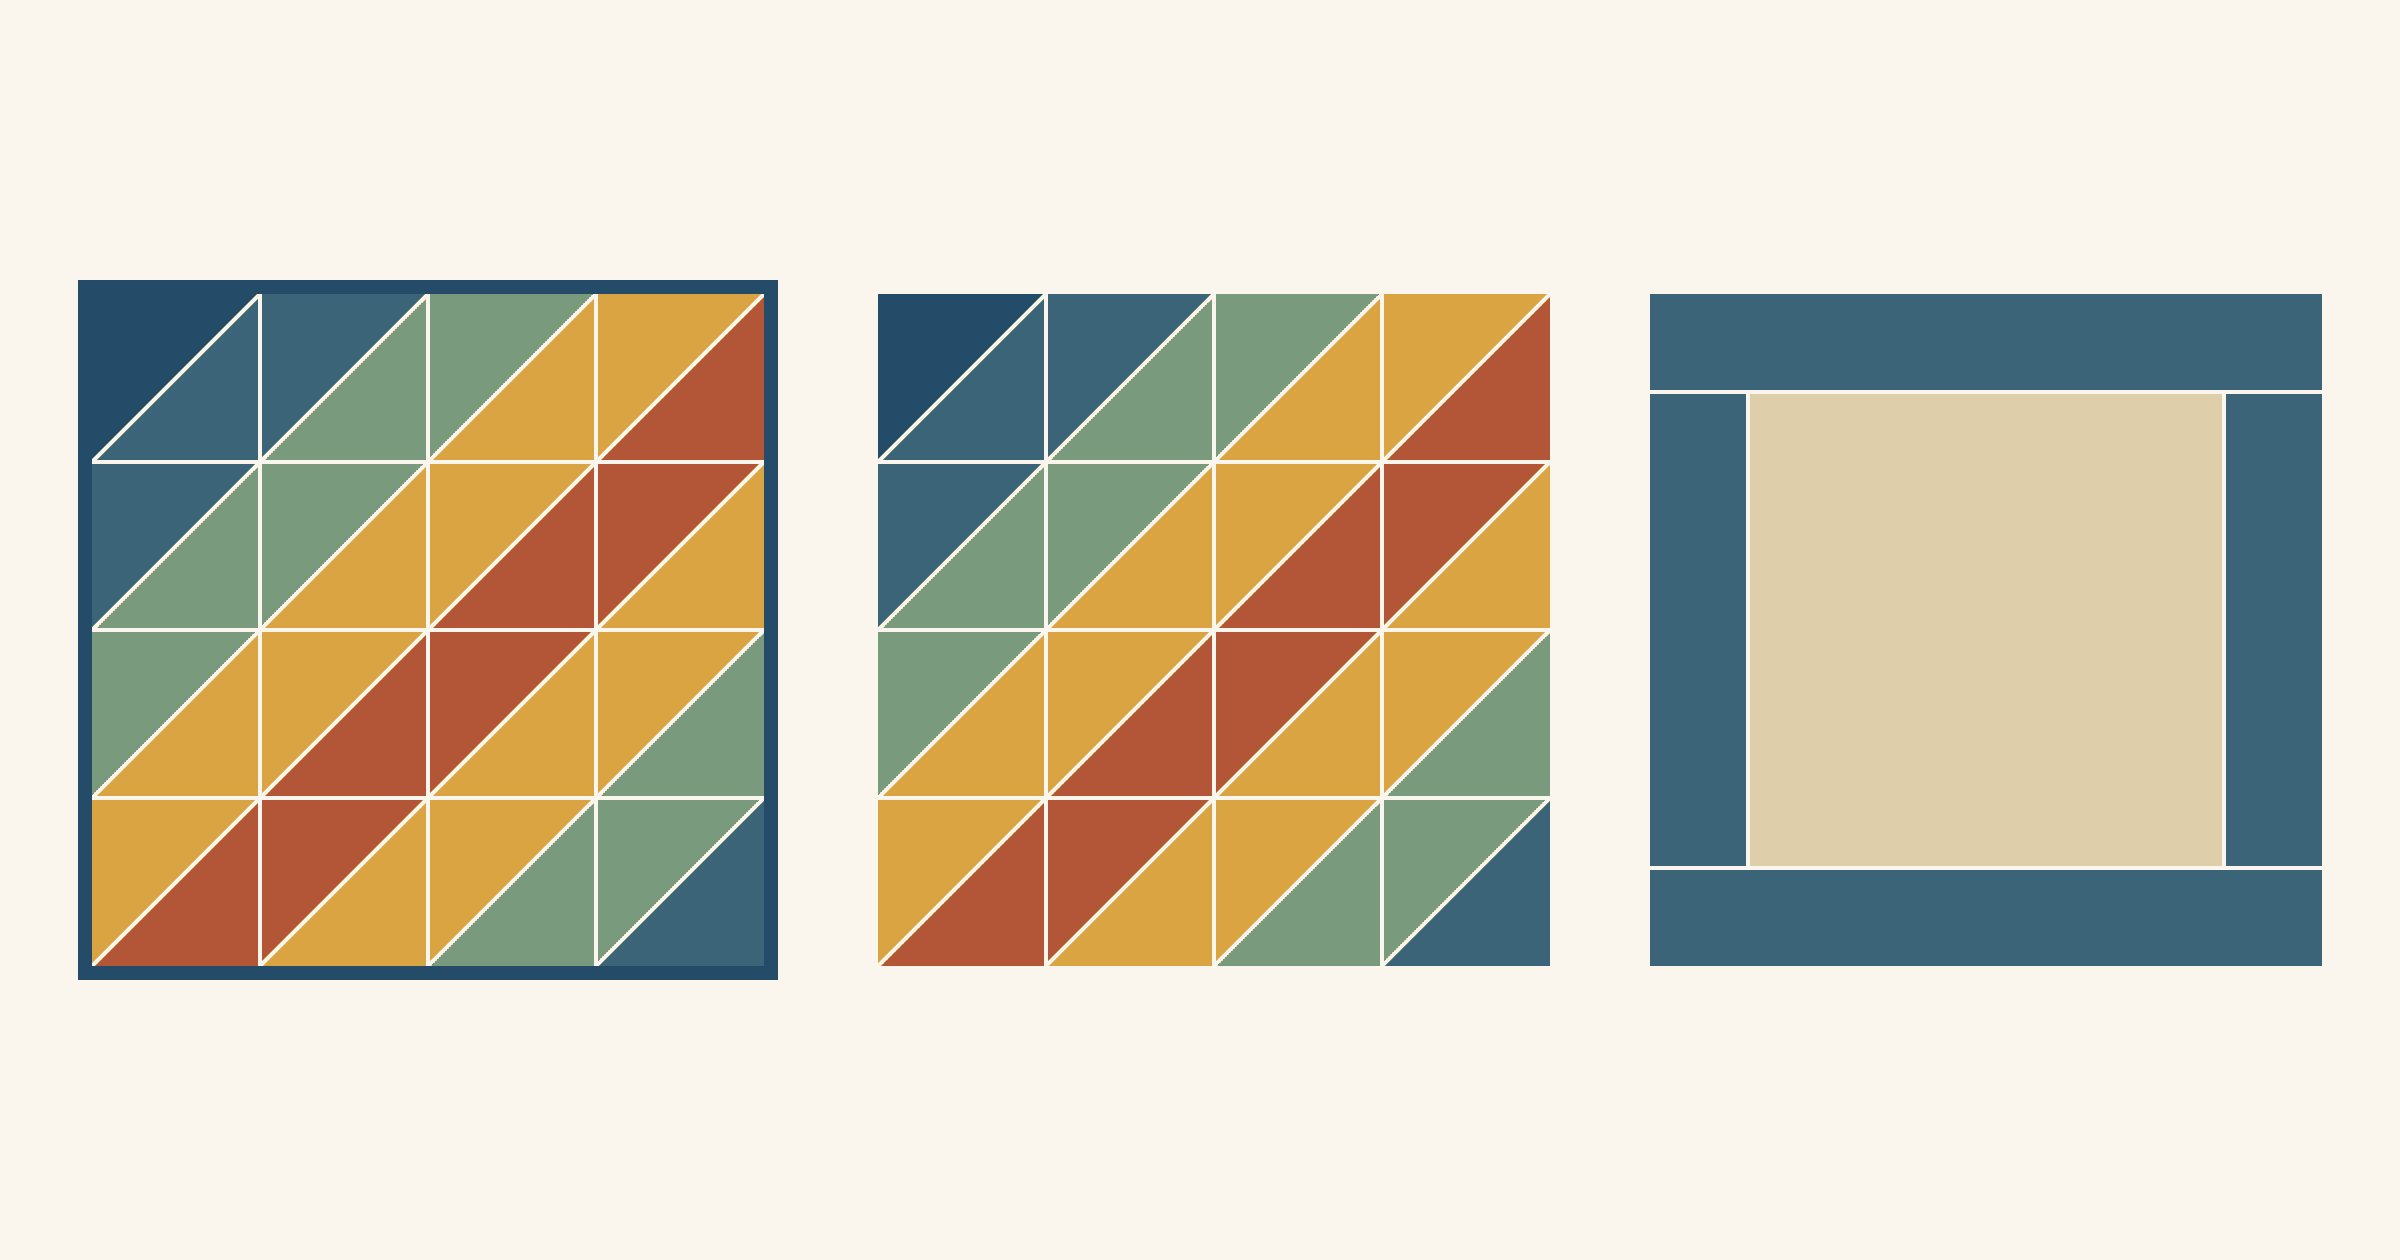
Face a quilt when you want the design to run right to the edge with nothing around it. Bind it when a narrow frame helps. A facing is sewn to the front and turned completely to the back, so none of it shows. The Quilt Show's Quiltipedia entry on facing says it gives "a clean edge to a quilt without the frame of binding" and suits art quilts and designs that go off the edge. A binding wraps the edge and shows on the front. The American Quilter's Society's guide to binding decisions puts common finished widths at 1/4 to 1/2 inch.
Our recommendation: for a mini or wall quilt whose stripes, colors or shapes cross the edge, choose a facing. Choose a binding when you want a frame, when one fabric already runs along the edge, or when the back will be seen.
Below, one 12-inch mini is shown both ways, with the size change each finish makes and the facing cuts for it. We drew these diagrams for this article and haven't sewn them.
What each finish does at the edge
Both finishes start the same way: a strip sewn to the front of the trimmed quilt with a 1/4-inch seam. What happens next decides what you see.
- Binding folds over the raw edge to the back. On the front you see the strip from the seam line to the fold, about 1/4 inch with a 1/4-inch seam. The quilt finishes at its trimmed size.
- Facing turns entirely to the back and takes the 1/4-inch seam allowance with it. The seam line becomes the edge, so the patchwork runs right to it. The quilt finishes about 1/2 inch smaller in each direction than it was trimmed.
Hayley Grzych's easy quilt facing tutorial on WeAllSew calls the result "a clean, nearly invisible edge." She points out a practical bonus too: there are no mitered corners to fuss over.
The same mini, faced and bound
The example mini is sixteen 3-inch finished half-square triangles, four across and four down, all turned the same way. Their halves line up into eight diagonal stripes: navy, slate, sage, mustard, rust, mustard, sage and slate. Every stripe runs off at least one edge.
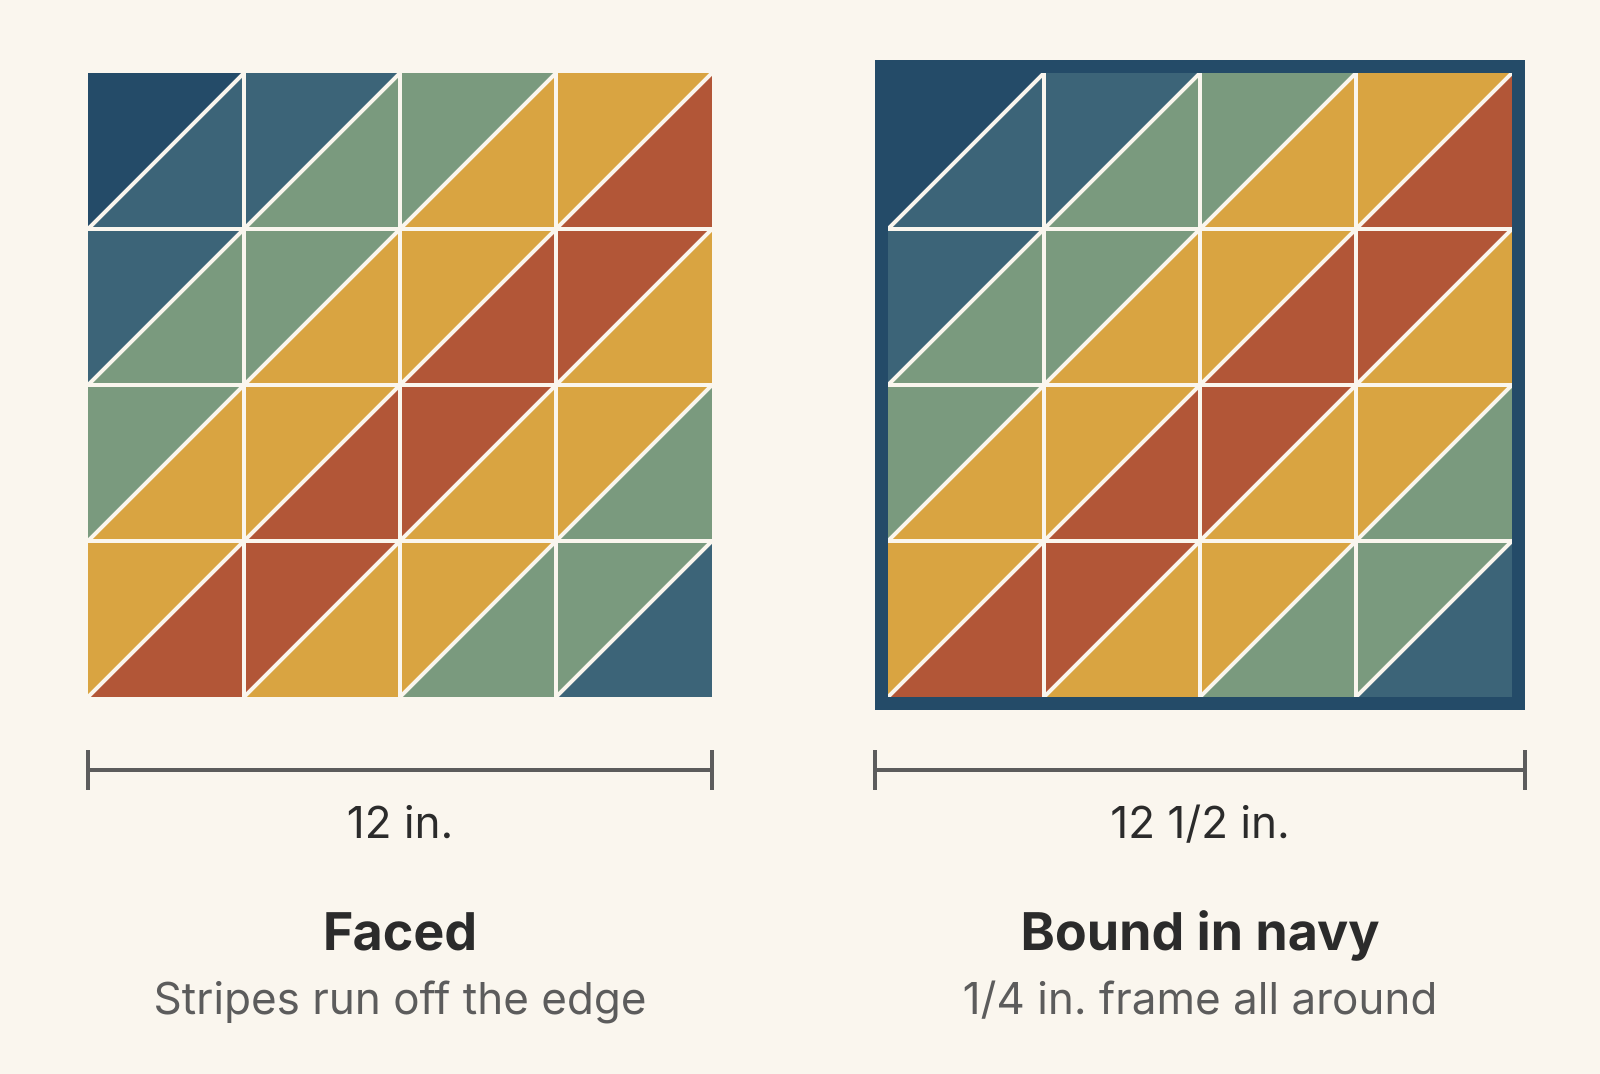
Faced, the stripes just stop at the edge, and the mini reads like a window onto a bigger pattern. Bound in navy, the same stripes sit inside a 1/4-inch line. The binding blends into the navy corner at the top left and outlines everything else, most sharply where the rust and mustard stripes meet it.
Navy is what the AQS guide calls the middle-of-the-road choice: a color already in the quilt. It still frames this mini, because five different fabrics touch the edge (navy, slate, sage, mustard and rust), and one binding fabric can match only one of them.
That gives you a quick test for your own quilt. Walk around the edge and count the fabrics that touch it. One fabric means a matching binding can almost vanish. Several means any binding will read as an outline, so decide whether you want one. On a larger quilt with no border, our guide to borderless quilt design works the same choice: a binding that frames the edge or one that blends in.
When the edge should recede
Choose a facing when:
- The design runs off the edge. A binding boxes in stripes, a landscape or an improv composition that crosses the edge. Shereece Nicole, in her quilt facing tutorial on Diary of a Quilter, faced her Generations quilt "because the design goes to the edge"; she felt binding "would have altered the infinity pool-like look."
- Many fabrics touch the edge. As in the mini above, no single binding color matches them all.
- You want a wall piece without a frame. Jennifer Houlden's 12-step facing tutorial on QUILTsocial explains that she didn't want to frame her piece; she wanted it to "run off the page."
- The edge isn't straight or has trim. Houlden chose a facing for a quilt whose border has jut-outs, and The Quilt Show lists prairie points and scallops as edges a facing finishes.
Size alone doesn't decide it. Nicole notes that facing works on anything "from mug rug to bed size," though she suggests trying it first on a wall quilt or modern project.
When a binding is the better finish
- The quilt has a plain outer border. The AQS guide says binding cut from the outermost border fabric "extends the outside border and almost disappears." You get a quiet edge and no size change. If you're still deciding whether to add a border at all, our quilt border ideas post compares widths and a no-border option on one center.
- You want a frame. The same guide asks, "Does your design call out for a visual frame?" To check, tuck a piece of contrasting fabric under the edge and step back. A contrasting binding is a last line of color you choose on purpose.
- The back will be seen. A faced quilt has strips on the back. Allison Kelley's facing tutorial at Sewing by Sarah recommends facing for wall hangings and notes that the back "is not as clean as the binding edge is." On a table topper or a quilt that gets flipped over, a binding shows the same edge on both sides.
Plan the size: a facing finishes 1/2 inch smaller
Each 3-inch unit measures 3 1/2 inches before it's sewn in, so the pieced top measures 12 1/2 inches square. Quilt it, then trim it even with the top: 12 1/2 inches.
- Bound, it finishes at about 12 1/2 inches: 12 inches of patchwork plus 1/4 inch of binding on each side.
- Faced, it finishes at about 12 inches, because the 1/4-inch seam allowance on each side turns to the back.
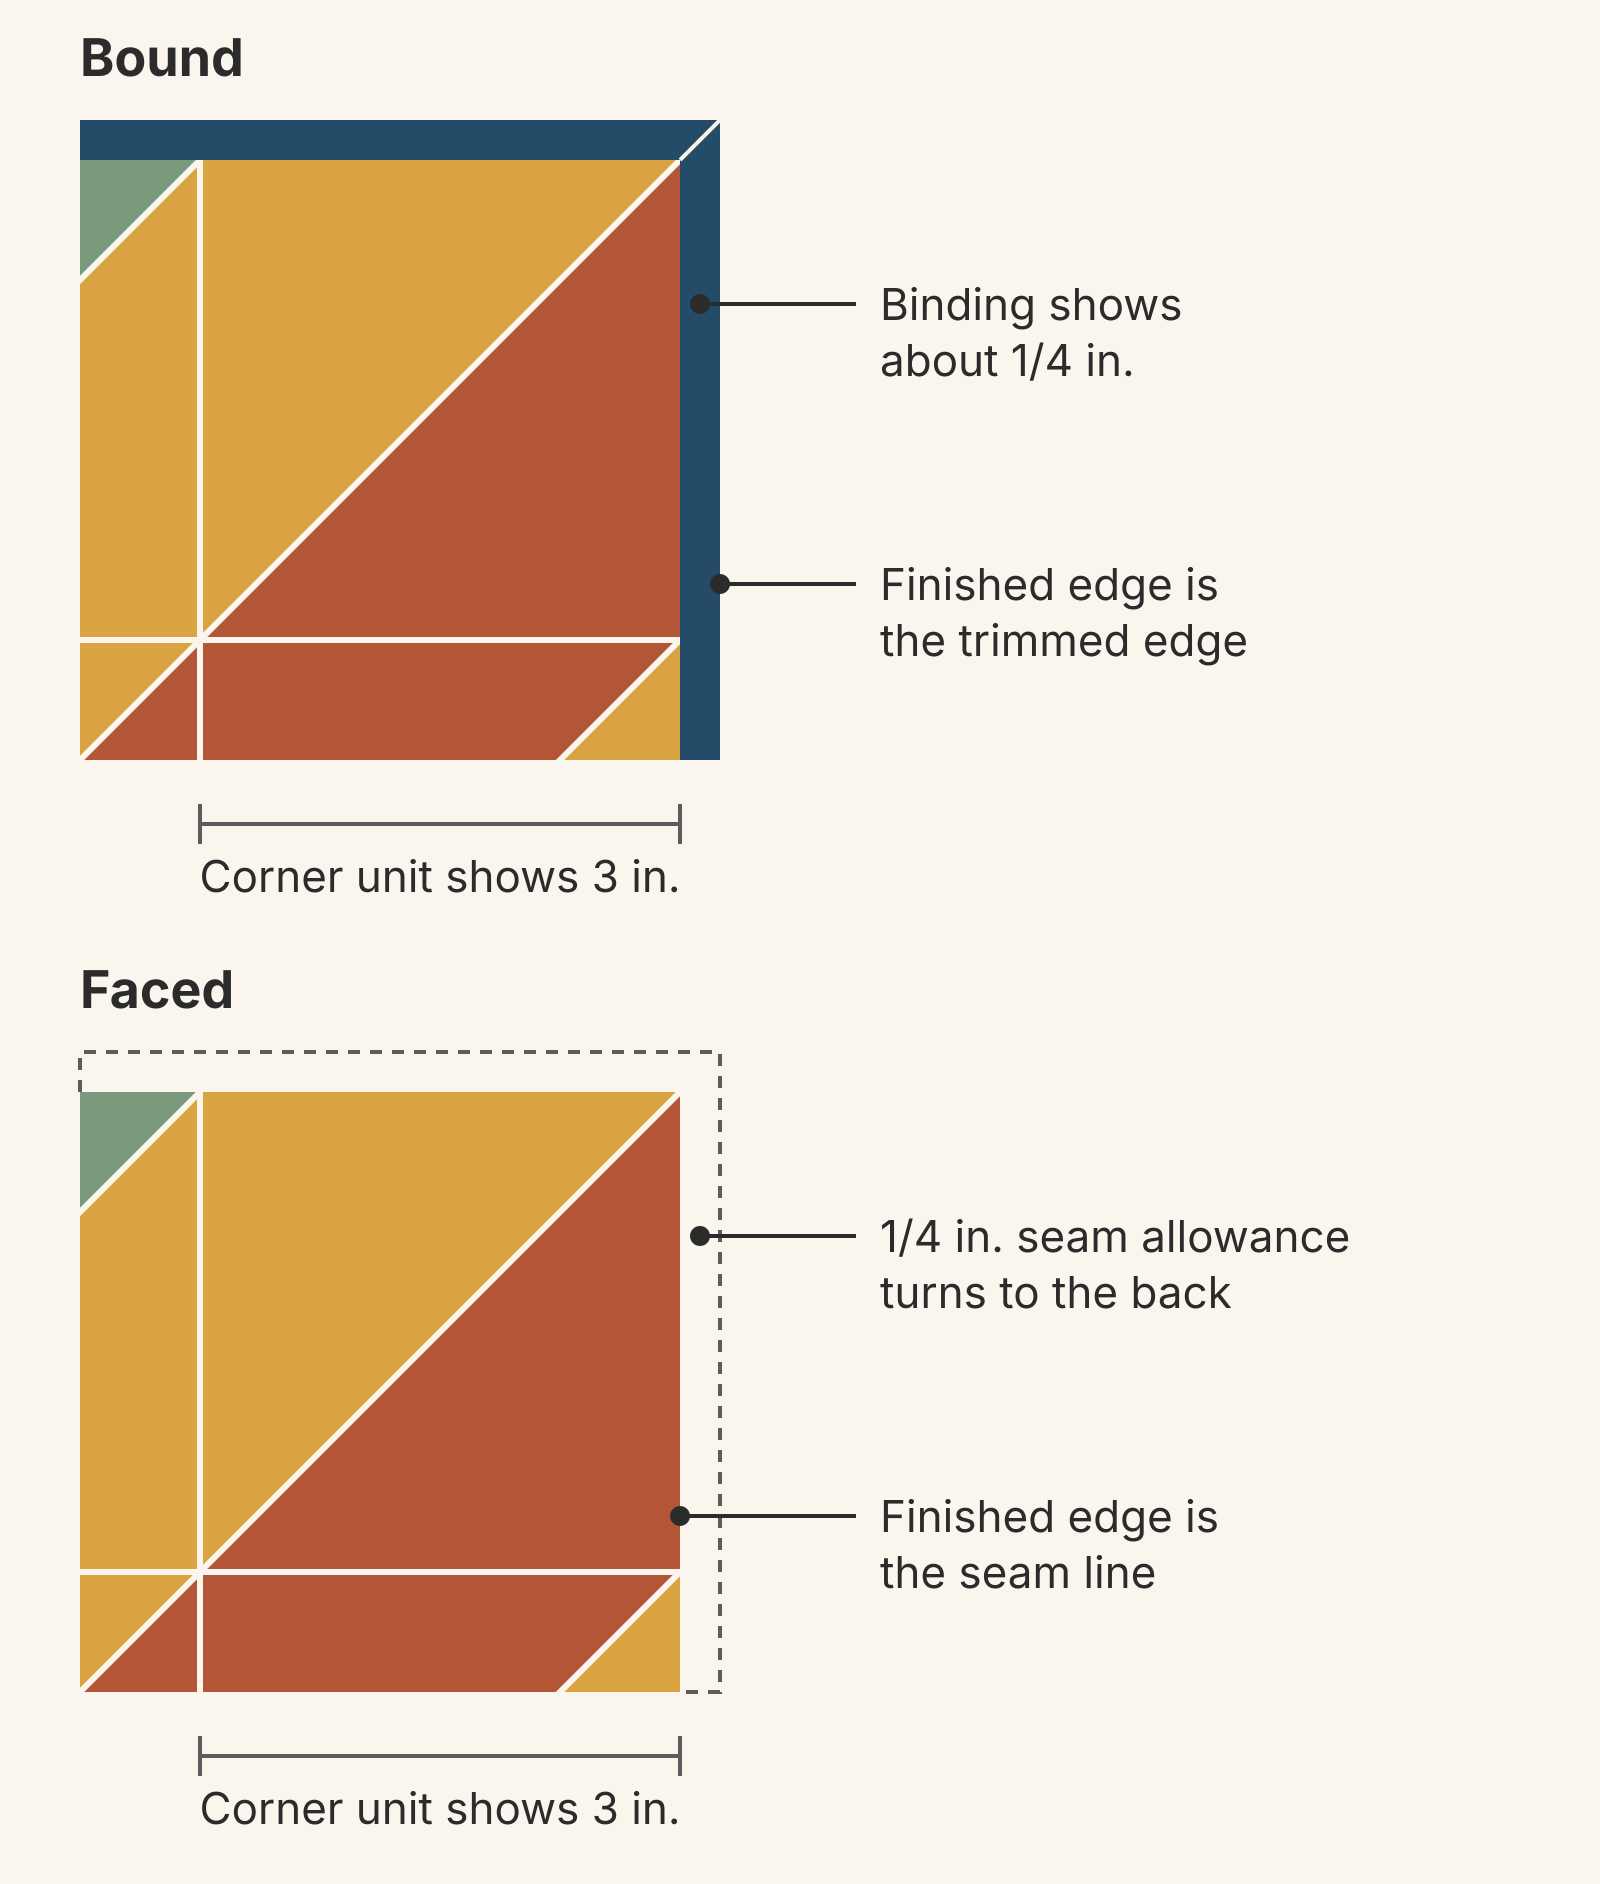
So the facing doesn't eat into the design. It removes only the binding's 1/4-inch frame.
That matters when a size is fixed. Say the mini has to fit a 12-inch spot on a wall. Faced, it fits as planned. Bound, it comes out 12 1/2 inches. To bind it at 12 inches, you'd trim the sandwich to 12 inches, and the outer units would shrink to 2 3/4 inches, against 3 inches for the inner units. When you know the target size before piecing, work backward. For a facing, piece and trim the top 1/2 inch larger than the target. For a binding, the trimmed size is the finished size.
Cut the facing for the 12-inch mini
Houlden's QUILTsocial method suits a mini well; she demonstrates it on a small piece. Her cuts, worked for a mini trimmed to 12 1/2 inches:
- Cut strips 4 inches wide. Fold each in half lengthwise, wrong sides together, and press, so it's 2 inches wide.
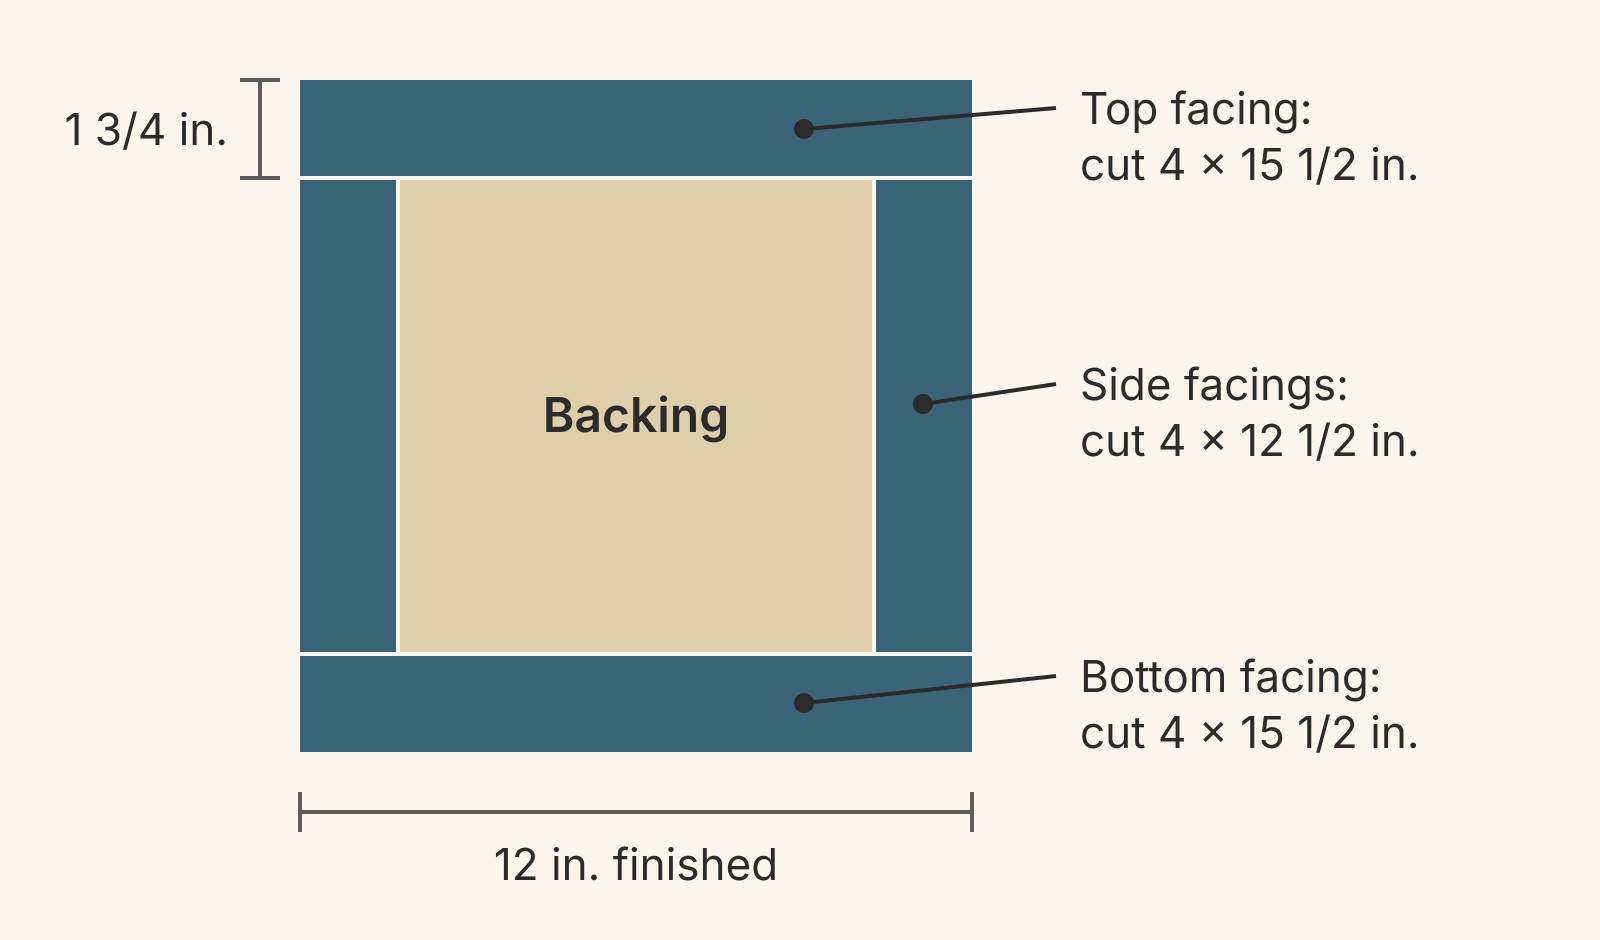
- Sides: cut two pieces 4 x 12 1/2 inches, the length of the side.
- Top and bottom: cut two pieces 4 x 15 1/2 inches, the width plus 3 inches, so the ends can tuck under.
- Sew the side pieces to the front with a 1/4-inch seam. Press them toward the edge. Then, from the back, stitch 1/8 inch from the edge to help the fold form. Press the facing to the back and hand sew it down.
- Repeat for the top and bottom, centering each piece so the same amount hangs off each end. Fold the ends under as you hand sew.
The four pieces add up to 2 x 12 1/2 + 2 x 15 1/2 = 56 inches of 4-inch strip. One fat quarter, about 18 x 21 inches, cuts into four 4 x 21-inch strips, one per piece. From yardage, two 4-inch strips cut across 42 inches of usable width hold all four: 12 1/2 + 12 1/2 + 15 1/2 = 40 1/2 inches in one, and 15 1/2 in the other. A quarter yard covers it.
On the back, each facing shows its 2-inch folded width minus the 1/4-inch seam: 1 3/4 inches.
Two more choices before you cut:
- Facing color. Houlden suggests a facing fabric close to the color of the quilt's edge, so it blends in with the front. When the edge crosses several colors, as this one does, pick the fabric that matches most of the edge or match the backing.
- Hanging. On a small piece, Houlden leaves the folded ends of the facing open rather than sewing them down, so a hanging rod can slide through. On this mini, the top facing doubles as the rod pocket.
Grzych's WeAllSew method is a narrower alternative. She cuts 2-inch strips, folded to 1 inch, which show 3/4 inch on the back. Four 5-inch squares, folded into triangles, cover the corners and hide the strip ends. Her worked example is a 40 x 30-inch wall hanging. After the 1/4-inch seam, each triangle covers 4 1/2 inches of edge on the back. On a 12-inch mini, the two corner triangles would take up 9 of each edge's 12 inches, which is why we used Houlden's strips here.
Next step: audition the edge before you cut
- Lay the quilted top flat and count the fabrics that touch the edge.
- Tuck a folded strip of your binding candidate under one edge so about 1/4 inch shows. Step back, then pull it away and look at the bare edge.
- Choose. If you face it, plan for the quilt to finish 1/2 inch smaller in each direction. If you bind it, our backing and binding fabric guide shows how to count strips from the perimeter. To set the strip width, see how wide to cut binding strips.
If you plan the mini in QuiltLab, you can compare both edges before you sew. QuiltLab has no binding or facing setting and doesn't work out strip lengths, so let a narrow border stand in for the binding. In the Quilt Editor, choose Add border under Borders, set Finished width to 0.25 and pick your binding color. The status bar then shows the quilt top at 12 x 12 inches and the overall size at 12.5 x 12.5, the bound size. Remove the border to see the faced edge, which finishes at the 12-inch top.
Quilt Editor: arrange blocks and fabric →Set a layout, add borders and read the finished dimensionsRelated posts

How to Design a Bargello Quilt: Plan the Wave on Paper
A bargello wave is a staircase of stepped columns. Number your strips, write one row per column, and see how column width turns a zigzag into a curve.

Borderless Quilt Design: Plan an Edge That Looks Finished
With no border, the outer blocks and the binding make the edge. Compare whole and halved motifs on one 48 x 60 inch quilt, then pick the binding color.

Crosshatch Quilting: How to Make the Lines Meet at the Edges
Space a 45-degree crosshatch so the lines meet in a V at every edge and corner. Choose the edge step first, mark dots around the quilt, then connect them.