


Quilt Binding Width: How Wide to Cut Your Strips
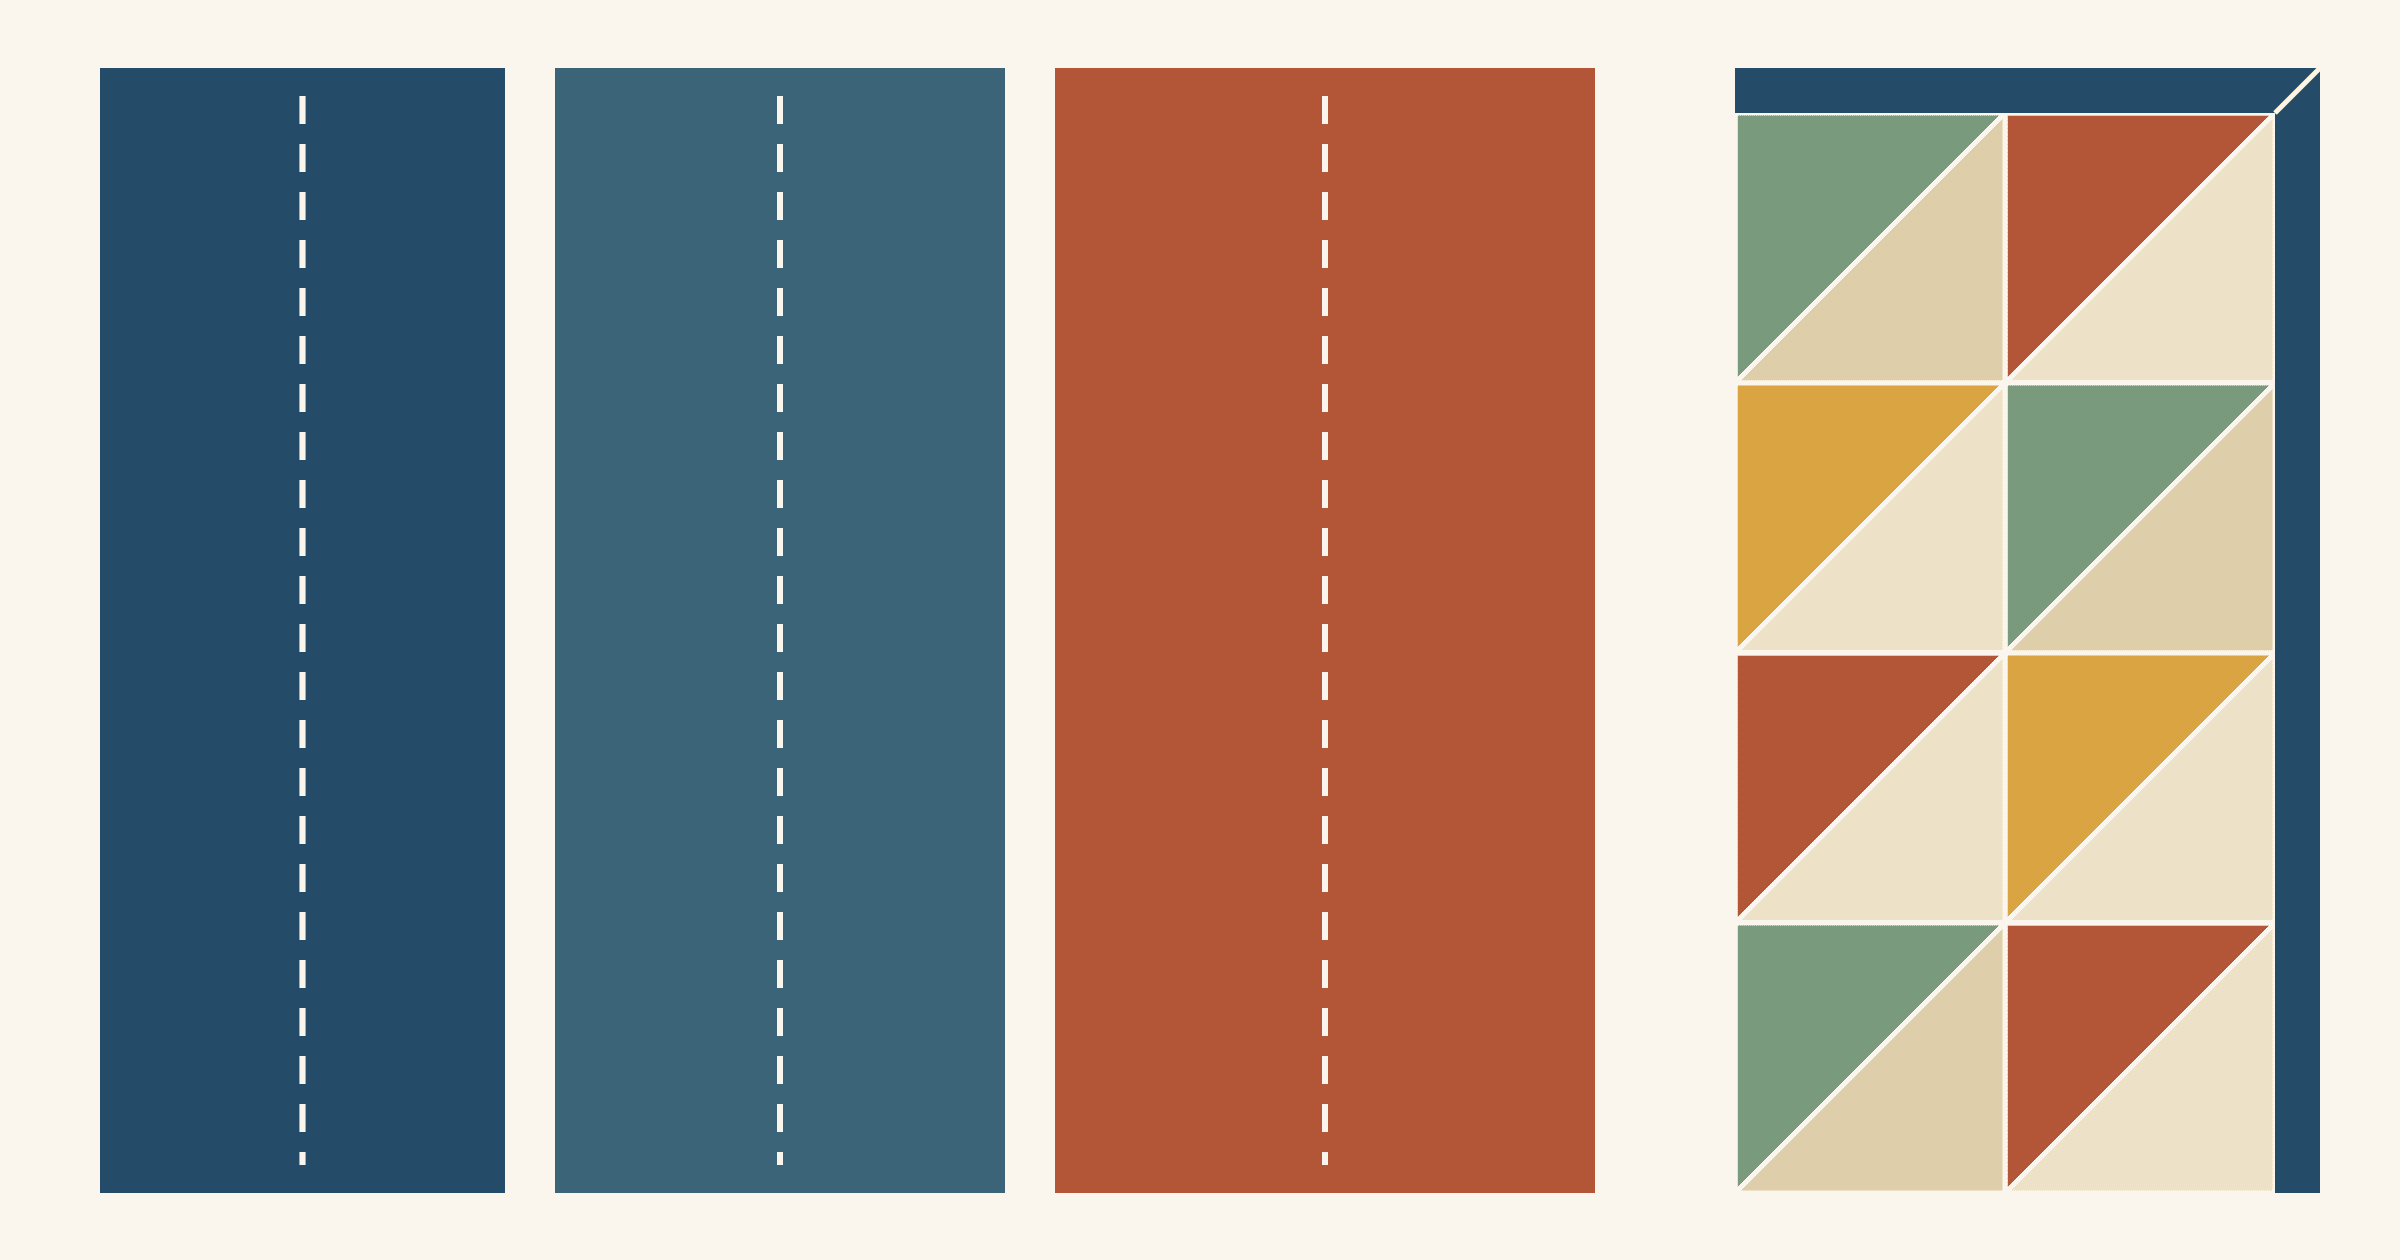
Most quilters cut double-fold binding strips 2 1/4 or 2 1/2 inches wide. Sewn on with a 1/4-inch seam, either width shows about 1/4 inch of binding on the front. Tricia Mathis's binding guide for Utah State University Extension cuts 2 1/4-inch strips and suggests 2 1/2 inches for a thicker quilt sandwich. Cut 2 1/4 inches for thin cotton or 80/20 batting and 2 1/2 inches for batting with a 1/4-inch loft. Go wider only when the edge is thicker still or you want more binding to show.
The cut width doesn't decide how much binding shows on the front. The seam allowance does. The strip only has to be wide enough to cover the seam, the front, the trip around the edge, and enough of the back to hide your stitching. Below, we split a strip into those four parts so you can work out a width for any edge. Everything here assumes straight-grain, double-fold binding on a quilt with the batting and backing trimmed even with the top. If any edge curves, see when a quilt needs bias binding instead.
Where the 2 1/4 inches goes
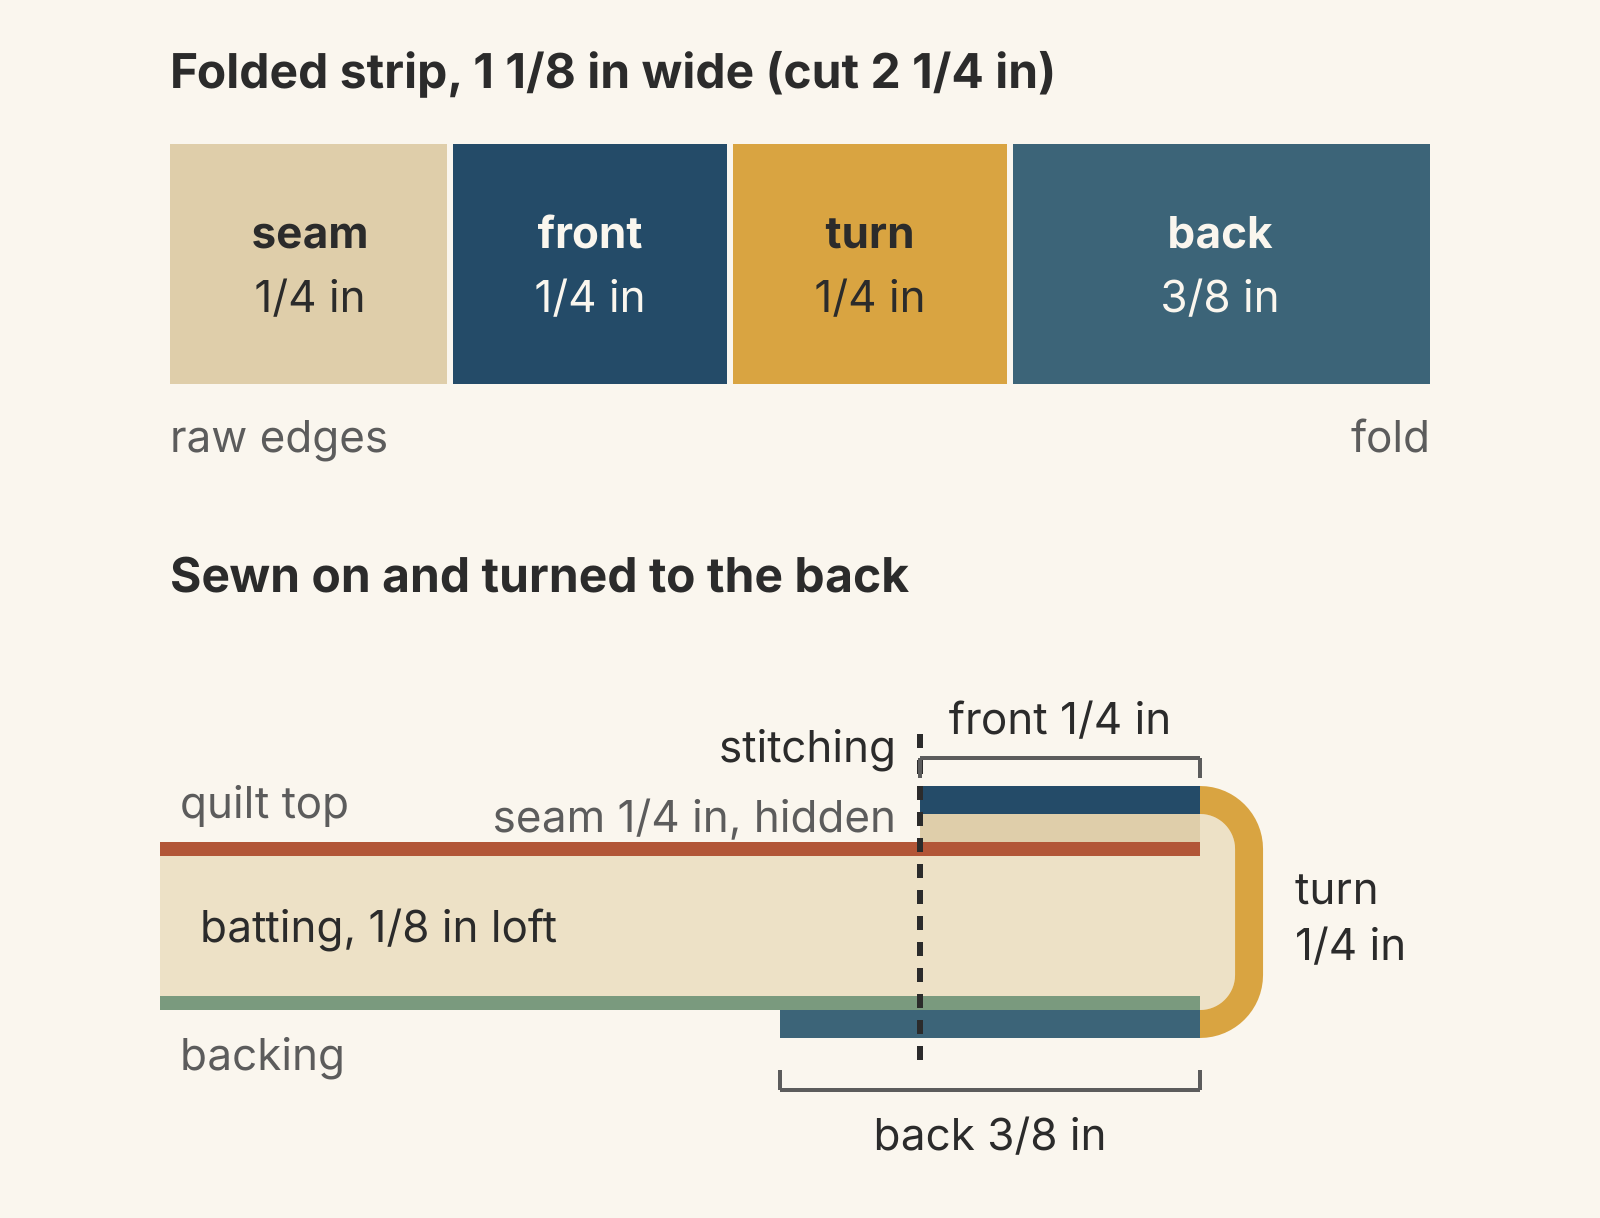
Double-fold binding is pressed in half before you sew it on, so the two layers make the same trip around the edge. Each half of the cut width has four jobs:
- Seam: from the raw edges to the stitching. It ends up hidden inside the binding.
- Front: from the stitching out to the edge of the quilt. This is the binding you see on the front.
- Turn: the distance around the edge, across the thickness of the quilt.
- Back: from the edge to just past the stitching line on the back, so the fold covers it.
That gives one formula:
Cut width = 2 x (seam + front + turn + back).
Here's the math for an everyday binding. You sew a 1/4-inch seam, so the front is also 1/4 inch. You want the fold to pass the stitching on the back by 1/8 inch, so the back is 1/4 + 1/8 = 3/8 inch. On thin cotton batting we assume the turn takes 1/4 inch.
1/4 + 1/4 + 1/4 + 3/8 = 1 1/8 inches for each half, so you cut the strip 2 x 1 1/8 = 2 1/4 inches wide.
The model matches the three widths Nicki gives in The Ruffled Purse's double-fold binding guide: 2 inches for a binding the same width front and back, 2 1/4 for one slightly wider on the back, and 2 1/2 for one that pulls easily over the back. With a 1/4-inch seam, front and turn, those strips leave 1/4, 3/8 and 1/2 inch for the back.
The 1/4-inch turn is the one number you can't read off a ruler. We chose it because it makes the common 2 1/4-inch strip come out with 1/8 inch to spare on the back. Your edge may take a little more or less, which is what the test strip at the end is for.
How batting loft changes the cut width
Loft is the thickness of the batting. Hobbs lists it for each product in its recommended uses chart:
- 1/16 inch: Thermore.
- 1/8 inch: the Heirloom cotton and 80/20 cotton-polyester battings.
- 1/4 inch: Poly-Down, Tuscany Polyester and Tuscany SUPREME cotton.
- 1/4 to 3/8 inch: Tuscany Wool.
- 1/2 to 5/8 inch: CloudLoft.
A thicker edge takes more fabric to get around. For planning, we add 1/8 inch to the loft to get the turn. The extra covers the layers of fabric and the rounded fold. That makes the turn 1/4 inch for a 1/8-inch loft, 3/8 for a 1/4-inch loft and 5/8 for a 1/2-inch loft.
Because the strip is doubled, every extra 1/8 inch of turn adds 1/4 inch to the cut width. That's the same 1/4-inch step USU Extension takes from 2 1/4 to 2 1/2 inches for a thicker sandwich, and the 1/4 inch Nicki tells you to add when your batting is very thick.
Dense quilting flattens an edge, and a tied or lightly quilted edge stays fuller, so two quilts with the same batting can need different strips. If you're still choosing batting, our batting guide compares materials by loft, warmth and shrinkage.
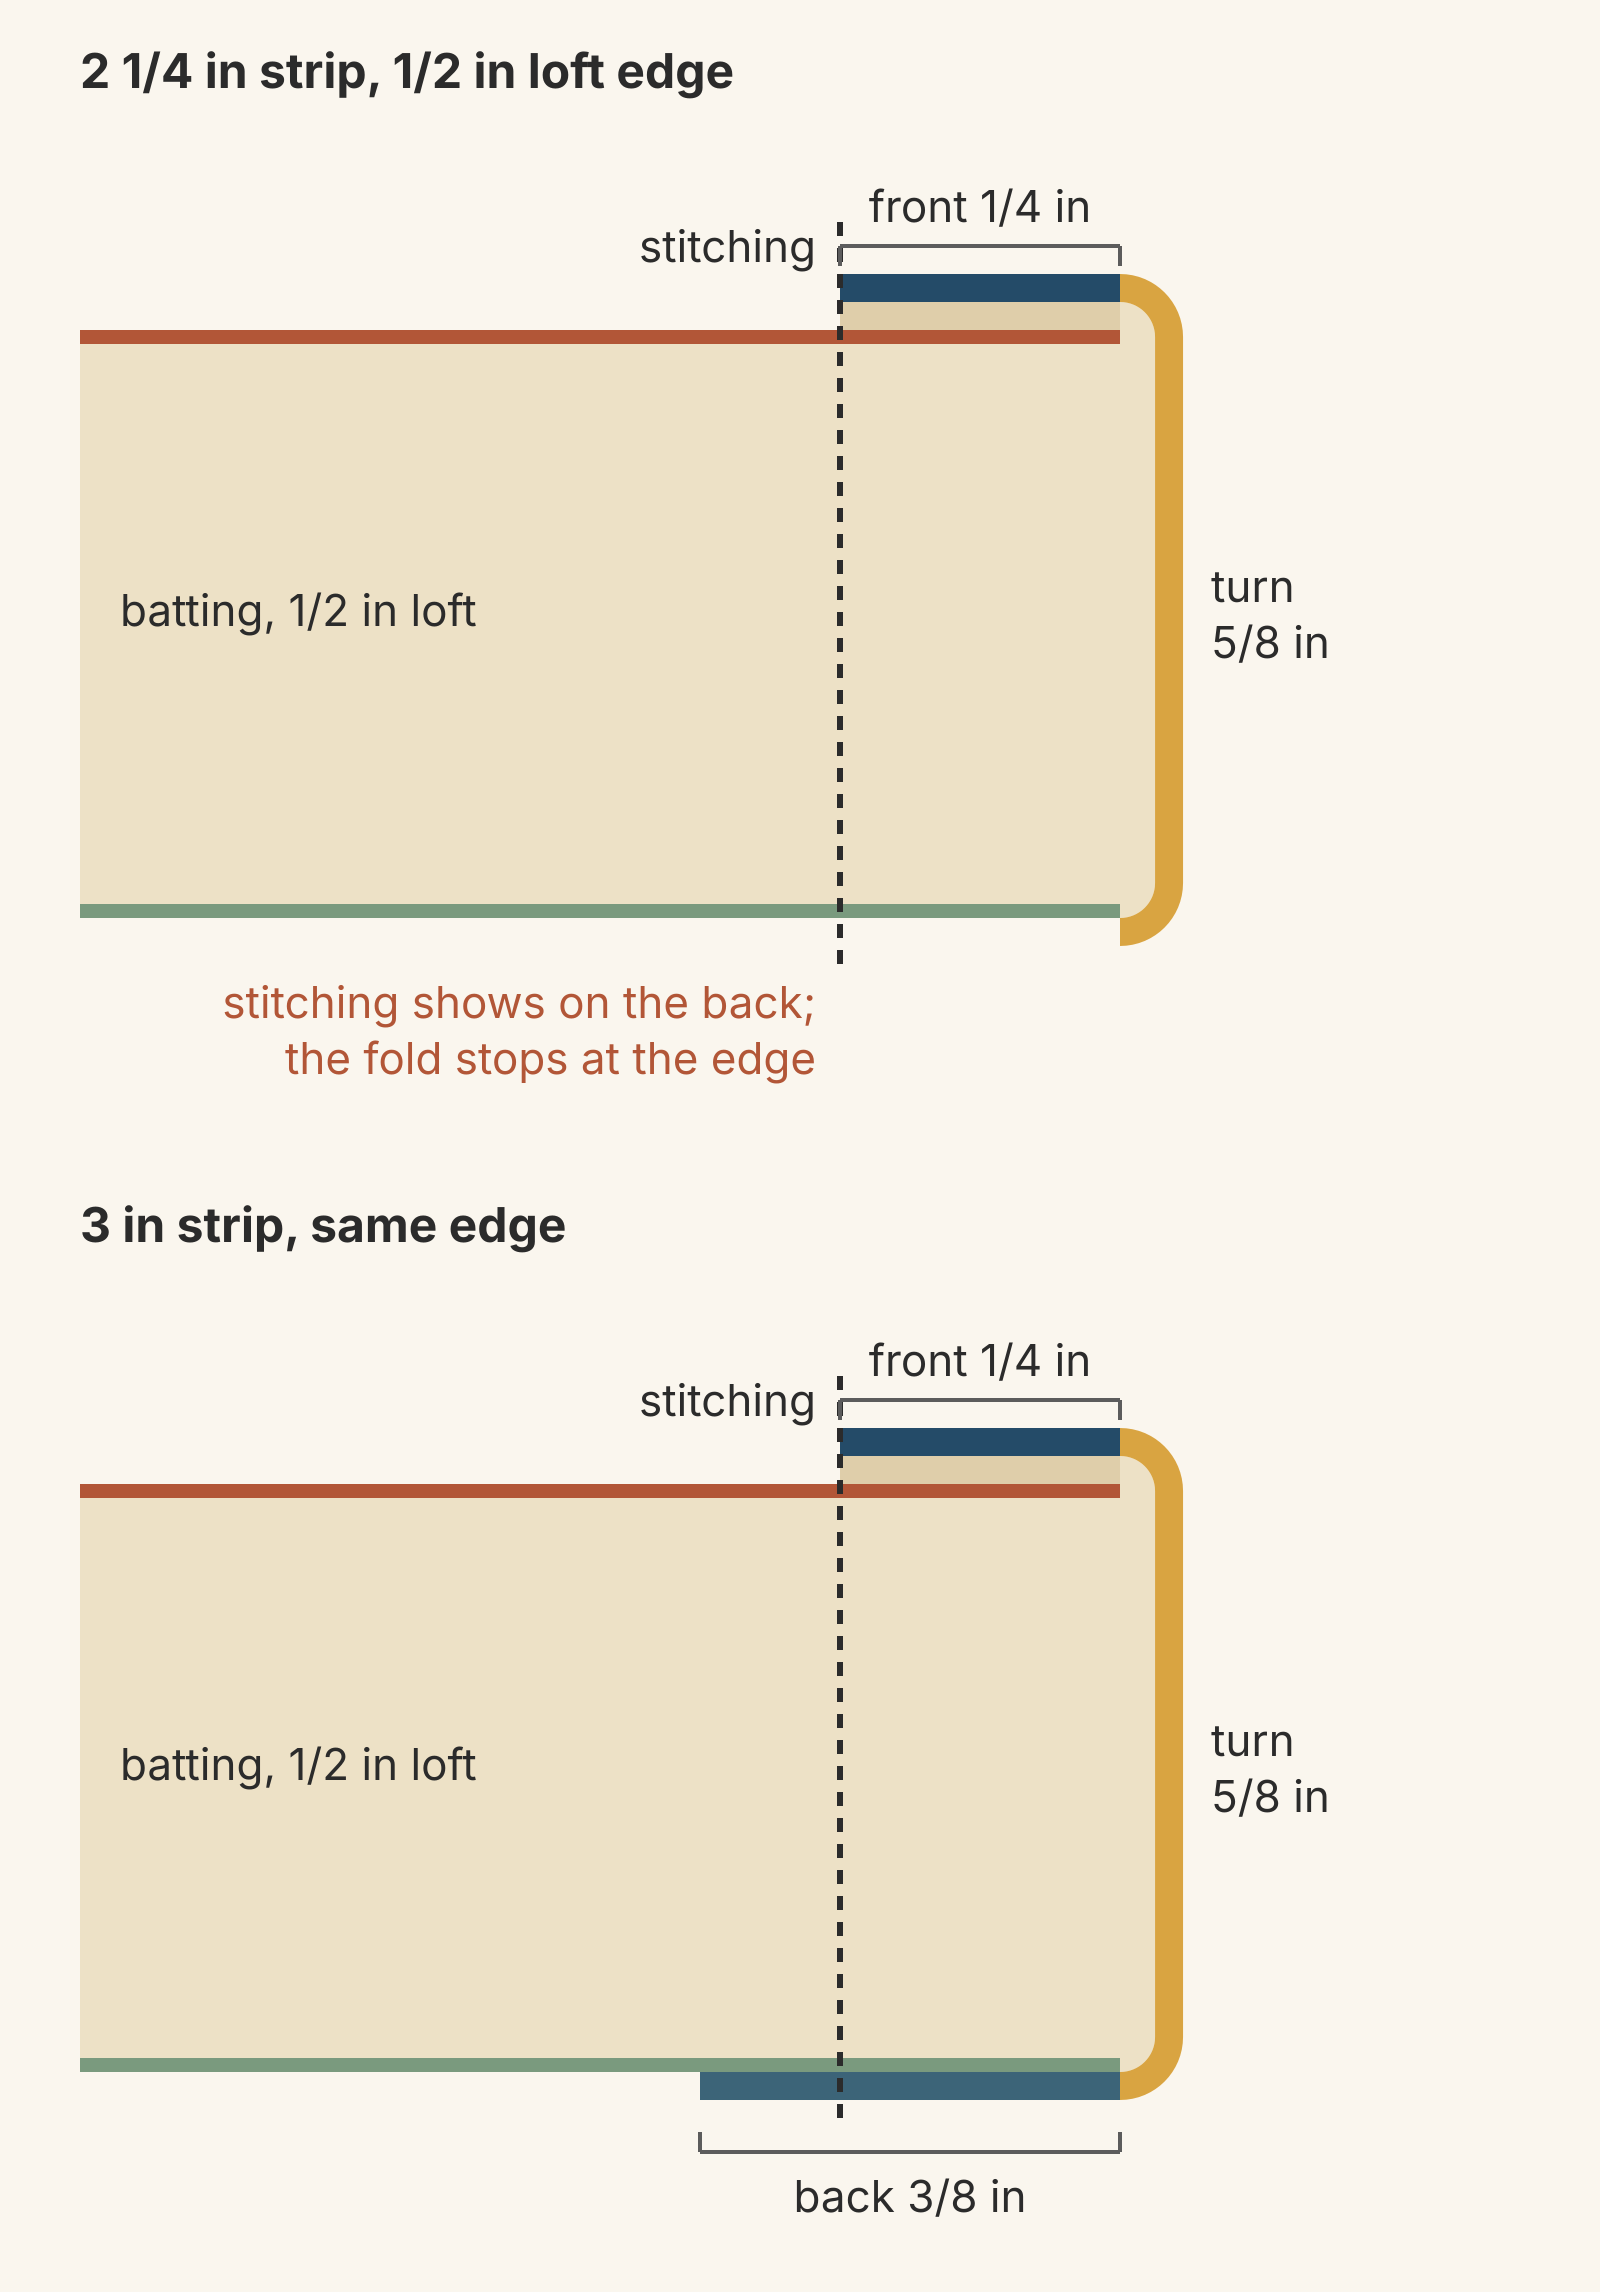
On that high-loft edge, the 2 1/4-inch strip spends 1/4 + 1/4 + 5/8 = 1 1/8 inches before it reaches the back. That's the whole half-width. You need 3/8 inch more on each half, so the strip has to be 2 x 3/8 = 3/4 inch wider: 3 inches.
How a wider binding changes the cut width
With the layers trimmed even, the front of the binding is as wide as your seam allowance. To show 1/2 inch of binding, sew a 1/2-inch seam. Every part except the turn grows: the seam is 1/2, the front 1/2, and the back 1/2 + 1/8 = 5/8. On thin cotton that's 1/2 + 1/2 + 1/4 + 5/8 = 1 7/8 inches, so you cut 3 3/4 inches.
So the front width costs more than the loft does. Each extra 1/8 inch on the front adds 3/4 inch to the cut width, three times what an extra 1/8 inch of turn adds.
The wider seam also moves the stitching 1/4 inch onto the finished top. Take a top that finishes 60 x 72 inches. With a 1/4-inch seam, the bound quilt measures about 60 1/2 x 72 1/2 inches before any shrinkage from quilting. All 60 x 72 inches of patchwork show. With a 1/2-inch seam, the outside size stays the same, but only 59 1/2 x 71 1/2 inches of patchwork show. Any point that meets the edge loses its tip under the binding.
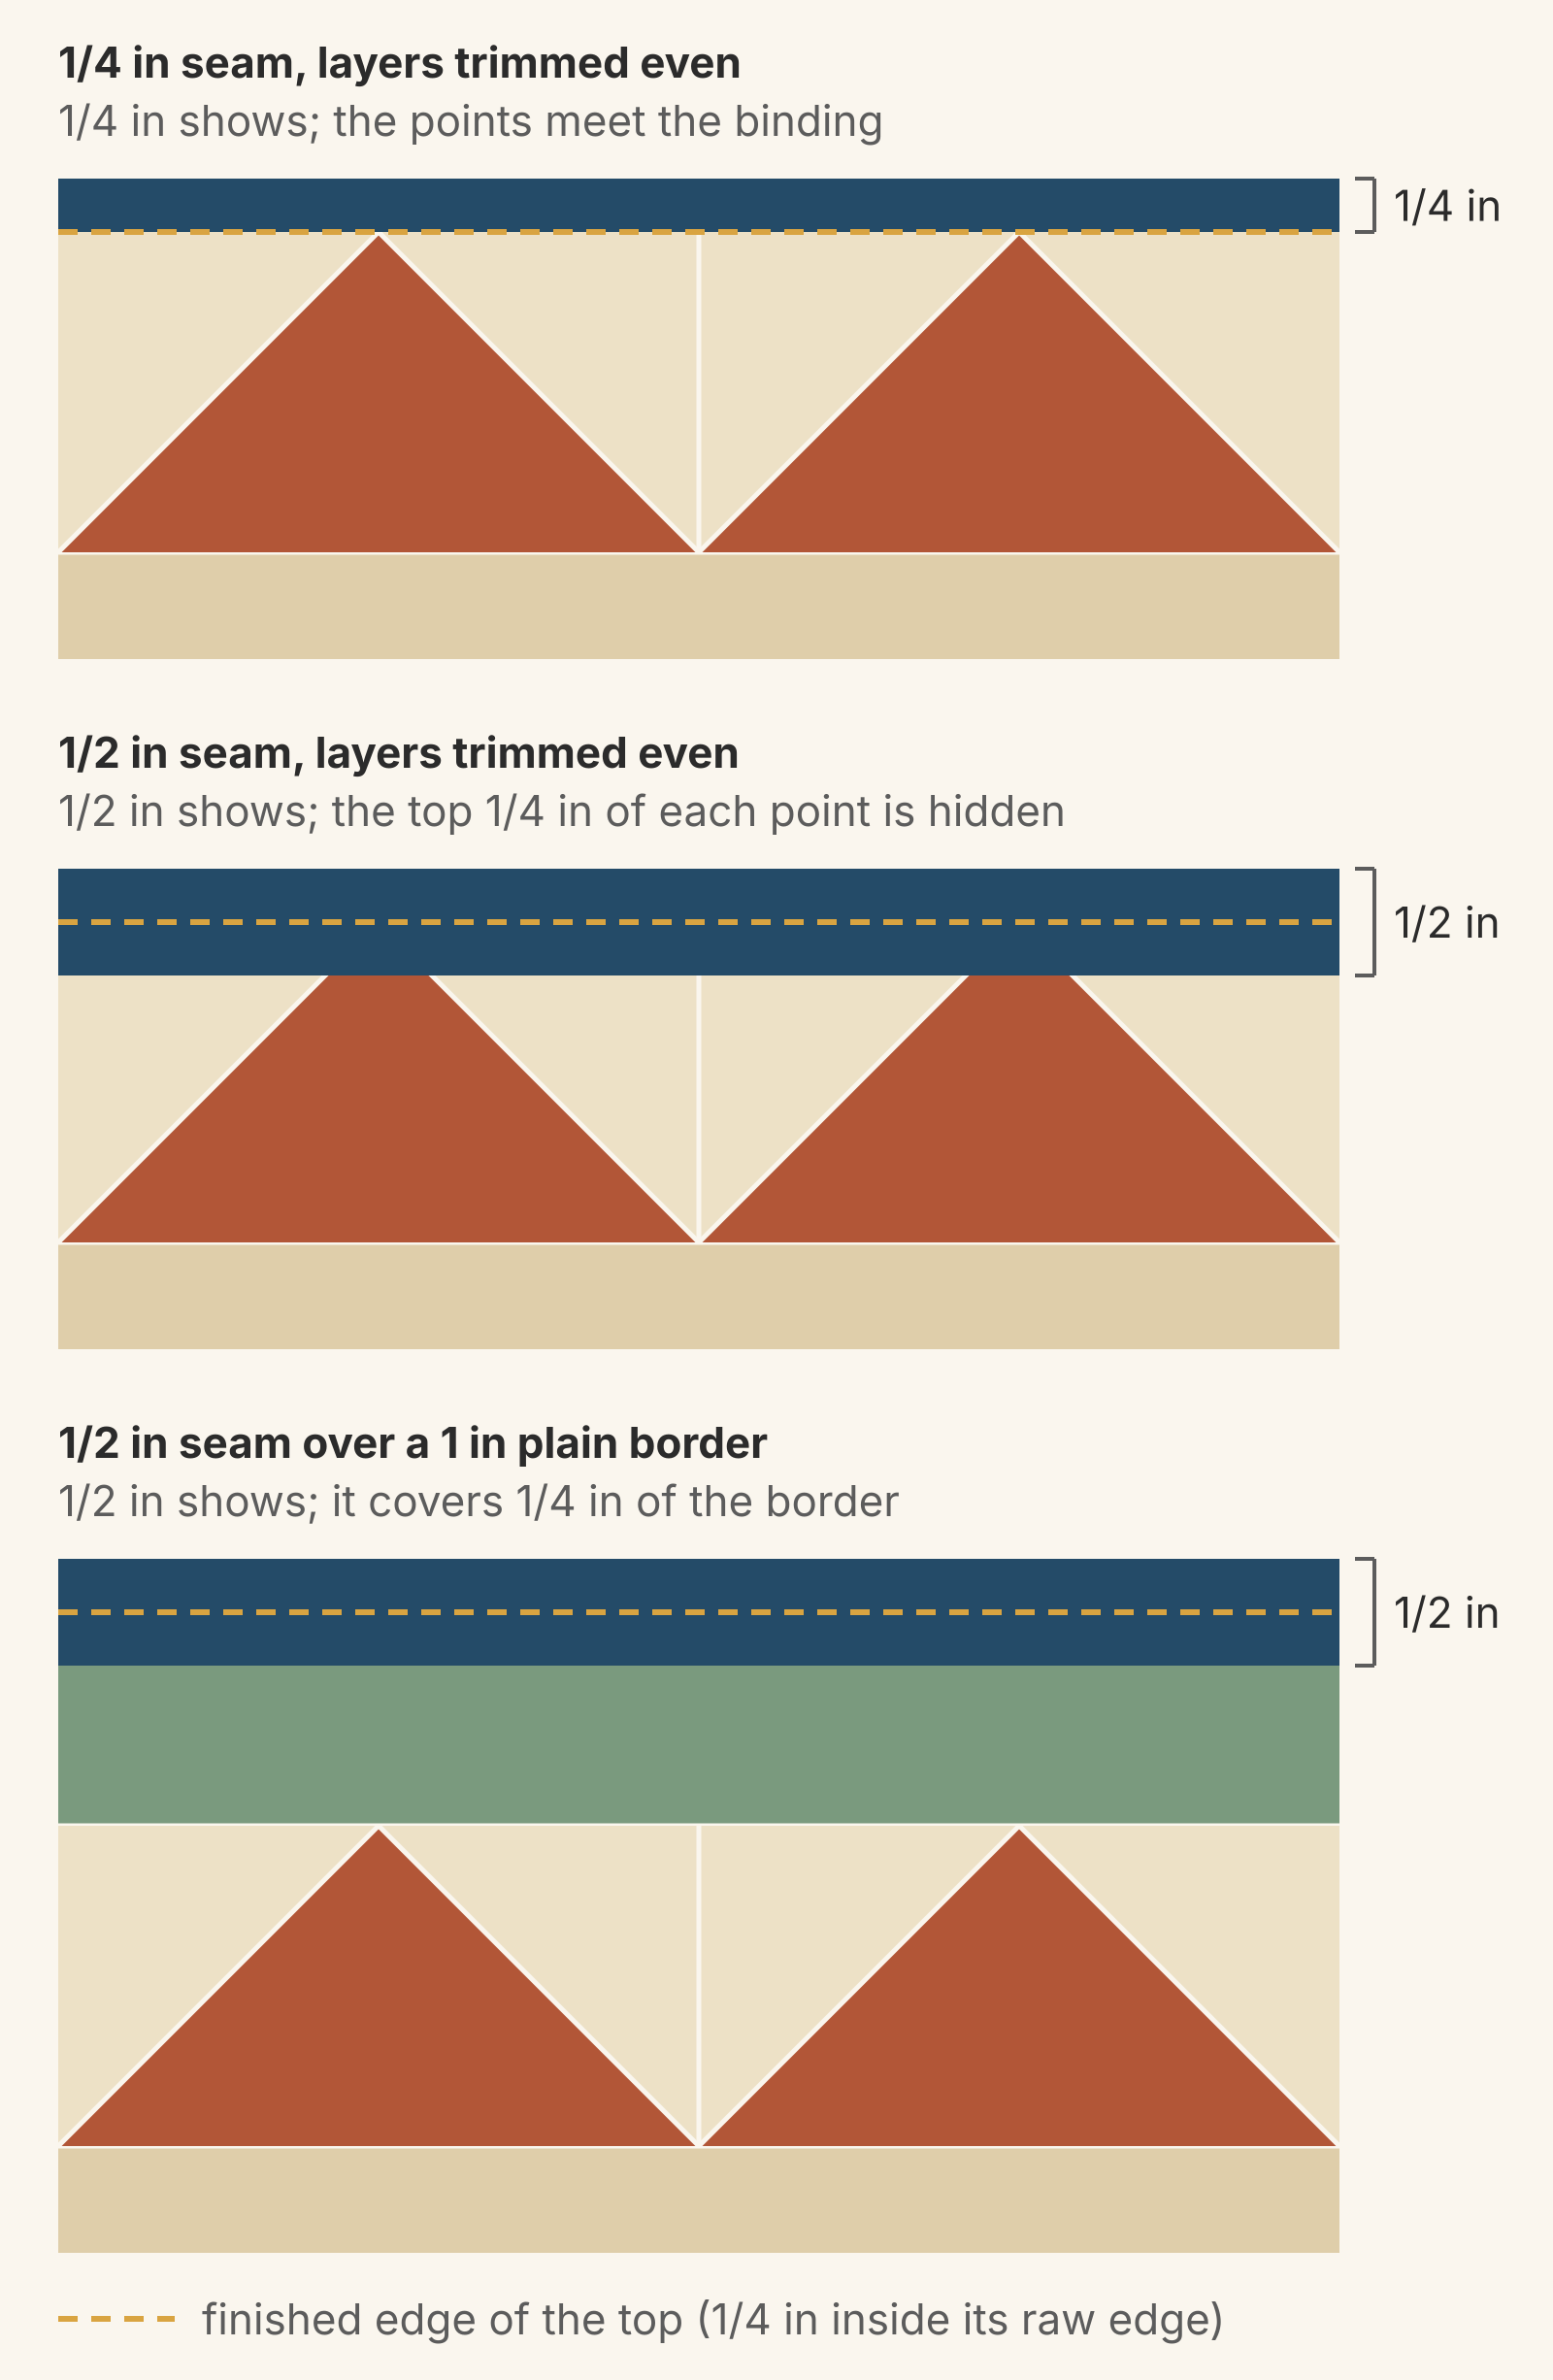
If the outer row has points that meet the edge, keep the 1/4-inch seam, or add a plain border before you sew a wider one. On a plain border, a 1/2-inch seam just takes 1/4 inch off the border. Our border ideas compare border widths on one quilt center.
Some teachers trim the batting and backing 1/4 inch past the top instead of even with it. Fat Quarter Shop's binding tutorial does, with 2 1/2-inch strips. Marcia Hohn trims that way too in her binding lesson on Quilter's Cache, and says her 2 1/2-inch strips finish 1/2 inch wide. If that extra batting stayed flat, the front would be 1/2 inch and our model would call for a 3 1/4-inch strip. These teachers cut 3/4 inch narrower, so some of the extra batting must pack into the fold, and our model can't say how much. If you want a wider binding this way, sew a test strip first.
A binding width chart for common edges
Every row uses the assumptions above: layers trimmed even, a turn of the loft plus 1/8 inch, and a fold that passes the back stitching by 1/8 inch. The first two rows match the widths USU Extension recommends. The rest are our extrapolation, so test them.
| Edge | Seam + front + turn + back | Cut width |
|---|---|---|
| Thin cotton or 80/20, 1/8-inch loft | 1/4 + 1/4 + 1/4 + 3/8 = 1 1/8 | 2 1/4 inches |
| Polyester or cotton, 1/4-inch loft | 1/4 + 1/4 + 3/8 + 3/8 = 1 1/4 | 2 1/2 inches |
| Wool, 3/8-inch loft | 1/4 + 1/4 + 1/2 + 3/8 = 1 3/8 | 2 3/4 inches |
| High loft, 1/2 inch | 1/4 + 1/4 + 5/8 + 3/8 = 1 1/2 | 3 inches |
| Thin cotton, 1/2 inch showing, 1/2-inch seam | 1/2 + 1/2 + 1/4 + 5/8 = 1 7/8 | 3 3/4 inches |
Why is 2 1/2 inches so common, then? Fat Quarter Shop calls 2 1/2-inch strips the most popular method, and it's the width of a jelly roll strip, so precut strips are ready to join into binding. On thin cotton trimmed even, a 2 1/2-inch strip lands the fold 1/4 inch past the back stitching instead of 1/8. That's the binding Nicki describes as one that pulls easily over the back.
Test one strip before you cut them all
Fabric thickness, how hard you press and how firmly you pull the binding all change the turn. A short test settles it:
- Cut one strip about 10 inches long at your planned width. Fold it in half and press.
- Sew it to the edge of a small quilted sample made with the same batting, using the seam you plan to use.
- Fold it over to the back and measure how far the fold passes the stitching line.
- Change the cut width by twice the difference. If the fold passes the stitching by 3/8 inch and you wanted 1/8, cut 1/2 inch narrower. If it lands 1/16 inch short of where you want it, cut 1/8 inch wider.
USU Extension's guide makes the same check on the quilt itself after the first inch or two of sewing.
Next: count your strips
Pick how much binding you want to see, look up your batting's loft, add up the four parts and cut one test strip. Then work out how many strips to cut. Our guide to backing and binding yardage turns the quilt's perimeter into strips and yardage; multiply by your own strip width. Your cut width also sets how far to overlap the tails when you join the binding ends.
QuiltLab doesn't calculate binding, but the Quilt Editor helps you judge the edge before you cut. Check whether the outer row has points a wider seam would cover. To preview a 1/4- or 1/2-inch frame, choose Add border under Borders in Properties and give it that finished width in your binding fabric. A border adds to the quilt's size, so remove it before you read the finished dimensions beside the Layout heading.
Quilt Editor: arrange blocks and fabric →Where to read the finished size and add bordersRelated posts

How to Design a Bargello Quilt: Plan the Wave on Paper
A bargello wave is a staircase of stepped columns. Number your strips, write one row per column, and see how column width turns a zigzag into a curve.

Borderless Quilt Design: Plan an Edge That Looks Finished
With no border, the outer blocks and the binding make the edge. Compare whole and halved motifs on one 48 x 60 inch quilt, then pick the binding color.

Crosshatch Quilting: How to Make the Lines Meet at the Edges
Space a 45-degree crosshatch so the lines meet in a V at every edge and corner. Choose the edge step first, mark dots around the quilt, then connect them.