


Bias vs Straight Grain Binding: When Does a Quilt Need Bias?
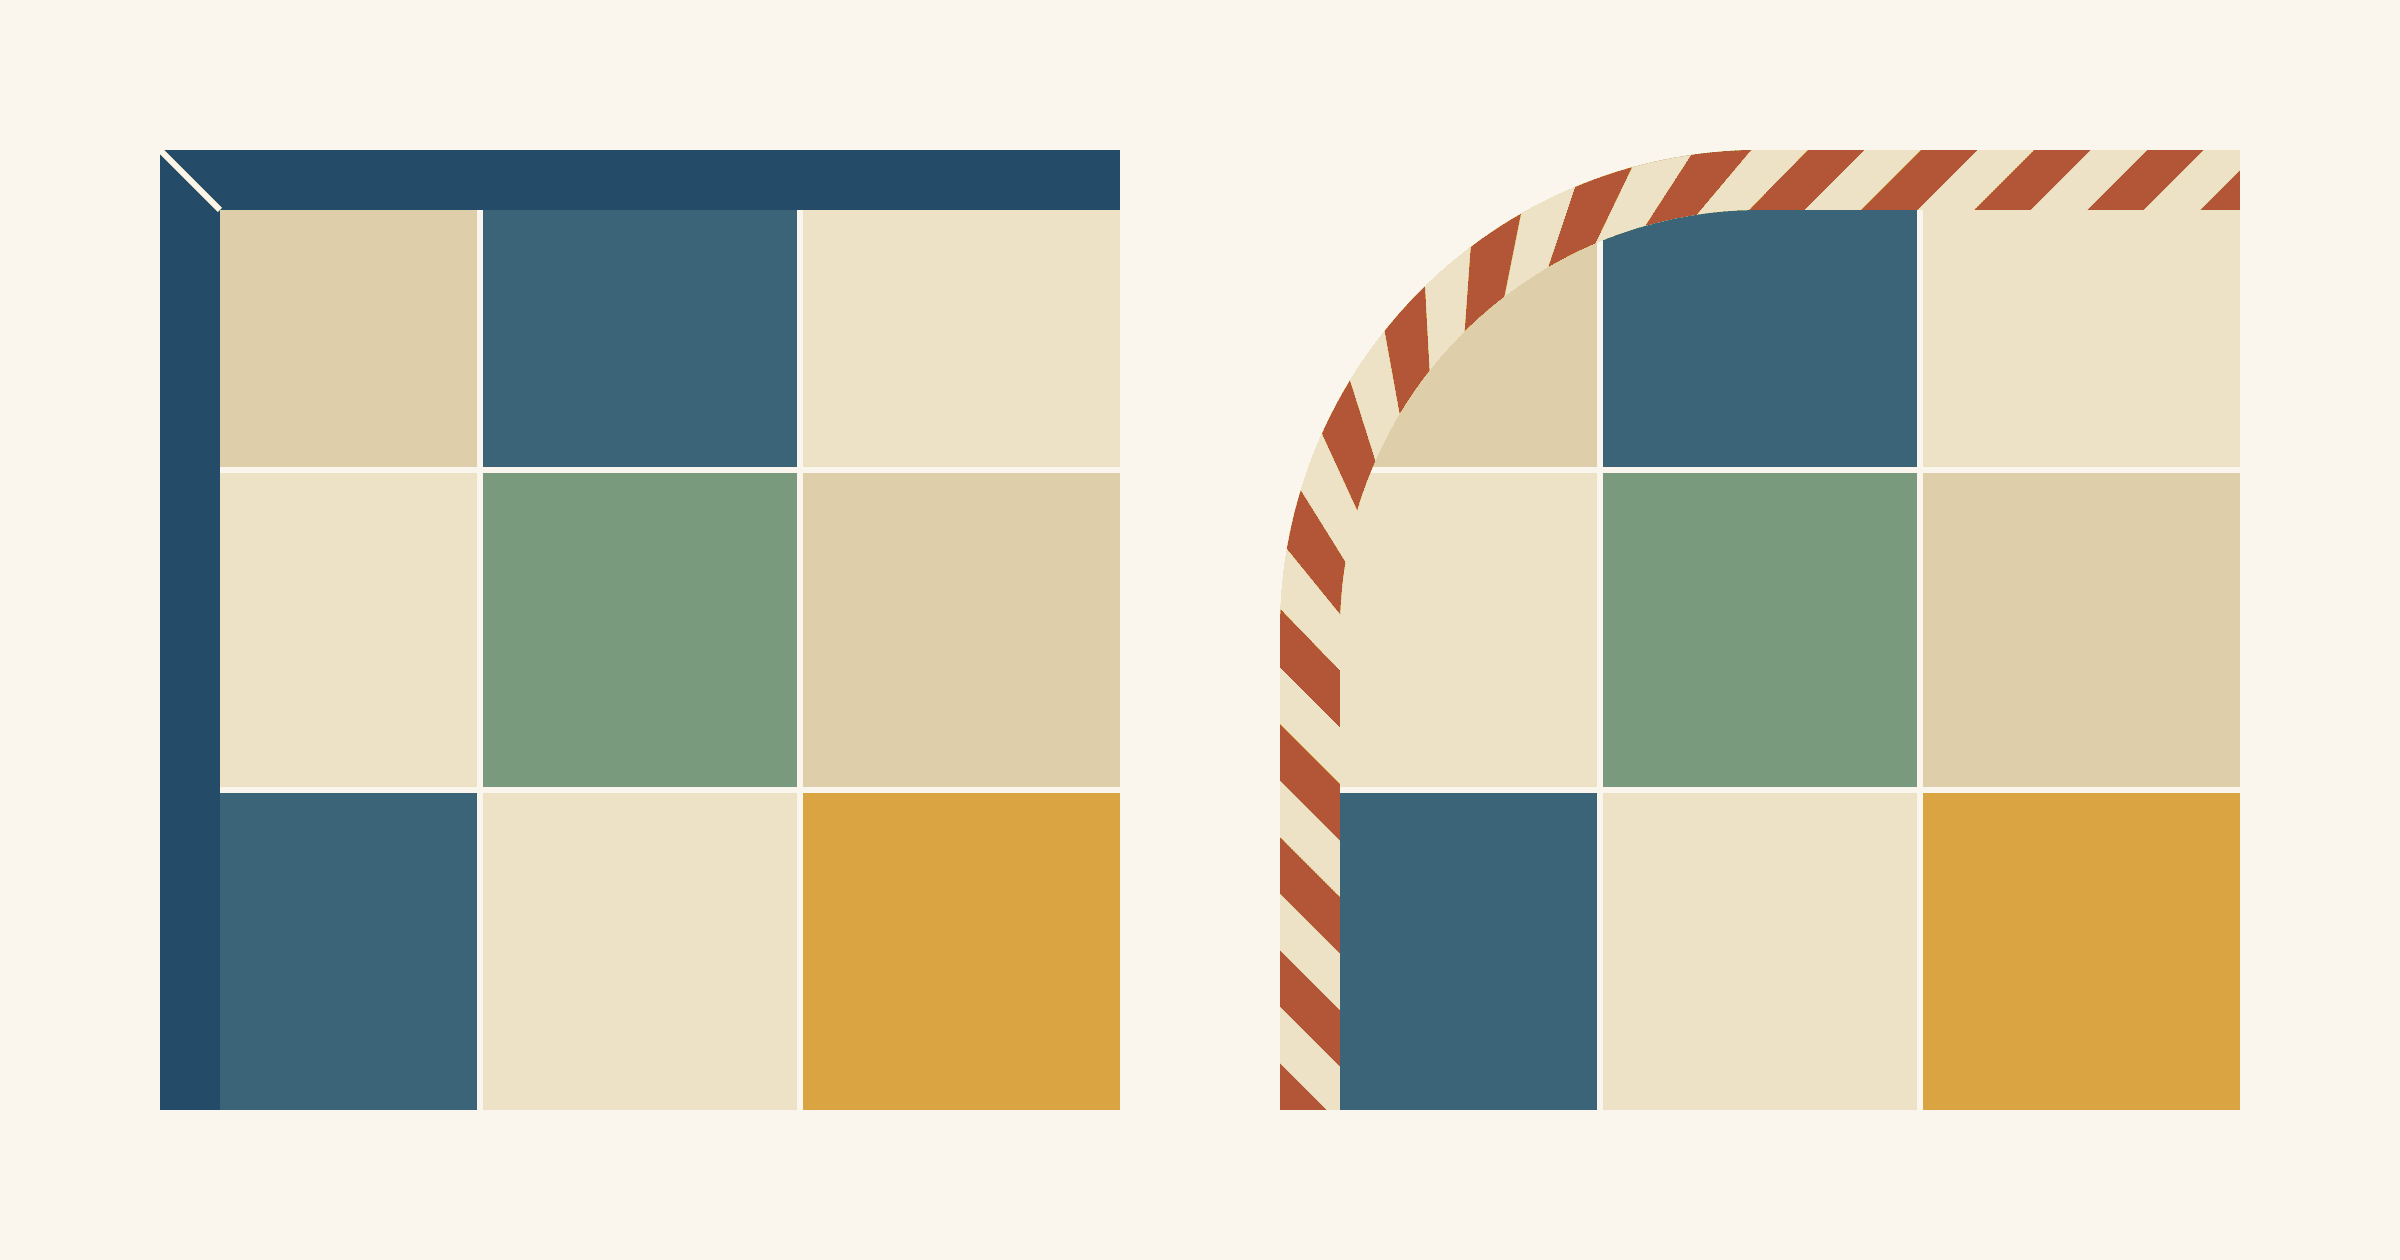
Cut straight-grain binding for a quilt with straight sides and square corners. Cut bias binding when any edge curves: rounded corners, scallops, a wavy edge or a circle. That's the line Colleen Tauke draws in Straight of Grain vs. Bias Binding at National Quilters Circle. She writes that bias "is always recommended for any quilt edge that contains a curve, wave, or scallop," and she uses straight of grain herself "unless there is a curve involved."
For most quilts, that means strips cut across the width of the fabric. On a straight-edged quilt, choose bias only for a reason you can name, such as a stripe you want to run diagonally. Bias also costs more: on a 60 x 72 in throw it takes 5/8 yard and 11 joins, where straight grain takes 1/2 yard and 7.
Lengthwise, crosswise and bias: what changes
Woven fabric has two straight grains and a bias. Suzy Webster lays out all three in AccuQuilt's When, Where & Why to Use Bias Binding:
- Lengthwise grain runs parallel to the selvage and has the least stretch.
- Crosswise grain runs selvage to selvage, at 90 degrees to the selvage, with a little more give.
- Bias runs at 45 degrees to the selvage and stretches the most.
When a pattern says straight-grain binding, it usually means crosswise strips. They're quick to cut, and each one runs the full width of the fabric, about 42 in once the selvages are off. Lengthwise strips are straight grain too, with even less stretch. Tauke notes they can be cut longer than width-of-fabric strips when you're cutting from more than 1 1/4 yards.
Why a curved edge needs bias
You sew double-fold binding to the front of the quilt with the strip's raw edges along the quilt edge and its fold lying inward. Along a straight side, the raw edges and the fold run the same length. At a square corner you fold a miter and keep sewing, so no part of the strip has to stretch or shrink.
A curve changes that. Round a corner to a 3 in radius and the raw edges of a 2 1/2 in strip, folded to 1 1/4 in, follow an arc of about 4 3/4 in. The fold sits 1 1/4 in closer to the center, so it follows an arc of about 2 3/4 in. One piece of fabric has to be about 2 in shorter on one edge than on the other. Turning the binding to the back asks it to change shape again.
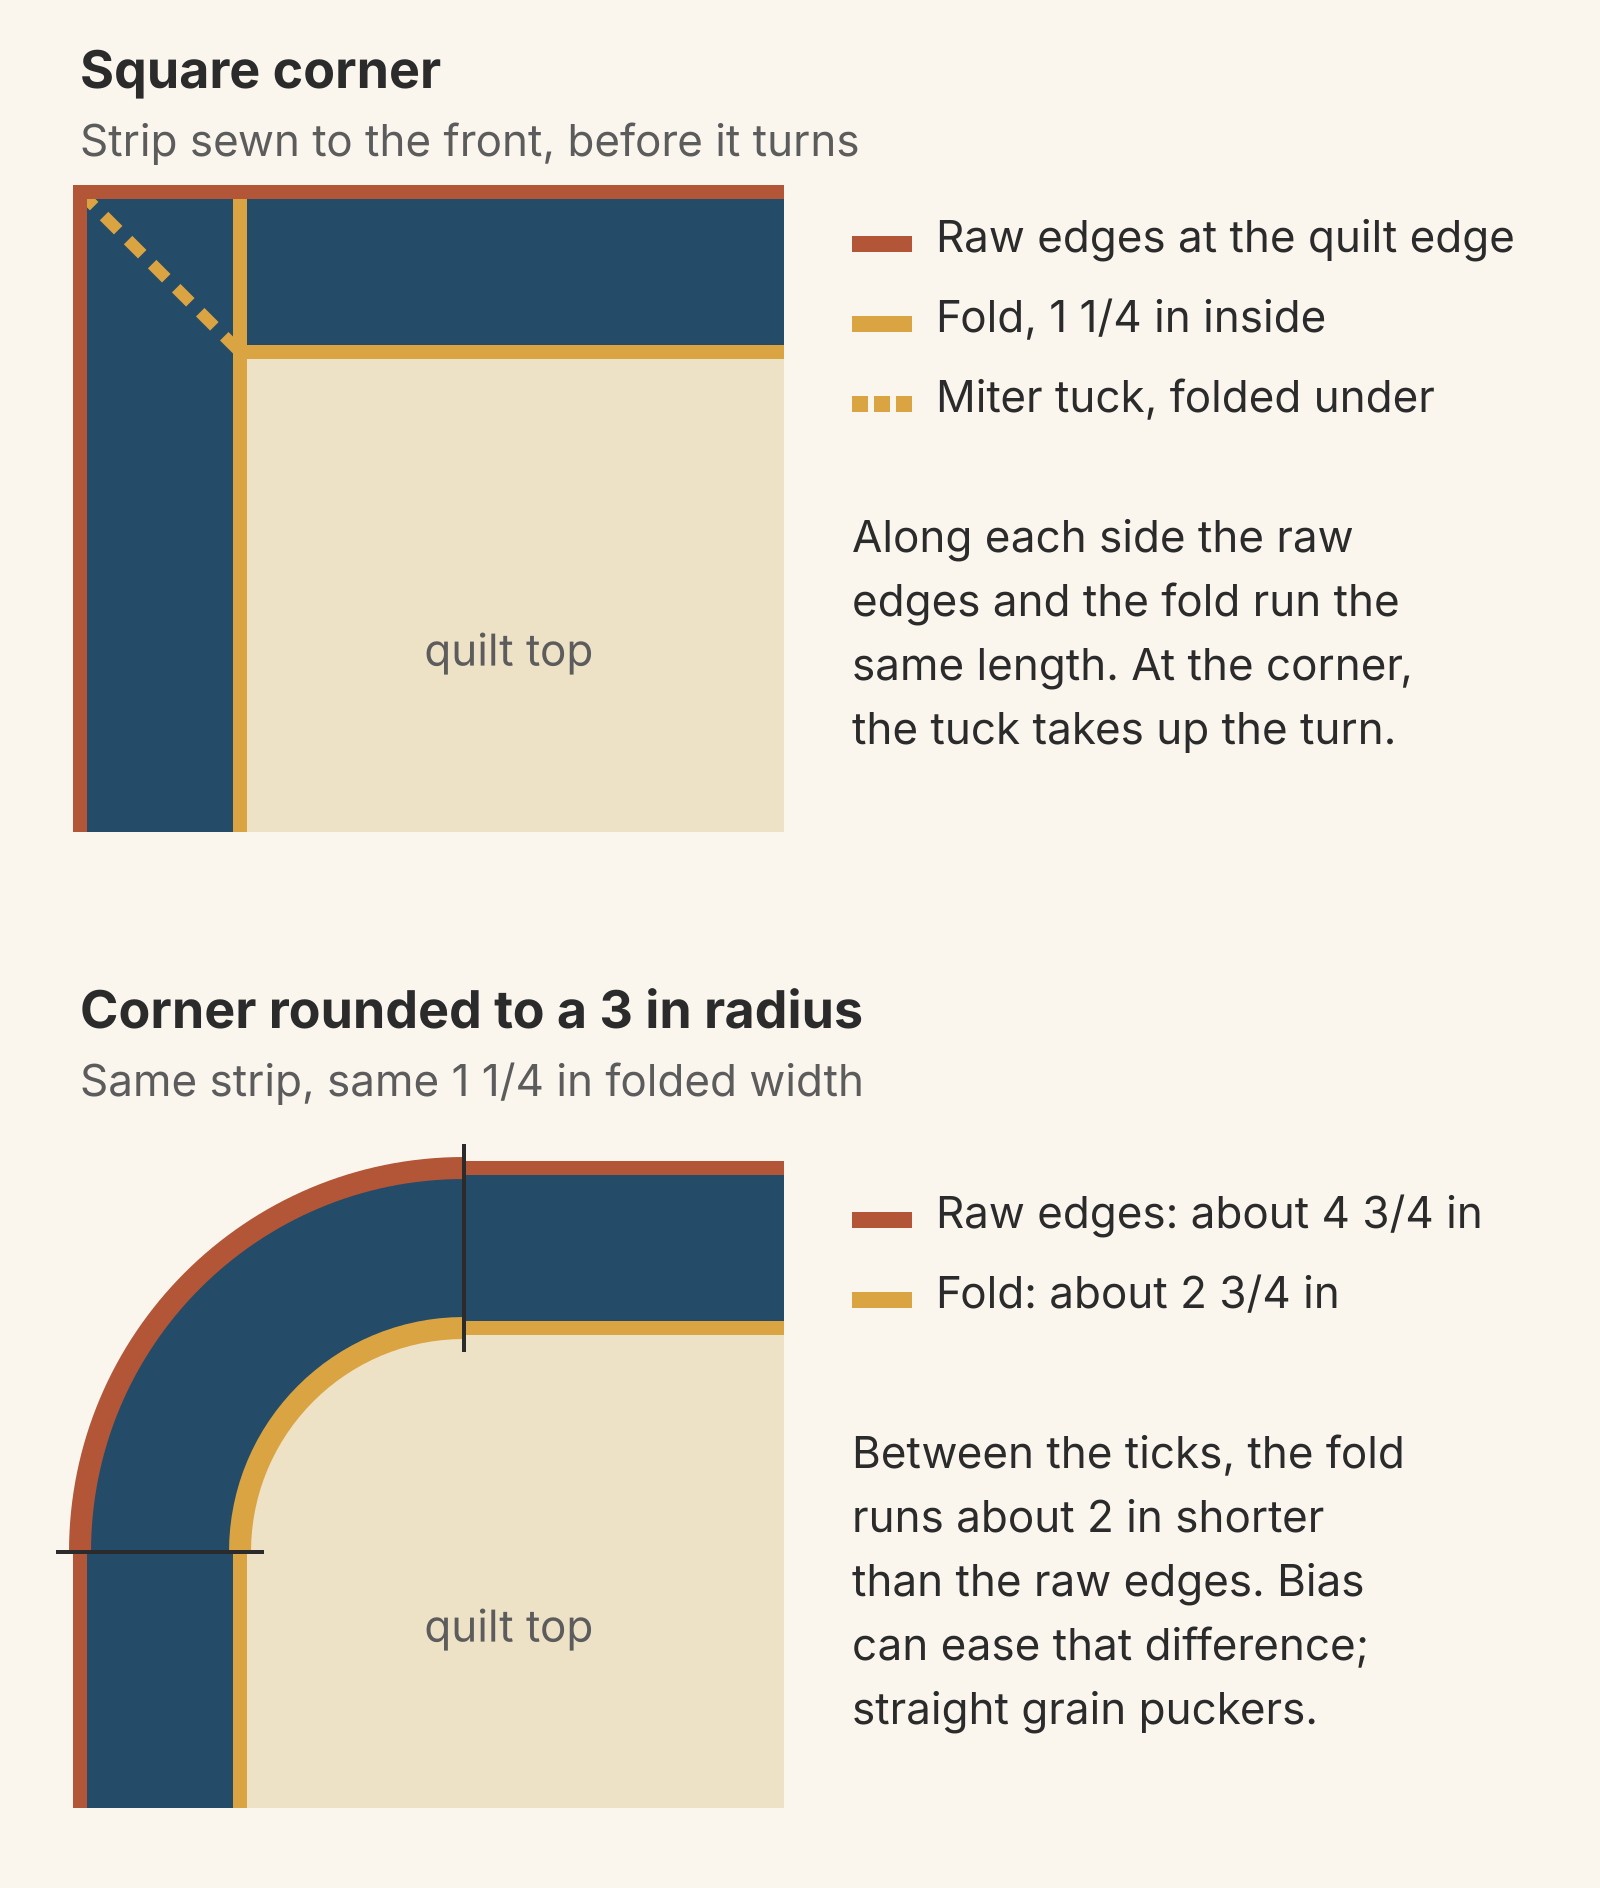
A straight-grain strip can't make that change. Its threads run along the strip and barely lengthen or compress, so the fold ripples and the corner cups or puckers. On the bias, every thread crosses the strip at 45 degrees, and the weave can shift so one edge eases in while the other stretches. Webster puts it plainly: "Quilts with a curved edge need a little more flexibility from the binding in order to lay flat." Amy Smart says the same about her plate-traced corners in How to Finish a Quilt with a Bias Binding at Diary of a Quilter: "This will only work with bias strips because they have some stretch!"
The 2 in difference comes from the 90-degree turn and the strip's folded width, not from the radius. A gentler 6 in radius spreads the same 2 in over a longer arc, so it's easier to ease, but it's still a curve that calls for bias. On an inward curve, such as the dip between two scallops, the difference reverses: the fold has to be longer than the raw edges. Bias handles that direction too. If you'd rather not bind a scalloped edge at all, a facing finishes it with no frame on the front.
Does bias binding last longer?
The usual case for cutting bias on every quilt is wear. Tauke reports that many quilters believe the crossed fibers on the outer fold make a longer-lasting edge, because "stress and abrasion aren't placed on only one or two warp fibers" as they are on straight-grain binding. Smart lists "added durability" as a benefit too.
The one test we found points the other way. Madison Moyer at Sewing by Sarah rubbed a straight-grain and a bias sample, cut from the same printed cotton, 50 times with 240-grit sandpaper in Straight Grain vs Bias Binding: What Happens Under Abrasion?. The straight-grain sample held its weave together better. It was one sample of each in a deliberately harsh test, and she writes that it "does not declare one universally better than the other."
So treat wear as unsettled. On a straight-edged quilt, choose by the look you want and the cutting you're willing to do.
Stripes and plaids: grain changes the look
Grain matters to the eye as much as to the edge. Take a stripe printed parallel to the selvage:
- Cut crosswise, the stripes cross the strip as short bars.
- Cut lengthwise, they run along it. The front of the binding shows only a narrow band of the strip, so you may see one solid line.
- Cut on the bias, they turn diagonal, "similar to a barber pole," in Webster's words.
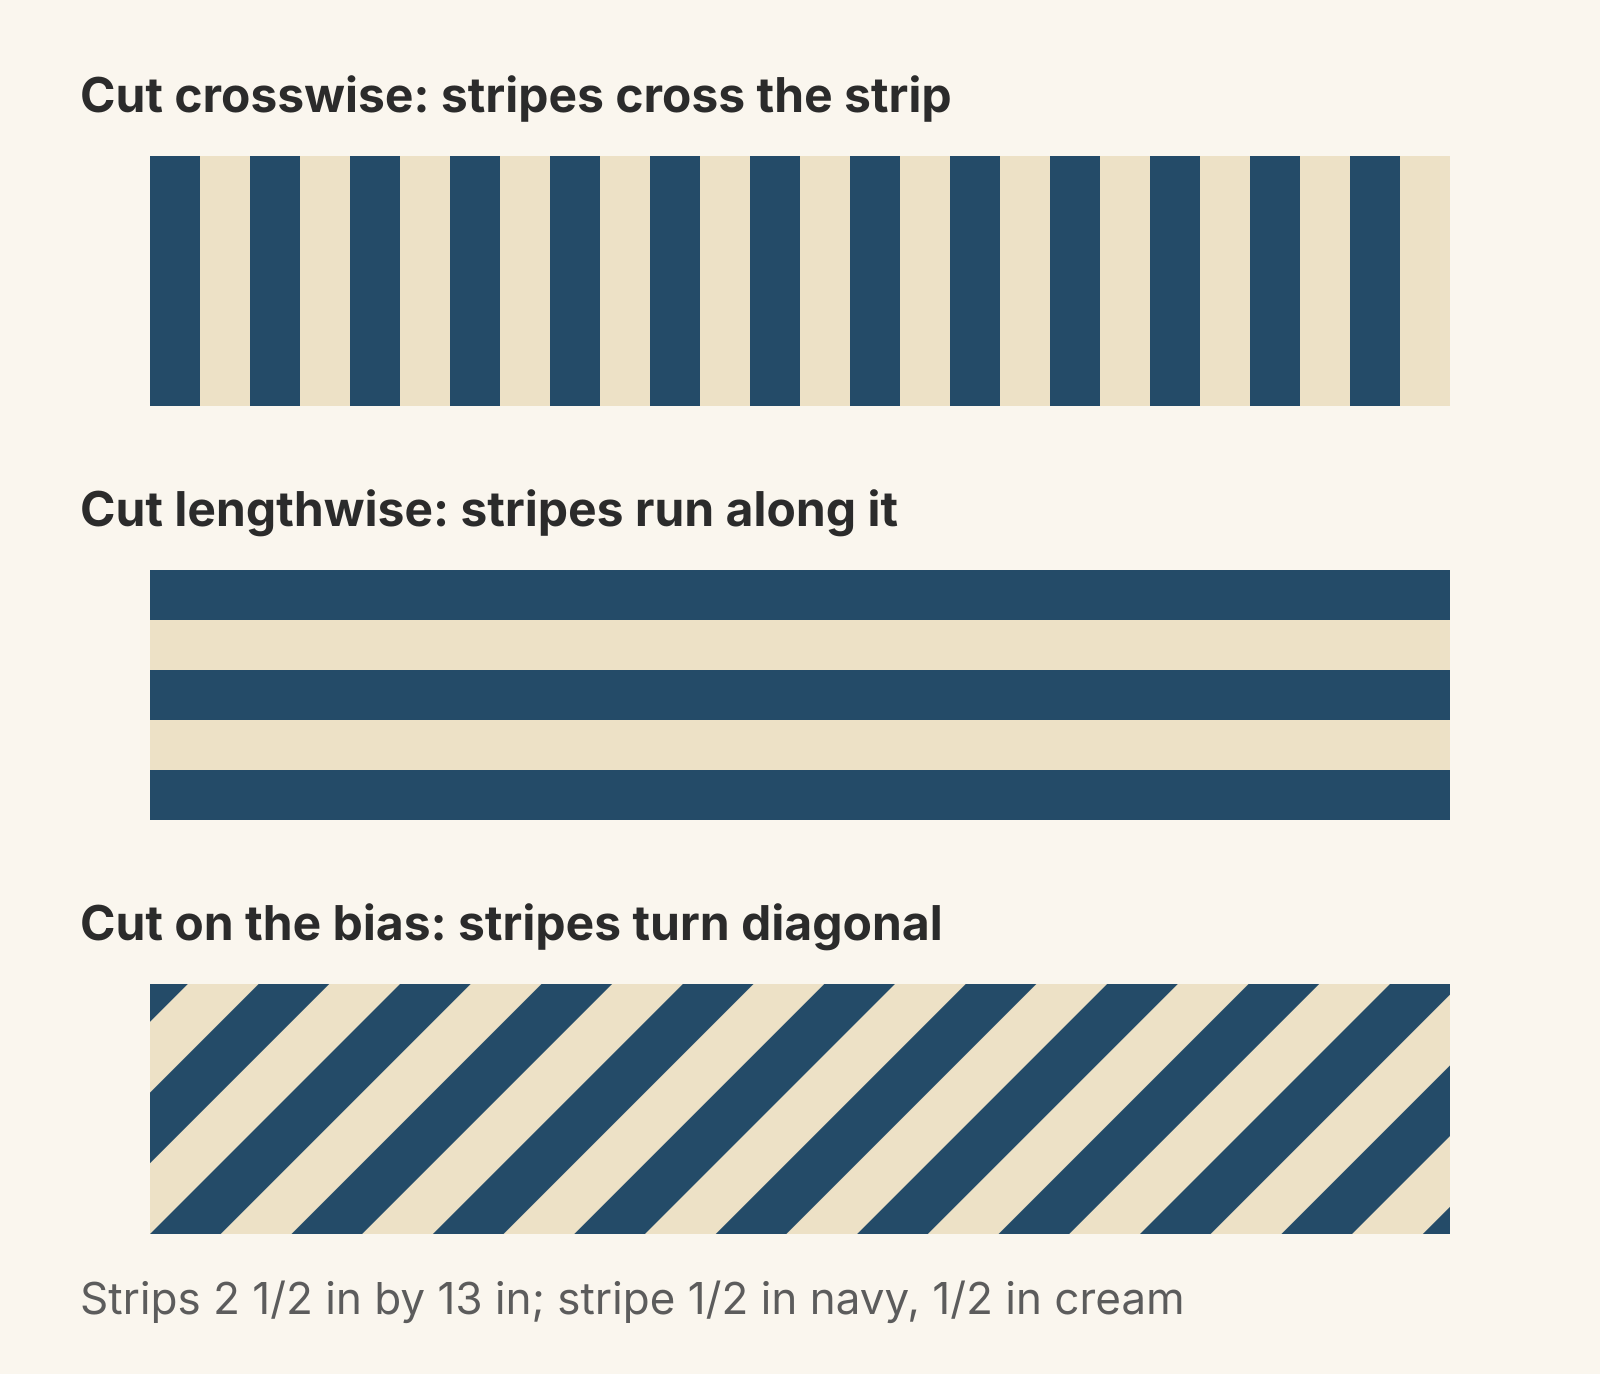
Tauke suggests straight-grain stripes to accent the outer edge and bias for a "peppermint-twist diagonal stripe." Plaids and checks behave the same way: on the bias, the squares turn into diamonds. A stripe you want diagonal is the clearest design reason to cut bias for a quilt with straight sides.
What bias costs: a worked example
Here's the trade in numbers for a 60 x 72 in throw with 2 1/2 in strips. Our backing and binding guide works the binding out at 276 in: the 264 in perimeter plus 12 in for corners and the final join.
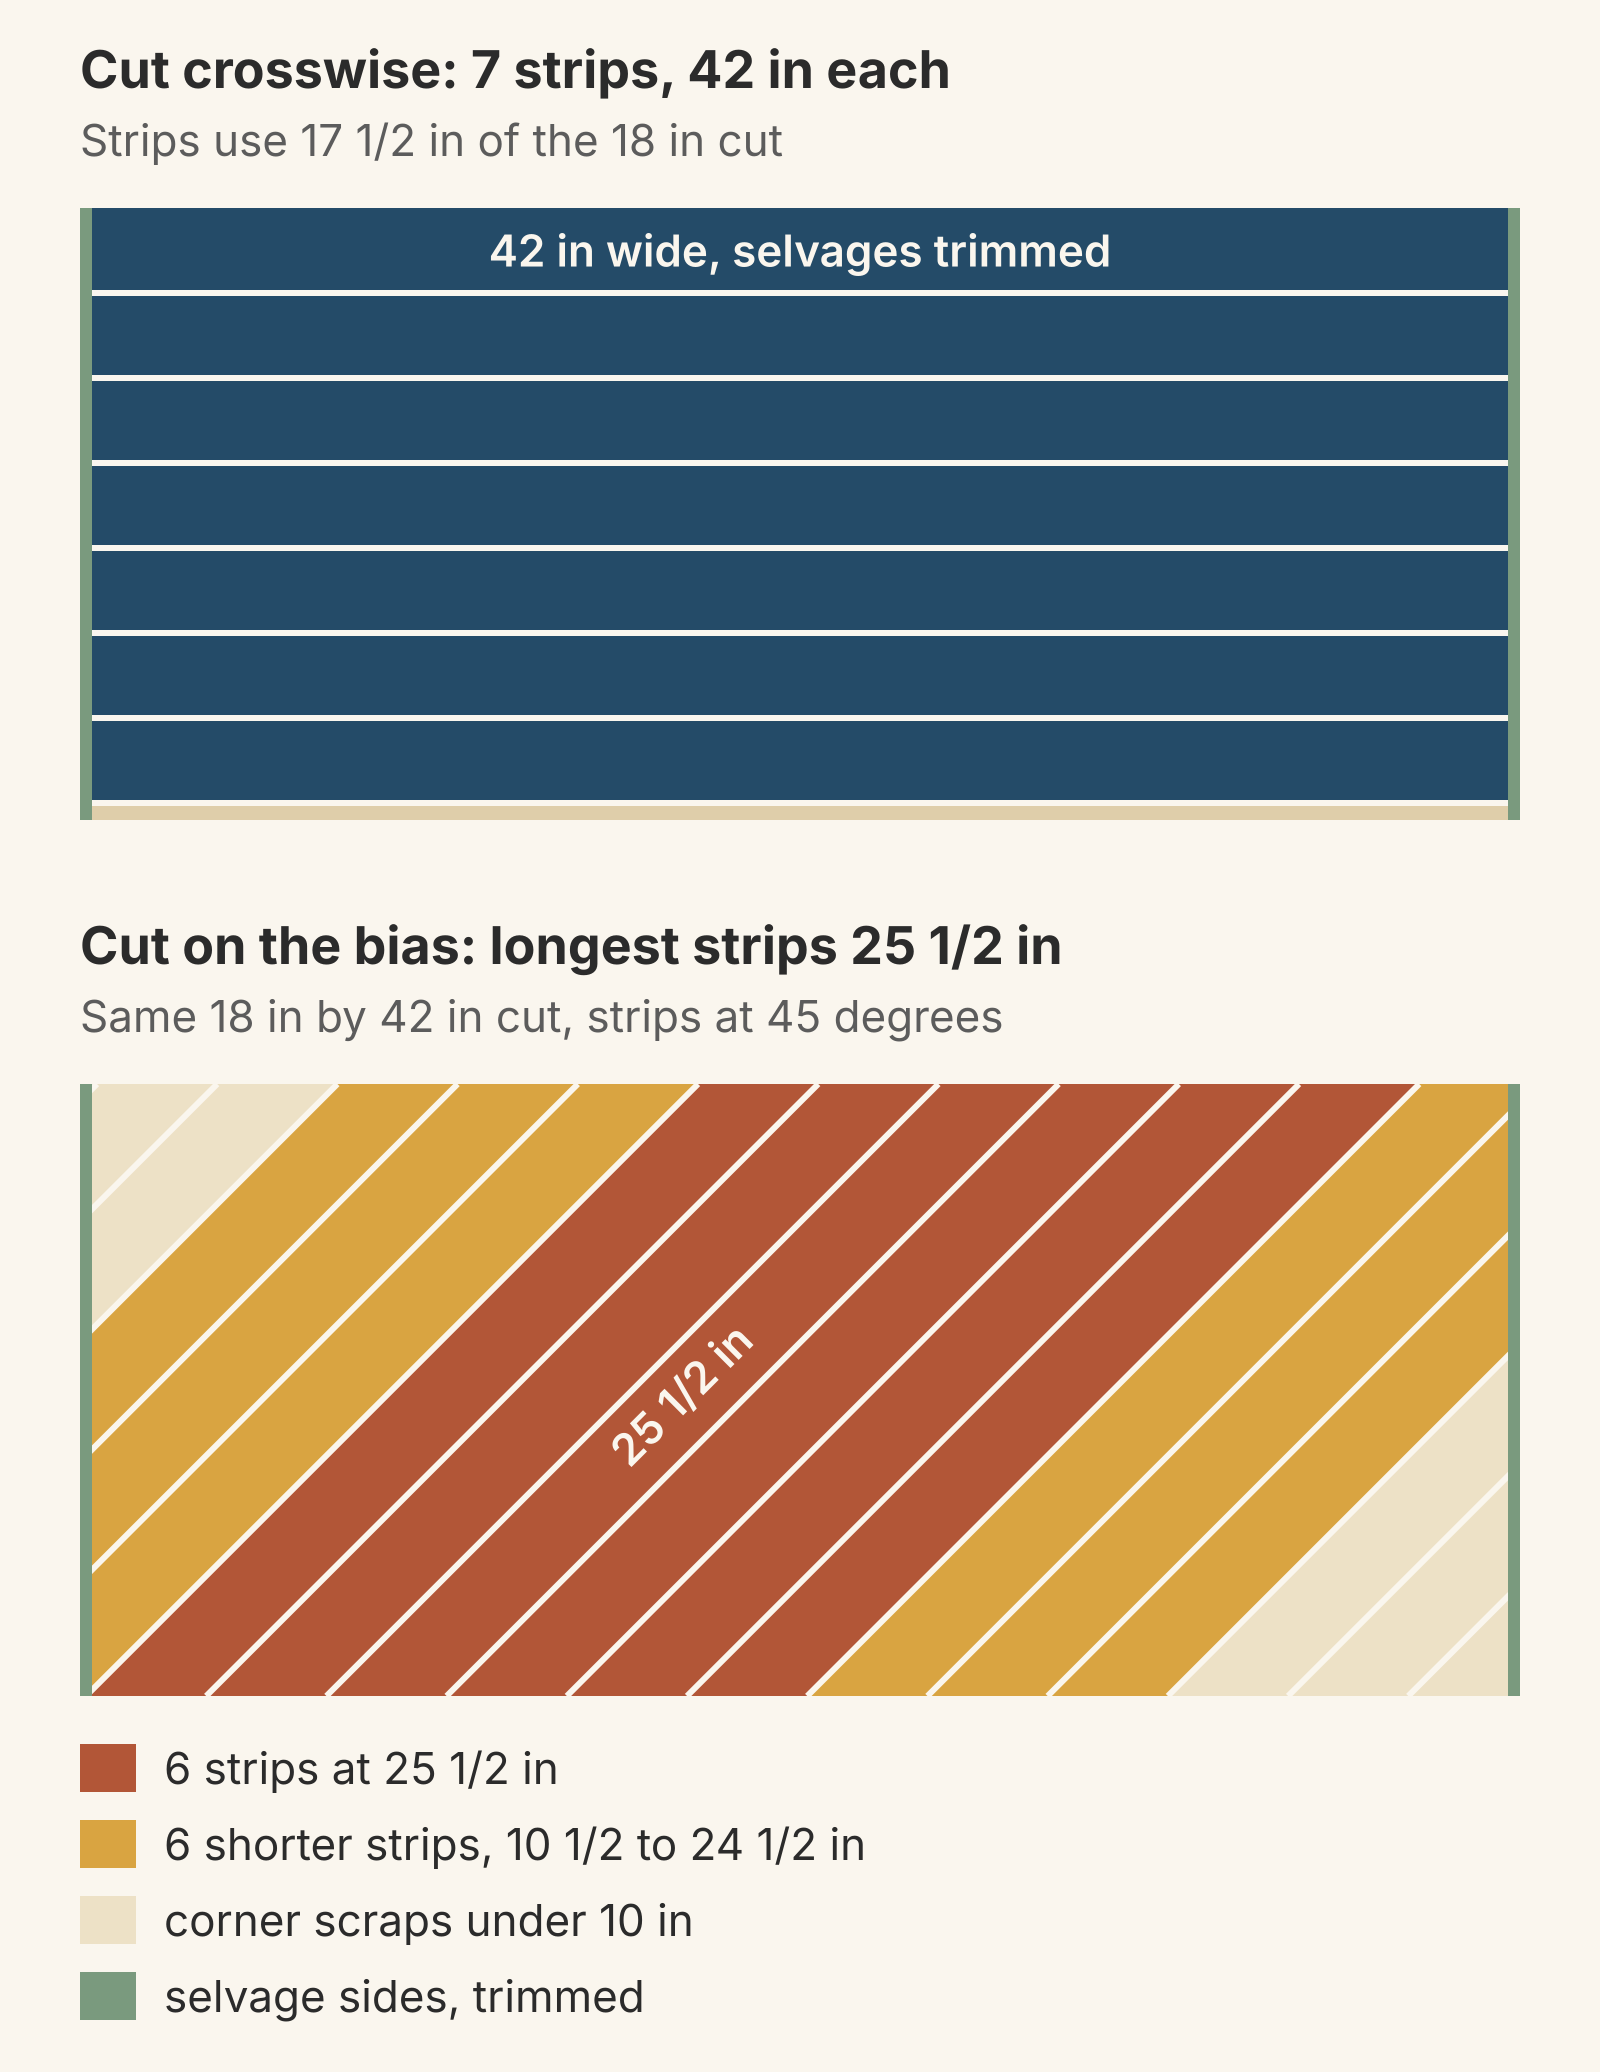
Straight grain from 1/2 yard. That guide counts 40 in per crosswise strip once the joins are allowed for, so seven strips give 7 x 40 = 280 in. They take 17 1/2 in of an 18 in cut, so 1/2 yard is enough.
Bias from the same 1/2 yard. A 45-degree line across an 18 in cut is 18 x 1.414, or about 25 1/2 in, so that's the longest strip you can get. Cutting from one corner of a single layer, the piece gives 6 strips at 25 1/2 in, 6 shorter strips from 10 1/2 to 24 1/2 in, and corner scraps. That's about 257 in before joins. Bias ends already sit at 45 degrees, so each join is a 1/4 in seam across the ends and uses less than 1 in. Allow 1 in per join and you're left with about 245 in, roughly 30 in short.
Bias from 5/8 or 3/4 yard. A 22 1/2 in cut (5/8 yard) gives strips up to about 31 3/4 in, and 11 of them make about 287 in after joins. A 27 in cut (3/4 yard) gives strips up to about 38 1/4 in and needs only 9 of them for about 293 in.
So for this throw, plan on 5/8 yard for bias where 1/2 yard covers straight grain, or 3/4 yard for more margin and fewer joins. Counting the final join, you'll sew 11 joins on the 5/8 yard plan instead of 7. Rounding all four corners to a 3 in radius shortens the edge by about 5 in; keep the full 276 in as margin.
You'll need a ruler with a 45-degree line for the first cut. Our ruler guide compares rulers by size, markings and grip.
Handle bias without stretching it
Bias gives while you work, which is the point on a curve and a nuisance everywhere else.
- Press without sliding. Lift the iron and set it down. Webster warns that "it is VERY easy to stretch the bias" and presses on a flannel-covered board so the fabric grips.
- Stiffen before cutting. Tauke suggests a light spray of sizing or starch on the fabric before you cut to reduce distortion.
- Pin closely on curves. Webster pins about every inch around a curve. Smart recommends a walking foot for bias binding.
- Don't pull on the straight sides. Lay the strip down without tugging. Stretch you sew into a bias strip stays in the edge.
Choose before you cut
Work through these in order and stop at the first yes:
- Does any edge curve? Cut bias.
- Is the binding a stripe or plaid you want to run diagonally? Cut bias.
- Do you have a long piece left over, more than 1 1/4 yards? Lengthwise straight grain gives you longer strips.
- Otherwise, cut crosswise straight-grain strips.
If you chose bias, buy more fabric than the straight-grain count says.
Next step: measure the edge
Add up the four sides of the finished quilt, then add 12 in for the corners and the final join. That's the binding length to cut for. For the strip width, see how wide to cut binding strips for your batting. If you laid the quilt out in QuiltLab, the Quilt Editor shows the finished dimensions beside the Layout heading in Properties. QuiltLab doesn't calculate binding, so the strip math is yours.
To see a binding fabric beside the top before you cut, go to Borders, choose Add border, give it a narrow finished width and choose the fabric. A border has no setting to turn the fabric, so it won't show a stripe cut on the bias. Border widths add to the overall quilt size, so note the finished size first.
Quilt Editor: arrange blocks and fabric →Read finished dimensions and add bordersRelated posts

How to Design a Bargello Quilt: Plan the Wave on Paper
A bargello wave is a staircase of stepped columns. Number your strips, write one row per column, and see how column width turns a zigzag into a curve.

Borderless Quilt Design: Plan an Edge That Looks Finished
With no border, the outer blocks and the binding make the edge. Compare whole and halved motifs on one 48 x 60 inch quilt, then pick the binding color.

Crosshatch Quilting: How to Make the Lines Meet at the Edges
Space a 45-degree crosshatch so the lines meet in a V at every edge and corner. Choose the edge step first, mark dots around the quilt, then connect them.