


Stitch in the Ditch vs Echo Quilting: Which Should You Use?
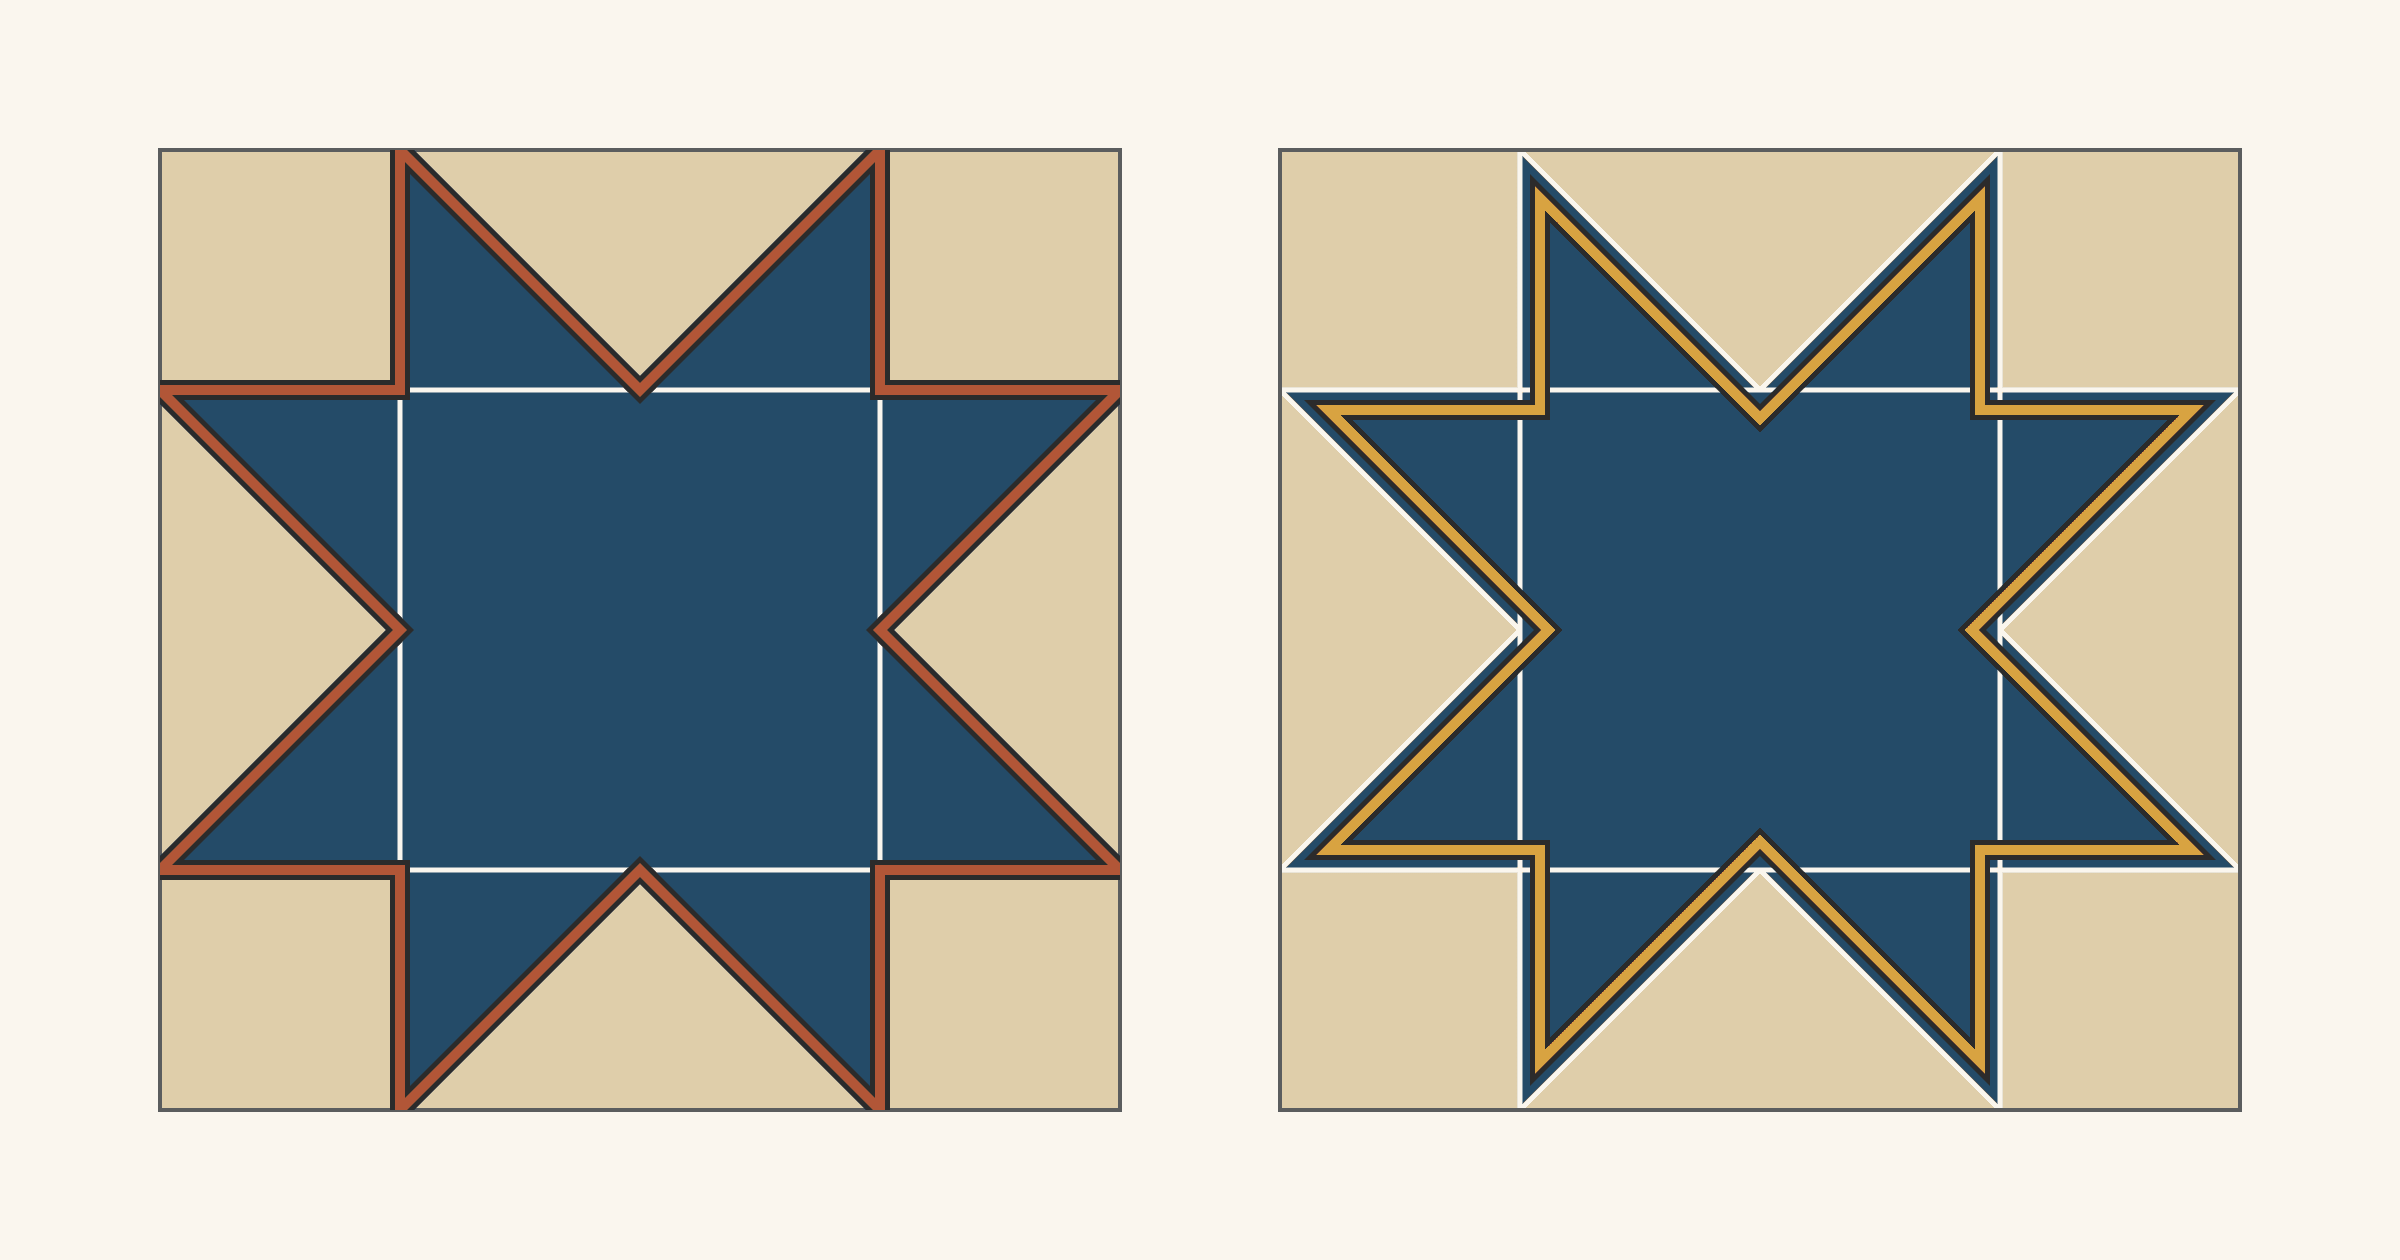
Stitch in the ditch runs right in the seam, on the low side away from the pressed seam allowance, so the stitches nearly disappear and the piecing does the talking. Echo quilting runs beside the seam, usually 1/4 inch away with the presser foot as the guide, so the stitches show and outline each shape. Linda Griepentrog's quilting primer for the American Sewing Guild sums up the difference: the ditch holds the layers "without creating new design lines," while an echo lets you "highlight the shapes you've intricately pieced."
Choose the ditch when you want the quilting to vanish and your seams are pressed to one side. Choose a 1/4-inch echo when the seams are pressed open, when strong contrast would show every miss, or when you want a shape outlined. If you can't decide, echo inside the shapes you care about most. The foot gives you a guide, and a small wobble stays on one fabric.
Below, one 12-inch Sawtooth Star gets three paths: the ditch around the star, an echo inside it and an echo outside it. We drew these diagrams for this article and haven't sewn them.
How each one looks on the finished quilt
A ditch line sinks into the seam, so from the front you see the patchwork and very little thread. Angela Walters writes on her site, Quilting Is My Therapy, that "the best stitching in the ditch is the kind that you don't even notice" (her four ditch tips). The quilting holds the layers and adds a little texture, but the shapes come from the fabric alone.
An echo is a line you are meant to see. It repeats the piecing in thread, 1/4 inch inside or outside a shape. Christa Watson calls the straight-line version "Linear Echoes" in her book Machine Quilting with Style. She stitches them around the patchwork "to help outline the piecing design and make it pop" (her quilt-along post). In that post her lines sit about 1/4 inch apart, spaced with her quarter-inch foot.
An echo also changes the shape it repeats. Inside a star it draws a slightly smaller star with shorter points, because the line has to turn before it reaches each tip. Outside the star it draws a line in the background, and as you'll see, that line can't get around the tips.
Thread works differently too. A ditch line sits on the border between two fabrics, so a colored thread can match only one of them. When a seam joins black to white, Walters usually matches the lighter fabric, which she calls a personal preference. An echo 1/4 inch inside the star sits only on the star fabric, so a thread that matches the star blends in and a contrasting one reads as a deliberate outline.
Where the needle goes for each
| Stitch in the ditch | Echo 1/4 inch | |
|---|---|---|
| Needle position | In the seam, on the low side | 1/4 inch from the seam |
| Seams pressed open | Not advised | Works |
| What shows from the front | Almost nothing | A second outline |
| Room for a wobble | Almost none; a miss lands on one fabric | Up to 1/4 inch, though uneven spacing shows |
The ditch has no margin
The Quilt Show's Quiltipedia defines the ditch as "the low side of a seam or where there is no seam allowance fabric under the block component" (What is stitch in the ditch?). When an allowance is pressed open there is no low side, and the same entry says ditch quilting then isn't advisable: you'd only be stitching on the threads of the seam line. Walters' fix for an open seam is to stay just beside it, on the fabric that matches your thread.
Check every seam before you start. Around a star, some allowances may be pressed toward the points and others toward the background, so the low side can switch from one seam to the next. If you're still piecing, our guide to pressing seams open or to the side shows how a ditch plan changes the choice.
Once the needle leaves the seam, the stitches land on one fabric or the other. In a National Sewing Circle lesson, Ashley Hough points out that a dark thread drifting onto a light fabric shows, and so does light thread on dark. Between strongly contrasting fabrics, the lesson says to stitch slowly. Matching thread forgives a lot; Walters says it "will cover a multitude of quilting sins."
The echo has a guide but no seam at the corners
An echo has a physical guide: the edge of the foot runs along the seam. The ASG primer describes this as using "the presser foot width to keep your quilting lines an even distance from the piecing seams." Before you trust your foot for 1/4 inch, stitch beside a seam on a scrap and measure the gap.
Open seams are no problem, because the needle never has to find a low side. Rachel Hauser's stitch-in-the-ditch guide at Craftsy points quilters with pressed-open seams to outline quilting just beside the seam, and adds: "once you've chosen a side, stick with it."
A wobble smaller than 1/4 inch stays on the same fabric, but the line is visible, so it shows as spacing that widens and narrows. A crooked seam matters too. An echo guided by the foot copies the crooked seam; an echo marked with a ruler stays straight, and the gap shows the crooked seam instead.
The harder part is turning. The echo's corners sit inside a patch, where no seam tells you to pivot. That's where the star example helps.
One Sawtooth Star, three quilting paths
The block is a 12-inch finished Sawtooth Star: a 6-inch center, four 3 x 6-inch flying-geese units and four 3-inch corner squares. It's the same block we colored three ways in our Sawtooth Star color placement article. Here the center and eight points are navy and the background is tan.
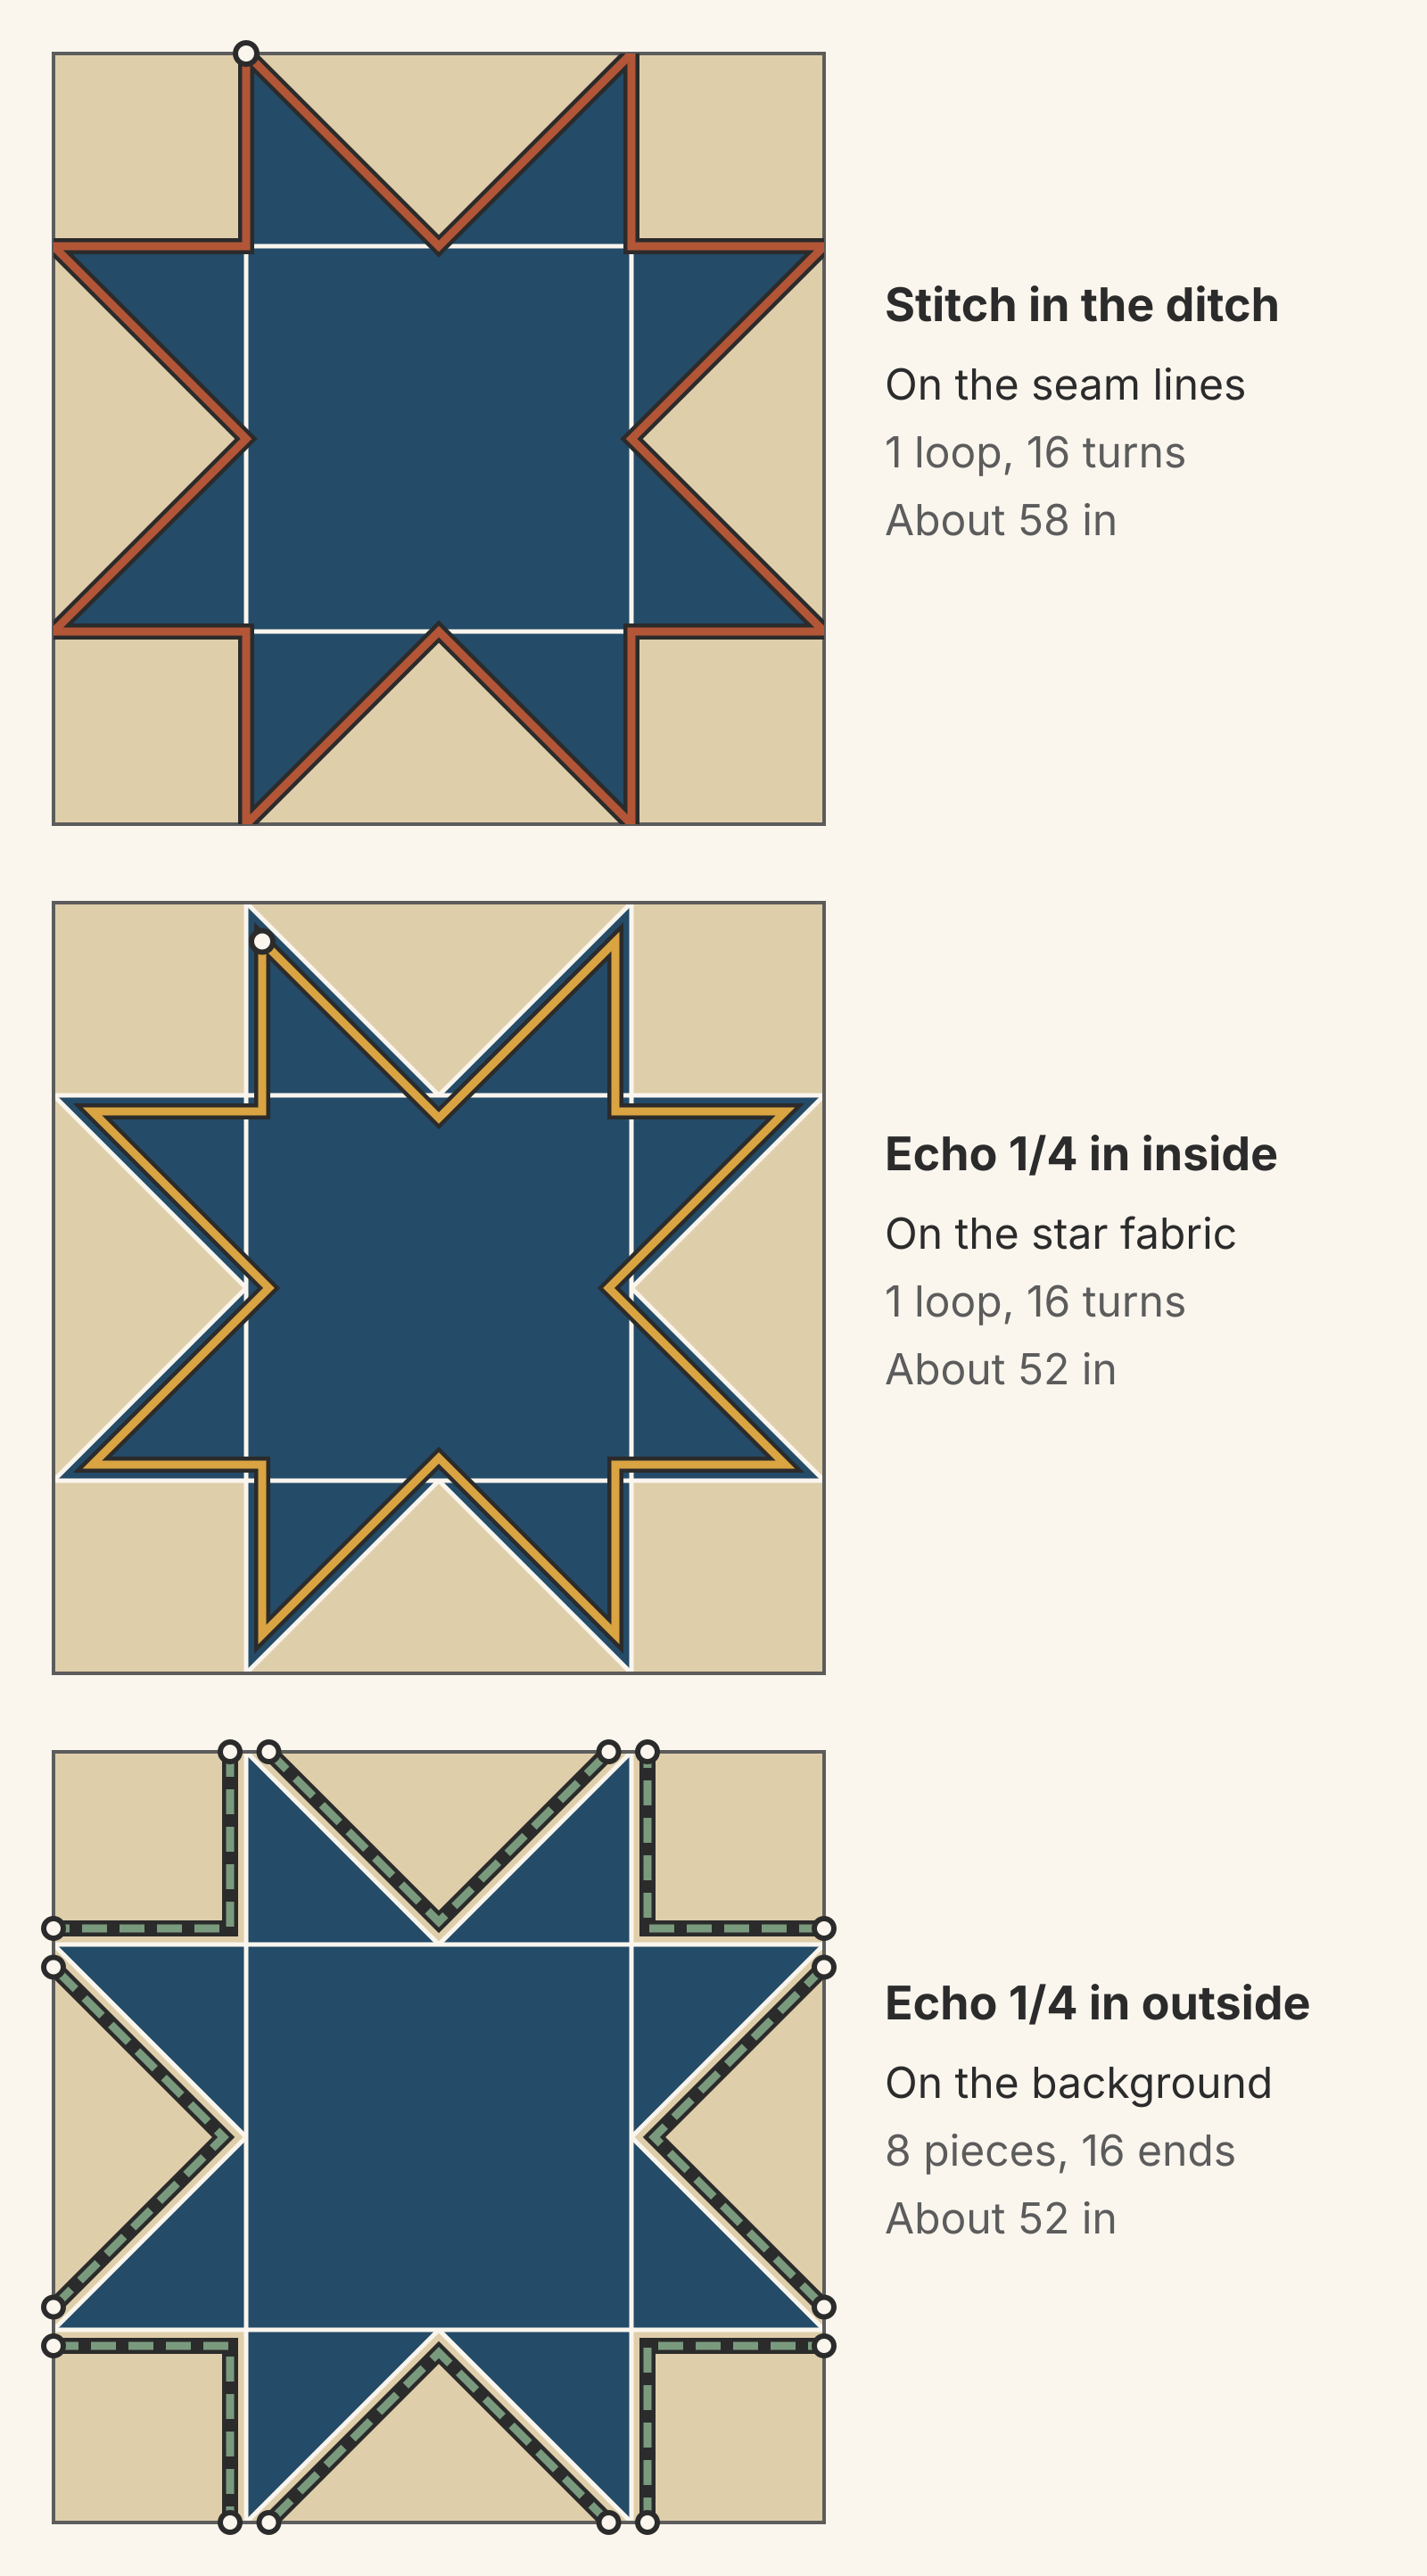
| Path | Where the stitches sit | Turns | Starts and stops |
|---|---|---|---|
| Ditch around the star | In the seams | 16, each at a seam point | 1 loop |
| Echo 1/4 inch inside | On the star fabric | 16, none on a seam | 1 loop |
| Echo 1/4 inch outside | On the background | 8 | 8 pieces, 16 thread ends |
The ditch loop follows eight 3-inch straight seams and eight goose seams of about 4 1/4 inches each, about 58 inches in all. Each echo comes to about 52 inches. Length isn't what separates them; the path is.
The ditch is one closed loop, and every turn falls where two seams meet, so you can see each pivot before you reach it. At the eight tips, that point sits right on the block's edge.
The inside echo is also one loop, but its 16 turns sit in open fabric. Eight are just inside the tips and eight are at the inner corners, where the points meet the center.
The outside echo can't wrap around the tips, because the tips touch the edge of the block. Going around one would carry the line into the next block. So it breaks into eight pieces: a V inside each goose and an L in each corner square, each starting and ending at the block edge. That's 16 thread ends in one block. The ASG primer suggests anchoring each end by shortening the stitch length to near zero, or pulling the threads to the back, knotting them and burying them.
If the blocks sit side by side with no sashing, those pieces meet the next block's pieces at the shared seam. Two Vs join into a diamond across the seam, and four corner Ls join into a 5 1/2-inch square around the point where four blocks meet. Next to sashing or a border, they stop at the edge.
Whichever path you choose, no line crosses the star's 6-inch center. Check that open space against your batting's spacing limit with our batting gap check before you settle the plan.
How far an echo turns before a point
An echo corner always sits back from the seam corner, and the sharper the point, the farther back it sits. The distance is the echo width divided by the sine of half the point's angle. For a 1/4-inch echo:
| Point angle | Where you'll see it | Echo corner sits back |
|---|---|---|
| 90 degrees | Corner of a square | About 3/8 inch (0.35) |
| 60 degrees | Point of a 60-degree diamond | 1/2 inch |
| 45 degrees | Sawtooth Star point | About 5/8 inch (0.65) |
On the Sawtooth Star, that means the inside echo turns about 5/8 inch short of each tip. The pivot sits 1/4 inch in from the straight side seam and about 5/8 inch below the block's edge (0.60 inch). The ditch line runs all the way to the tip.
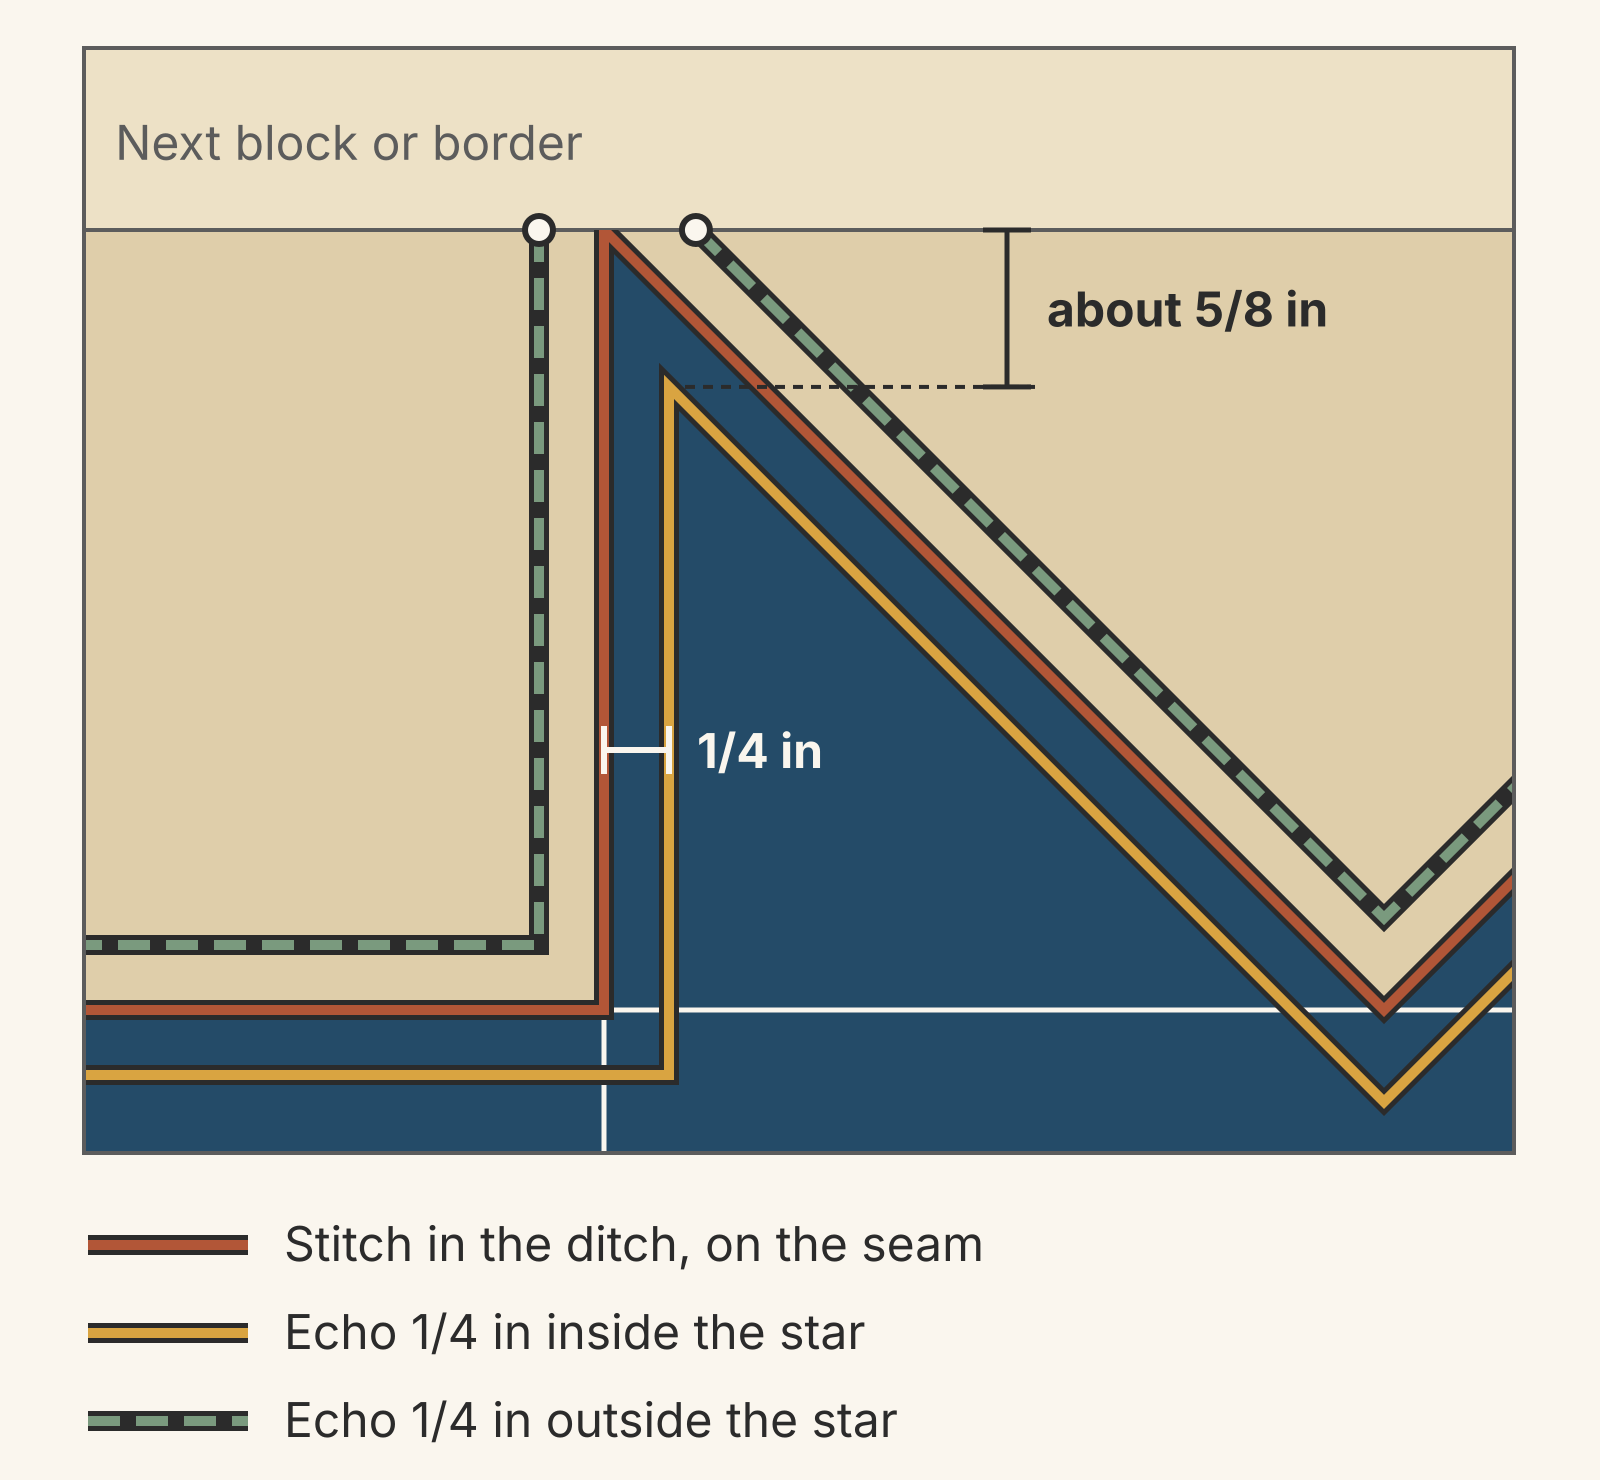
Nothing on the quilt top marks those pivots, so mark them. With a ruler and a removable marker, put a dot 1/4 inch from both seams at each of the 16 turns, then stitch from dot to dot. The eight dots at the tips matter most, because they sit farthest from any seam point.
When to choose each
Stitch in the ditch when:
- You want the quilting to disappear and the fabric to carry the design.
- The seams are pressed to one side, so there is a low side to aim for.
- The fabrics are close in value or busy enough to hide a small miss.
- You're anchoring the layers first. The National Sewing Circle lesson notes that ditch quilting can serve as basting before more detailed quilting, or be the only quilting on a project.
Echo 1/4 inch inside the shape when:
- The seams are pressed open.
- The fabrics contrast strongly, so a ditch miss would show.
- You want the star, or any shape, outlined in thread.
- The ditch makes you nervous. The ASG primer's advice: "If stitching in the ditch seems a bit scary, think about echo quilting."
Echo outside the shape when the background is where you want the texture, and you're ready for the starts and stops. It suits blocks set edge to edge, where the pieces link up into loops.
You can also combine them. Ditch the long seams between blocks first to stabilize the layers, then echo inside the shapes you want to show. If you'd rather quilt straight lines across the whole top, our straight-line spacing guide shows how far apart to sew them and how to keep them off the seams.
Plan your path before you mark
- Draw your block on graph paper, or print a copy.
- Sketch the ditch path in one color and the echo in another.
- Count the turns and the starts and stops for each, as in the table above.
- For the ditch, note which way each seam is pressed. For the echo, mark the pivots at every point.
- Try your favorite on a spare block or a small practice sandwich, with the thread you plan to use.
If you haven't settled on a walking foot or free motion for these lines, our walking foot vs free motion comparison covers that choice.
QuiltLab doesn't plan quilting paths, but it can give you a clean drawing of your block to sketch on. Draw the block in the Block Editor at its finished size, then choose Export PDF or Export SVG from the File menu and print it to draw both paths on.
Block Editor guide →Draw a block, set its dimensions and save it for your quiltsRelated posts

How to Design a Bargello Quilt: Plan the Wave on Paper
A bargello wave is a staircase of stepped columns. Number your strips, write one row per column, and see how column width turns a zigzag into a curve.

Borderless Quilt Design: Plan an Edge That Looks Finished
With no border, the outer blocks and the binding make the edge. Compare whole and halved motifs on one 48 x 60 inch quilt, then pick the binding color.

Crosshatch Quilting: How to Make the Lines Meet at the Edges
Space a 45-degree crosshatch so the lines meet in a V at every edge and corner. Choose the edge step first, mark dots around the quilt, then connect them.