


AI Quilt Design: Describe, Review and Edit in QuiltLab
AI quilt design becomes useful when you can inspect the proposed layout, change it in an editor and check the construction numbers yourself. A pleasing image is only one part of that process. You also need to know what was saved, how large the pieces are supposed to finish and which calculations remain yours.
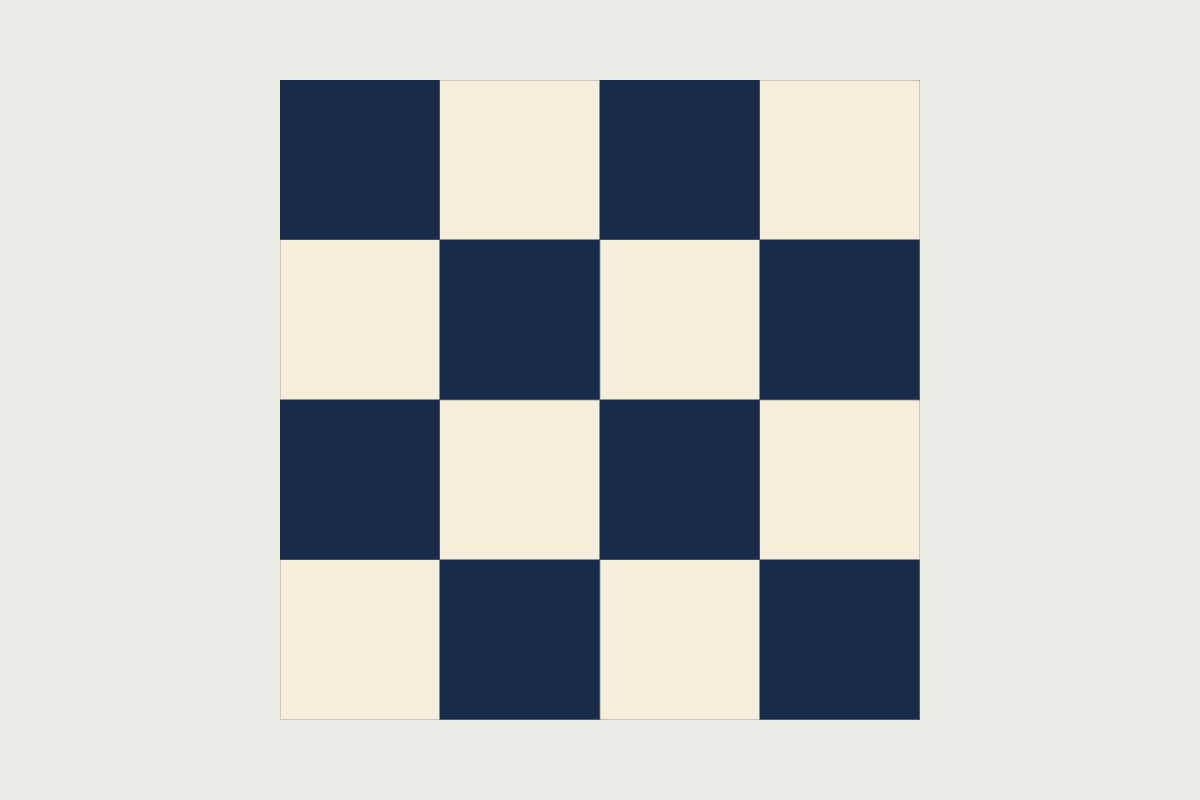
This walkthrough follows a real QuiltLab product check on October 10, 2026: one prompt produced a reviewable quilt proposal, which was applied, reopened, edited and exported. The result is a 24 x 24 inch design made from four Four Patch blocks. The pictured geometry is actual product output; it is not a sewn sample or a construction-ready pattern.
Give the assistant a brief it can be checked against
Open the QuiltLab assistant from the homepage or the Assistant control in the app. Sign in to send an AI request. State the destination, finished size, block count, palette and construction boundaries you want.
Here is the exact original request used for this example:
Propose a new personal 24 x 24-inch quilt of four 12-inch blocks using navy and cream. Name it Blog AI proof 2026-10-10. Use simple square patches and state which construction calculations need manual checking. Keep the proposed result ready for review before applying it; preserve existing designs.
The useful constraints are measurable: four blocks, 12 inches each, a two-color palette and a separate new personal design. Asking for the remaining construction checks also makes the division of work explicit.
For your own brief, add the restrictions that matter: no triangles, no border, only two fabric roles, or a particular maximum finished size. A specific request is easier to review than a request for something beautiful. Change the document name to one you will recognize later.
Treat the response as a proposal to examine. Repeating this prompt can produce a different result; this article records what happened in one product check rather than promising an identical design every time.
Review the proposed quilt before applying it
The assistant returned a 2 x 2 arrangement of 12-inch Four Patch blocks, with 6-inch finished patches, no border and no sashing. It explicitly left cutting allowances, yardage, backing, batting and binding for manual checks.
In the proposal, inspect the preview and use Review full quilt for a larger view. Read the destination and what Apply will create. For the demonstrated package, applying created the linked solid-color swatches, block design and quilt together, then opened the Quilt Editor.
Before applying, check four things:
- Identity: Is this a new design with the intended name and personal destination?
- Dimensions: Do two 12-inch blocks make the requested 24 inches in each direction?
- Geometry: Are there four equal square patches per block, with the intended color arrangement?
- Remaining work: Which construction details were left out or only suggested?
If a detail is wrong, ask for a revised proposal and inspect the new version. Apply only the version you intend to save. The proposal review controls that proposed write; it does not suspend the ordinary autosave behavior of another design you already have open.
Jen Strauser's firsthand account of designing a quilt with AI at Dizzy Quilter describes the Gotham Quilts team's movement from a generated graphic starting point to human design work, a pattern and sewn samples. It is a useful example of the work between inspiration and construction. Their project is separate from the QuiltLab example here.
Confirm the saved design in the editor
After applying, open the saved quilt and inspect its layout. Our product check showed Standard orientation, block width and height of 12 inches, two columns, two rows and a 24 x 24 inch finished area with four placed blocks. The saved document reopened with that layout.
The Quilt Editor guide explains layout controls and reopening personal quilts. Check the saved state before leaving the document: a preview in a conversation and a quilt reopened from your library are different evidence.
The check also confirmed editable dimensions. Changing the block width from 12 to 10 inches changed the overall design to 20 x 24 inches; restoring it to 12 and saving returned the design to 24 x 24 inches. That was a change in this saved example, not a claim that every assistant proposal supports every kind of edit.
Changing dimensions changes your construction plan. A four-patch block that finishes 10 inches wide and 12 inches high contains rectangular 5 x 6 inch finished patches if its two-by-two internal geometry scales with those dimensions. Recheck the actual block and its placements, and recalculate cuts; the old 6-1/2-inch square cutting plan would no longer describe that version.
If you want to revise the block's individual pieces, use the Block Editor guide. The broader QuiltLab tool tour explains how swatches, blocks and quilts fit together. This walkthrough focuses on the assistant-to-editor handoff rather than repeating that tour.
Inspect the real exported geometry
For the saved 24 x 24 design, choose File > Export SVG. In Export as SVG, select Solids, then Export SVG. That route was exercised in the product check.

The exported file contains sixteen patch polygons, grouped into four placed blocks: eight navy and eight cream. The four-by-four checkerboard continues across the block joins. The native SVG canvas is 768 x 768 pixels; that pixel size does not establish a print-at-100-percent cutting scale or include physical seam allowances.
Use the export to record the selected arrangement and colors. Keep a separate cutting plan with units and assumptions. For an image of a real sewn quilt, you would still need to construct and photograph one.
Independently check the square-patch cuts
The following calculation applies to the restored 24 x 24 inch design, using consistent quarter-inch seams and no border or sashing. It is an independently checked construction example, not an automatically supplied QuiltLab cut list or a sew-tested pattern.
A 12-inch finished Four Patch block has two patches along each side. Each patch finishes 6 inches square. Add 1/4 inch at both opposing edges, so each cut square is 6-1/2 inches.
Natalia Bonner's Four Patch tutorial at Piece N Quilt gives the same cut size for a 12-inch finished block: two light and two dark 6-1/2-inch squares. Her tutorial provides a useful construction reference; the four-block count below comes from our saved design.
| Item | Quantity | Finished size | Size before the next join |
|---|---|---|---|
| Navy patches | 8 | 6 inches square | Cut 6-1/2 inches square |
| Cream patches | 8 | 6 inches square | Cut 6-1/2 inches square |
| Four Patch blocks | 4 | 12 inches square | 12-1/2 inches square |
| Assembled top | 1 | 24 inches square | 24-1/2 inches square, raw |
Check one block before cutting the whole batch. Joining two 6-1/2-inch squares uses a quarter inch from each piece, so a pressed row should measure 12-1/2 x 6-1/2 inches. Joining two rows gives a 12-1/2-inch unfinished block. Two such blocks joined across a quilt row give 12-1/2 + 12-1/2 - 1/2 = 24-1/2 inches; the second row follows the same height calculation.
Julie Baird's quarter-inch seam test at Generations Quilt Patterns explains checking the pressed result with the fabric and thread you will use. A digital drawing cannot verify that physical seam. If your sample is too small, diagnose it before scaling the mistake across four blocks.
For an independent fabric example, suppose each prepared fabric has 40 inches of usable width, and you cut individual squares from width-of-fabric strips. One 6-1/2-inch-wide strip yields six 6-1/2-inch squares because 6 x 6-1/2 = 39 inches. Each color needs eight squares, so allow two strips per color: 13 inches of fabric length. A half yard, 18 inches, of each color exceeds that mathematical requirement under these assumptions.
Those extra inches are limited working room, not a guarantee against shrinkage, damage or cutting errors. Re-measure the usable width after preparation; a narrower piece or a directional print may need another layout. The calculation excludes backing, batting and binding. Use the actual top and your chosen quilting method with the backing and binding guide.
Use credits for decisions you want to explore
AI requests use credits. The amount varies with the request and model usage; a charge from one request is not a fixed price for designing a quilt. Read the current allowance and access details on pricing, and inspect the account's displayed usage before sending more requests.
You can make a follow-up brief more focused: keep the same dimensions and block arrangement while changing the palette, or ask for a revised proposal with a clearly named change. Review the proposed result each time. The example above establishes one successful personal quilt workflow, not universal access or unlimited generation for every account.
For ordinary size checks, use the saved editor controls. Reserve another assistant request for a design question you actually want help exploring.
Leave with a design and a list of checked assumptions
A useful outcome is a saved quilt you can reopen, an export of the chosen arrangement and a separate record of the construction decisions. For this example that record includes sixteen 6-1/2-inch cut squares, four 12-1/2-inch unfinished blocks and a 24-1/2-inch raw top under quarter-inch-seam assumptions.
If an answer proposes a new technique, an unfamiliar cutting formula or a feature you cannot find, pause that part and consult the published help or an appropriate quilting teacher. The assistant can help you explore a layout; your measurements, material choices and construction checks turn the reviewed design into a plan you can work from.
Related posts
QuiltLab Update: What the Editors Can Do Today (and a Correction)
An earlier version of this post announced pattern-recognition features that never shipped. Here's an accurate rundown of what QuiltLab's editors actually do today.
How to Write a Quilt Pattern: Pages, Diagrams and Testing
Turn a quilt design into a clear pattern with a page plan, checked quantities, useful diagrams and a testing process.
Draw Quilt Pattern Sewing Diagrams That Show the Next Action
Make sewing steps easier to follow with clear fabric orientation, distinct line styles, stable labels and measurable checkpoints.