


Draw Quilt Pattern Sewing Diagrams That Show the Next Action
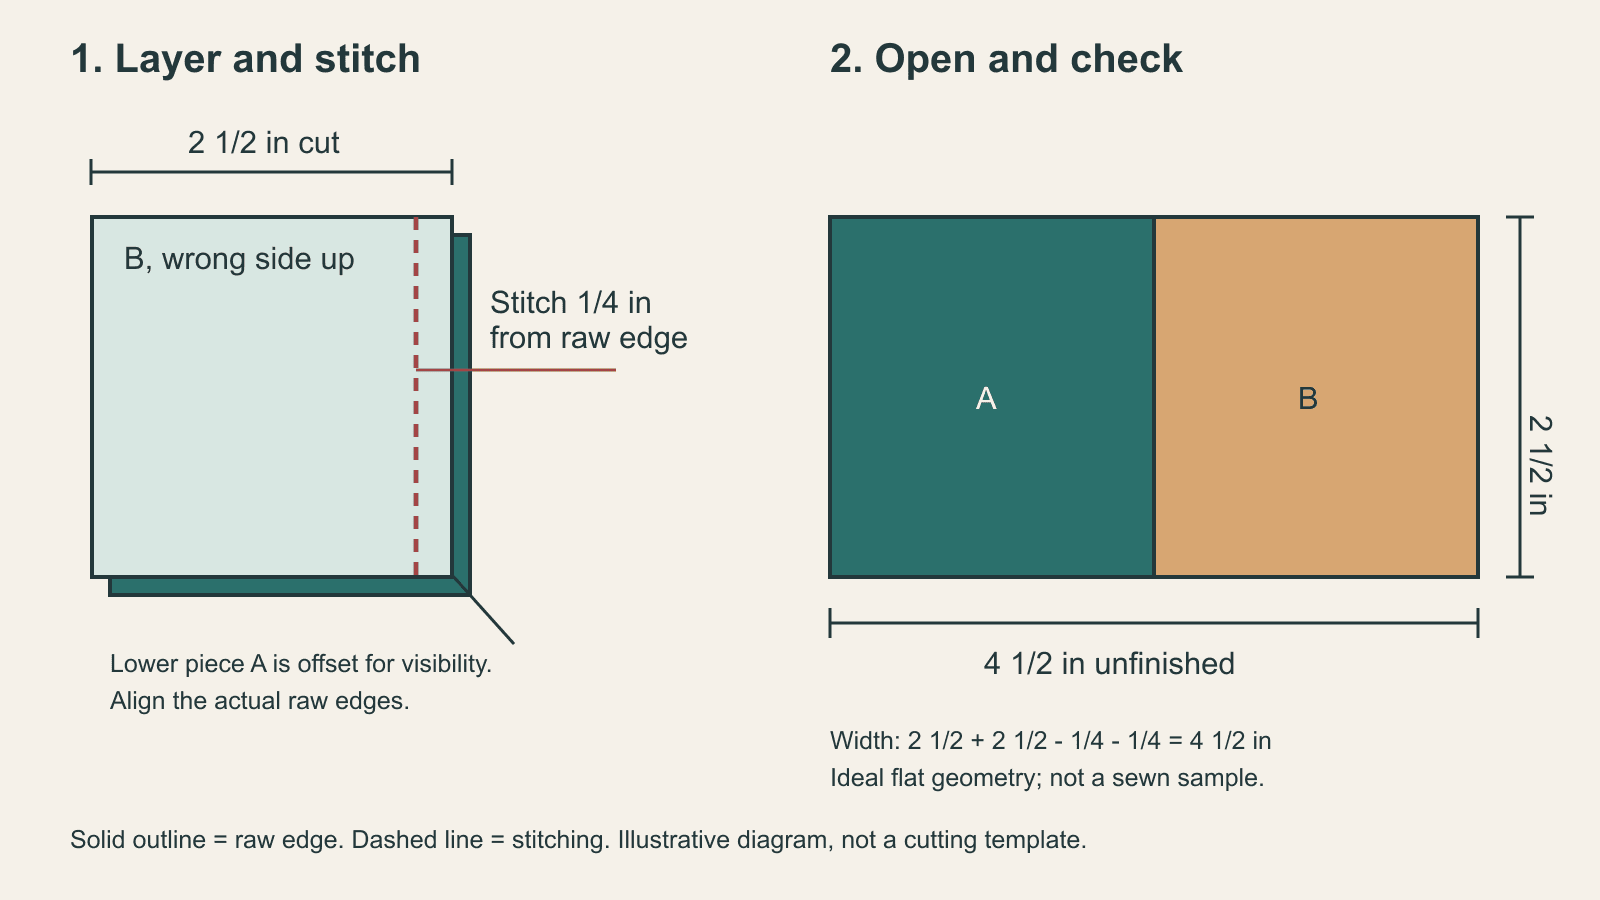
A finished block picture cannot explain every step that produced it. Useful quilt pattern sewing diagrams show the fabric as it looks at a particular moment, identify the next action and give the reader a way to check the result.
Begin with a small question: what could someone misunderstand in this step? It might be which side faces up, which edge gets stitched or whether a measurement includes seam allowances. Draw that answer. This guide uses an original two-square join as a communication and geometry study, rather than a tested quilt pattern.
Give each diagram one main action
Write the sentence the diagram supports before drawing it. For example: "Place A and B right sides together, align their raw edges and stitch the indicated edge using the specified seam allowance."
That sentence suggests the information the drawing needs:
- Two identifiable pieces, A and B.
- An indication of which surfaces face each other.
- The aligned edge.
- The stitching line and its distance from the raw edge.
- A separate view of the opened unit if its size is the next checkpoint.
Avoid putting layering, stitching, cutting, pressing and trimming into the same crowded view. Use a second diagram when the fabric's state changes. A new view should explain new information rather than repeat the same picture with another arrow.
Sherri McConnell discusses diagrams alongside written steps in her pattern-writing advice at A Quilting Life. Give both forms the same labels and sequence. Neither should require the reader to guess what the other means.
Separate fabric state from the final layout
A piece can appear in three different states:
| State | What the picture represents | Useful label |
|---|---|---|
| Cut piece | Fabric before this seam | Cut dimensions; A or B |
| Intermediate unit | Pieces joined, outer allowances remain | Unfinished dimensions |
| Finished layout | Visible area after surrounding seams | Finished dimensions |
Do not draw a finished unit and label it as an unfinished measurement check. A reader comparing their current fabric to the picture needs the size it should have now.
Make a simple visual convention for right side and wrong side. You might use a solid fill for the right side and a pale fill with a "WS" label for the wrong side. Explain it once near the first illustration. Color alone is unreliable: two prints may be similar, and readers may print in grayscale.
In a layering view, a small illustrative offset can reveal the lower piece. Label that offset as a drawing convention and instruct readers to align the real raw edges. Carli Marsico's diagram guidance at Guilty Quilty Studio recommends visible layering, outlines and intermediate measurements to make sewing steps easier to interpret.
Use a line key that matches the action
Different line styles should communicate different instructions. Choose your own key and keep it throughout the document:
| Line or mark | Meaning in this example | Reader action |
|---|---|---|
| Solid outline | Raw edge of a piece | Align or measure the named edge |
| Dashed line | Stitching line | Sew along it |
| Arrow with text | Direction or callout | Read the attached instruction |
| Separate measurement line | Distance between named edges | Measure that span |
Use a distinct style if the pattern also includes marking, cutting or trimming. Do not use the same dashed line for both "stitch here" and "cut here" without an unmistakable label. A color change does not solve that ambiguity in a monochrome printout.
Keep arrows short and direct. An arrow pointing vaguely toward a unit does not say whether to move it, rotate it, press toward it or stitch along it. Pair the arrow with a verb. If an operation needs several arrows, consider breaking it into separate views.
Check one original diagram with numbers
Consider two 2 1/2-inch cut squares joined along one edge with a 1/4-inch seam allowance. Before sewing, show two separate squares labeled A and B. In the layering view, show the wrong side of the top square and a narrow offset that identifies the lower square; state that the actual edges align.
The opened unit has a nominal unfinished width of:
2 1/2 + 2 1/2 - 1/4 - 1/4 = 4 1/2 inches.
Its nominal unfinished height stays 2 1/2 inches. The join consumes one allowance from each piece. Label the opened diagram 4 1/2 x 2 1/2 inches, unfinished, rather than showing only a 4-inch finished width. Those outer allowances are still present.
This is ideal flat geometry, not evidence of a sewn sample. Thread, pressing and fabric behavior can affect the measured result; the pattern's specified method still needs a sewing test. The calculation gives the author a consistency check before that test.
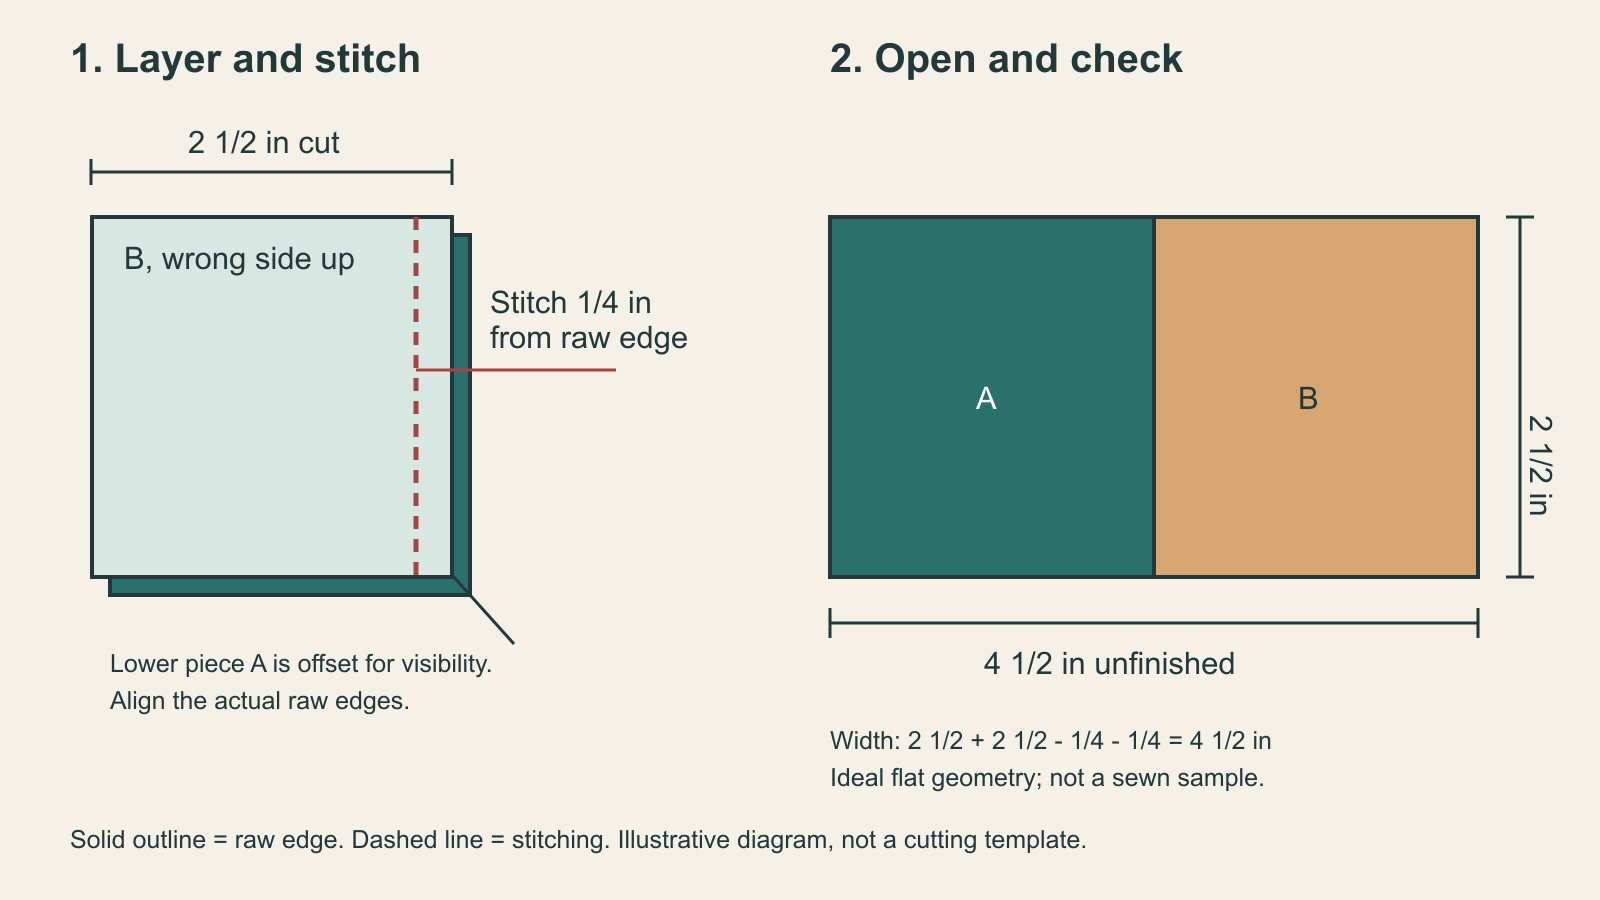
A common illustration error is to draw the joined width as 5 inches because the artist placed the two cut squares side by side without accounting for the seam. Another is to show 4 inches, the finished width after future outer seams, as the immediate measurement checkpoint. Either picture conflicts with the sewing stage.
Draw and save a diagram in QuiltLab
The Diagram Editor works with diagrams you open from the Diagram library or a diagram frame in Pattern Builder. To create one from a pattern, choose Insert > Asset to open Library > Assets, then New diagram. After saving and choosing Done, click the saved diagram's library row to insert its frame. Use Edit diagram on the frame to reopen it.
The Diagram Editor's Insert menu includes shapes, lines and labels. Current line choices include Drawn line, Stitching line, Cut line, Trim guide and Arrow; the label choices include Label and Callout.
Use the choices to build your drawing, drag elements to position them and double-click a label to edit its text. Give each action an explicit label even when you use the appropriate line tool. The editor's line names help you construct the illustration; your reader still needs the key used in the finished pattern.
The toolbar also has Seam Allowance and Dimensions controls. Inspect what they show for the selected geometry before relying on them in an instruction. A visual toggle cannot determine the appropriate cutting method or establish that your sewing sequence is correct.
Follow the Diagram Editor guide for editing, autosave and recovery. Save writes immediately; in the inline editor, Done saves pending changes and returns you to Pattern Builder. Wait for the save to finish before checking the pattern's diagram frame.
Draw and label a sewing step →Open a diagram, add elements and lines, save changes and return to your pattern.Check the diagram in its final document
An illustration can look clear at editor zoom and fail when reduced to a small frame on paper. Place it next to the matching step, then inspect it in the Pattern Builder document and exported PDF. Open Print preview, inspect the Review tab and Layout status, then choose File > Export PDF. The Pattern Builder guide explains document review and export.
Check the actual PDF, not just a saved thumbnail. Confirm that the outlines, stitching marks, labels and fabric distinctions survive export. Layout and export checks help identify document issues; they do not verify the craft meaning of a line or the correctness of a measurement.
Cait Lisle's technical-editing description distinguishes detailed mathematical and consistency checks from pattern testing. Keep that review separate from export: a successful download proves that the document was produced, while a reader and a sewing sample establish whether its instructions work.
Print one page at the intended size and examine it in black and white. Ask another person what action each illustration requests, which edges align and which measurement they would check. If they need your spoken explanation, revise the drawing or caption.
Use this final pass before repeating the style across the pattern:
- Does every picture state its sewing stage?
- Do piece labels agree with the table and text?
- Can the reader distinguish stitches from cuts?
- Do measurements describe named edges and the current unit?
- Is an illustrative offset clearly different from actual alignment?
- Are text and line weights readable on the exported page?
When those answers are clear, the diagram earns its space. It gives the reader the next action and an opportunity to catch a mistake before repeating it.
To place those diagrams in a complete document, our quilt-pattern writing guide connects the page plan, designer-filled tables, quantity checks and testing milestones.
Related posts
How to Write a Quilt Pattern: Pages, Diagrams and Testing
Turn a quilt design into a clear pattern with a page plan, checked quantities, useful diagrams and a testing process.
Eight at a Time Half Square Triangles: Batch Math
Plan eight-at-a-time half-square triangles with an oversized starting-square rule, a clear cutting sequence, and a 54-unit color-pair example.
Fussy Cutting: Plan the Motif Before You Cut
Frame the print, protect the seam allowance and count usable repeats. A four-inch square example, plus a QuiltLab preview before you cut.