


Make Bonus Half Square Triangles You Can Use
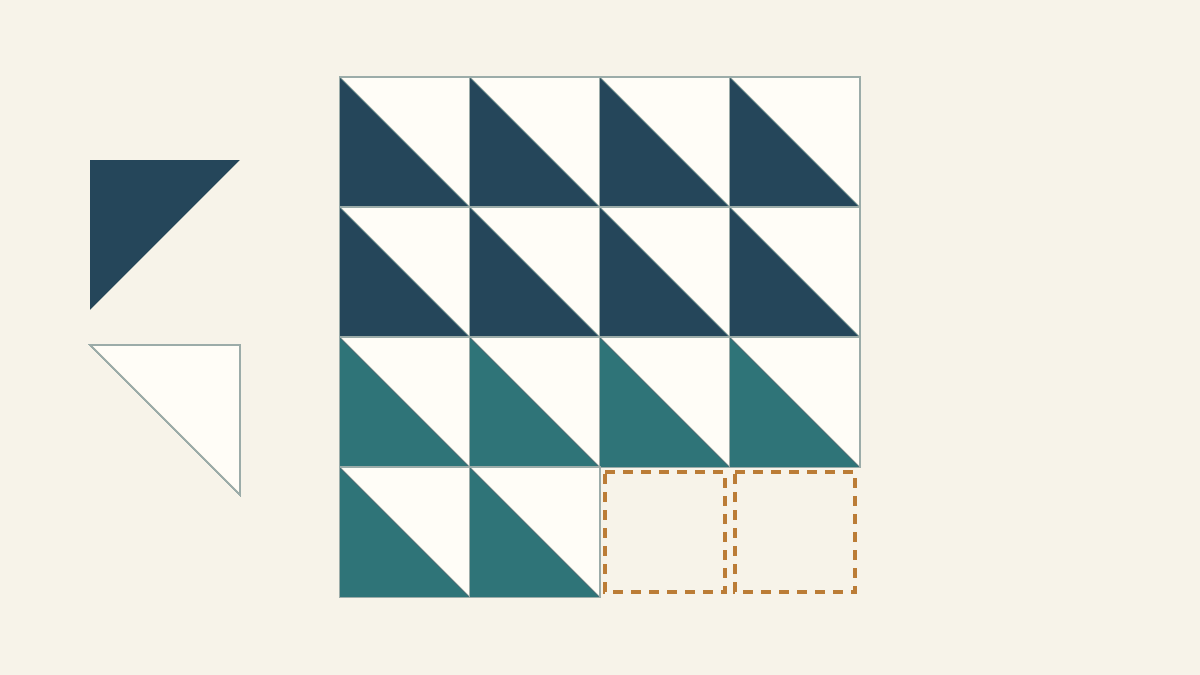
For a first bonus-HST project, choose one unfinished size and keep only pressed units that can be trimmed to it. Check that the full ruler square fits with its diagonal on the seam. Then count those accepted units toward a small layout; a bucket of corners isn't a block count yet.
Bonus half square triangles come from the corners removed during stitch-and-flip piecing, such as one-at-a-time Flying Geese. Sewing those layers together before trimming them off gives you another pieced unit. The useful question comes next: which ones fit the project you actually want to make?
Make a unit before you count it
Keep the main quilt's cutting and stitching instructions in charge. Julie Baird's connector-corner lesson describes adding a second seam toward the corner, then cutting between the stitching lines to make a bonus HST. Her lesson also recognizes that some parent units are too small to give a useful bonus.
Use one complete method for marking, sewing and trimming. Leanne Parsons at Devoted Quilter uses a target-size triangle template and credits Bonnie Hunter for the approach. That template places the second seam for a chosen size. It isn't interchangeable with measuring a fixed gap between two seam lines.
If your method specifies a gap between parallel diagonal seams, measure it at right angles to those seams. A half inch along the square's raw edge describes a different spacing. Don't move the main seam or reduce its required allowance to rescue a larger bonus.
Already cut the corners away? Keep the matching triangles together, but label them unsewn pairs. They become countable units only after sewing, pressing and checking. Two loose triangles and one completed HST are different stages of work.
Pick the unfinished size your next project needs
Check the size at which the unit enters the next seam. A 2-inch finished HST normally needs to measure 2-1/2 inches unfinished when it is joined on all four sides with quarter-inch seams.
For this example, our target is 2-1/2 inches unfinished. We'll use sixteen units in a small field. You might choose another target for a pattern you already own; keep that pattern's measurements and trimming instructions together.
Don't trim the whole pile to its smallest member automatically. You may turn useful larger units into an inconvenient size just to include one undersized corner. First find out how many units fit the size you want. Keep smaller units for a separate decision.
If the labels in a pattern seem inconsistent, our finished-versus-unfinished guide explains which measurement belongs at each stage.
Check the seam, not just the outside dimensions
Press each unit flat before measuring. Jen Shaffer's bonus-HST lesson finishes by pressing and trimming the secondary units. Use a square ruler with a diagonal line so you can inspect both the shape and the seam.
Place the ruler's diagonal on the sewn line. Look at the complete required square: all four corners and every edge must have sound fabric beneath them. Then see whether moving the window along the seam gives a better fit. Keep the window's edges parallel to the unit's grain-aligned edges.
Here are three paper examples. Each has a straight 45-degree seam and flat rectangular edges. We drew these examples and haven't sewn them.
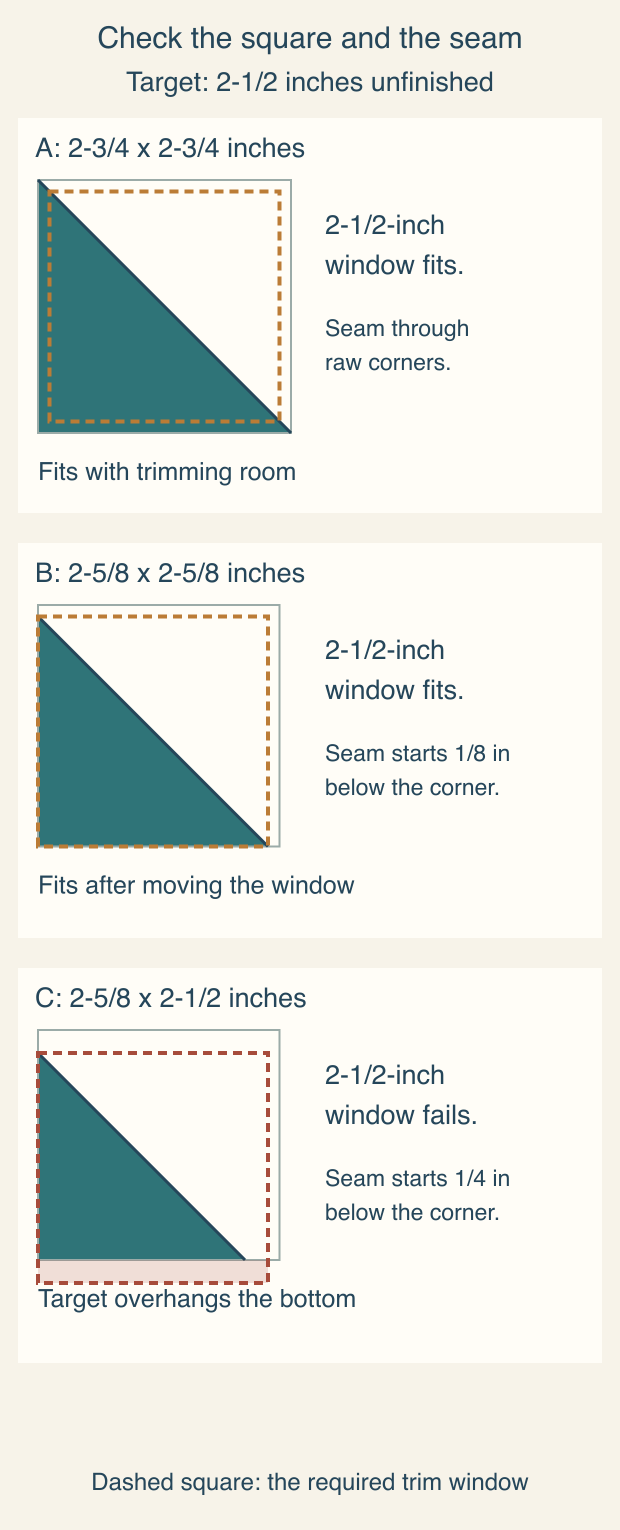
A: there is room around the target
The first unit measures 2-3/4 inches square, with its seam through the opposite raw corners. A centered 2-1/2-inch window fits. That leaves 1/8 inch beyond each side of the target for trimming.
B: the window needs to move
The second unit measures 2-5/8 inches square. Its seam meets the left edge 1/8 inch below the top corner. Move the target window down that 1/8 inch, keeping the diagonal on the seam. The square fits, although one edge has no extra trimming room in this ideal drawing.
On fabric, check the ruler lines themselves. A ragged edge or a tuck can remove the small margin that looked available from the first measurement. Don't count the unit until the whole target is present.
C: the outside measurements look sufficient, but it fails
The third unit measures 2-5/8 inches wide and 2-1/2 inches high. Both measurements seem large enough. Its seam, however, starts 1/4 inch below the top-left corner.
Moving the 2-1/2-inch window down to align its diagonal makes the bottom overhang by 1/4 inch. Moving it right makes the mismatch worse. The largest aligned square in this drawing is only 2-1/4 inches.
That unit can serve a smaller plan. It cannot supply this project's 2-1/2-inch unit merely because one raw side reaches that number. Our HST trimming guide covers the ruler alignment and cutting sequence in more detail.
Sort by what is ready for this project
Imagine the following pile. These are counts chosen for the example, rather than a prediction of what a particular quilt will leave behind.
| What the pile contains | Number | This project's count |
|---|---|---|
| A units that pass the target check | 8 | Accept 8 |
| B units that pass after positioning | 6 | Accept 6 |
| C units too small for this target | 4 | Keep separate |
| Loose, matching triangle pairs | 4 pairs | Pending sewing and checking |
| Sewn units with damaged fabric or an insecure seam | 2 | Exclude until resolved |
There are 20 sewn units and four loose pairs in front of you, but only 14 accepted units for the project. That accepted number is the one to put on the layout card.
Keep three places while you work: accepted, smaller and pending. A damaged unit belongs outside the accepted group until you decide whether it can be repaired or used another way. When a pending pair is sewn and passes the target check, move it once and update the totals. Don't count it in both places.
For broader scrap sorting, use the usable-size inventory. This check follows a particular corner by-product after the main project has already determined its shape.
Give the accepted units a finish line
Sixteen 2-inch-finished HSTs in four columns and four rows make an 8 x 8-inch finished field, before borders. Our fourteen accepted units leave two empty positions.
You can wait for more suitable corners, finish and check the loose pairs, or make two new units by a method that reaches the same unfinished size. The two-at-a-time HST guide explains that separate production choice. None of those options makes the missing units exist before you check them.
Once all sixteen are ready, arrange their colors and diagonals. Our HST layout guide shows several orientation ideas. Photograph your chosen arrangement and label the rows before moving pieces to the machine.
With nominal quarter-inch seams, the assembled field should measure 8-1/2 inches square unfinished. Four 2-1/2-inch units total 10 inches across; three joins consume 1-1/2 inches, leaving 8-1/2. The outside allowances account for the remaining half inch in the finished field.
Make the next measurement useful
Write your target unfinished size and required unit count on one card. Press five candidate units, check the full ruler window and sort them before processing the rest.
Then update the accepted total. A smaller, checked pile with two clearly marked gaps gives you a more useful next step than a full bucket with an unknown size.
Plan your next quilt
Lay out blocks and try colors in QuiltLab's grid editor before you cut.
Free forever, no card needed.
Get quilting tips by email
QuiltLab updates, tips and quilting inspiration. Unsubscribe anytime.
Related posts
Large Star Quilt Planning: Choose the Star Before the Margins
Compare 36-inch and 48-inch stars on one quilt top, then check the center print, background and fabric-width constraints.

Nested Star Quilt Design: Keep Every Ring Visible
Compare three nested star sizes, choose contrast at each shared edge, and check which fabric survives in the narrowest ring.
Pieced Quilt Border Math: Fit Whole Motifs
Fit complete border motifs around a measured center, compare end caps with resizing, and keep repeat phase clear at the corners.