


How to Trim Half Square Triangles So the Points Meet
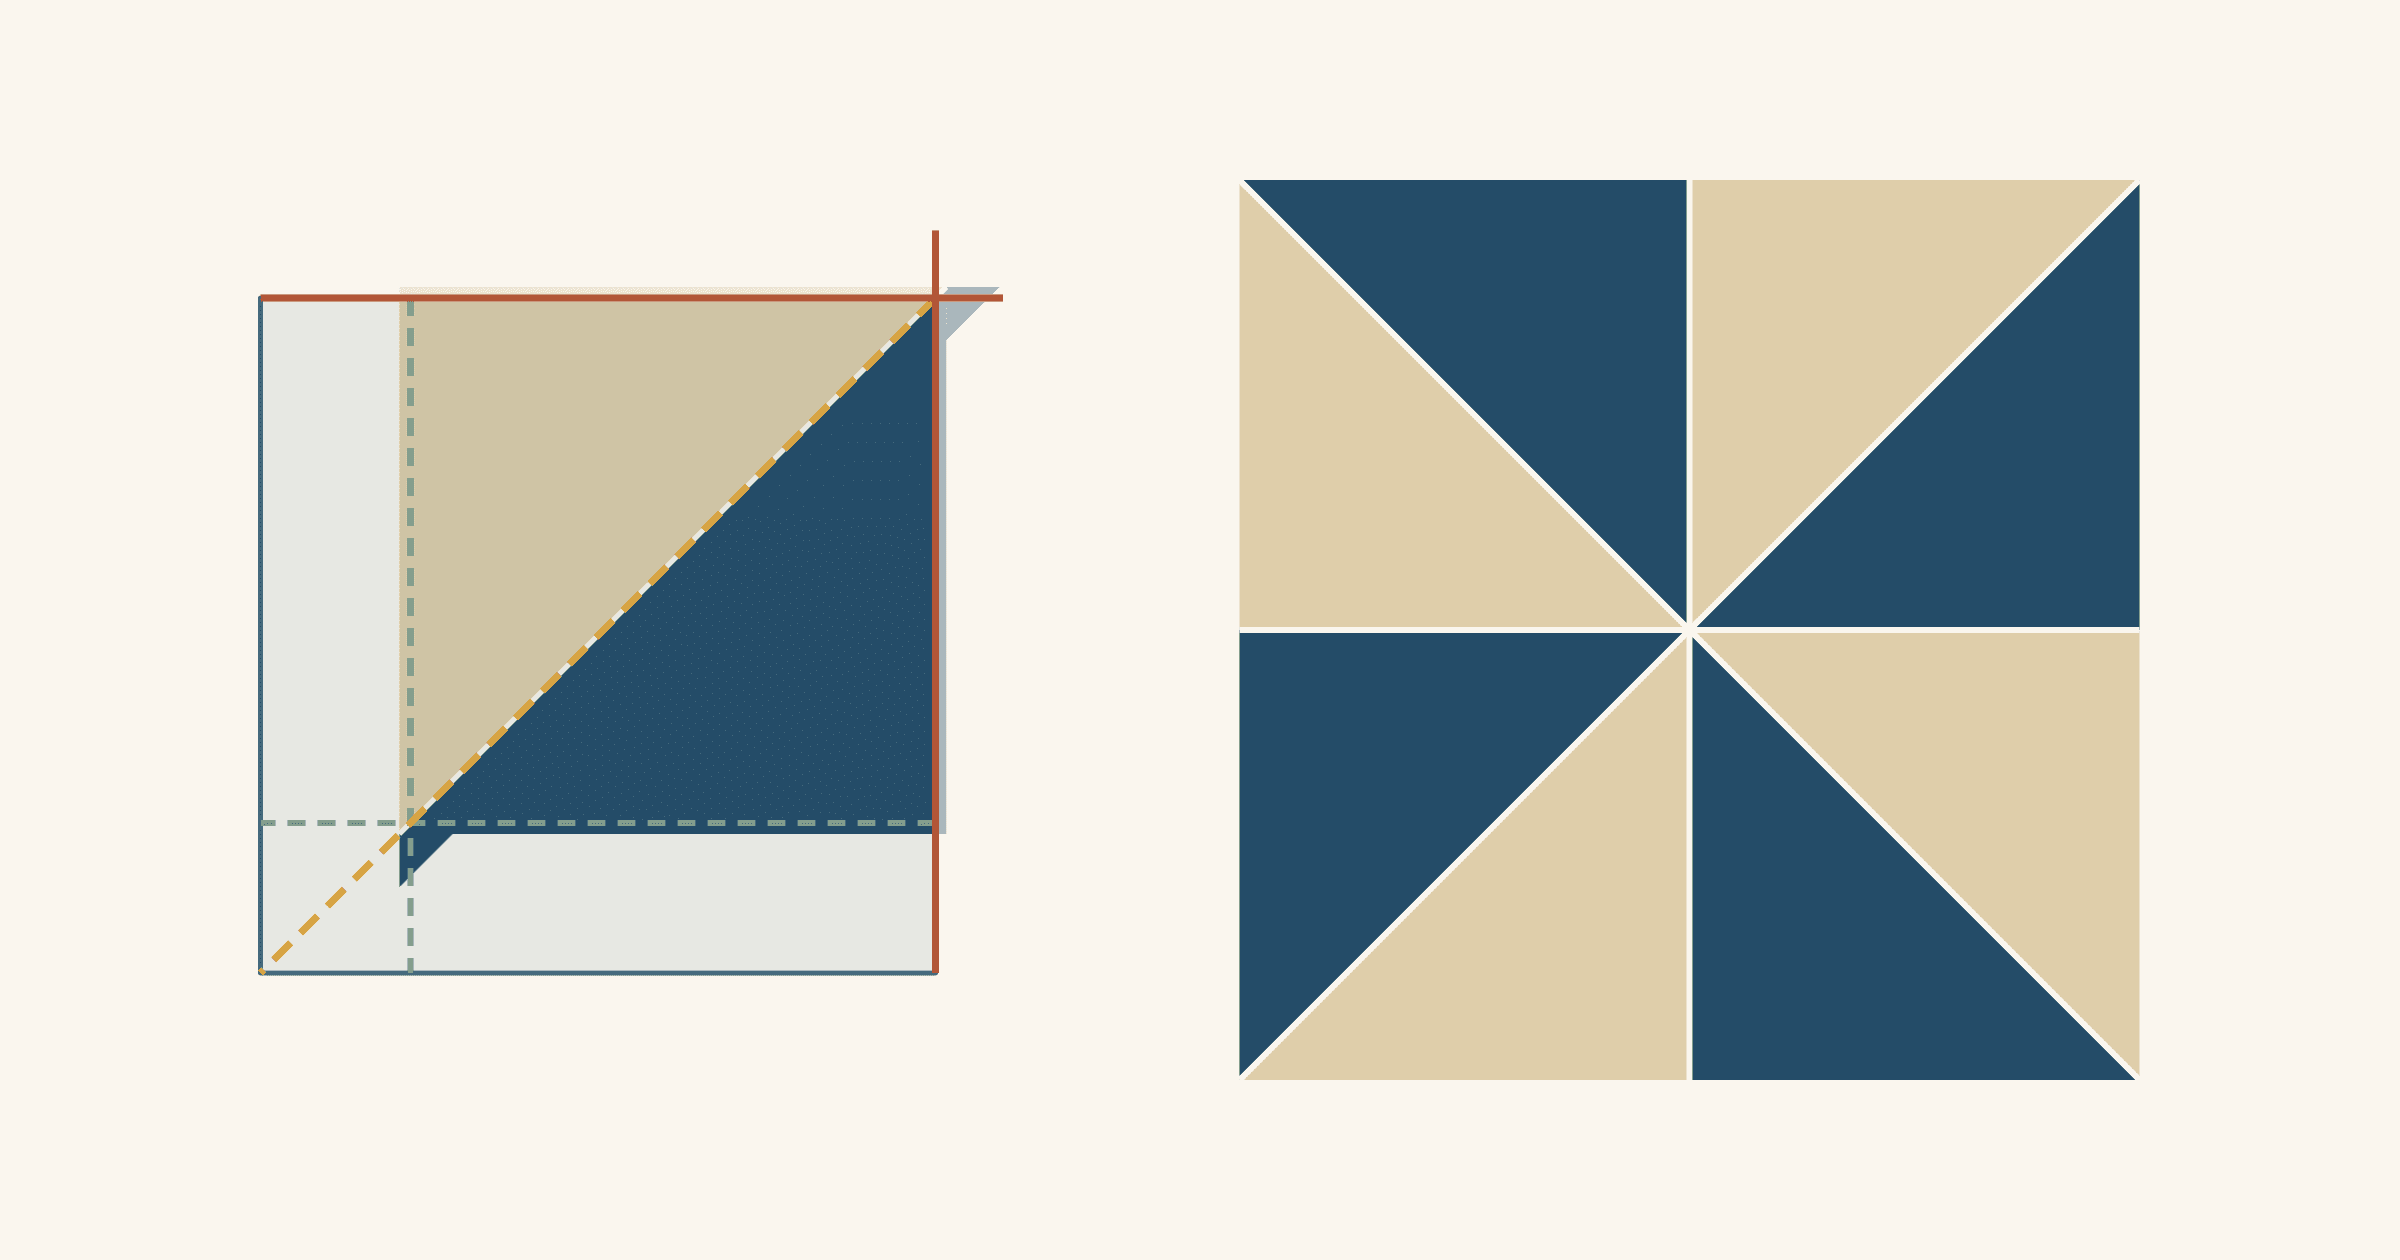
To trim a half-square triangle (HST), press it and lay a square ruler on top. Put the ruler's 45-degree line right on the seam, with the trim-size lines inside the fabric. Cut the two edges along the ruler. Then turn the unit, set the fresh edges on the trim-size lines with the 45-degree line back on the seam, and cut the other two. That is how Melissa Corry trims HSTs at Happy Quilting and how Amy Smart squares them up at Diary of a Quilter. The trim size is the finished size plus 1/2 inch: 3 1/2 inches for an HST that finishes at 3 inches.
The seam is the line to watch. Raw edges stretch and corners wander, but the seam is the diagonal your points depend on. Below is a worked example, the two small ruler slips that move the diagonal, and a quick check for units that don't have enough fabric.
What the 45-degree line goes on
On the front of a pressed HST, the seam is the line where the two fabrics meet. Put the ruler's 45-degree line on that line, along its whole length.
Brittany Lloyd at Lo & Behold Stitchery puts the goal simply: the seam should run corner to corner before and after trimming. That way, when you sew the unit with 1/4-inch seams on all four sides, the points stay crisp. Sarah Vanderburgh at QUILTsocial adds the other half of the reason. With the 45-degree line exactly between the two halves, both triangles come out the same size.
Don't square the ruler to the raw edges instead. Amy Smart points out that sewing corner to corner means sewing on the bias, so even careful units can come out a little misshapen. If you line up on a crooked edge, the crooked edge decides where the seam ends up.
Use a square ruler with a 45-degree line. It should be bigger than the untrimmed unit, so each cut runs along a ruler edge all the way across. A 4 1/2-inch or 6 1/2-inch square covers the example below. Our ruler reviews cover square and long rulers.
Worked example: trim a 3-inch HST to 3 1/2 inches
This example makes two units at a time from two 4-inch squares. Melissa Corry's rule is to trim to 1/2 inch smaller than the starting square, so 4 inches becomes 3 1/2 inches. If you're still choosing starting squares, the two-at-a-time HST guide covers that math.
With an exact 1/4-inch seam, each opened unit measures about 3 5/8 inches. That leaves a little more than 1/8 inch to trim in all, or a bit over 1/16 inch per side if you split it evenly. There's also a small dog ear at each end of the seam.
- Press first. Let the unit lie flat before it goes under the ruler.
- First pass. Put the 45-degree line on the seam. Slide the ruler along the seam until its 3 1/2-inch lines sit just inside the left and bottom edges, so both lines are on fabric. Cut the right and top edges. That takes off the dog ear at the top right.
- Turn the unit 180 degrees. The edges you just cut are now on the left and bottom.
- Second pass. Set those cut edges on the 3 1/2-inch lines and check that the 45-degree line is on the seam again. Cut the right and top edges, which takes off the second dog ear.
If you're left-handed, mirror the setup: the 3 1/2-inch lines go on the right and bottom, and you cut the left and top.
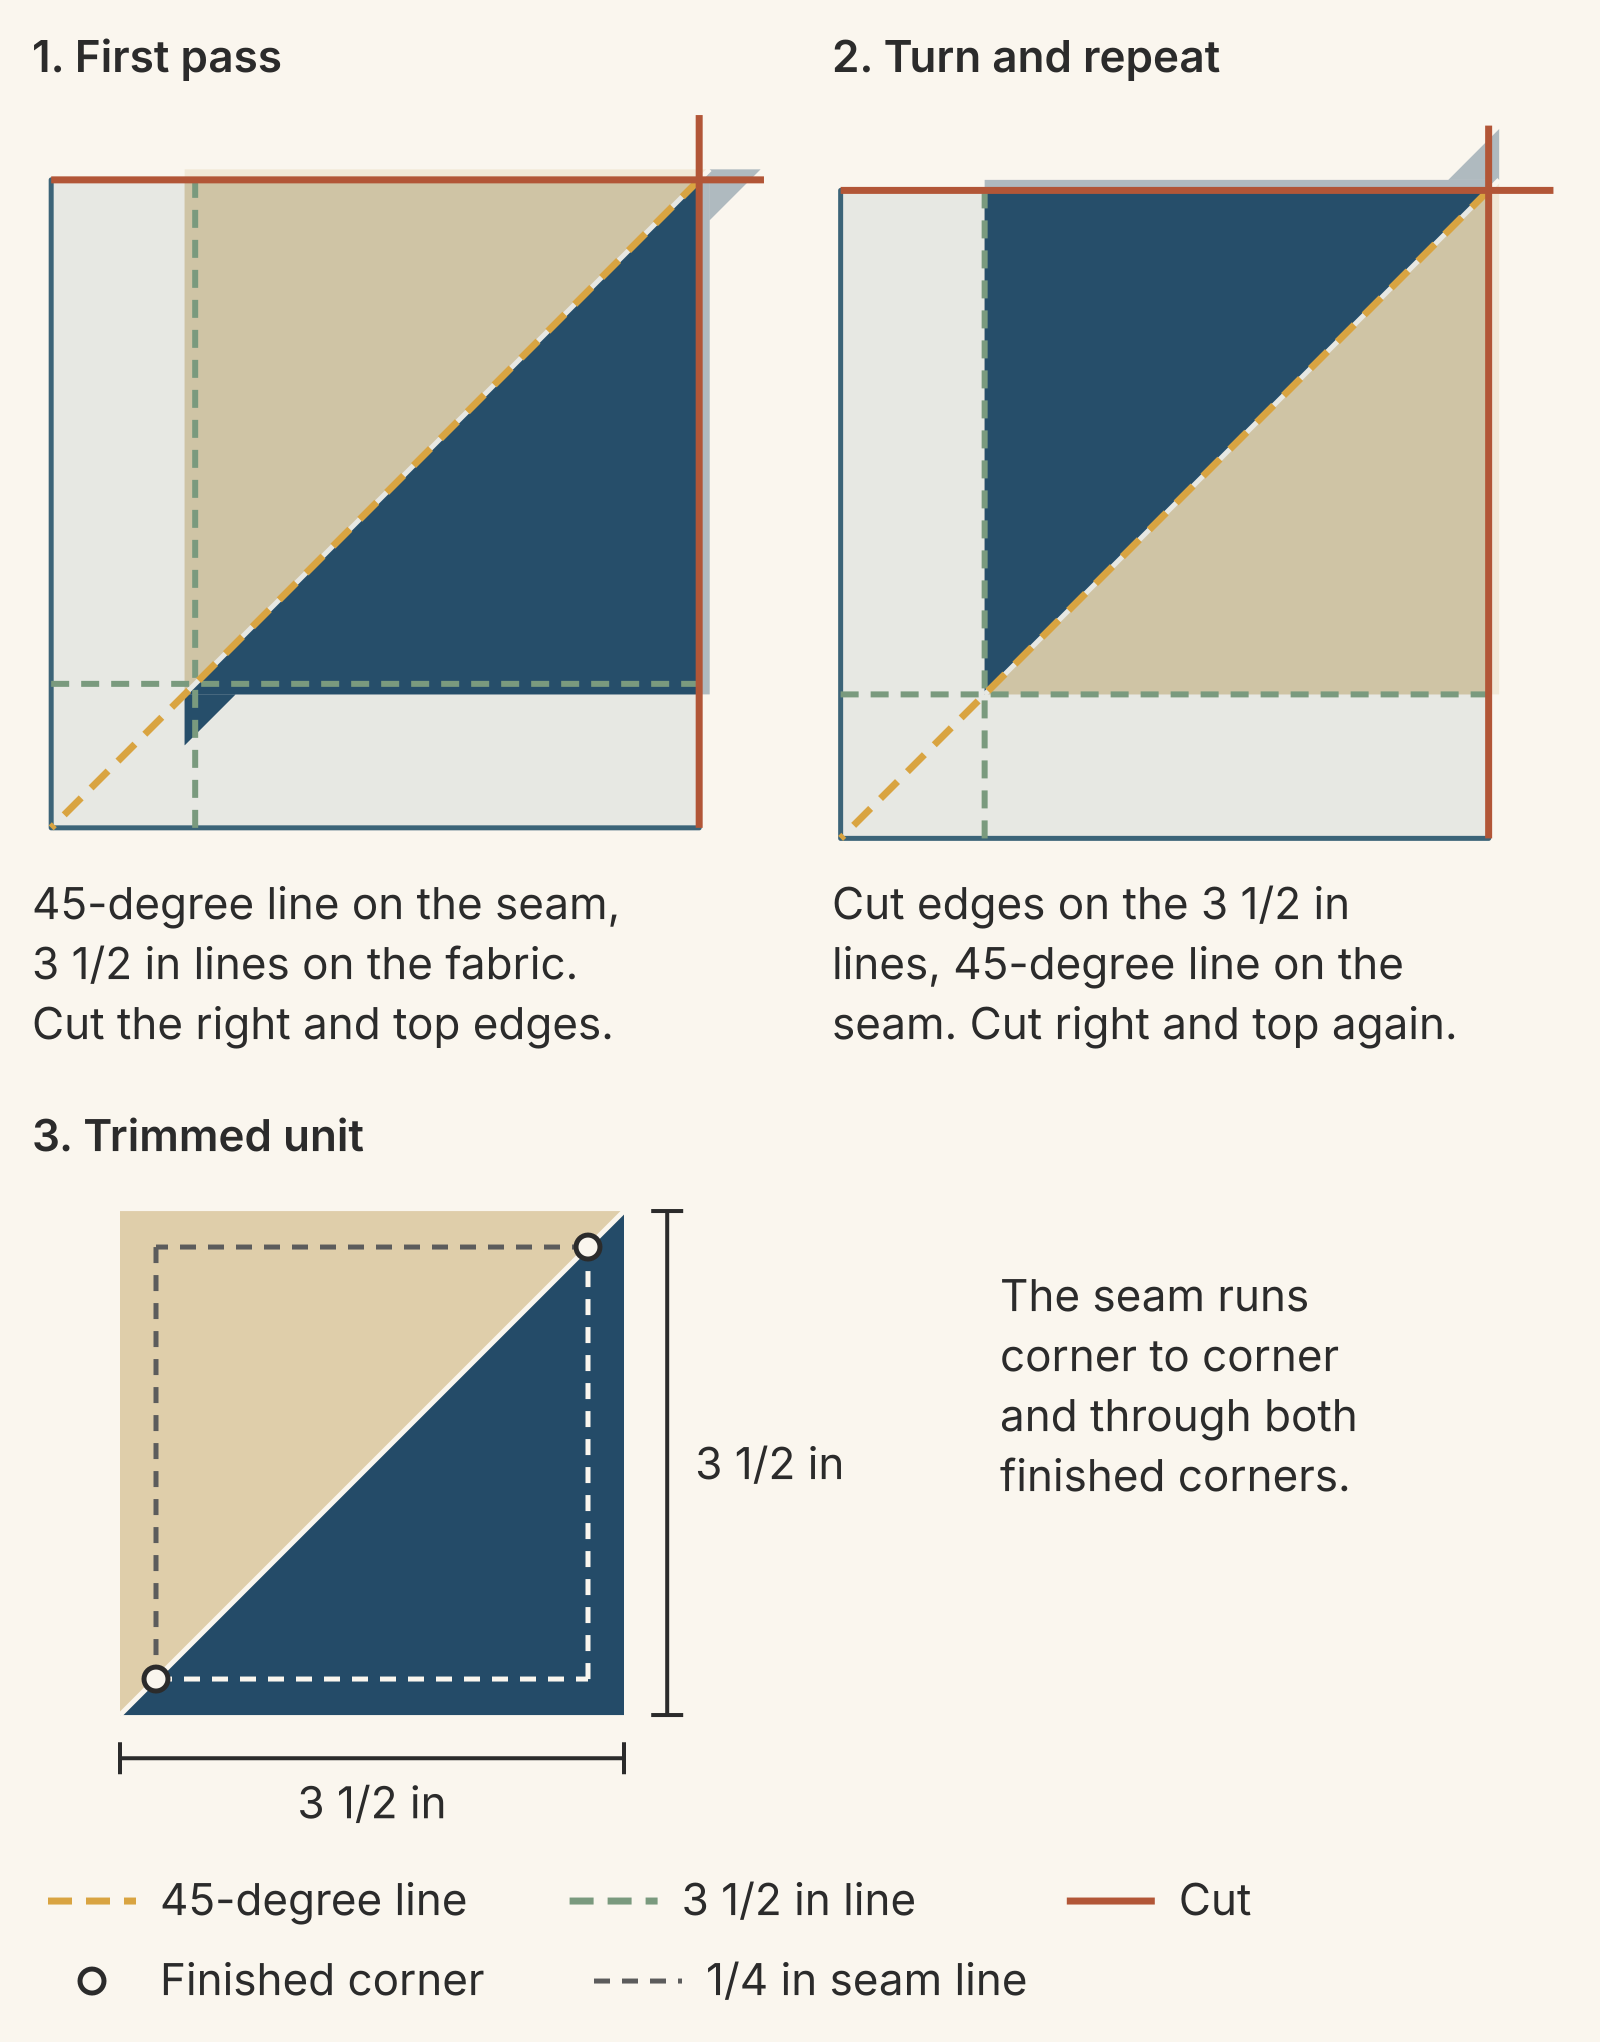
Where along the seam the ruler sits matters much less than whether it's on the seam. Slide the ruler along the seam and you only change which sides lose more fabric. Slide it across the seam and you move the diagonal.
Two small slips that move the diagonal
Both mistakes below happen in the first pass, and both are easy to miss on the cutting mat. The diagrams show what you get when the second pass just follows the cut edges. Either slip shows up later, when the points don't meet.
The 45-degree line sits just beside the seam. The line is parallel to the seam but less than 1/10 inch to one side. After both passes, the seam lands 1/8 inch from two corners of the 3 1/2-inch unit. One triangle gets bigger and the other loses its points.
The ruler is twisted 1 degree. The 45-degree line crosses the seam near one corner and drifts away from it toward the other. On a 3 1/2-inch unit, 1 degree is enough to leave the far end about 1/8 inch from its corner.
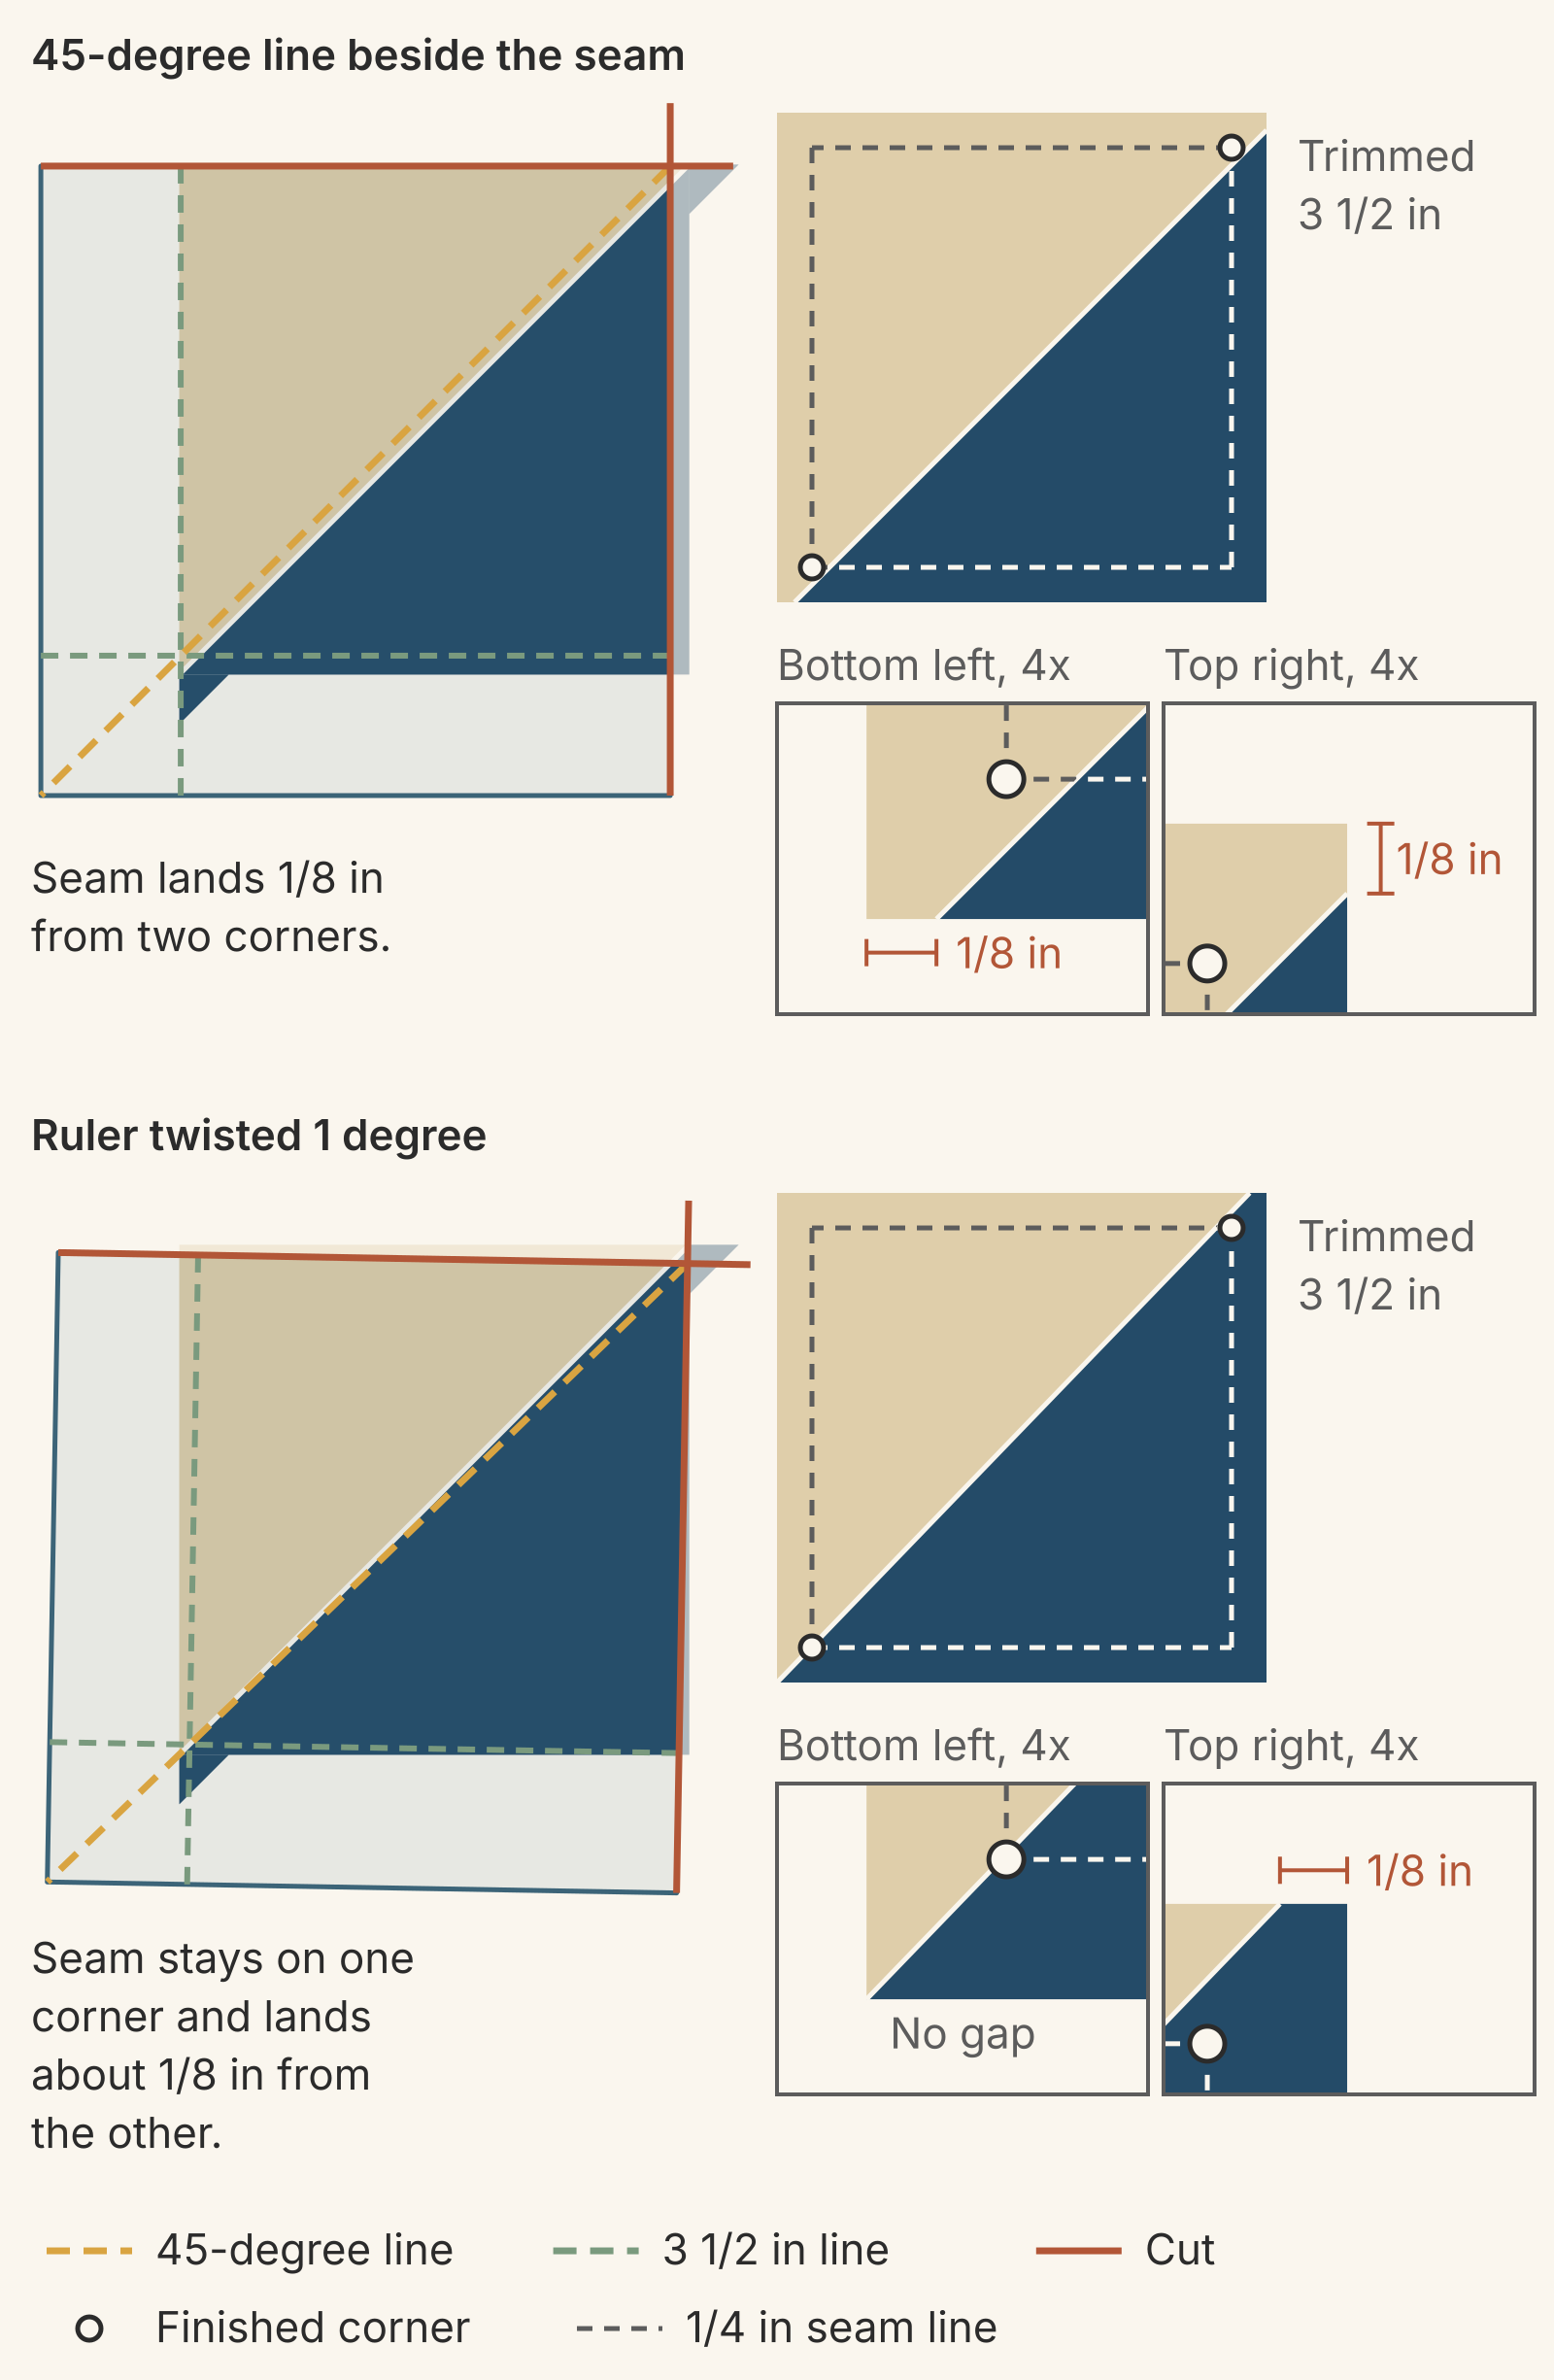
The miss you can see at the trimmed edge is roughly the miss you'll get after sewing. The seam runs at 45 degrees, so a seam that lands 1/8 inch from the raw corner also crosses the 1/4-inch seam line 1/8 inch from the finished corner. In a pinwheel or a star point, that gap shows.
That's why the 45-degree line goes back on the seam in the second pass, instead of lining up on the cut edges alone. Usually the 3 1/2-inch lines then fall right on the edges you just cut. If they don't, trust the seam. Keep the 45-degree line on it, check that both 3 1/2-inch lines still land on fabric, and cut. Then turn the unit and true up the other two edges the same way. If the lines can't both land on fabric, the unit is short. The next section shows how to spot that before you cut.
Check that a 3 1/2-inch square fits around the seam
Sometimes the problem is the unit, before the ruler ever touches it. Brittany Lloyd notes that fabric can shift while you sew and seam allowances can drift. That's why most patterns have you trim HSTs down to size. If the seam has drifted off the unit's corners, the unit may not hold a full-size square with the seam on its diagonal.
Here is a quick test. Subtract the trim size from the untrimmed unit's size to get the spare. Then look at where the seam meets the edges. If the seam lands farther from a corner than the spare, the trimmed square won't fit.
For a unit that measures 3 5/8 inches, the spare is 3 5/8 - 3 1/2 = 1/8 inch.
| Seam lands this far from the corner | In a 3 5/8-inch unit (1/8 inch spare) |
|---|---|
| 1/16 inch | Fits, with 1/16 inch to spare |
| 1/8 inch | Just fits, with no room left |
| 3/16 inch | 1/16 inch short |
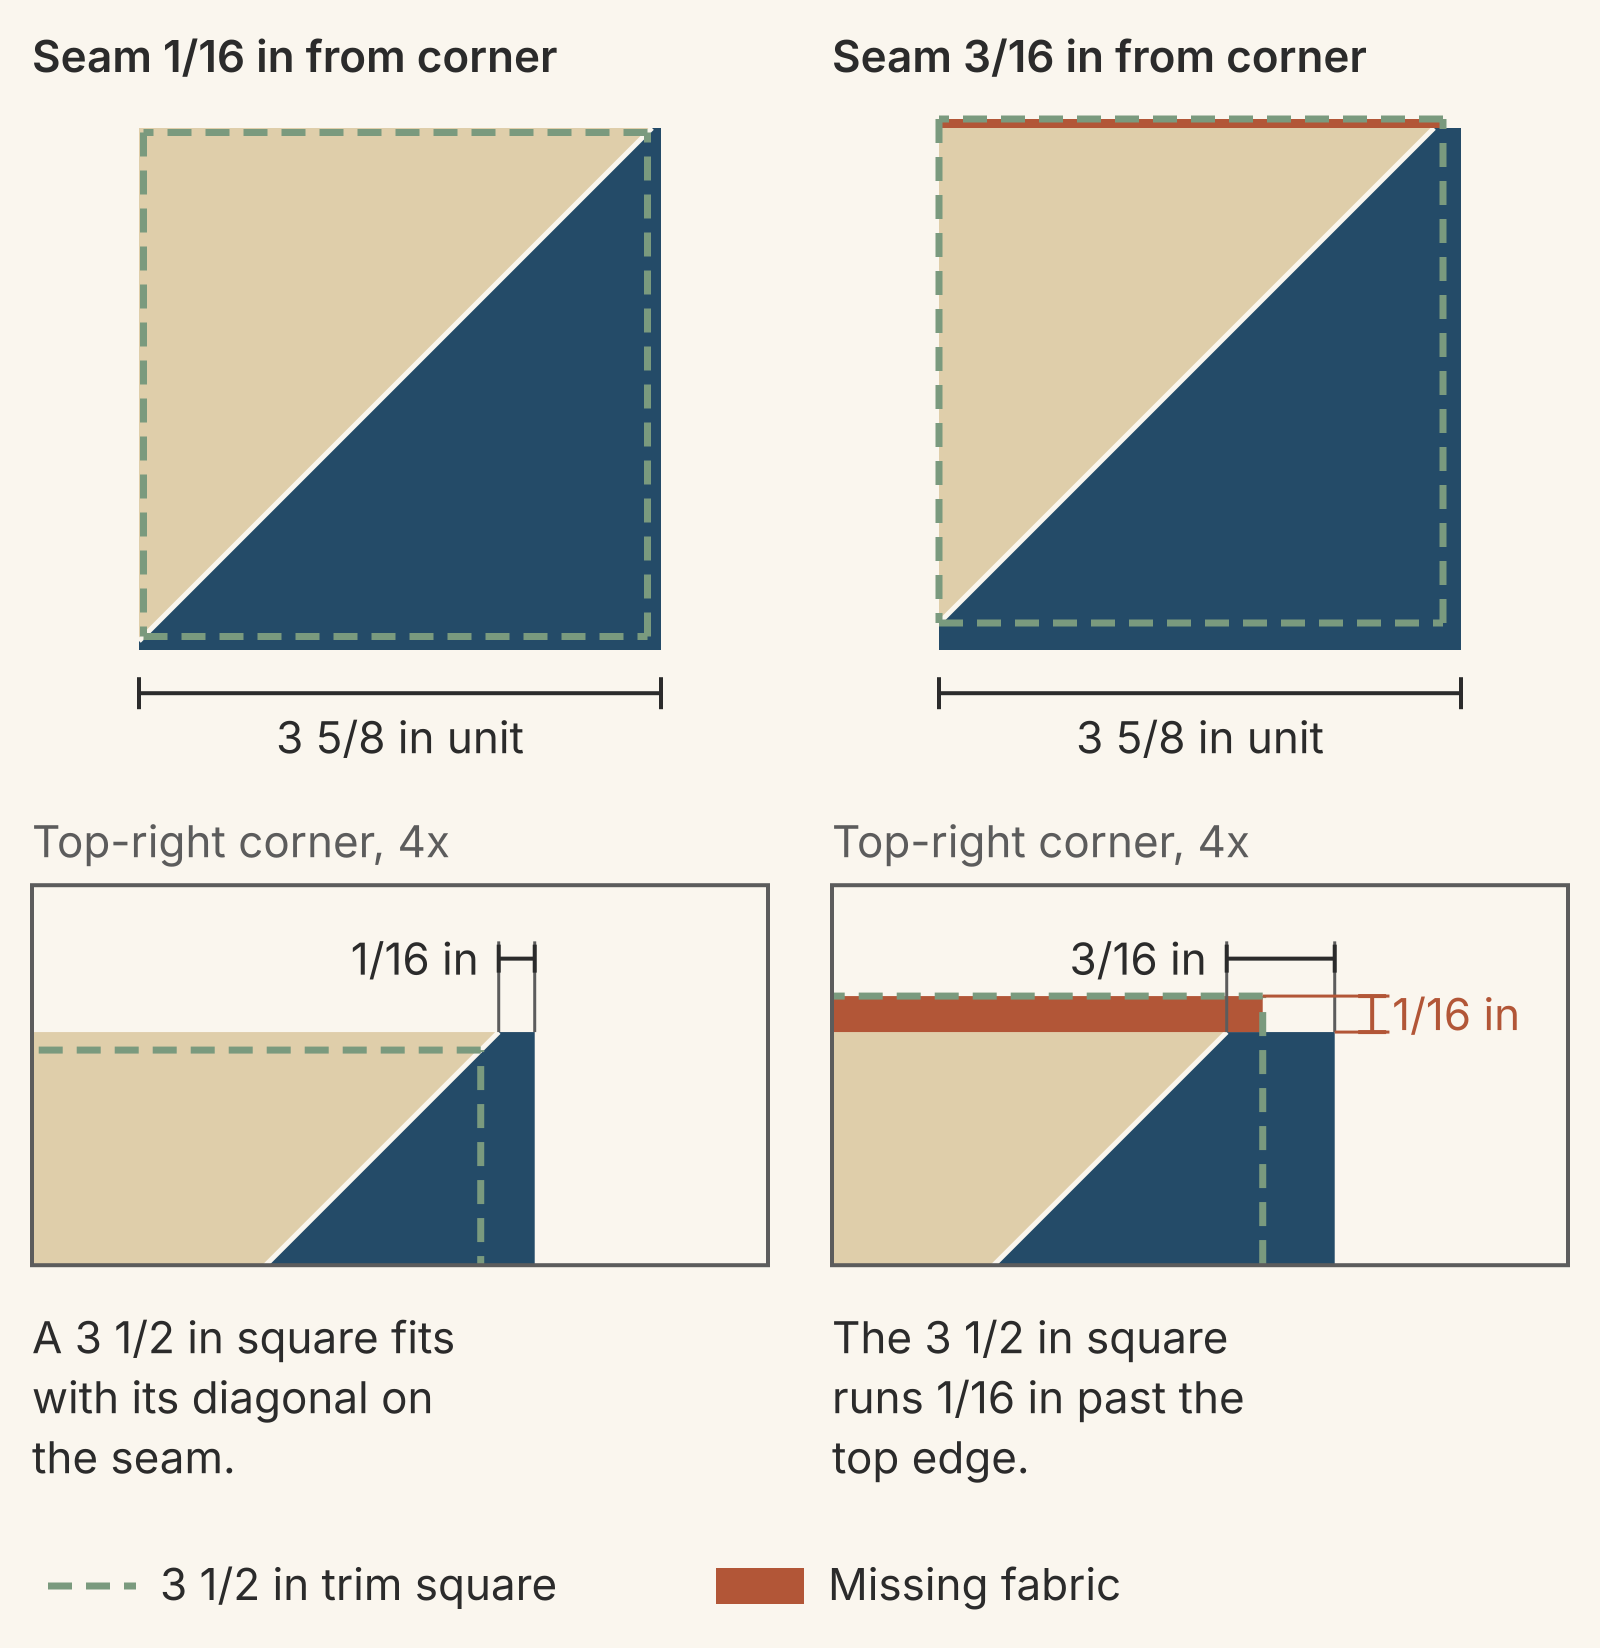
You can't trim a short unit back to size, and trimming it smaller won't help, because it then won't line up with its neighbors. If its points have to meet others, as in a pinwheel or a star, make a replacement. Before you sew the next pair, check the starting squares, your seam width and whether the layers shifted under the presser foot.
Work with the ruler you have
You don't need a special ruler. These workarounds come from the same teachers:
- Use the ruler's corner. If your square ruler has no diagonal line, Amy Smart puts the ruler's corner on the seam. Then she checks that the trim-size point, 3 1/2 inches in this example, sits on the seam at the other end.
- Add a line. Brittany Lloyd suggests drawing a corner-to-corner line on the ruler with a permanent marker, or marking it with a strip of tape.
- No square ruler? Use a long one. Melissa Corry trims one side at a time with a rectangular ruler. She puts its 45-degree line on the seam and the trim-size line on the opposite edge, then cuts. She turns the unit 90 degrees and repeats until all four sides are trimmed.
- Try a slotted ruler. The Bloc Loc ruler has a groove on the back that locks onto the seam, as Becky Jorgensen shows at Patchwork Posse. Brittany Lloyd finds it grips best when the seam is pressed to one side rather than open. For a flat ruler that slides while you cut, she suggests ruler grips.
Check each unit after trimming
Before you sew trimmed units into blocks, check each one:
- It measures 3 1/2 by 3 1/2 inches.
- The seam goes into two opposite corners.
- The dog ears are gone. In her squaring-up video post, Becky Jorgensen notes that even a tiny trim helps. It takes the rounded edge off the triangle and leaves less bulk at the corners.
A quick way to check is to set the ruler's corner on one corner of the unit with the 45-degree line on the seam. The 3 1/2-inch point should land on the opposite corner.
Trim a whole batch the same way. Units from the eight-at-a-time method go through the same two passes at their own trim size. Four-at-a-time units do too, but all four of their edges are bias, so see how to keep four-at-a-time edges from stretching.
Your next step
Make one test pair, trim both units with the two passes above, and measure them before you cut the rest of your squares. If the seam lands within the spare and the units come out at 3 1/2 inches, cut the batch. When you sew the trimmed units together, stitch through the X so the points meet.
Then plan where the units go. In QuiltLab's Block Editor, draw the HST as two pieces in a 3-inch block and choose its two fabrics. QuiltLab works in finished sizes and doesn't work out starting squares, trim sizes or cutting lists, so keep the 3 1/2-inch trim size in your notes. Repeat the block in a Quilt Editor grid. Its Layout panel shows the finished quilt size, and the block count tells you how many units to trim. For ways to turn them, see half-square triangle quilt layouts.
Related posts

How to Design a Bargello Quilt: Plan the Wave on Paper
A bargello wave is a staircase of stepped columns. Number your strips, write one row per column, and see how column width turns a zigzag into a curve.

Borderless Quilt Design: Plan an Edge That Looks Finished
With no border, the outer blocks and the binding make the edge. Compare whole and halved motifs on one 48 x 60 inch quilt, then pick the binding color.

Crosshatch Quilting: How to Make the Lines Meet at the Edges
Space a 45-degree crosshatch so the lines meet in a V at every edge and corner. Choose the edge step first, mark dots around the quilt, then connect them.