


Mark the Top of a Directional Quilt Backing
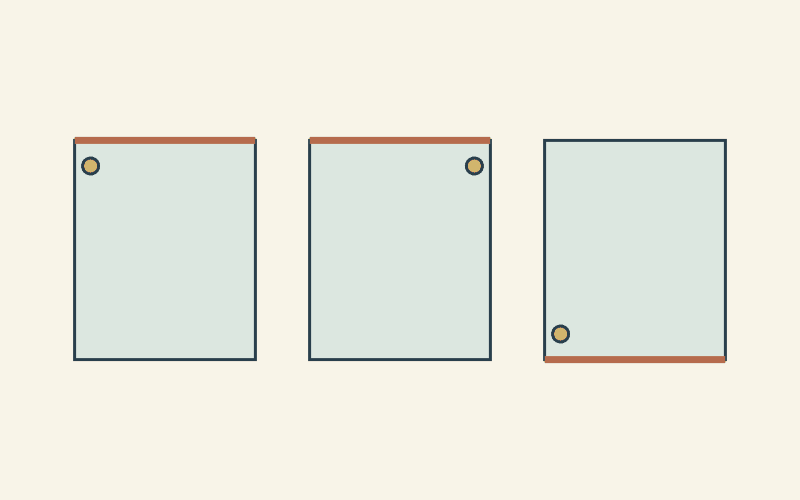
Mark the physical top edge of both the quilt top and the backing, then give your quilter a right-side sketch of each. For an upright directional print, decide how you expect the back to read when you turn the quilt over. Turning around a vertical edge preserves the top at the top; turning over a horizontal edge changes that view.
Without that sketch, “please keep the back upright” can make two people picture different turns. Your directional quilt backing alignment note should name the intended turn as well as the top edge.
Define the view you care about
Hold a sheet of paper upright and imagine it is the quilt. Its upper edge is one physical edge, regardless of which face you can see. A tree print on the back might need its treetops pointed toward that edge.
Now imagine turning the paper like a page in a book, around a vertical edge. The back faces you, and the same physical upper edge remains above it. This is a useful default for comparing upright front and back views.
Turn it over the top instead, around a horizontal edge. The physical upper edge now appears at the bottom of the new view. A directional print cannot be judged from these two views as though they were identical.
This is a whole-quilt viewing decision. It is separate from keeping individual directional patches upright inside blocks, which our directional-fabric guide covers.
Identify one shared physical location
An asymmetric reference catches a mistaken turn more clearly than a centered mark. On our drawn 56.5-by-68.5-inch panel, point A starts 5 inches from the left and 8 inches from the top. The dot represents the same physical location in every view, as if it were identifiable from either face of a paper sheet. It is not a printed motif appearing through the cloth.
When the panel is turned around a vertical edge, left and right exchange places. Point A is now 56.5 - 5 = 51.5 inches from the new left, while remaining 8 inches below the top.
When the panel is turned around a horizontal edge, top and bottom exchange places. Point A remains 5 inches from the left and is now 68.5 - 8 = 60.5 inches below the new top of the view.
| View | Point A from the left | Point A from the top of that view |
|---|---|---|
| Starting reference | 5 in | 8 in |
| Turn around a vertical edge | 51.5 in | 8 in |
| Turn around a horizontal edge | 5 in | 60.5 in |
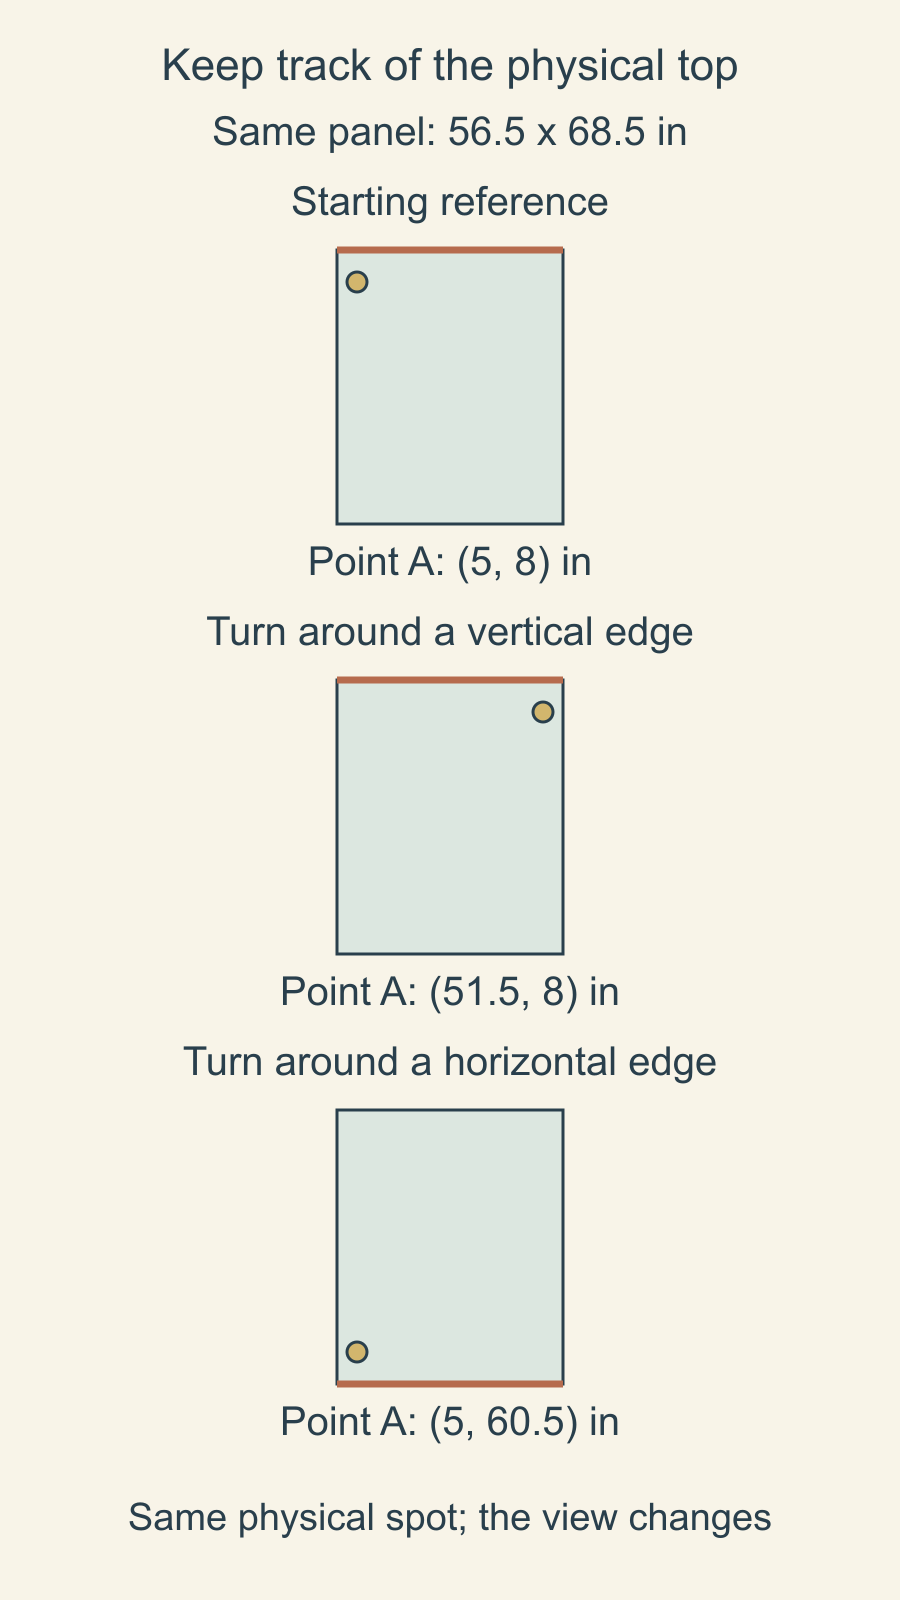
We drew this orientation study for the article. Its coordinate changes describe viewing the whole panel from the opposite face. They don't create mirror-image motifs on the right side of printed fabric.
Use the provider's labeling convention
Discovery Sewing Studio's preparation instructions explicitly ask makers to mark the top of a directional backing, as well as a directional quilt top. They explain that an unmarked pieced backing may be loaded in the direction most conducive to quilting. That makes a missing label a practical handoff problem.
Use your actual service's tagging method and say which layer each label belongs to. Don't rely on a loose note that could be separated from the fabric. If both layers have a tag reading only “top,” your accompanying sketch should still identify front and backing clearly.
The Quilting Studio also asks for a top-identification note on directional work. Its preparation page loads backing, batting and top separately. Keep the orientation information with the individual layers rather than expecting a preassembled sandwich to communicate the match.
Ask the provider to confirm the intended relationship before the project is loaded. If a quilting design also has an up direction, include that in the conversation. The print, quilt top and quilting motif can each have a direction worth distinguishing.
Write a short handoff note
For a hypothetical quilt with an upright tree backing, the note could say:
Front: the row of houses belongs at the physical top. Backing: the treetops point toward the edge tagged “backing top.” I want both views upright when the quilt is turned around a vertical edge. Please confirm the loading plan before quilting.
Attach two small right-side sketches showing those labels and one recognizable asymmetric feature. A phone photo of the actual arranged layers can supplement them, provided it clearly identifies which face and edge are shown.
Keep separate requests separate. Upright print direction doesn't also mean exact centering, invisible print matching or a particular seam position. If one of those matters, write it as an additional request and discuss whether the provider can meet it.
Keep loading and seam decisions in the conversation
Dawn Cavanaugh's APQS backing lesson discusses seam direction, grain and the possibility of loading a quilt sideways. It also notes that a directional quilting design may look different when run along the quilt's length. Those operational choices are another reason to communicate the final view rather than guessing how the frame will be arranged.
Our backing seam-direction guide handles the panel and seam question. You can choose a practical seam arrangement and still label the print's intended physical top. One choice doesn't automatically settle the other.
Likewise, a backing that meets the service's size requirement may still need an orientation discussion. Use the longarm preparation checklist for dimensions and other handoff details while keeping this particular viewing note with the backing.
Check before folding the layers away
Lay out the right-side drawings, identify their common physical top and perform the intended turn with a paper stand-in. Check an off-center feature rather than a symmetrical motif. Read the labels without referring to your memory of the design.
Then confirm the same labels on the actual separate layers, following the provider's instructions. Save the agreed sketch with the project record. That gives both you and the quilter a clear view to return to when “upright” could otherwise mean two different things.
Plan your next quilt
Lay out blocks and try colors in QuiltLab's grid editor before you cut.
Free forever, no card needed.
Get quilting tips by email
QuiltLab updates, tips and quilting inspiration. Unsubscribe anytime.
Related posts
Plan a Small Sewing Room Around One Quilt
Draw a measured small sewing room with machine, chair, cutting and pressing footprints, then check door swing, movement and storage.
Design a Pieced Quilt Back with Leftover Blocks
Check a leftover-block stripe against backing margins, inherited seams and new half-inch joins before preparing the surrounding panels.
Check Batting Against Your Wall Quilt's Requirements
Write a wall-quilt batting brief, reject mismatches, check an exact spacing limit and keep unresolved material and support questions visible.