


Quilt Backing Seam: Horizontal or Vertical?
Run the backing seam horizontally when two widths of your fabric reach the backing's full length, and vertically when they reach only its width. Most lap quilts end up with a horizontal seam; bigger quilts often need a vertical seam or a third width. Christine Baker, a longarm quilter writing for QUILTsocial, gives the usual rule of thumb. Tops 60 inches wide or smaller get a horizontal seam, and tops 61 to 80 inches wide get a vertical one. Anything wider takes three lengths with two vertical seams.
When both directions fit, run the seam parallel to the quilt's shorter edges. On the usual top that's longer than it is wide, that's a horizontal seam. It takes less fabric, and many longarm quilters prefer it because it runs parallel to their frame's rollers.
The rule of thumb stands in for a minute of arithmetic: the size of your backing against the usable width of your fabric. An inch or two of fabric width can flip the answer, as the throw below shows.
How far do two widths of fabric reach?
Usable width is what's left once the selvages are cut off. Measure it on your own fabric, after prewashing if you prewash. Our prewashing decision table covers whether to wash the backing to match the top. In her backing yardage steps, Baker says pattern designers assume 40 inches, because some quilters prewash and shrink their fabric.
Each seam uses up some of that width. Baker sews backing seams with a 1/2-inch allowance and presses them open, so each seam takes 1 inch, half from each panel. With that seam:
- Two widths cover twice the usable width, minus 1 inch.
- Three widths cover three times the usable width, minus 2 inches.
A horizontal seam stacks the widths top to bottom. They have to cover the backing's length, and each panel is cut as long as the backing is wide. A vertical seam sets them side by side to cover the backing's width, and each panel is cut as long as the backing.
| Usable width | Two widths cover | Top they back, 4 in extra per side | Top they back, 6 in extra per side |
|---|---|---|---|
| 40 in | 79 in | 71 in | 67 in |
| 41 in | 81 in | 73 in | 69 in |
| 42 in | 83 in | 75 in | 71 in |
Read the last two columns as the longest top that two horizontal panels can back, or the widest top that two vertical panels can back.
The extra around the top matters as much as the fabric. This article uses 4 inches per side. That's the 8 inches Sherri McConnell adds to each dimension in her guide to piecing a quilt backing, and the high end of the 6 to 8 inches Baker adds. Keelyn of The Night Owl Quilts, a longarm quilter writing for Bear Creek Quilting Company, asks for 6 to 8 inches on all sides, so the table shows 6 inches too. Use your quilter's number. Our longarm prep checklist shows how two services' margins differ for the same top.
Wider seams shorten the reach too. McConnell recommends backing seams of 3/4 to 1 inch. A 1-inch seam uses 2 inches of width, so take another inch off the last three columns.
Where the 60-inch rule runs out
Baker's thresholds match the arithmetic for typical lap quilts. They're written as top widths, though, and the reach depends on both dimensions. Her later yardage steps check both: she compares each side of the quilt with multiples of 40 inches.
- Wide tops. Two 42-inch widths back a top up to 75 inches wide with 4 inches per side. At the 40 usable inches Baker assumes for yardage, the limit is 71 inches. A top 72 to 80 inches wide can need a third width even though the rule calls for two.
- Long tops. Two horizontal panels only work when they reach the backing's length. With 42 usable inches and 4 inches per side, that's a top up to 75 inches long. A 60 x 80 inch top is narrow enough for the rule's horizontal seam, but its 88-inch backing length is too long for two panels. Two vertical panels take 5 yards; three horizontal ones take 5 3/4.
Check both directions against the table before you buy.
One throw, two layouts
Here's a 62 x 74 inch top. With 4 inches per side it needs a 70 x 82 inch backing. Baker's rule calls for a vertical seam, since the top is 62 inches wide, but the fabric width decides whether a horizontal seam is possible.
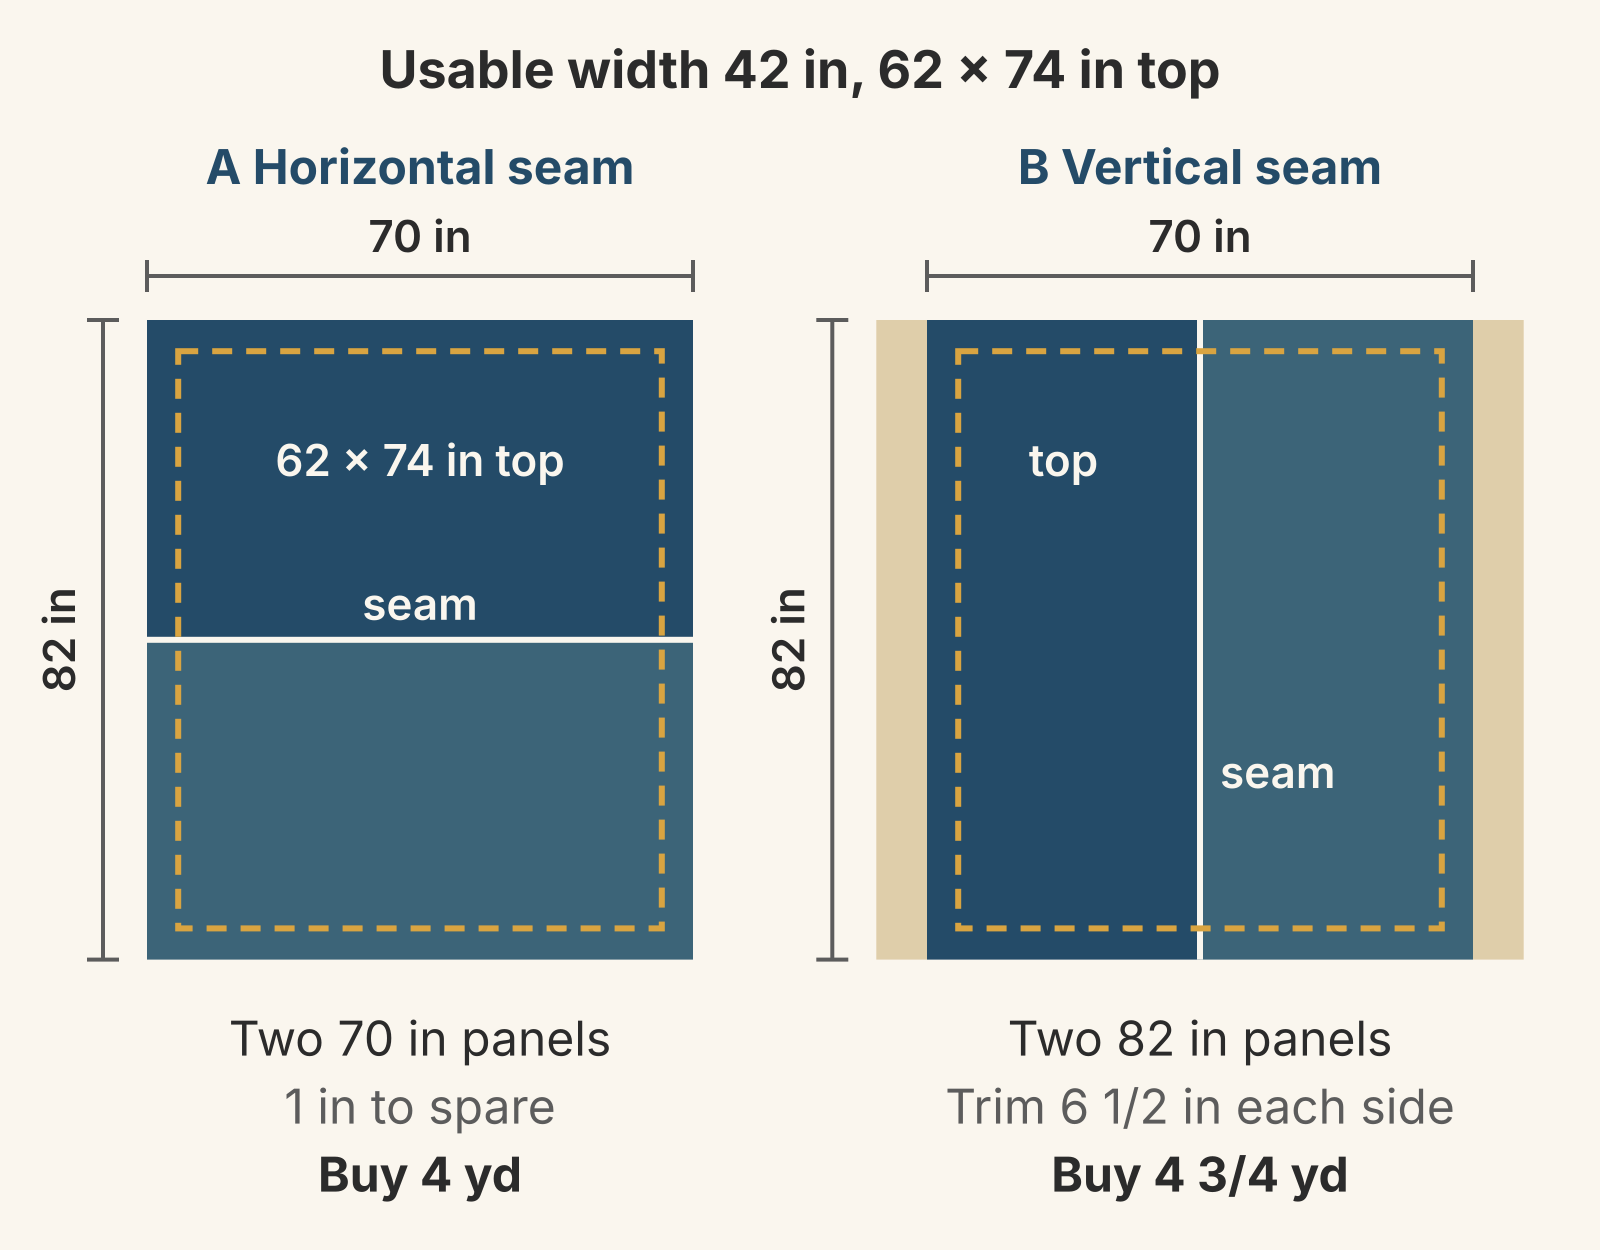
Layout A, horizontal seam. Cut two panels 70 inches long and sew them together along their long edges. Two 42-inch widths cover 83 inches, so the 82-inch length fits with 1 inch to spare. That's 140 inches of fabric. Buy 4 yards, which leaves 4 inches for straightening the cut ends.
Layout B, vertical seam. Cut two panels 82 inches long. Side by side they cover 83 inches and you need 70, so trim 6 1/2 inches from each outer edge to keep the seam centered. That's 164 inches of fabric. Buy 4 3/4 yards.
At 42 usable inches, Layout A saves 3/4 yard and puts the seam where most longarm quilters want it. The margin is thin, though. A 1-inch seam allowance uses up the spare inch, and a fabric that measures 40 inches after prewashing breaks the layout.
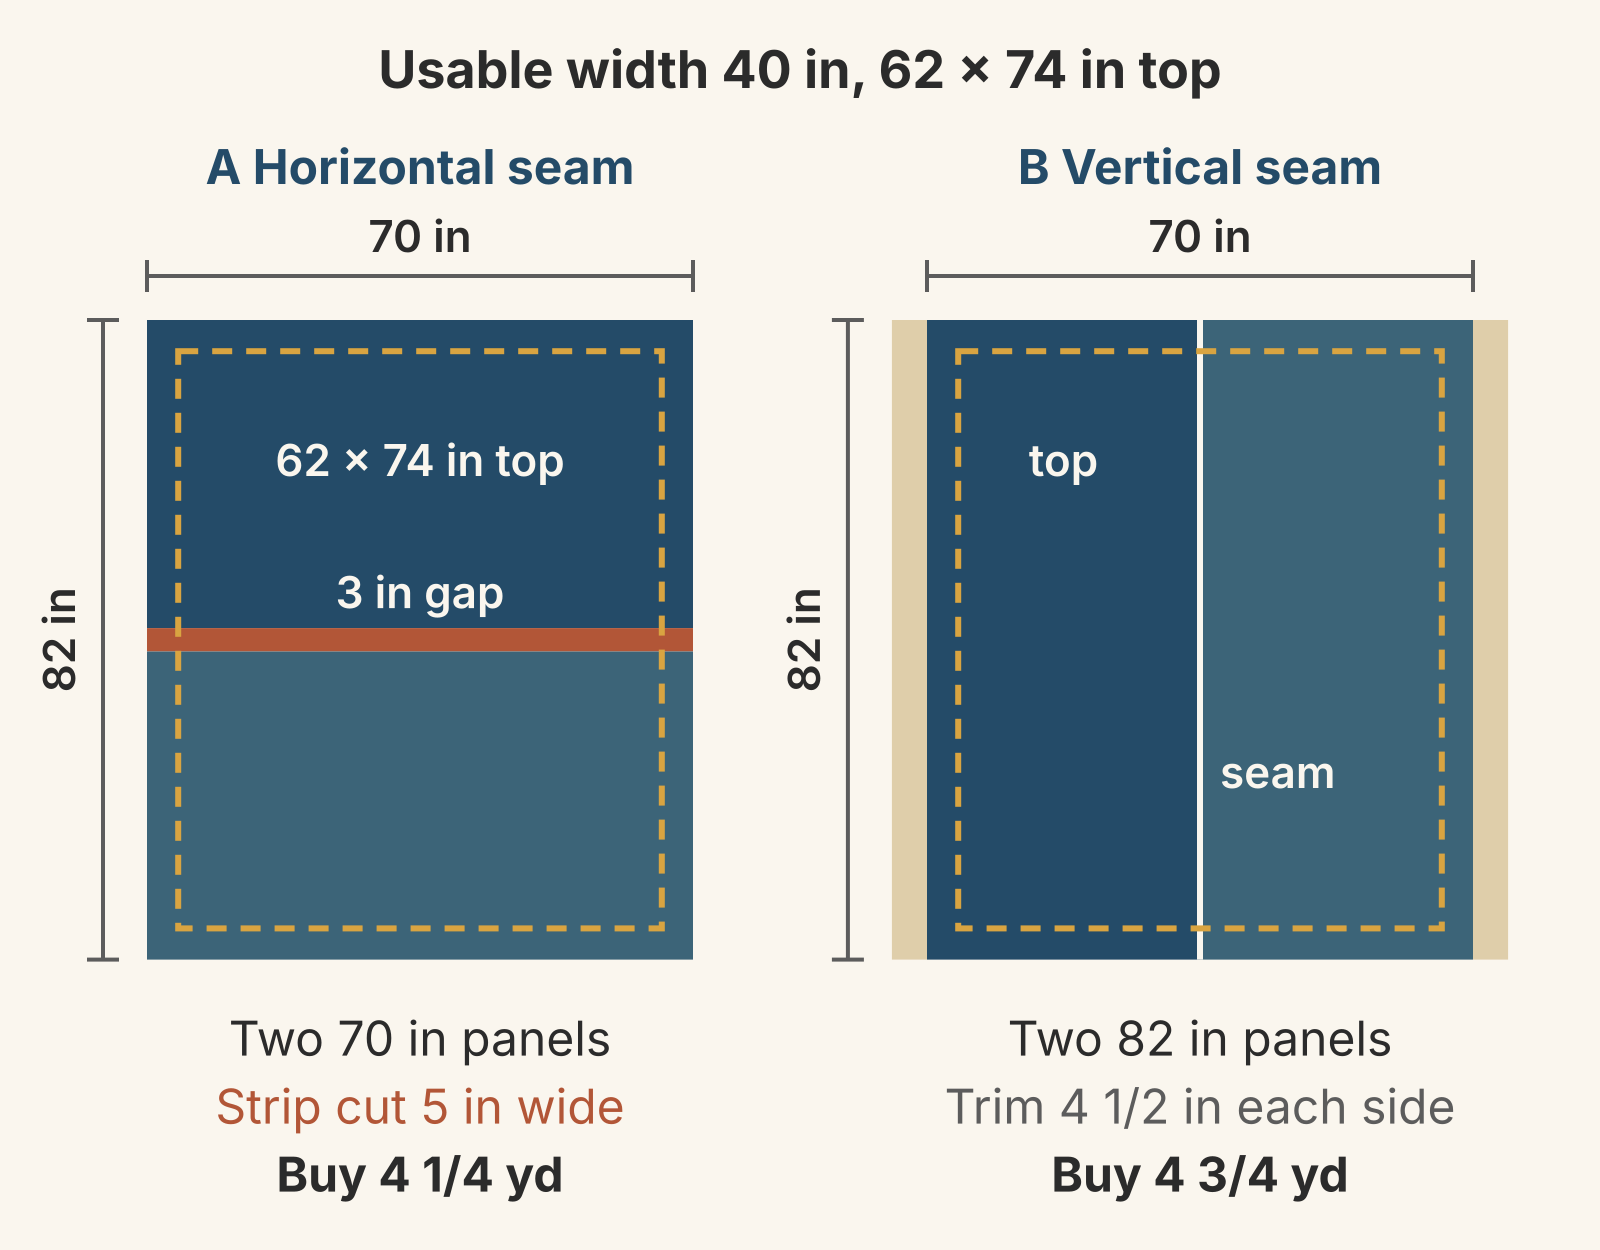
At 40 usable inches, two horizontal panels cover 79 inches, 3 short of 82. A whole third panel would bring Layout A to 6 yards. A strip between the panels costs less. Cut two strips 5 inches wide across the fabric, join them end to end, and sew the strip between the two panels. The backing then covers 83 inches, and Layout A takes 4 1/4 yards. Baker uses the same fix in her backing yardage steps, with a pieced strip down the middle of a backing that's a little too narrow.
Layout B still works with 4 1/2 inches trimmed from each side, and it still takes 4 3/4 yards.
So for this throw: if your fabric measures at least 42 usable inches and you sew 1/2-inch seams, choose Layout A. With less, choose Layout B for a single seam. If your quilter wants horizontal seams, add the strip to Layout A instead; it also saves 1/2 yard.
Which way do longarm quilters want the seam?
On a longarm frame, the backing's top and bottom edges attach to rollers that run side to side. The backing winds from one roller to the other as the quilting moves down the quilt. Cindy Roth's loading guide for Longarm University assumes the quilt goes on with its shorter edges at the top and bottom. On most tops, a horizontal seam then runs parallel to the rollers.
- Angela Huffman of Quilted Joy, an APQS longarm dealer and educator, says to orient the seam parallel to the bars. A seam that crosses them stacks on itself as it wraps around the rollers, which can lead to pleats and uneven quilting.
- Keelyn gives a similar reason. A horizontal seam keeps the backing straight and evenly taut, she writes, while a vertical one can be taut at the seam and loose on either side.
- Marion, the longarm quilter McConnell asked for her guide, prefers horizontal seams because they make a backing easier to square up. If the quilt's size forces vertical seams, she suggests squaring the backing carefully and adding extra width and length.
Vertical seams still get quilted. Roth notes that a center back seam can serve as the center mark when she loads a backing. She rolls the backing back and forth until the fabric on both sides of the seam lies flat. When it won't, one cause she lists is a seam with one side gathered into it as it was sewn.
If your backing has to have a vertical seam, tell your quilter before you sew it. Ask whether they'll load the quilt sideways so the seam runs parallel to the rollers. That needs a frame long enough for the quilt's length, and McConnell notes there may be some all-over designs your quilter can't use on a sideways quilt. If you quilt on a home machine, there are no rollers to plan around, so pick the layout that uses less fabric.
How the top's size changes the direction
Here are four tops worked both ways, with 4 inches per side.
| Quilt top | Backing, 4 in per side | 42 in usable | 40 in usable |
|---|---|---|---|
| 50 x 60 in | 58 x 68 in | Horizontal, 2 panels, 3 1/4 yd | Horizontal, 2 panels, 3 1/4 yd |
| 62 x 74 in | 70 x 82 in | Horizontal, 2 panels, 4 yd | Vertical, 2 panels, 4 3/4 yd |
| 72 x 90 in | 80 x 98 in | Vertical, 2 panels, 5 1/2 yd | Horizontal, 3 panels, 6 3/4 yd |
| 90 x 100 in | 98 x 108 in | Horizontal, 3 panels, 8 1/4 yd | Horizontal, 3 panels, 8 1/4 yd |
Each cell is the layout that takes the least fabric in whole widths, rounded up to the next quarter yard. Where two widths fall a few inches short, a strip like the one above can cost less.
Once both backing dimensions pass what two widths can cover, you need three panels either way. Then the choice gets simpler. With the same number of panels in both directions, seams parallel to the backing's shorter edges take less fabric, because each panel is cut to the shorter dimension.
The 72 x 90 inch top flips the other way. At 40 usable inches, two vertical panels cover 79 inches of the 80-inch backing width, 1 inch short. Three horizontal panels become the cheaper layout. Before you buy that third width, ask your quilter whether 3 1/2 inches per side is enough. If it is, two vertical panels still fit in 5 1/2 yards.
For the 90 x 100 inch top, three horizontal panels take 8 1/4 yards and three vertical panels take 9. Baker's rule calls for vertical seams on a top this wide, but the horizontal seams save 3/4 yard.
If you'd rather have no seam at all, wideback fabric removes the question for most quilts. Our backing and binding yardage guide shows when wideback saves fabric and works the yardage for five sizes.
When does the print decide?
A one-way print can overrule the arithmetic. Check which way the motif points against the selvage. In Layout A the selvages run side to side across the back, so a motif that points along the selvage lies on its side. In Layout B they run top to bottom, and the same motif stands upright.
Baker's tip keeps a directional print running the same way across the seam in either layout. Cut the right selvage from one panel and the left selvage from the other, then sew the two cut edges together.
Plan the seam before you buy
- Measure the finished top in inches, borders included.
- Ask your quilter how much extra they need on each side and which way they want the seam.
- Measure the usable width of the backing fabric, selvages off, after prewashing if you prewash.
- Work out what two widths cover: twice the usable width, minus 1 inch for 1/2-inch seams.
- If that covers the backing length, use a horizontal seam. If it covers only the width, use a vertical seam. If it covers neither, compare three panels each way. When two widths fall just short, price a strip between them too.
- Check the print direction, then buy.
If you laid the quilt out in QuiltLab, the Quilt Editor shows the finished size beside the Layout heading in Properties. Once you add a border, the status bar also shows an Overall size with the borders included. Plan the backing from that number. QuiltLab doesn't plan backing panels or yardage, so the seam layout is yours to work out.
Quilt Editor: arrange blocks and fabric →Where a layout's finished dimensions appearStart with step 3: measure the usable width of the backing fabric you have in mind. Set that number against your backing size, and you'll know which way the seam goes before you cut anything.
Related posts
Joining Batting Scraps: Zigzag, Tape or Hand Stitch?
Butt matched edges and join them with a wide zigzag or fusible tape. See which method suits your batting, a seam plan for a 68 x 80 inch batting and a sample test.
Pin Basting vs Spray Basting: Which Fits Your Quilt and Room?
Pins 3 to 4 inches apart hold until you remove them; spray is faster but lasts only as long as its label says. Choose by quilt size, surface and can.
How to Prepare a Quilt for Longarm Quilting
The checklist longarm quilters ask for, with the reason behind each step, then one 64 x 80 inch top checked against two real service sheets.