


Quarter Square Triangle Size Chart: Cut Big, Trim to the Center
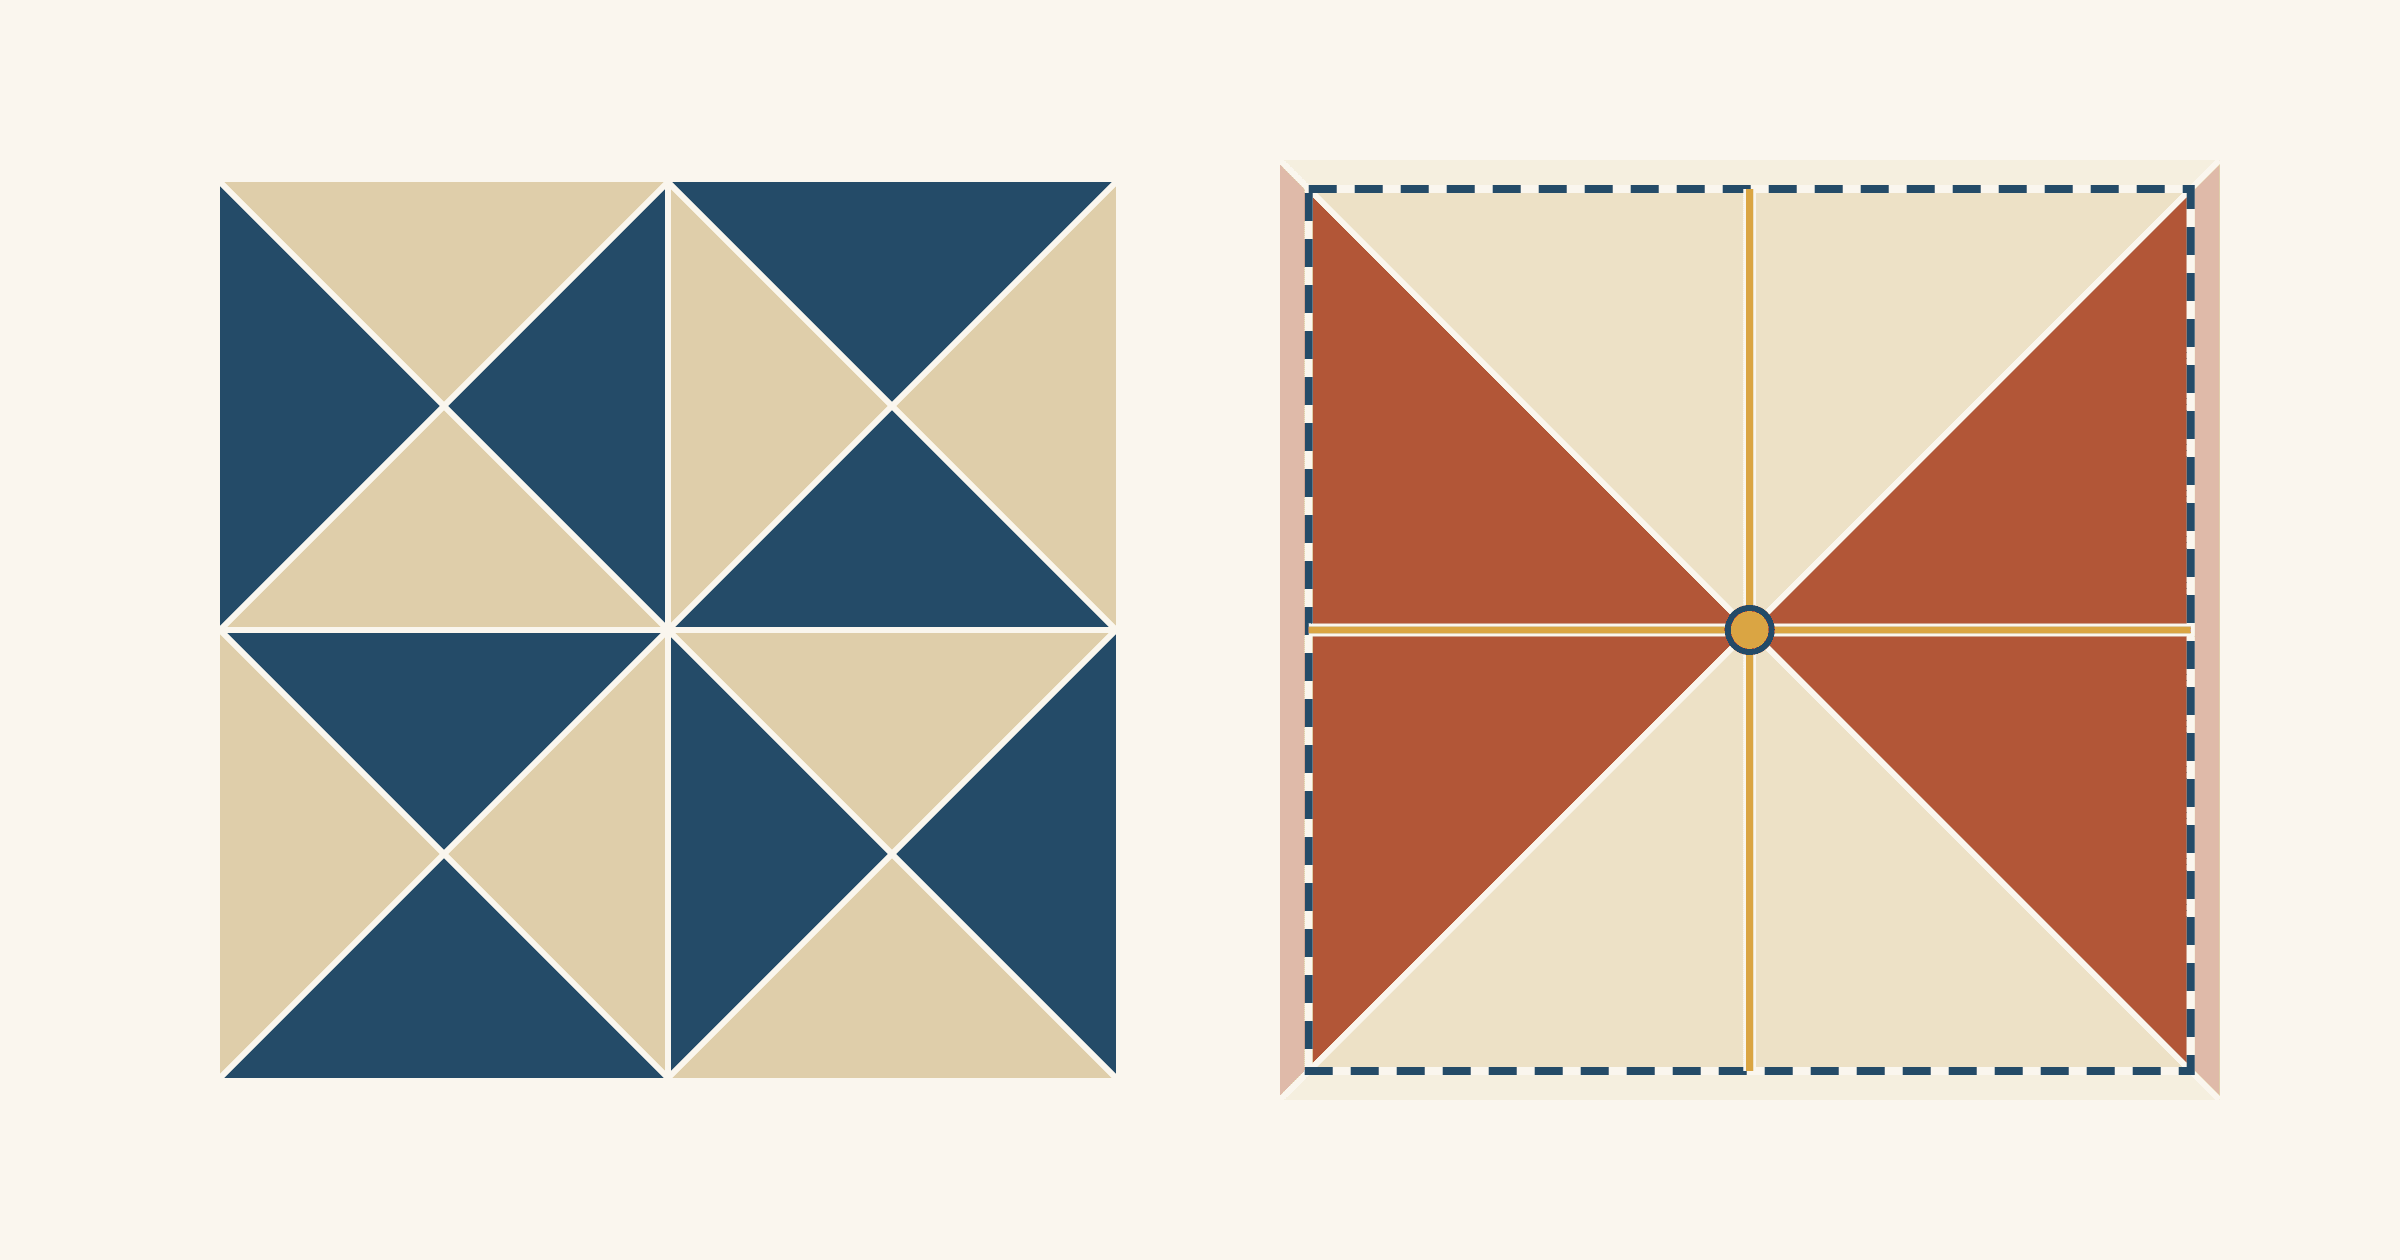
To make two quarter-square triangle (QST) units, also called hourglass units, cut two squares 1 1/4 inches larger than the finished size. That is the rule Nancy Zieman taught on Sewing with Nancy: 5 1/4-inch squares for a 4-inch finished unit. Other teachers cut 1 1/2 inches larger and trim. Erin Kroeker suggests the bigger squares for beginners and anyone who wants wiggle room in her QST tutorial for OLFA. Christine Weld cuts hers that way in her Moda Bake Shop QST lesson.
We recommend the 1 1/2-inch version for most quilters. The extra quarter inch is what lets you trim around the center, where the four triangles meet, so the seams run into the corners. For a 4-inch finished hourglass, cut 5 1/2-inch squares, then trim each unit to 4 1/2 inches with the center on the ruler's 2 1/4-inch marks.
Quarter square triangle size chart
Each pair of squares, one of each fabric, makes two hourglass units. Trim size is the finished size plus 1/2 inch, and the center mark is half the trim size.
| Finished unit | Squares (+1 1/4) | Squares (+1 1/2) | Trim to (center mark) |
|---|---|---|---|
| 2 inches | 3 1/4 inches | 3 1/2 inches | 2 1/2 inches (1 1/4 inches) |
| 3 inches | 4 1/4 inches | 4 1/2 inches | 3 1/2 inches (1 3/4 inches) |
| 4 inches | 5 1/4 inches | 5 1/2 inches | 4 1/2 inches (2 1/4 inches) |
| 5 inches | 6 1/4 inches | 6 1/2 inches | 5 1/2 inches (2 3/4 inches) |
| 6 inches | 7 1/4 inches | 7 1/2 inches | 6 1/2 inches (3 1/4 inches) |
Two published hourglass tutorials follow the 1 1/2-inch rule. Kroeker's 6-inch unit starts from 7 1/2-inch squares and trims to 6 1/2 inches with the center at 3 1/4. Rita Hodge's hourglass tutorial at Red Pepper Quilts starts from 6-inch squares and trims to 5 inches, measuring 2 1/2 inches out from the center.
Precuts fit the same rule. Weld notes that a pair of 5-inch charm squares trims to 4 inches and finishes at 3 1/2. A pair of 10-inch layer cake squares trims to 9 inches and finishes at 8 1/2.
The chart is for methods that start from two squares and turn a pair of half-square triangles (HSTs) into two hourglasses. Methods that make more units at once use their own numbers, so follow their charts. If two charts still disagree, translate both to the finished size before you cut.
Where the 1 1/4 inches goes
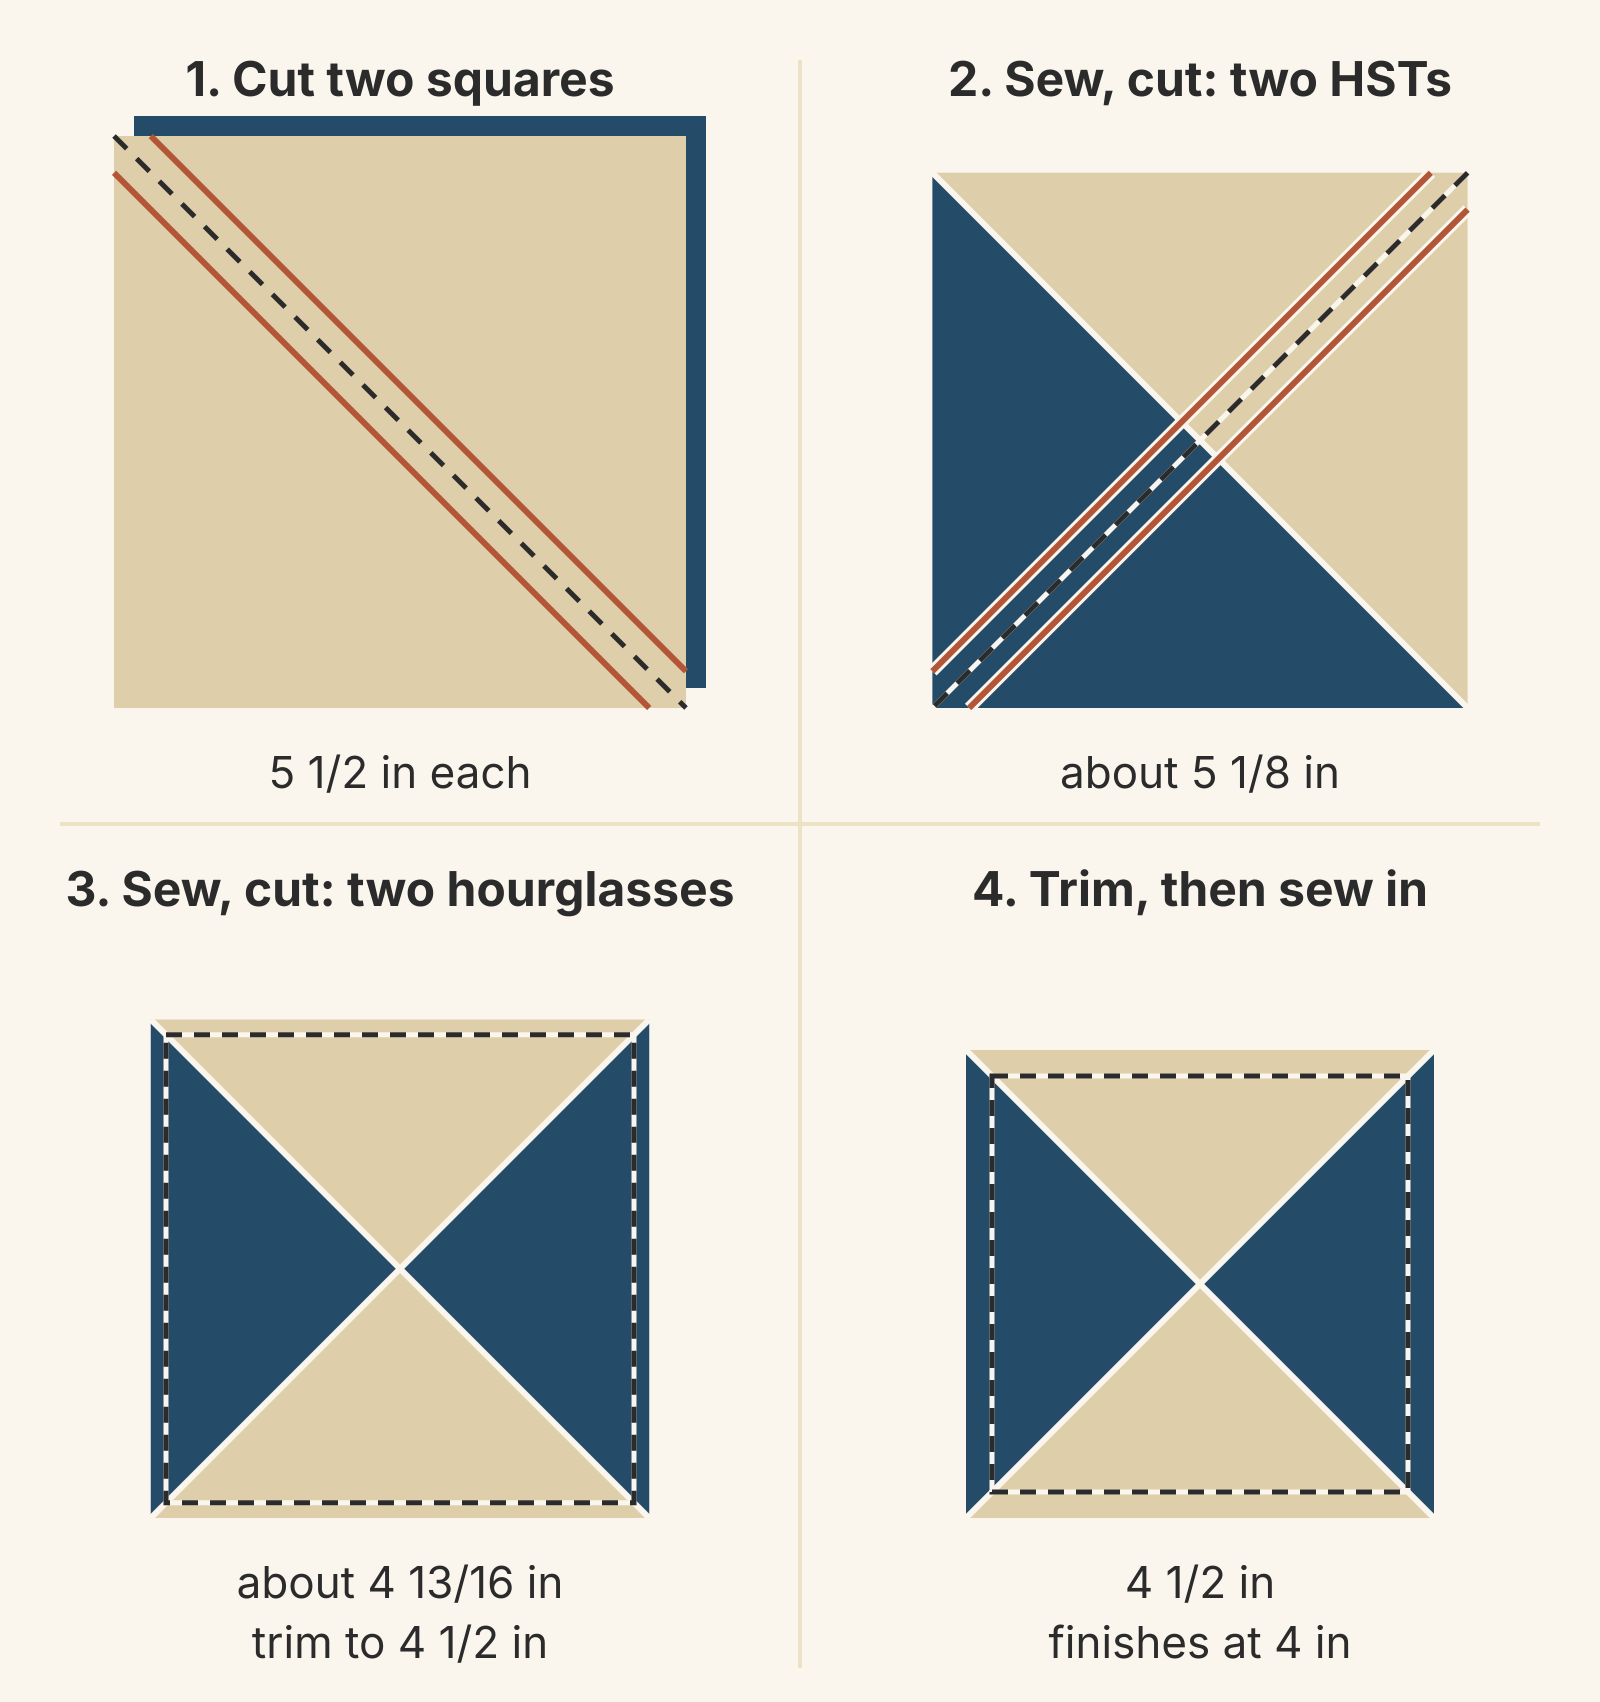
The unit loses fabric to two diagonal seams and to its outside seams.
- First seam. Sew 1/4 inch on both sides of a diagonal and cut between, the same start as two-at-a-time HSTs. A 1/4-inch seam beside a 45-degree line shortens the opened square by 1/4 inch times 1.414 (the square root of 2), about 0.354 inch.
- Second seam. Layer the two HSTs right sides together, contrasting fabrics facing and seams nested. Mark the diagonal that crosses the seam, sew 1/4 inch on both sides and cut. That takes another 0.354 inch.
- Outside seams. The finished unit needs 1/4 inch on each side, so 1/2 inch in all.
Add them up and the exact allowance is 0.354 + 0.354 + 0.5 = 1.207 inches. The 1 1/4-inch rule rounds that up to a measurement on your ruler.
On paper, with perfect 1/4-inch seams, 5 1/4-inch squares sew into units about 4.54 inches wide. That's 0.043 inch over the 4 1/2-inch trim size, less than 1/32 inch per side. Thread and the fold at each seam take a little more in real fabric, so that margin can vanish. In Zieman's demonstration, 5 1/4-inch squares yield a pair of 4 1/2-inch units; the rule assumes accurate seams and leaves nothing to spare.
Squares cut at 5 1/2 inches sew into units about 4.79 inches wide. That leaves 0.293 inch to trim, a little over 1/8 inch per side.
The same allowance turns up in other quarter-square triangles. Cut a square on both diagonals and each of the four triangles keeps straight grain on its long edge. For those, the square is also cut 1 1/4 inches larger than the finished long edge. That is the side-triangle math in our on-point setting guide.
How to trim a quarter square triangle around its center
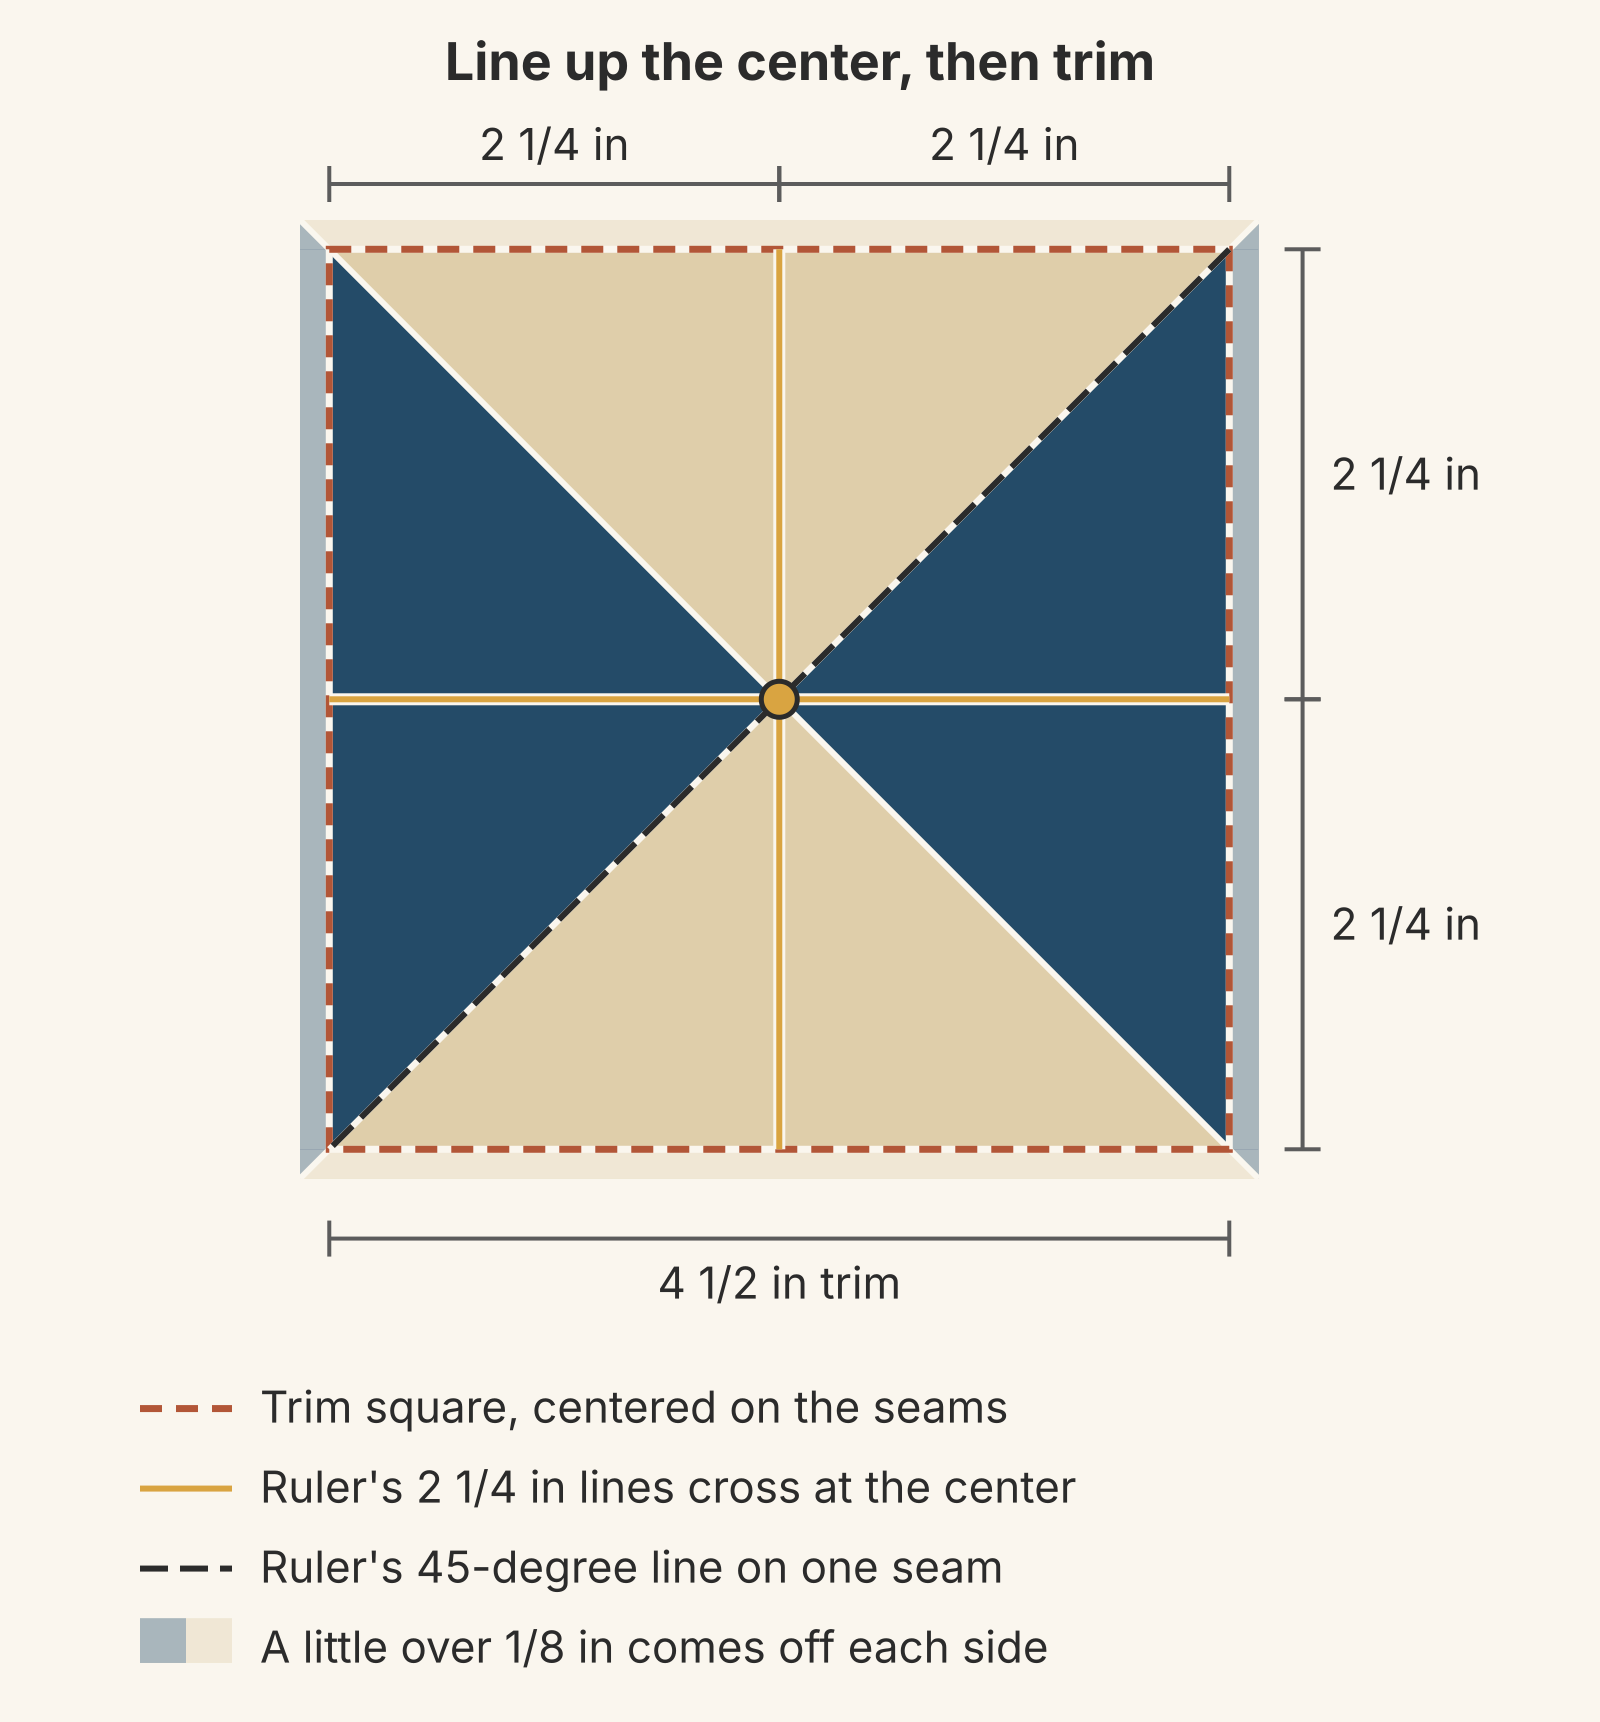
The center is where the two seams cross. The goal is a trimmed unit with that point exactly in the middle and both seams running into the corners. It's the same two-pass trim used for half-square triangles, with the center as a second mark to hold. Here's the routine for a 4 1/2-inch trim:
- Press the unit flat before it goes under the ruler.
- Halve the trim size. Half of 4 1/2 inches is 2 1/4 inches. Weld suggests marking that spot on your ruler with a bit of tape when you have many units to trim.
- Place the ruler. Use a square ruler a little bigger than the unit, with a clear 45-degree line; a 6 1/2-inch square covers this example. Put the 2 1/4-inch lines across the center and the 45-degree line on one seam. If the seam and the 45-degree line won't agree exactly, Weld's advice is to get as close as you can without letting the center move off its mark.
- Cut the two edges along the ruler, usually the right and top.
- Turn the unit 180 degrees. Set the cut edges on the 4 1/2-inch lines, check the center and the 45-degree line again, and cut the last two edges.
- Check it. The center should be 2 1/4 inches from all four edges, and each seam should run corner to corner.
What an off-center trim does to the points
Suppose you square the unit to its raw edges and the center ends up 1/8 inch right of the middle. Each seam now misses its finished corner by 1/8 inch. The navy triangle on the left grows to 2 1/8 inches deep and wraps around its corners, and the one on the right shrinks to 1 7/8 inches and stops short of them. The finished size is still right, but the points won't meet the next unit's points at the seam.
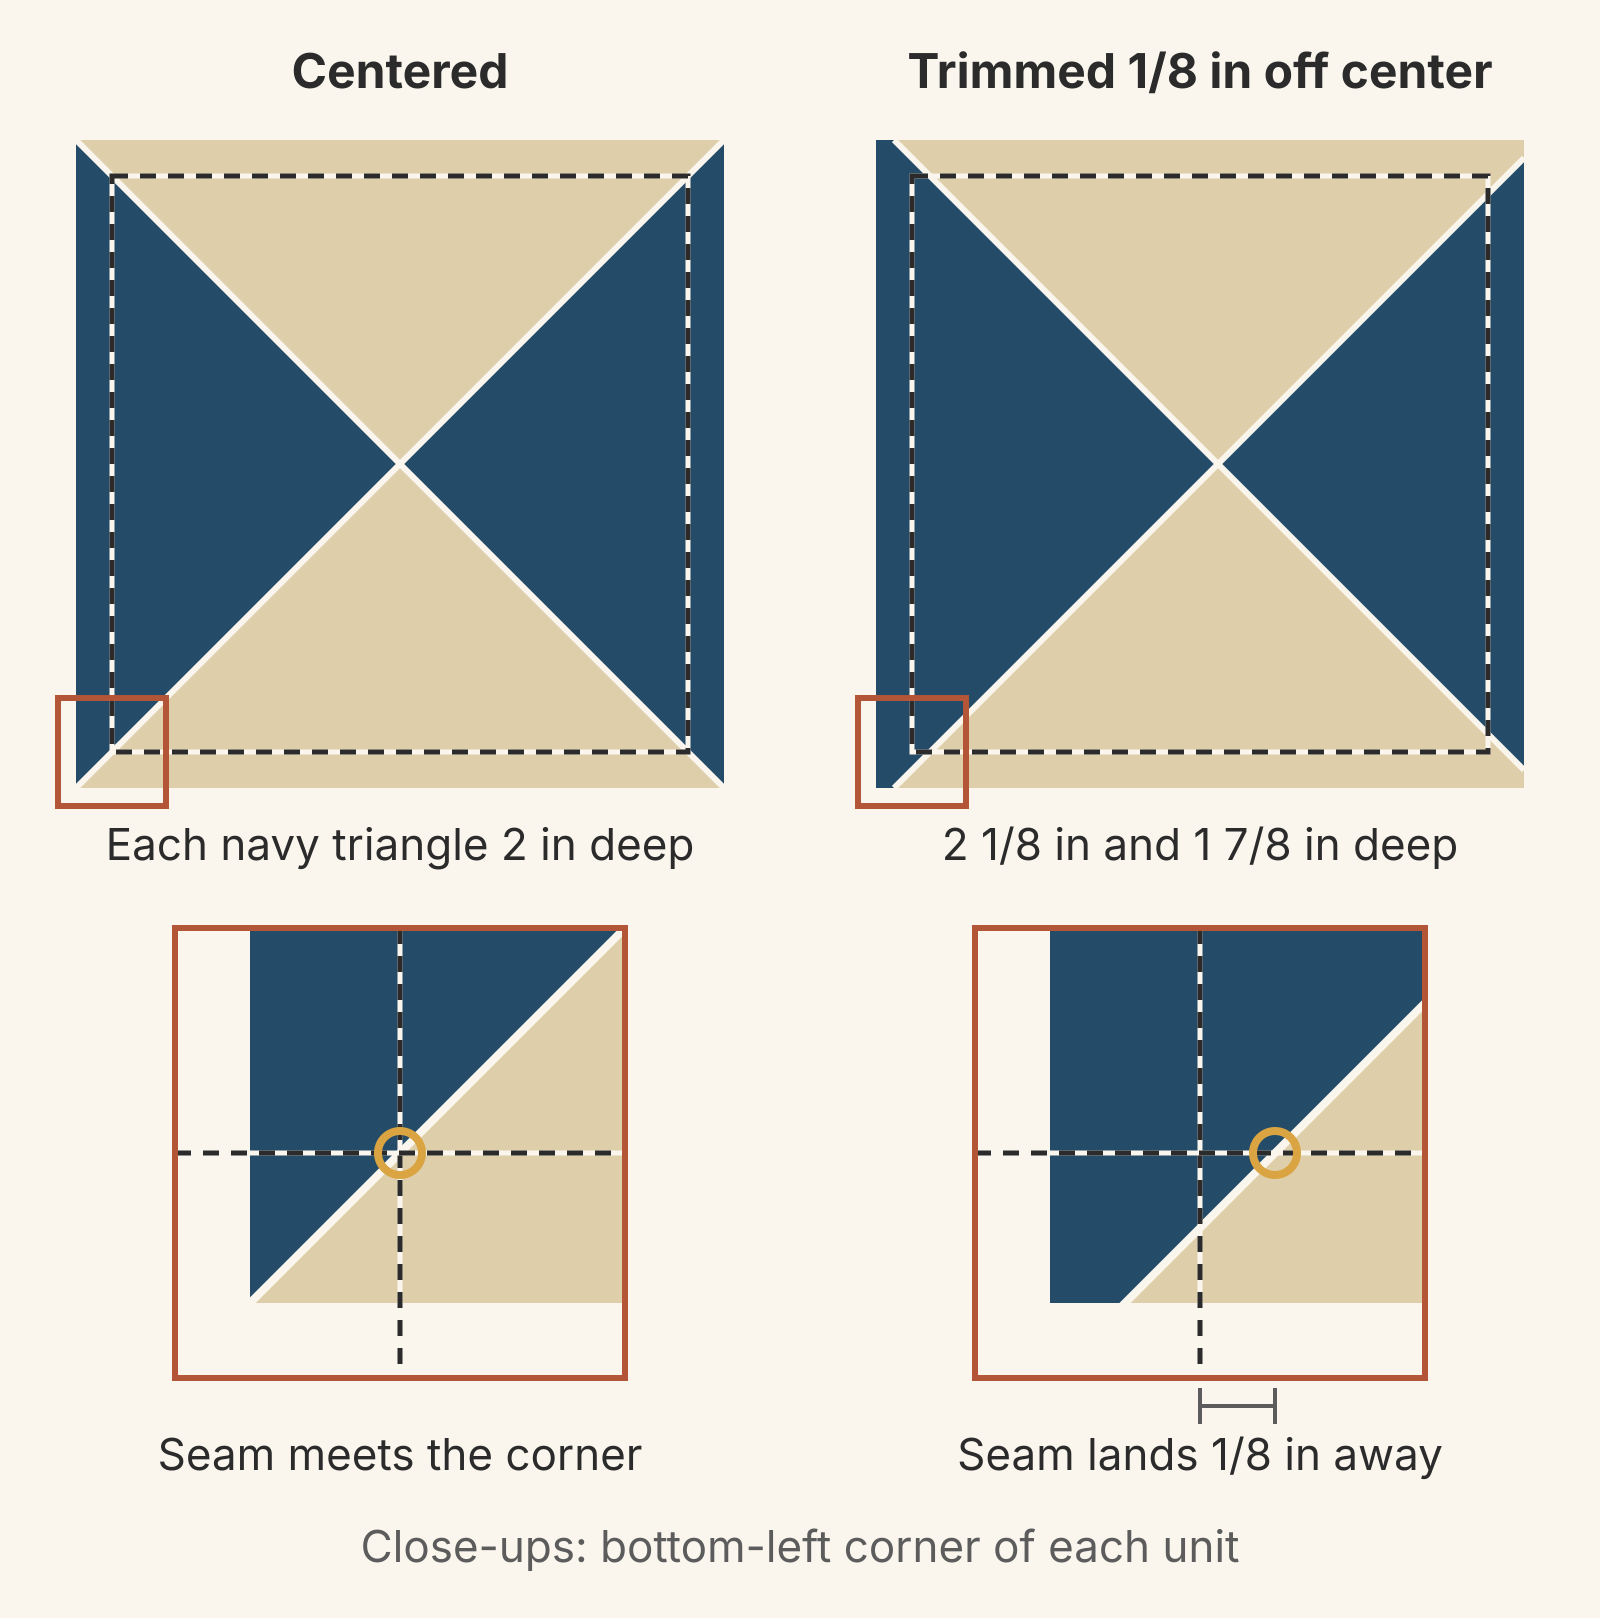
This is why the bigger squares matter. A unit sewn from 5 1/2-inch squares has a little over 1/8 inch to spare on every side. That means its center can sit up to about 1/8 inch off the unit's middle and you can still trim a full 4 1/2-inch square around it. A unit sewn from 5 1/4-inch squares has less than 1/32 inch to spare. If its center is off, you have no fabric to move the trim square.
A center usually drifts when the two HSTs are different sizes, when their seams weren't nested exactly, or when the second line wasn't drawn corner to corner. Fix those on the next pair. Trimming centers the point you have; it can't add fabric to a unit that measures under 4 1/2 inches.
Worked example: 24 hourglass units for six 8-inch blocks
The Big Dipper block is four hourglass units, each turned a quarter from its neighbors. With 4-inch finished units, the block finishes at 8 inches (8 1/2 inches before it is sewn into the quilt). Six blocks need 6 x 4 = 24 hourglass units.
- Pairs: each pair of squares makes two units, so 24 / 2 = 12 pairs.
- Squares: cut 12 navy and 12 tan squares at 5 1/2 inches.
- Strips: a 5 1/2-inch strip with 40 usable inches gives 7 squares (7 x 5 1/2 = 38 1/2 inches). Cut 2 strips of each fabric for 14 squares, 2 more than you need. Squares cut at 5 1/4 inches also come 7 to a strip, so the bigger squares cost no extra strips here.
- Test pair: sew one navy and tan pair all the way through first. Measure both units before cutting the rest: each should be at least 4 1/2 inches, with room to center the trim. If they pass, they count toward the 24.
- Trim: every unit goes to 4 1/2 inches with the center at 2 1/4 inches, then finishes at 4 inches in the block.
Every unit in the block has the same two fabrics, so the two hourglasses from each pair are interchangeable once you turn them.
Plan the hourglass layout in QuiltLab
Before cutting, you can draw the block in QuiltLab's Block Editor at its finished 8-inch size, with four 4-inch hourglasses, set the triangles to your two fabrics, and save it to your library. In the Quilt Editor, place it in a Grid layout and set the block size, rows and columns. Six 8-inch blocks in 2 columns and 3 rows make a 16 x 24-inch center.
Block Editor guide →Draw pieces, set their measurements and assign fabricsQuiltLab works in finished sizes and doesn't generate cut sizes or yardage, so keep the 5 1/2-inch squares and the 4 1/2-inch trim in your own notes. The Quilt Editor guide covers Grid layouts and finished measurements.
For your own project, find your finished size in the chart and cut one test pair from the 1 1/2-inch column. Sew it, trim both units around their centers and check that each seam runs corner to corner. Then cut the rest.
Related posts

How to Design a Bargello Quilt: Plan the Wave on Paper
A bargello wave is a staircase of stepped columns. Number your strips, write one row per column, and see how column width turns a zigzag into a curve.

Borderless Quilt Design: Plan an Edge That Looks Finished
With no border, the outer blocks and the binding make the edge. Compare whole and halved motifs on one 48 x 60 inch quilt, then pick the binding color.

Crosshatch Quilting: How to Make the Lines Meet at the Edges
Space a 45-degree crosshatch so the lines meet in a V at every edge and corner. Choose the edge step first, mark dots around the quilt, then connect them.