


Why Are My Quilt Blocks Too Small? Measure Backward to Find Out
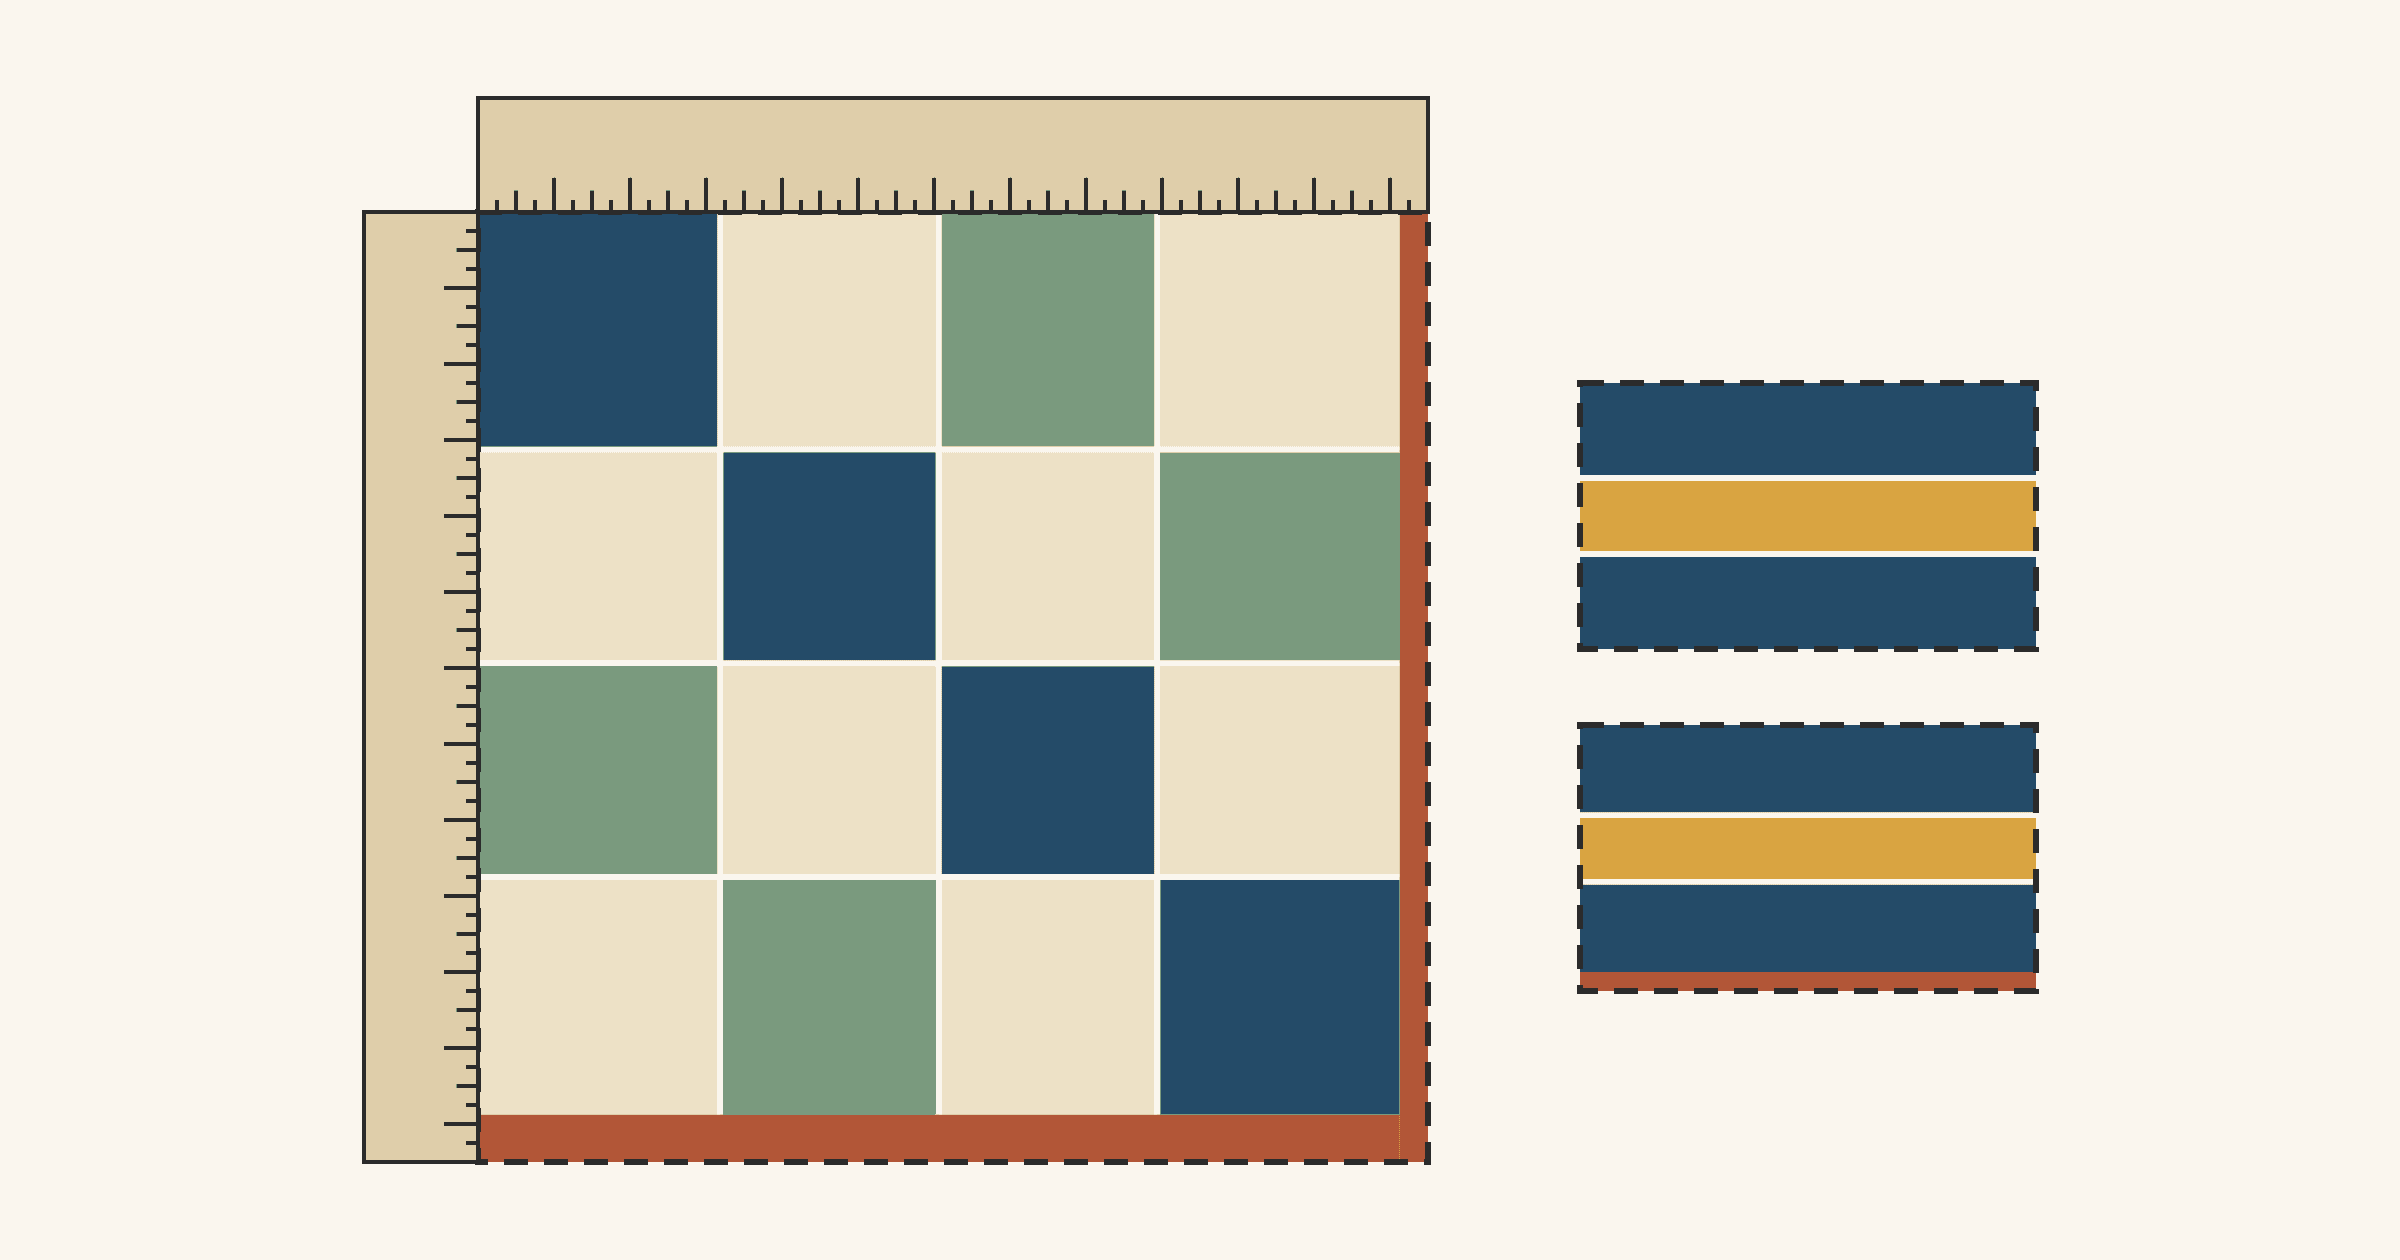
Most quilt blocks that finish too small have a seam allowance that's a little too wide. Becky Jorgensen of Patchwork Posse calls the 1/4 in. seam "the quiet villain behind most block-size trouble" and warns that "even a thread or two too wide will shrink your block" (Why Are My Quilt Blocks Finishing the Wrong Size?). Cutting, pressing and trimming can lose size too. So before you change anything, measure backward: the block, then its units, then a spare cut piece, then the seam itself. Each level shows where the size went missing, and there's often more than one cause.
The reason small errors matter is simple arithmetic. Every seam takes its allowance from both pieces. Sew at 5/16 in. instead of 1/4 in. and each seam costs an extra 1/8 in. A block with three seams across it comes up 3/8 in. short, which is enough to stop it lining up with its neighbors.
Start with the block, measured both ways
Lay the block flat without stretching it. Measure side to side and top to bottom through the middle, then again near each edge. Compare those numbers with the unfinished size, which is the finished size plus 1/2 in. A 12 in. block should measure 12 1/2 in. square before it joins the quilt.
Write down the shortfall for each direction. Then count the seams that cross each measurement. Those two numbers, the shortfall and the seam count, already narrow the search.
| What the measurements show | Likely cause | Check next |
|---|---|---|
| Short by the same amount both ways, more on blocks with more seams | Seam allowance too wide | Strip test and the allowance on the back |
| Short more in one direction | Pieces cut narrow in that direction | A spare cut piece, measured both ways |
| Units measure right, but the block is short | The seams that joined the units | Those seams' allowances and pressing |
| A unit is exactly 1/2 in. short | Cut or trimmed to the finished size | The pattern's cut and unfinished sizes |
| Allowance measures 1/4 in., unit still short | A fold left at the seam when pressing | The front of each seam |
| One edge shorter than the opposite edge | A wandering seam, a stretched edge or a crooked trim | Three measurements across the block |
A worked example: a Sixteen Patch that's short both ways
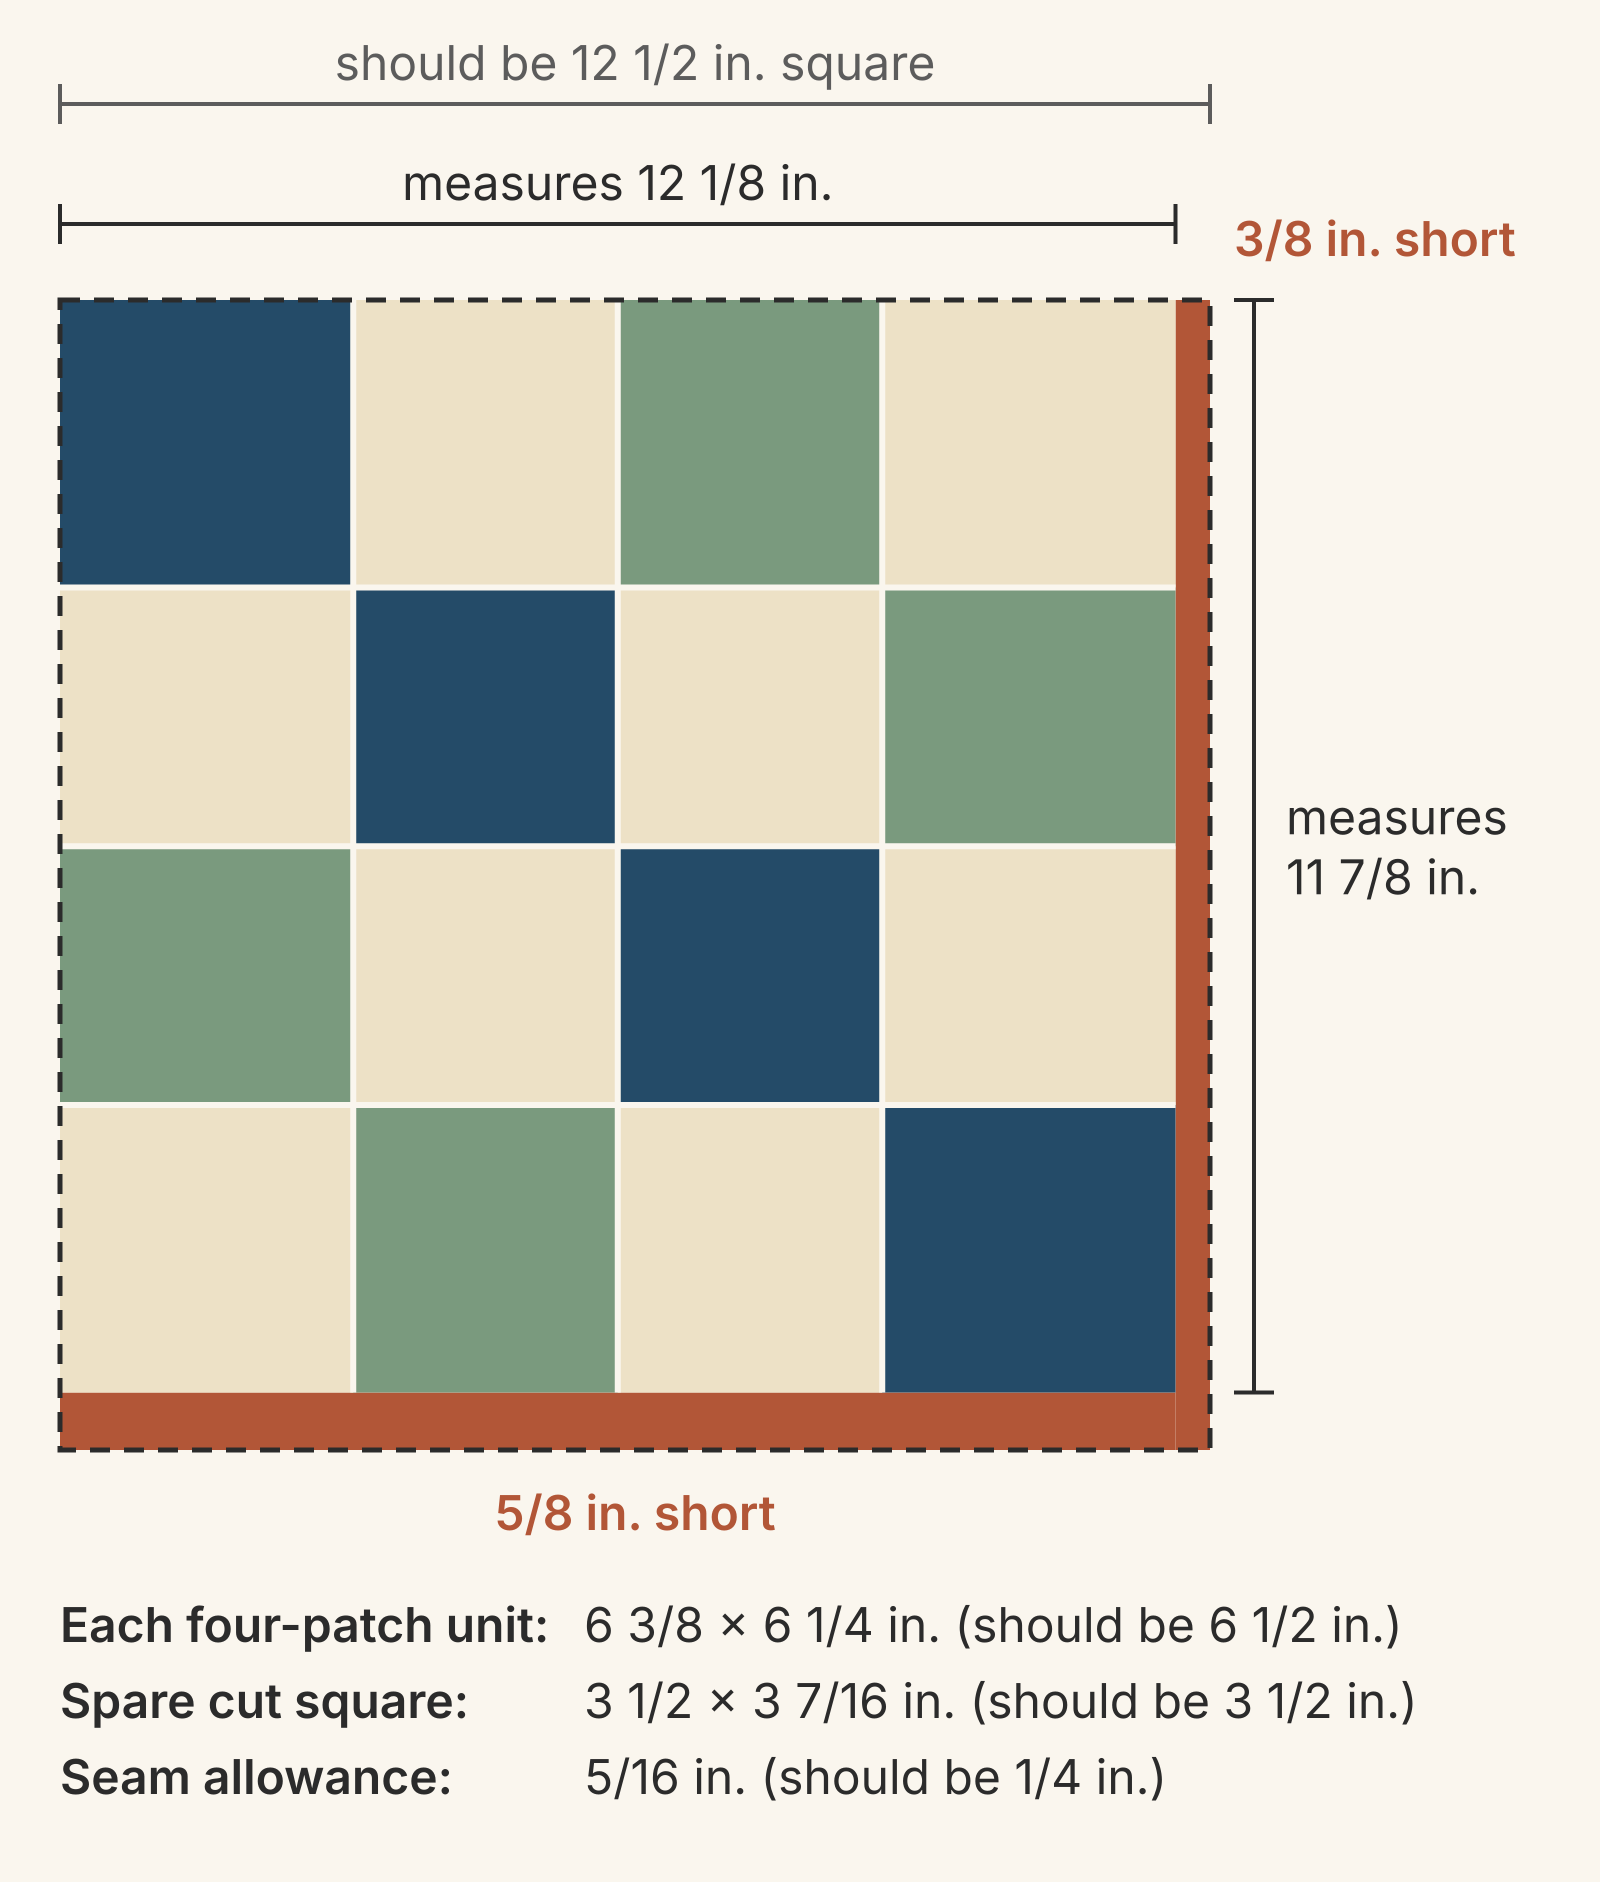
Here's the trace on one block. It's a 12 in. finished Sixteen Patch: sixteen 3 1/2 in. cut squares sewn into four four-patch units, each 6 1/2 in. unfinished, then joined. It should measure 12 1/2 in. square. The measurements are a made-up example, and we drew the diagrams for this article without sewing them.
| What you measure | Should be | Measures | Short by |
|---|---|---|---|
| Block, side to side | 12 1/2 in. | 12 1/8 in. | 3/8 in. |
| Block, top to bottom | 12 1/2 in. | 11 7/8 in. | 5/8 in. |
| Four-patch unit, side to side | 6 1/2 in. | 6 3/8 in. | 1/8 in. |
| Four-patch unit, top to bottom | 6 1/2 in. | 6 1/4 in. | 1/4 in. |
| Spare square, side to side | 3 1/2 in. | 3 1/2 in. | 0 |
| Spare square, top to bottom | 3 1/2 in. | 3 7/16 in. | 1/16 in. |
| Seam allowance, on the back | 1/4 in. | 5/16 in. | 1/16 in. too wide |
Now read it backward, one level at a time.
- The block. Three seams cross it in each direction: one inside each unit, plus the seam that joins the units. If the seams were the only problem, both directions would be short by the same amount. They aren't. The height is short an extra 1/4 in., so two things went wrong, and one of them affects only the height.
- The units. They show the same split, 1/8 in. one way and 1/4 in. the other. The errors were already in the units before you joined them. The seams that joined the units cost another 1/8 in. each way, like every other seam.
- The spare square. It measures 3 1/2 in. one way and 3 7/16 in. the other. The strip was cut 1/16 in. narrow, so every square is short in that direction. Four squares stack from top to bottom, and 4 x 1/16 in. is the extra 1/4 in.
- The seam. On the back, the allowance measures 5/16 in. Each seam takes an extra 1/16 in. from both pieces it joins. That's 1/8 in. per seam and 3/8 in. across three seams.
The two causes add up exactly. The seams cost 3/8 in. in both directions, and the narrow strip cost another 1/4 in. top to bottom, for 5/8 in. This only works out so neatly because the squares stayed turned the same way after subcutting. Turn some of them and the cutting error spreads into both directions, and the crossing seams stop lining up.
Check the seam with a strip test
One seam that's 1/16 in. off is hard to see. A strip test adds four of those errors together, so you can measure them. C&T Publishing's version, in Tips for Sewing a Perfect 1/4" Seam, uses three strips cut 1 1/2 in. wide and at least 3 in. long, ideally from your project fabric because fabric weight matters. Sew them side by side with your usual seam, press the allowances toward the outside, and measure. The piece should be exactly 3 1/2 in. wide. If it's narrower, your seams are too wide.
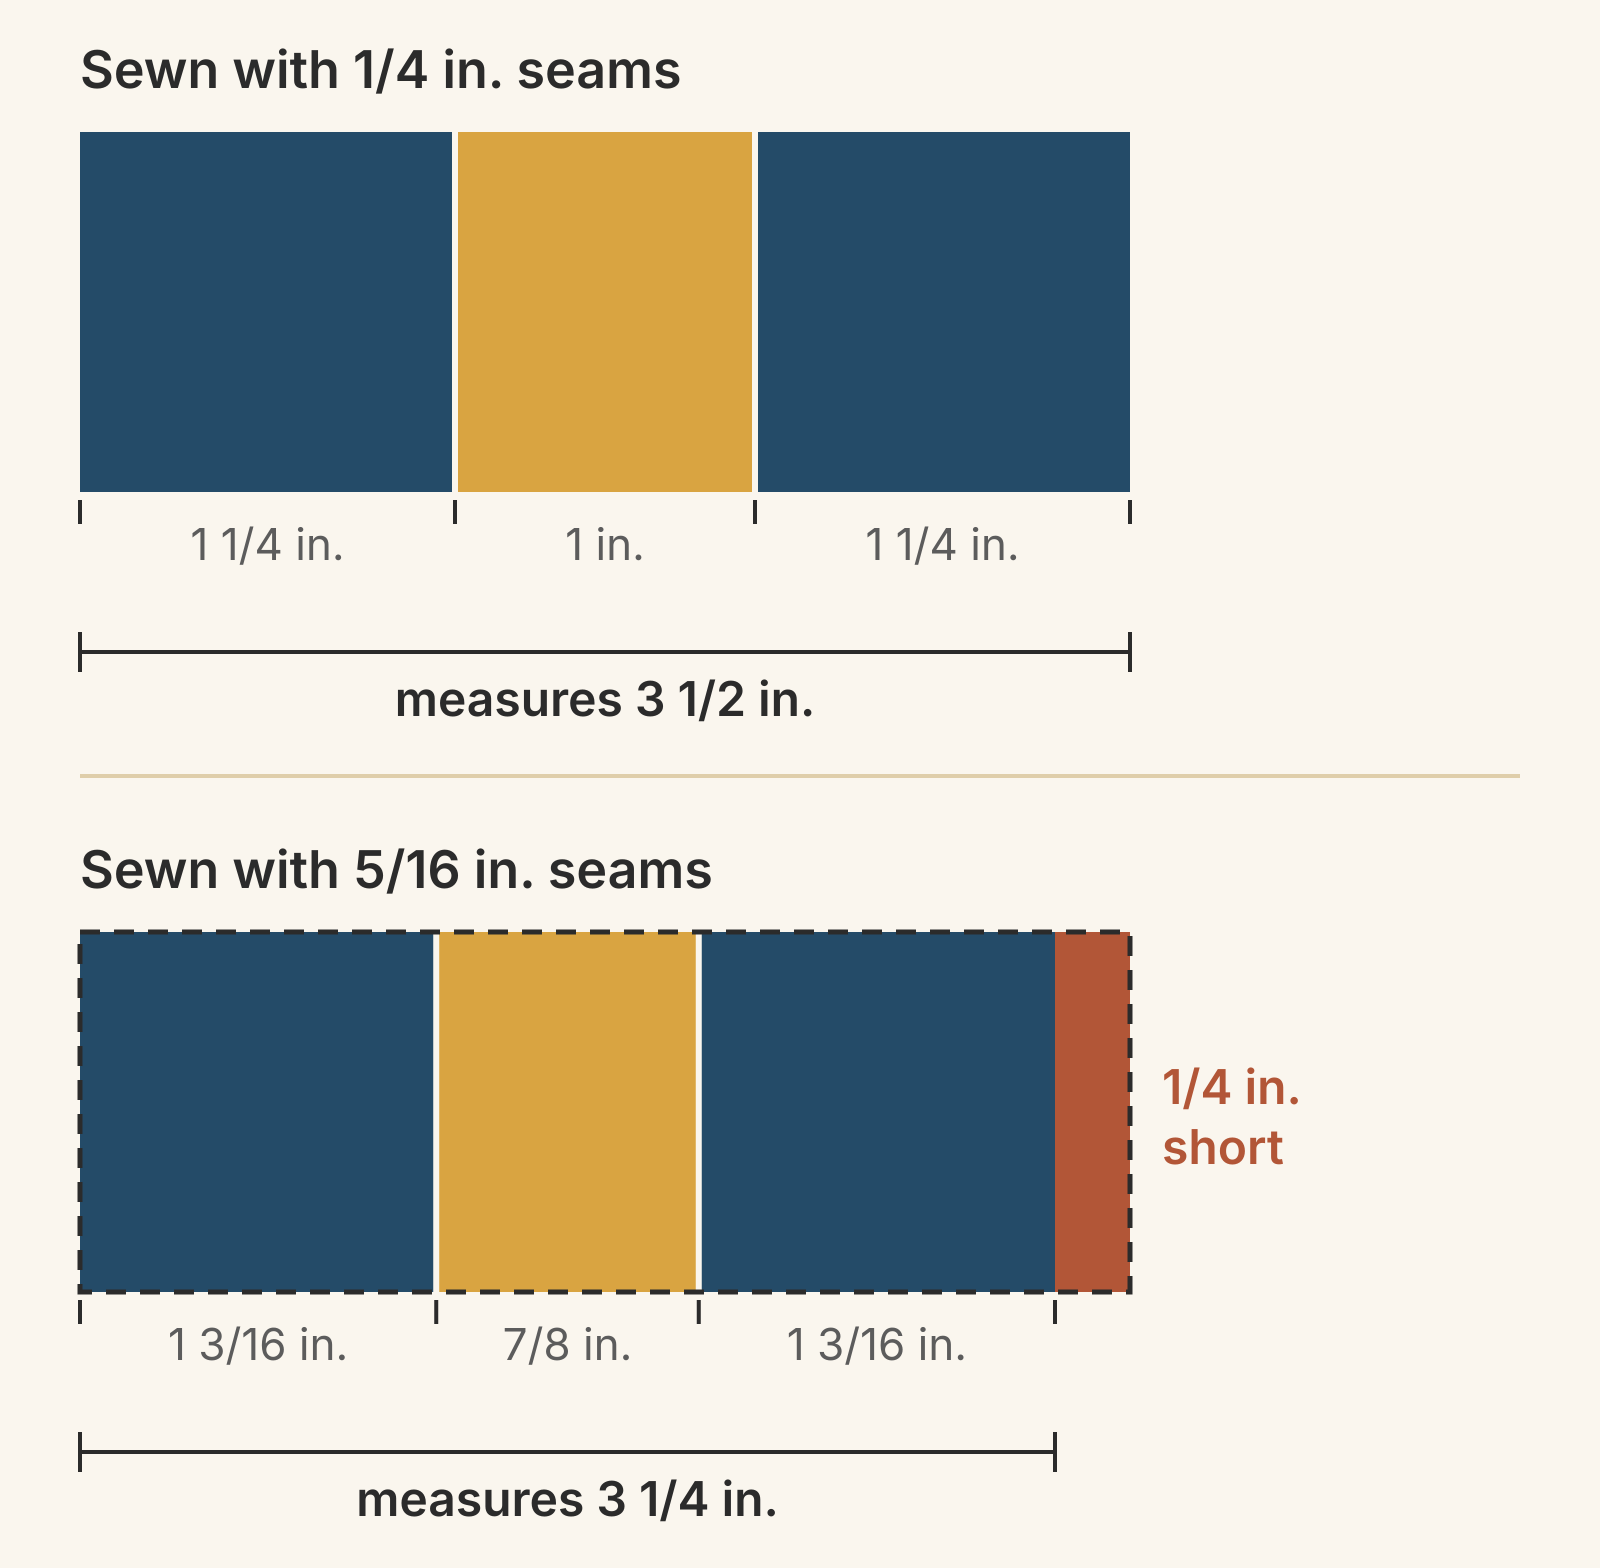
The same C&T article explains why a seam can look right and still lose size: the thread and the fold of fabric over the seam take up a little space. That's why books often call for a scant 1/4 in., a seam a little narrower than 1/4 in. To correct the seam, C&T suggests moving the needle slightly to the right if your machine allows it, or placing a guide of stacked painter's tape or moleskin 1/4 in. to the right of the needle. Write down the setting that passes, and retest with each new project's fabric.
Small seam errors add up faster than you'd expect. Designer Leila Gardunia, writing on Amy Smart's Diary of a Quilter, found her blocks were more than 1/2 in. too small. When she measured her seams, every one was just a hair over 1/4 in. Changing her machine's setting to a scant 1/4 in. fixed it (How to Resize a Quilt Block that is Too Small).
Check the cutting
You can't measure a square once it's sewn, so keep a spare piece from each batch or measure the leftover end of the strip in a few places. Measure in both directions. A piece that's short one way, like the 3 1/2 x 3 7/16 in. square above, points to strip width.
Jorgensen's cutting checklist is short: a fresh blade, a stable ruler, and the ruler's lines instead of the mat's. C&T passes on a tip from Jan Krentz: line the fabric up so the whole printed ruler line sits on the strip. That adds about a thread's width to each cut.
If you cut from printed templates or sew on printed foundation papers, check the printout too. Jinny Beyer advises printing at 100% with no scaling and checking the template's printed gauge with a ruler. Her own printer needed 101%, and she notes that on a block with many seams, a small printing error can leave it off by as much as half an inch (A Common Mistake).
Check the pressing
If the allowance measures a true 1/4 in. on the back but your strip test still comes up short, look at the front. A small tuck where the fabric didn't open fully at the seam hides width, and the allowance on the back won't show it. If every seam lies flat and the test is still short, that's the thread and fold C&T describes, so sew a scant 1/4 in.
Jorgensen's pressing routine is simple (How to Press Quilt Seams Correctly). Press the seam closed first to set it, then press it open or to the side. Use a quick up-and-down press, because sliding the iron stretches the fabric. A stretched block usually measures differently at opposite edges.
Press the fabric before you cut, too. Sherri McConnell of A Quilting Life notes that "even a small fold or wrinkle can make a big difference in the size of the block" (10 Quilt Piecing Tips & Tricks).
Check the trimming
Trimming can only remove fabric. If you trimmed units, compare the trimmed size with the unfinished size in your pattern. A unit that's exactly 1/2 in. short was usually trimmed or cut to its finished size, with the seam allowances left off. Our guide to finished vs unfinished sizes for triangle units shows which number a chart is giving you.
Trim a unit only when it's meant to be oversize, and only to the size your pattern gives. Squaring up a unit that's already short makes it smaller still. Our beginner blocks practice path makes the same point: measure before you trim.
McConnell's habit catches all four problems early: measure each unit as you sew it and match it to the size the pattern states.
What to do with the blocks you already made
Gardunia also gives a rule of thumb for blocks you've already sewn. A block that's no more than 1/4 in. under size can usually be eased in when you join it. Anything smaller needs to be remade, or, for blocks 1/2 in. or more too small, framed. She sews contrasting strips at least 1 1/2 in. wide to two adjoining sides, presses away from the block, then trims it to the correct unfinished size. She says it tends to work well in sampler quilts.
The block in our example is 5/8 in. short top to bottom, past the easing limit. Remake it, or frame it if the quilt can take the look. If every block in the quilt came out the same size, they'll still fit each other, and the top will simply finish smaller. In that case, measure the sewn top before cutting borders, as in our guide to preventing wavy quilt borders.
Write your checkpoints before the next block
Fix the cause first: adjust the seam until the strip test reads 3 1/2 in., and recut any strips that measured narrow. Then write down what each stage should measure before you sew. For the Sixteen Patch, that's 3 1/2 in. squares, 6 1/2 in. units and a 12 1/2 in. block. Our guide to designing a quilt block shows the same stage-by-stage checkpoint table for a different block.
QuiltLab can give you the finished numbers for that list. In the Block Editor, draw the block at its finished size, then select a piece to see its width and height. For squares and rectangles, add 1/2 in. to each finished measurement to get its unfinished checkpoint. Then keep the list by your machine and measure each stage as you sew.
Draw your block at finished size →Set the block's dimensions, draw its pieces and read each piece's width and height.Related posts

How to Design a Bargello Quilt: Plan the Wave on Paper
A bargello wave is a staircase of stepped columns. Number your strips, write one row per column, and see how column width turns a zigzag into a curve.

Borderless Quilt Design: Plan an Edge That Looks Finished
With no border, the outer blocks and the binding make the edge. Compare whole and halved motifs on one 48 x 60 inch quilt, then pick the binding color.

Crosshatch Quilting: How to Make the Lines Meet at the Edges
Space a 45-degree crosshatch so the lines meet in a V at every edge and corner. Choose the edge step first, mark dots around the quilt, then connect them.