


Should You Press Quilt Seams Open or to the Side?

Press quilt seams to one side by default, usually toward the darker fabric, and press them open where seams pile up. That's the common answer, and Missouri Star Quilt Co.'s pressing guide puts a number on it: press to the side for most piecing, and press open for Y-seams and for blocks where six or more seams meet at one point. Many quilters use both methods in the same quilt.
For a first quilt, press to the side. It's quicker, it lets the seams at each crossing lock together, and it leaves a ditch if you plan to quilt along the seams. Switch to pressing open, or spinning the seams, at star and pinwheel centers, on long strip-set seams, and when you want the flattest top for dense machine quilting. Below we count the fabric layers both ways, sort the common block joins, and show how your quilting plan changes the choice.
What pressing does to one seam
Every seam has two quarter-inch allowances. Pressed to one side, both lie under the same patch. That strip is three layers thick: the patch plus both allowances. The other side of the seam is a single layer. Pressed open, each patch keeps its own allowance, so you get two layers on each side.
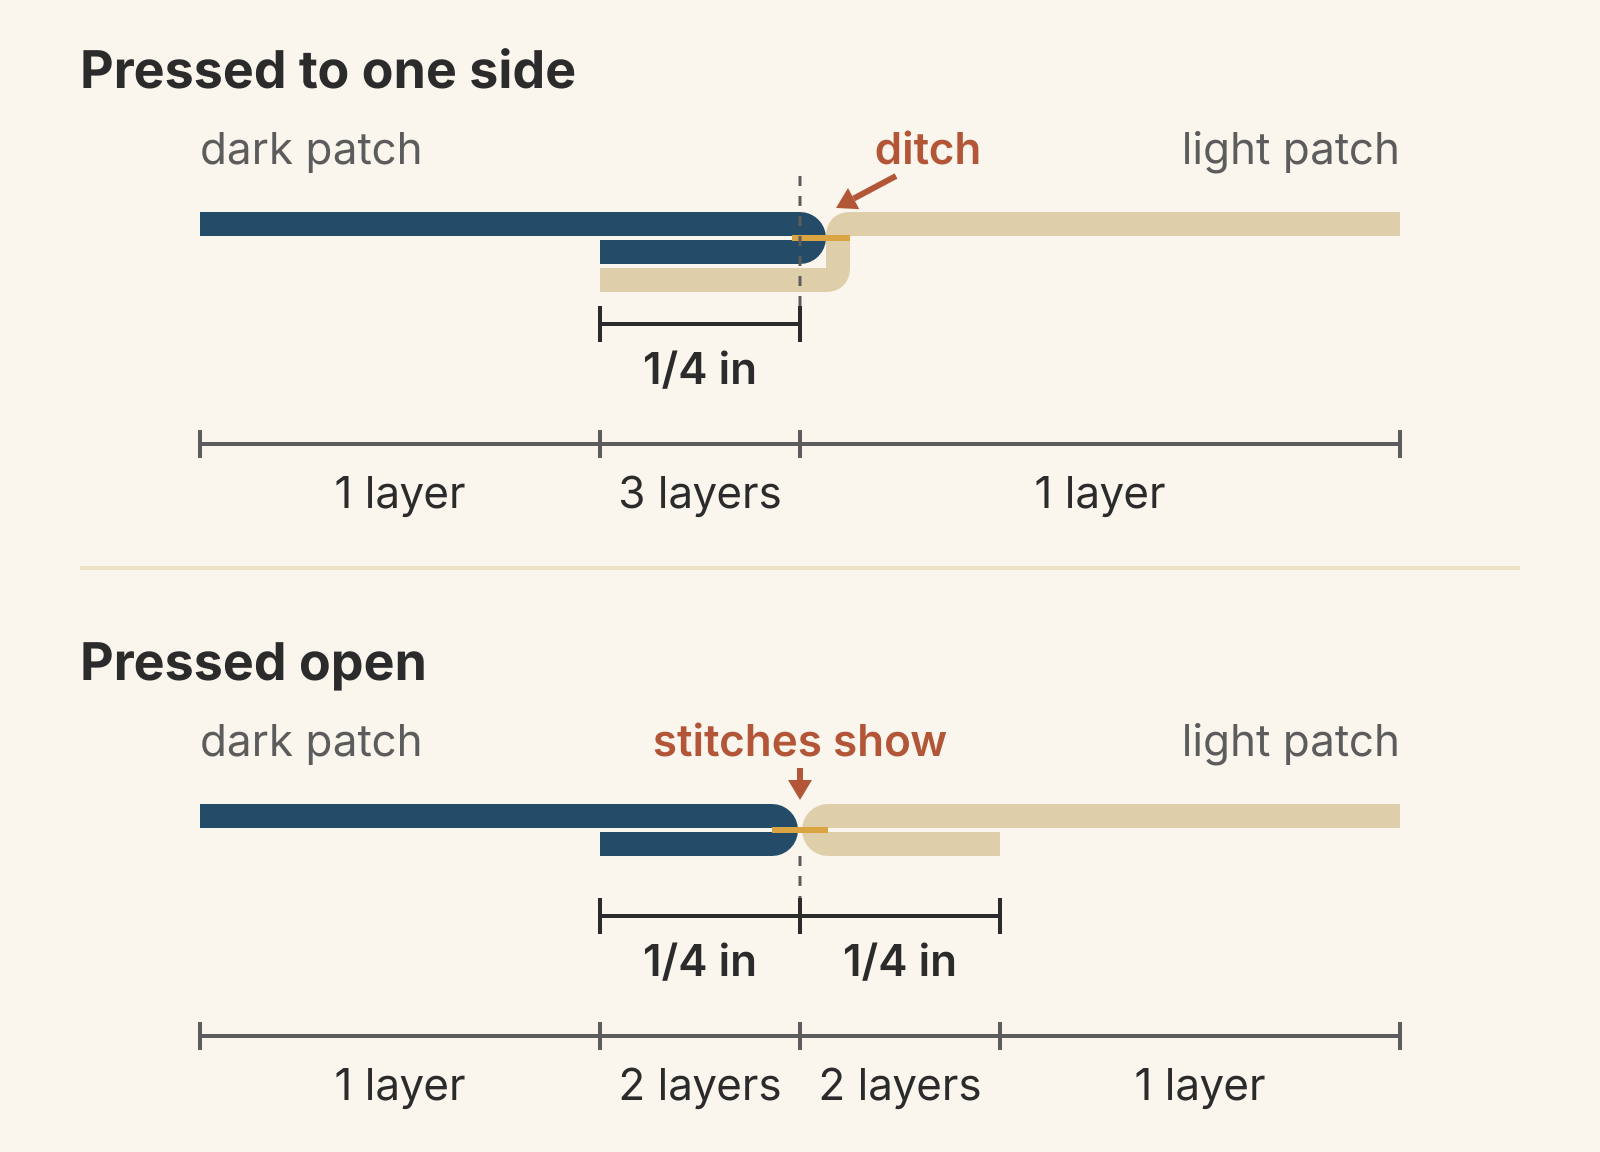
That difference is behind the two old arguments.
Strength. Julie Cefalu of The Crafty Quilter presses to the side partly because "it's both the fabric and thread that are holding those seams together." On an open seam you can see the stitches from the front. Christa Watson, who presses all of her seams open to get a flat quilt for machine quilting, says pressing open "will NOT weaken your seams." She does shorten her stitch to 2.0 from her default 2.5 so the seams don't split apart. Even the Missouri Star guide calls the strength difference minor with good thread and stitching. If you press open, shorten the stitch the way Watson does.
The ditch. A side-pressed seam has a high side, over the allowances, and a low side. The low side is the ditch, where stitch-in-the-ditch quilting hides. An open seam has no low side; its center line is the piecing thread.
Count the layers where four seams cross
One seam is easy. The real difference shows up where seams cross. Take a Four Patch made from four 2 1/2 in squares (2 in finished) with 1/4 in seams. Each two-square row measures 4 1/2 x 2 1/2 in, and the block measures 4 1/2 in square before it's joined to anything.
Press the seam in the top row toward its navy square (left) and the seam in the bottom row toward its navy square (right). Those two seams now point in opposite directions, so they nest when you join the rows. Press the long seam that joins the rows up, toward the top row. Then split the 1 in square at the center into 1/4 in cells and count the fabric in each one.
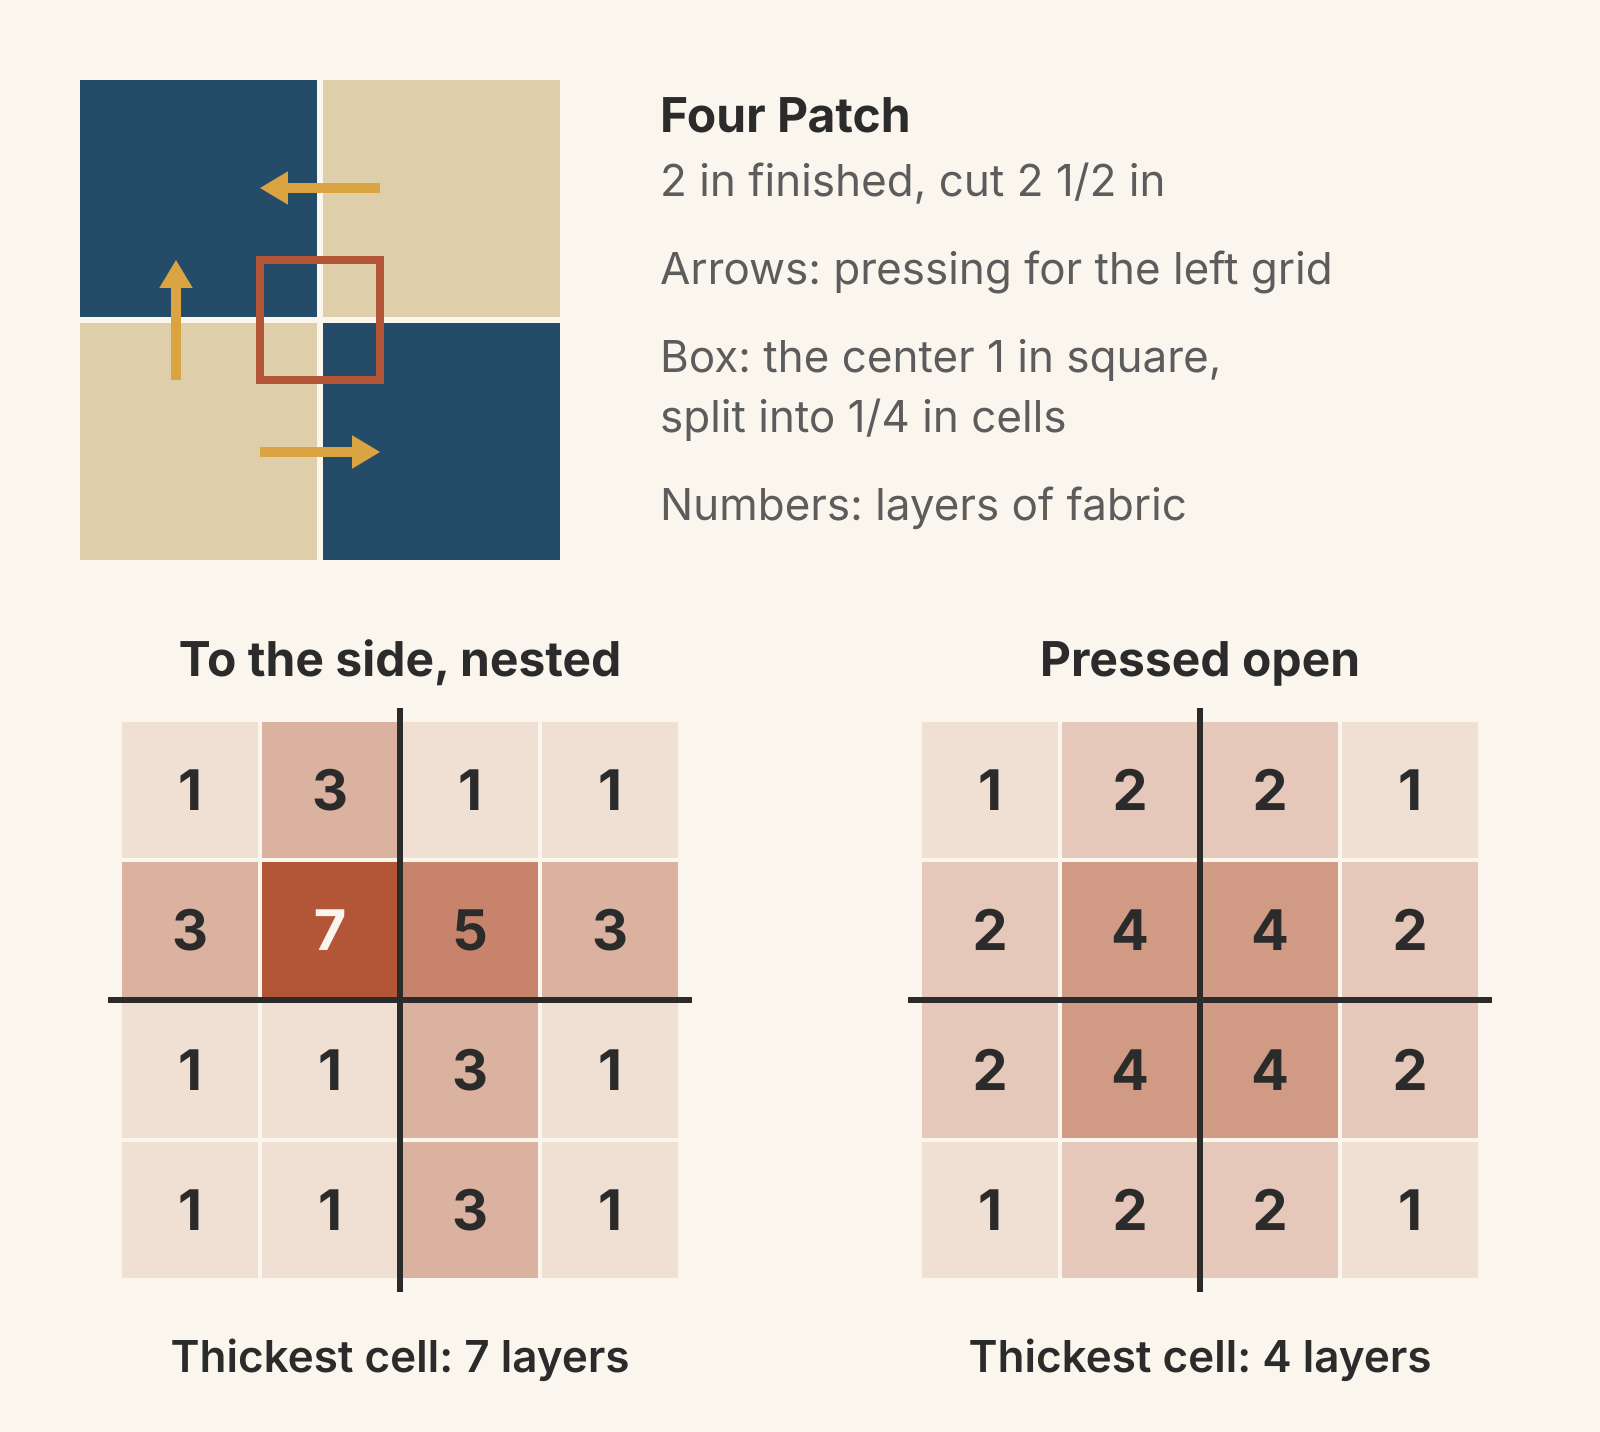
Pressed to the side, the thickest cell at the center holds 7 layers, and the other three cells that touch the center hold 5, 3 and 1. Pressed open, all four center cells hold 4 layers. The total is 16 either way (7 + 5 + 3 + 1 = 16, and 4 x 4 = 16). Pressing doesn't add or remove fabric; it decides where the fabric stacks.
The count also shows why nesting matters. If you pressed both rows the same way, the thickest cell would hold 9 layers and the seams couldn't lock together.
For a Four Patch, the 7-layer cell is the price of nesting, and quilters who press to the side find it worth paying. Cefalu finds nested seams much faster to match than open ones, and she pins the nested crossing before sewing. The trade-off changes as more seams meet.
Which block joins work best pressed to the side
Press to the side wherever two rows meet at four-seam crossings. That covers Four Patch and Nine Patch blocks, checkerboards, and rows of blocks joined to each other. Press neighboring rows in opposite directions so every crossing nests. Our beginner block practice path walks through that row-by-row pressing for a Four Patch and a Nine Patch.
When you choose a direction, the Missouri Star guide gives a useful order:
- Press so the next seam can nest.
- If nesting doesn't decide it, press toward the darker fabric, so the allowance doesn't shadow through the light one.
- If the fabrics are similar in value, press toward the simpler piece, away from points.
- If your pattern has pressing arrows, follow them. The designer has already planned the nesting.
Nesting also helps a single sharp point. Melissa Mortenson of Polka Dot Chair pressed the two halves of her heart block in opposite directions: the left side toward the print, the right side toward the background. The seams nested and the center point came out precise. Our guide to sewing perfect points through the X shows how to pin and sew a point where two blocks meet.
When to press open instead
Count the seam lines that end at one point. A Four Patch center has 4. A pinwheel center has 8: the four diagonal HST seams, plus four more from the two straight seams that run out from the center on both sides. Missouri Star's six-seam guideline puts the pinwheel on the press-open side.
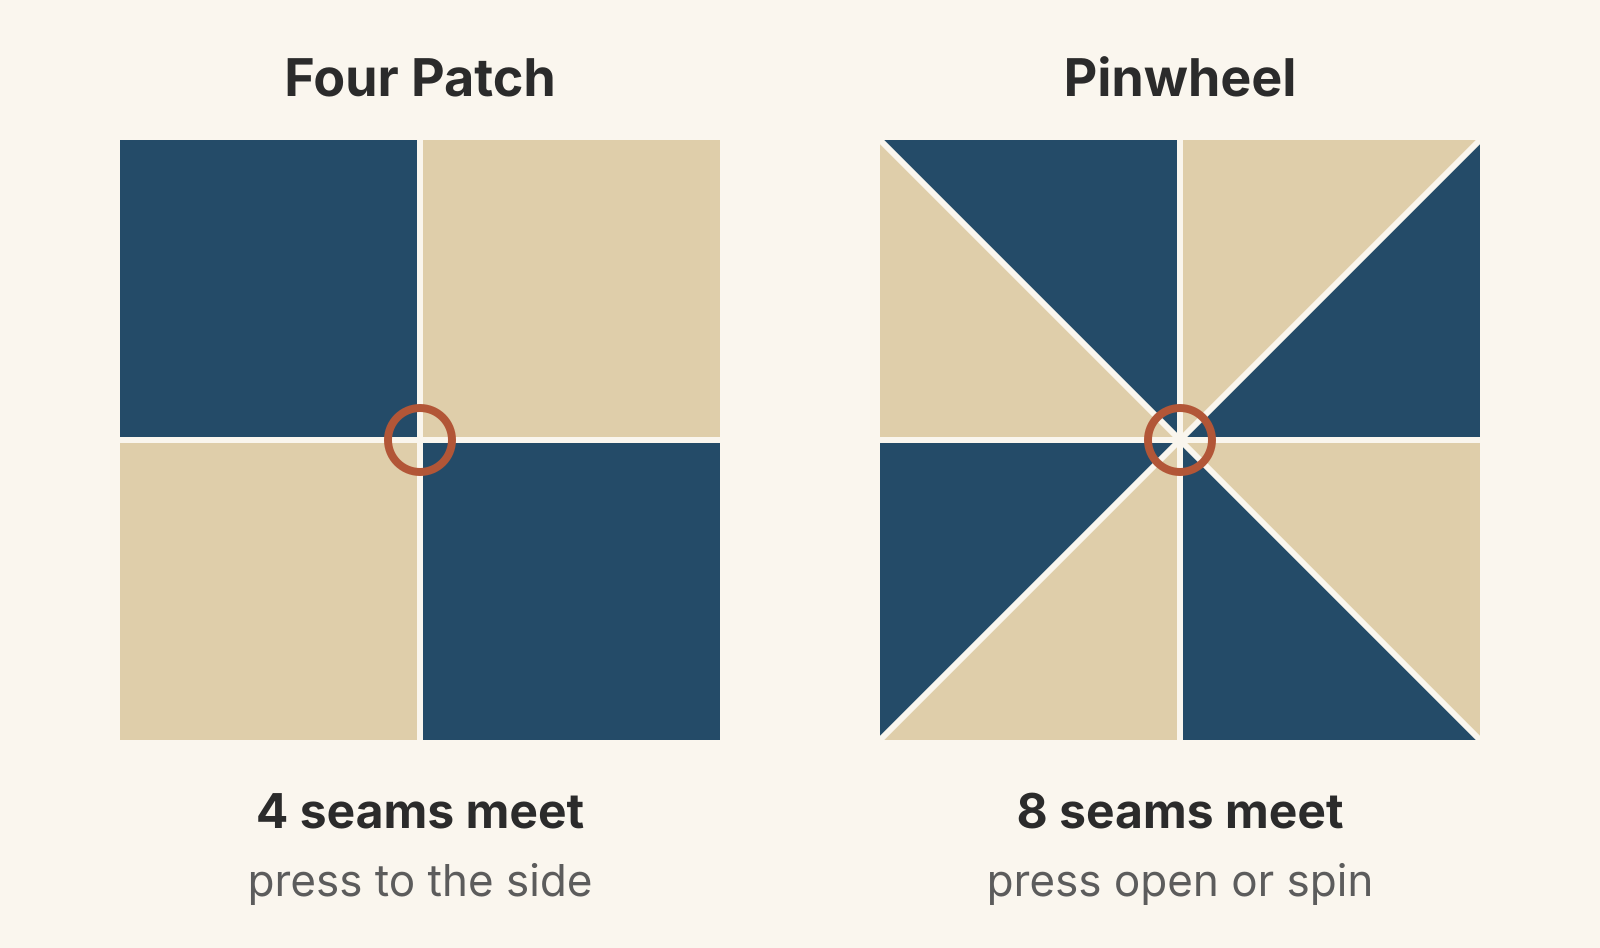
Eight-point stars and kaleidoscopes have the same eight-way center. In Quiltworx's flat-center tutorial, instructor Carol Thelen notes that eight pieces of fabric meet at an 8-point star's center. The result can be "a large, thick lump" that interferes with quilting "because most needles cannot stitch into it." Her fix presses every seam the same direction around the center and removes a few stitches inside the allowances, so they can turn. That leaves a tiny star on the back and a flat center on the front. Pressing those seams open is the other common answer.
The same idea works at a pinwheel or Four Patch center. Unpick the few stitches inside the seam allowance at the crossing so the allowances turn in a circle; our HST layouts post describes it for pinwheels.
Press open in a few other places too:
- Long strip-set seams. Mortenson finds that longer seams need to be pressed open. It's harder to work all the fabric out of the middle of a long seam, she says, and the seam can distort as you press. Pressing open keeps it straight.
- Very small blocks. In her follow-up recap of readers' tips, Cefalu notes that tiny blocks and miniatures may finish more neatly pressed open.
- Y-seams and curves. The Missouri Star guide lists both for open pressing.
How your quilting plan changes the choice
Decide how you'll quilt before you press, because the two choices depend on each other.
Stitch in the ditch. Press those seams to the side and quilt on the low side. The Missouri Star guide puts it plainly: to stitch in the ditch, "you need seams pressed to one side." Cefalu advises against ditch quilting over open seams, because the needle can cut piecing stitches and weaken the seam. Mortenson's rule is the same: press to the side anywhere you plan to stitch in the ditch. If you'd rather keep a seam open, quilt beside it instead, such as 1/4 in away on each side. Our comparison of stitch in the ditch and echo quilting shows where the needle sits for each on one 12-inch star.
Dense quilting across the seams. Here open seams earn their extra time. Watson presses everything open so her quilt sandwich stays flat while she wrestles it through a home machine. Cefalu's recap adds that bulky crossings can spoil a smooth free-motion feather or circle. The Missouri Star guide warns that a thick lump can cause skipped stitches or a broken needle. Our walking foot vs free motion comparison can help you pick the method first.
Shadowing. With a light background, an allowance pressed toward the light fabric can show through. Press toward the dark when you can. If a shadow still shows, the Missouri Star guide suggests pressing that seam open to split the bulk.
A pressing plan for one quilt
Here's how those choices sort out for the common joins:
| Seam or join | Press | Why |
|---|---|---|
| Rows that cross at four-seam points | To the side, alternating rows | Seams nest at every crossing |
| Seams you plan to stitch in the ditch | To the side | The low side gives you a ditch |
| A light patch next to a dark one | Toward the dark, if nesting allows | The allowance won't shadow |
| Six or more seams at one point | Open, or spin the seams | Spreads the lump the needle crosses |
| Long strip-set seams | Open | Keeps long seams straight |
| Very small blocks | Open | Finishes neater |
| A top for dense machine quilting | Open, with a shorter stitch | Flattest surface to quilt |
Mixing is normal. In the same Polka Dot Chair post, contributor Amy Ball presses one block's half-square triangle seams open. She presses the pairs of triangles that form its diamonds to the side so they nest, then presses the seam joining the diamond halves open. She says that in an all-HST quilt she would probably press to the side for strength.
Plan the pressing before you sew
Sketch your block and mark an arrow on every seam. Check that each crossing gets opposite directions. Circle any point where six or more seams meet and decide now whether to press it open or spin it. Then sew one block, press it, and feel the crossings before you make the rest.
If you design your own blocks, draw the block at its finished size in the Block Editor to see every place the pieces meet. If you're writing a pattern, the Diagram Editor has an Arrow line and text labels under Insert, so you can draw your pressing arrows right into the sewing steps. You place them yourself; our guide to quilt pattern sewing diagrams shows how to keep each arrow clear. You can draw blocks on a free account; see pricing for the limits.
Related posts

How to Design a Bargello Quilt: Plan the Wave on Paper
A bargello wave is a staircase of stepped columns. Number your strips, write one row per column, and see how column width turns a zigzag into a curve.

Borderless Quilt Design: Plan an Edge That Looks Finished
With no border, the outer blocks and the binding make the edge. Compare whole and halved motifs on one 48 x 60 inch quilt, then pick the binding color.

Crosshatch Quilting: How to Make the Lines Meet at the Edges
Space a 45-degree crosshatch so the lines meet in a V at every edge and corner. Choose the edge step first, mark dots around the quilt, then connect them.