


What to Put on a Quilt Label, With Wording to Copy
Every quilt label needs three things: who made the quilt, where it was made and when it was finished. That's the minimum the Quilt Alliance asks for in Amy Milne's post Label it Already!. For a gift, add who it's for and why, who quilted it, the pattern credit and one line of care. The American Quilter's Society's survey of more than 2,000 quilters puts every one of those in its top ten, with the date and the maker's name first.
Most quilters agree labels matter, and plenty still skip them. The same Quilt Alliance post cites a 2016 Handi Quilter survey: 94% of 24,185 quilters said documenting quilt history is important, but only 57% said they label their quilts consistently. If the wording is what stalls you, below are lines to copy, a way to check how much fits, and six finished labels.
For most quilts, aim for five to seven short lines on a 6 x 4 in or 6 x 5 in label. That covers the basics and the gift details without shrinking your handwriting to fit.
Start with the three lines every label needs
- Who made it. Write your full first and last name, the way a great-grandchild would search for it. "Made by Mom" means something today and very little in 60 years. "Made by Nora Hale (Mom)" works for both readers.
- Where. City and state. Add the country if the quilt might move abroad.
- When. The month and year you finished it, with the month spelled out. In the United States, 10/12/26 means October 12; in much of the world it means 10 December. "October 2026" can't be misread.
Here's the shortest useful label:
Made by Nora Hale
Duluth, Minnesota
October 2026
If the quilt has a name, put it on the first line. It's third on the AQS list, right after the date and the maker, and it's how the family will refer to the quilt.
The Quilt Alliance's three steps for documenting a quilt also include the maker's or owner's contact information. That's your call. Anyone who turns the quilt over can read it, and phone numbers and addresses change. For a gift to family, your name and town are usually enough. For a quilt going to a show, a charity or a stranger, add an email address you expect to keep.
Add the gift details: recipient, quilter and pattern
These are the lines that make a label more than a signature.
- Who it's for, and why. "For Sam on his 16th birthday" tells the family why the quilt exists, which a bare date can't. If the occasion and the finish date differ, as they can with a wedding quilt, write both.
- Who quilted it. If a longarm quilter or a friend did the quilting, name them. The Quilt Show's Quiltipedia entry on labels lists the maker, designer, quilter and recipient among the facts a label records.
- The pattern and its designer. Name both. For your own design, write "my own design." For a traditional block such as Ohio Star, say so.
- One line of message. AQS respondents mention prayers, scripture and short sayings. One line is plenty; a message that runs to four lines crowds out the facts. A couple of examples: "For naps, forts and sick days." "Wrap up and call your grandma."
AQS's longer list of ideas also includes the quilt's size, hours spent, cost, appraised value, batting type and fabric content. Those are worth keeping, but they need more room and some proof. Put them in a quilt materials record that travels with the quilt, and keep the label for the story. A price on a gift label can also read oddly to the person receiving it.
If you do put the size on the label, measure the finished quilt. Planned and finished sizes can differ: the example in our quilt project reflection was planned at 60 x 72 in and measured 59 x 70 in once bound. If you designed the quilt in QuiltLab, Properties shows its planned finished size beside Layout (see the Quilt Editor guide). Treat that as the plan, and use the tape measure for the label.
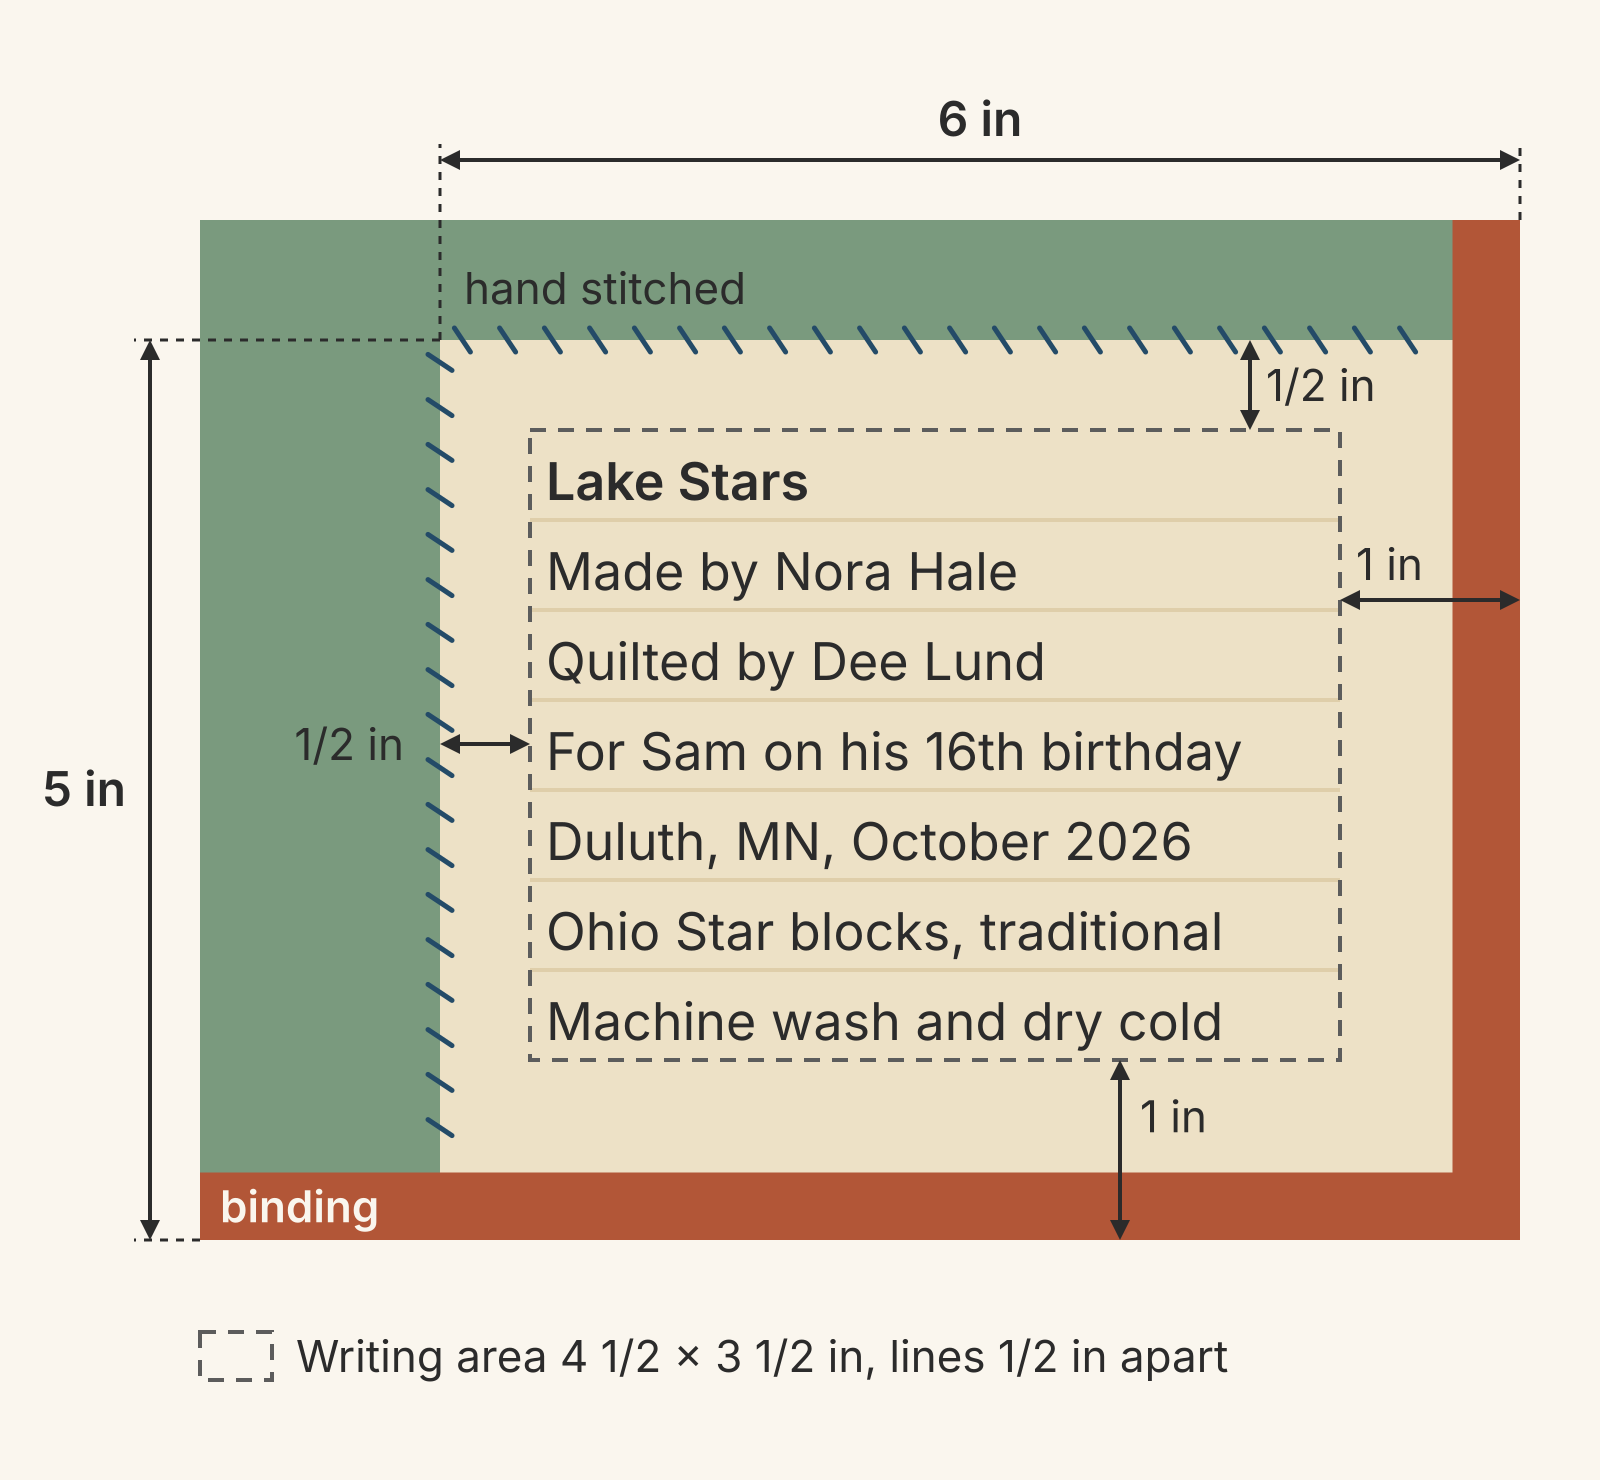
Worked example: fit seven lines on a 6 x 5 inch label
Here's a made-up gift throw with all seven lines:
Lake Stars
Made by Nora Hale
Quilted by Dee Lund
For Sam on his 16th birthday
Duluth, MN, October 2026
Ohio Star blocks, traditional
Machine wash and dry cold
Check that it fits before you cut the label. We planned with three numbers:
- Lines 1/2 in apart, which leaves room for everyday handwriting.
- A 1/2 in margin on the two sides you'll hand stitch, measured after you turn them under 1/4 in.
- A 1 in margin on the two sides that go into the binding, so the binding can't cover any words.
Height: 7 lines x 1/2 in = 3 1/2 in of writing, plus 1/2 in and 1 in of margin, makes 5 in. Width: allow 4 1/2 in for the longest line, add the same two margins, and you get 6 in. Cut the label 6 1/4 x 5 1/4 in. The extra 1/4 in is the turn-under on the two stitched sides; the two binding sides stay raw and get caught in the binding seam. If you cut your binding strips wider than usual, our guide to how wide to cut binding strips shows how far the fold reaches onto the back.
Handwriting varies, so write your longest line on scrap paper at the size you'll use and measure it. If it runs past 4 1/2 in, shorten it ("MN" for "Minnesota") or make the label wider. AQS respondents suggest drafting on graph paper to center the lines. On 1/4-inch graph paper, the writing area here is 18 squares wide and 14 squares tall, and each line takes 2 squares.
| Finished label | Writing area | Lines at 1/2 in apart |
|---|---|---|
| 5 x 3 in | 3 1/2 x 1 1/2 in | 3 |
| 6 x 4 in | 4 1/2 x 2 1/2 in | 5 |
| 6 x 5 in | 4 1/2 x 3 1/2 in | 7 |
| 8 x 6 in | 6 1/2 x 4 1/2 in | 9 |
The rule behind the table: finished height = lines x 1/2 in + 1 1/2 in, and finished width = longest line + 1 1/2 in. For a label you stitch down on all four sides away from the binding, use 1/2 in margins all around. The same seven lines then fit a 5 1/2 x 4 1/2 in label, cut 6 x 5 in.
Should care instructions go on the label?
Yes, if the quilt will be used and washed. Care instructions make the AQS top ten. Keep it to one line, and only write what every material's own directions support.
In our example, the batting is Warm & Natural. The Warm Company's product page says to machine wash and dry the finished quilt in cold water. If the bolt ends for your fabrics also say cold, "Machine wash and dry cold" is a line you can stand behind.
If any material says something different, or you don't know what a fabric is, don't guess. Leave the care line off and put the full directions on a card that goes with the quilt. Some AQS respondents tuck washing instructions into a label envelope for the same reason. Your materials record is where each direction's source lives.
Wording for baby, wedding and memory quilts
The same basics apply. What changes is the line that explains the quilt.
A baby quilt label puts the child first and the care line last, since baby quilts get washed often:
For Ava Hale, born May 3, 2026
Made by her grandmother,
Nora Hale, Duluth, MN
June 2026
Machine wash and dry cold
A wedding quilt label names the couple and the wedding date. Here the quilt was finished a month before the wedding, so both dates appear:
For Lena and Marcus Reyes
Married September 12, 2026
Made by Aunt Nora (Nora Hale)
Quilted by Dee Lund
Duluth, MN, August 2026
A memory quilt label says whom the quilt remembers and what it's made from. Work shirts may be blends with no fiber tag left, so this one has no care line:
In memory of Walter Hale
1948-2025
Made from his work shirts
by his daughter, Nora Hale
Duluth, MN, September 2026
Labeling a quilt you didn't make
At its talks, the Quilt Alliance asks how many people label the quilts they own but didn't make. In Milne's words, "the room gets quiet." An inherited quilt with no label loses a little more of its story each time it changes hands.
Write what you know, mark what's family story, and sign the label as its writer. That way no one later mistakes your label for the maker's:
Maker unknown
Family story: made in Iowa, 1930s
Owned by Ruth Hale, 1911-1994
Label added by Nora Hale
Duluth, MN, October 2026
Be careful with old and fragile quilts. In the National Quilt Museum's conservation guidance, Gerald E. Roy notes that fabrics that have seen better days "will not even support new stitching." For an important or fragile quilt, ask a textile conservator before you sew anything to it. Until then, keep the label information in a written note stored with the quilt.
Make the label last
What you write matters only if it stays readable and attached.
- Use the right pen. Milne recommends an archival, permanent, fadeproof pen, not one meant for the office. Iron freezer paper, shiny side down, to the back of the label at medium heat so the fabric doesn't shift while you write. Press again after writing to heat set the ink, then peel off the paper.
- Print in black. If you print labels on fabric sheets, The Quilt Show notes that black ink lasts much longer than colored printer ink.
- Tuck it into the binding. The most popular spot in the AQS survey is a corner, with two sides under the binding. A label caught in the binding is much harder to pull off than one stitched only to the surface. Milne also suggests attaching a label before quilting so the quilting holds it too.
- Write it twice. AQS respondents write the label information on the backing behind the label as well, in case the label wears off.
Your next step: draft the label before the details fade
Write your lines on scrap paper today, while you still remember the quilter's name and the pattern. The Quilt Show makes the same point: a label is much easier to make when you finish the quilt than later, when the details aren't as fresh. Count your lines, pick a size from the table, and test your longest line at full size.
If you'd rather print your label, you can lay it out on a QuiltLab canvas. Right-click the canvas and choose Insert, then Text, for each line. Some AQS respondents add a picture of the quilt; if you designed yours in QuiltLab, place it from Quilts on the Assets tab. Then use File to export a PNG or SVG. The export is sized in pixels, not inches, so print a paper test and measure it against your label plan before you print on fabric sheets.
Canvas Editor: arrange your ideas →Combine images, text and library assets on a personal or project canvasRelated posts

How to Design a Bargello Quilt: Plan the Wave on Paper
A bargello wave is a staircase of stepped columns. Number your strips, write one row per column, and see how column width turns a zigzag into a curve.

Borderless Quilt Design: Plan an Edge That Looks Finished
With no border, the outer blocks and the binding make the edge. Compare whole and halved motifs on one 48 x 60 inch quilt, then pick the binding color.

Crosshatch Quilting: How to Make the Lines Meet at the Edges
Space a 45-degree crosshatch so the lines meet in a V at every edge and corner. Choose the edge step first, mark dots around the quilt, then connect them.