


Y Seams in Quilting: Where to Stop Stitching and What to Sew First

A Y seam is where three pieces meet at one point and no seam runs straight through it. Every guide we checked gives the same rule: each seam that reaches the junction stops 1/4 in from the raw edge, at a marked dot where the seam lines cross. The National Quilters Circle editors call starting and stopping 1/4 in from the edge "the key to sewing a Y-seam." Sew two pieces together first, then set the third into the notch with two more seams, starting each one with the needle down in the dot.
Plan it on the drawing before you cut. Find each junction, decide which seam ends stop at a dot and which run off the edge, and write down the order. Below, we plan two three-piece junctions: a tumbling block made from diamonds that finish 2 1/2 in wide, and a window corner like the one in Attic Windows. We drew these diagrams for this article and haven't sewn them.
Is it a Y seam or an ordinary crossing?
Three pieces meeting at a point doesn't always mean a Y. Look at the seams that meet there:
- A T junction. Two of the seams line up as one straight line, and the third butts into it. Sew the seam that butts in first, then sew the straight seam across its end. No dots needed.
- A Y junction. No two seams line up. Whichever pair you sew first leaves a notch, and the third piece has to be set into it.
Jinny Beyer puts the test in terms of angles. If sewing two pieces together creates an inward angle that needs a set-in seam, start and stop at the dots. If the join creates only outward angles, she prefers to sew to the edge. The Quilt Show's glossary lists the other names you'll see in patterns: inset seams and set-in seams.
You'll meet them in tumbling blocks, eight-pointed stars, hexagons and Attic Windows. One more case to rule out: if every corner is square but the pieces spiral around a center, no seam can go first. That block needs a partial seam, which is a different technique. If you're drafting your own block, our block design guide shows how to trace the straight seams on your sketch. A seam that ends in the middle of another patch is your cue to look for a Y or a partial seam.
Decide where each seam stops
Every seam has two ends, and each end gets its own decision.
- The end lands on a junction: stop at the dot and backstitch. The American Quilter's Society's set-in seam steps mark dots 1/4 in from the edges "to indicate the beginning and end of each set-in seam," then sew dot to dot without stitching into the seam allowance.
- The end lands on the block's outer edge: sew straight through to the raw edge, as you would any seam. In Linda Clements's set-in seam guide for Today's Quilter, the only Attic Windows seams that stop short are the ones meeting in the middle of the block. The seams that reach the outer edges are sewn right to the edge.
Before you mark an outer end "edge," check what joins it next. In a tumbling-block quilt, each corner of a hexagon is where the neighboring blocks meet, so it's a junction too. Clements sews tumbling blocks into rows and then joins the rows with a zigzag seam that also goes from mark to mark.
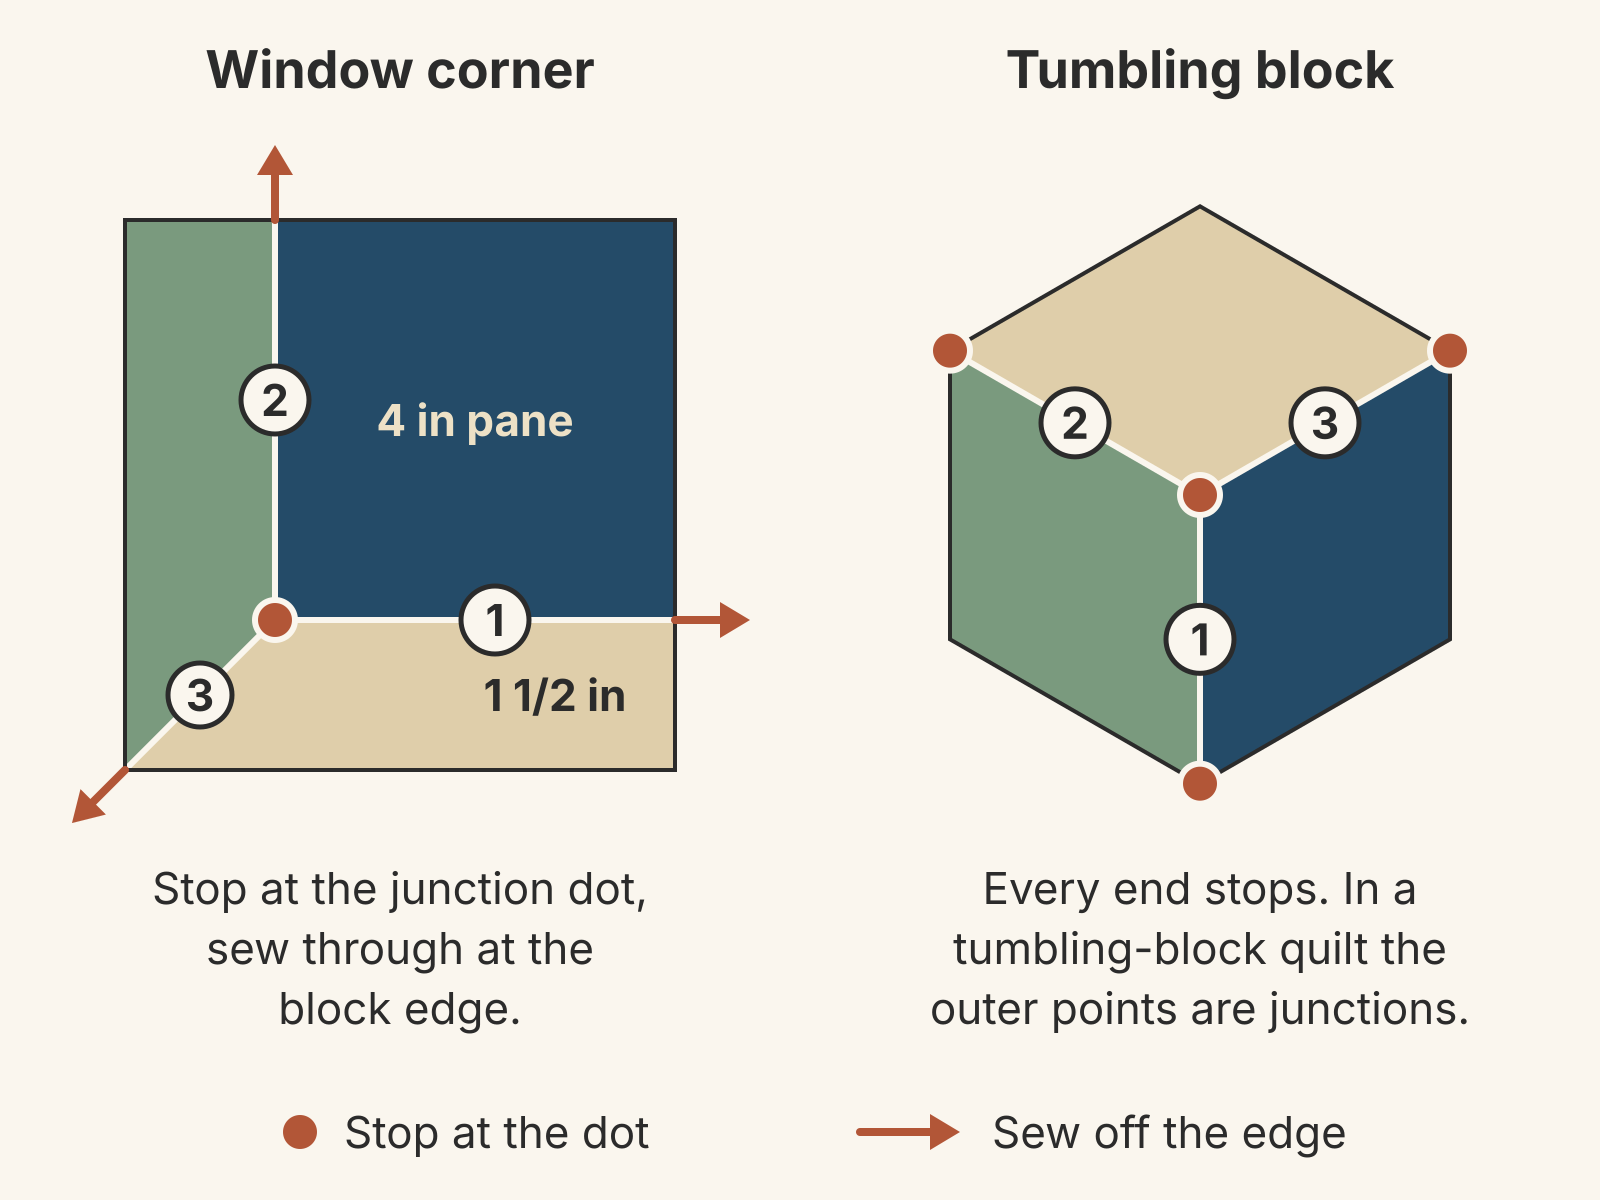
Our window corner finishes 5 1/2 in square: a 4 in pane with two 1 1/2 in strips mitered where they meet. Its three seams all start at one dot at the pane's inner corner. Their other ends reach the block edge, so they sew off. The tumbling block has the same count of three seams and six ends, but every end stops at a dot.
Mark the dots where the seam lines cross
Mark on the wrong side of each piece. The dot sits where two seam lines cross, 1/4 in from each edge. The National Quilters Circle editors draw both 1/4 in lines with a mechanical pencil so the crossing shows. Clements says simple dots or crosses are enough once the technique gets easier, and she suggests a light watercolor pencil for dark fabric. If your pattern gives templates, Beyer punches 1/16 in holes at the dots and marks through them.
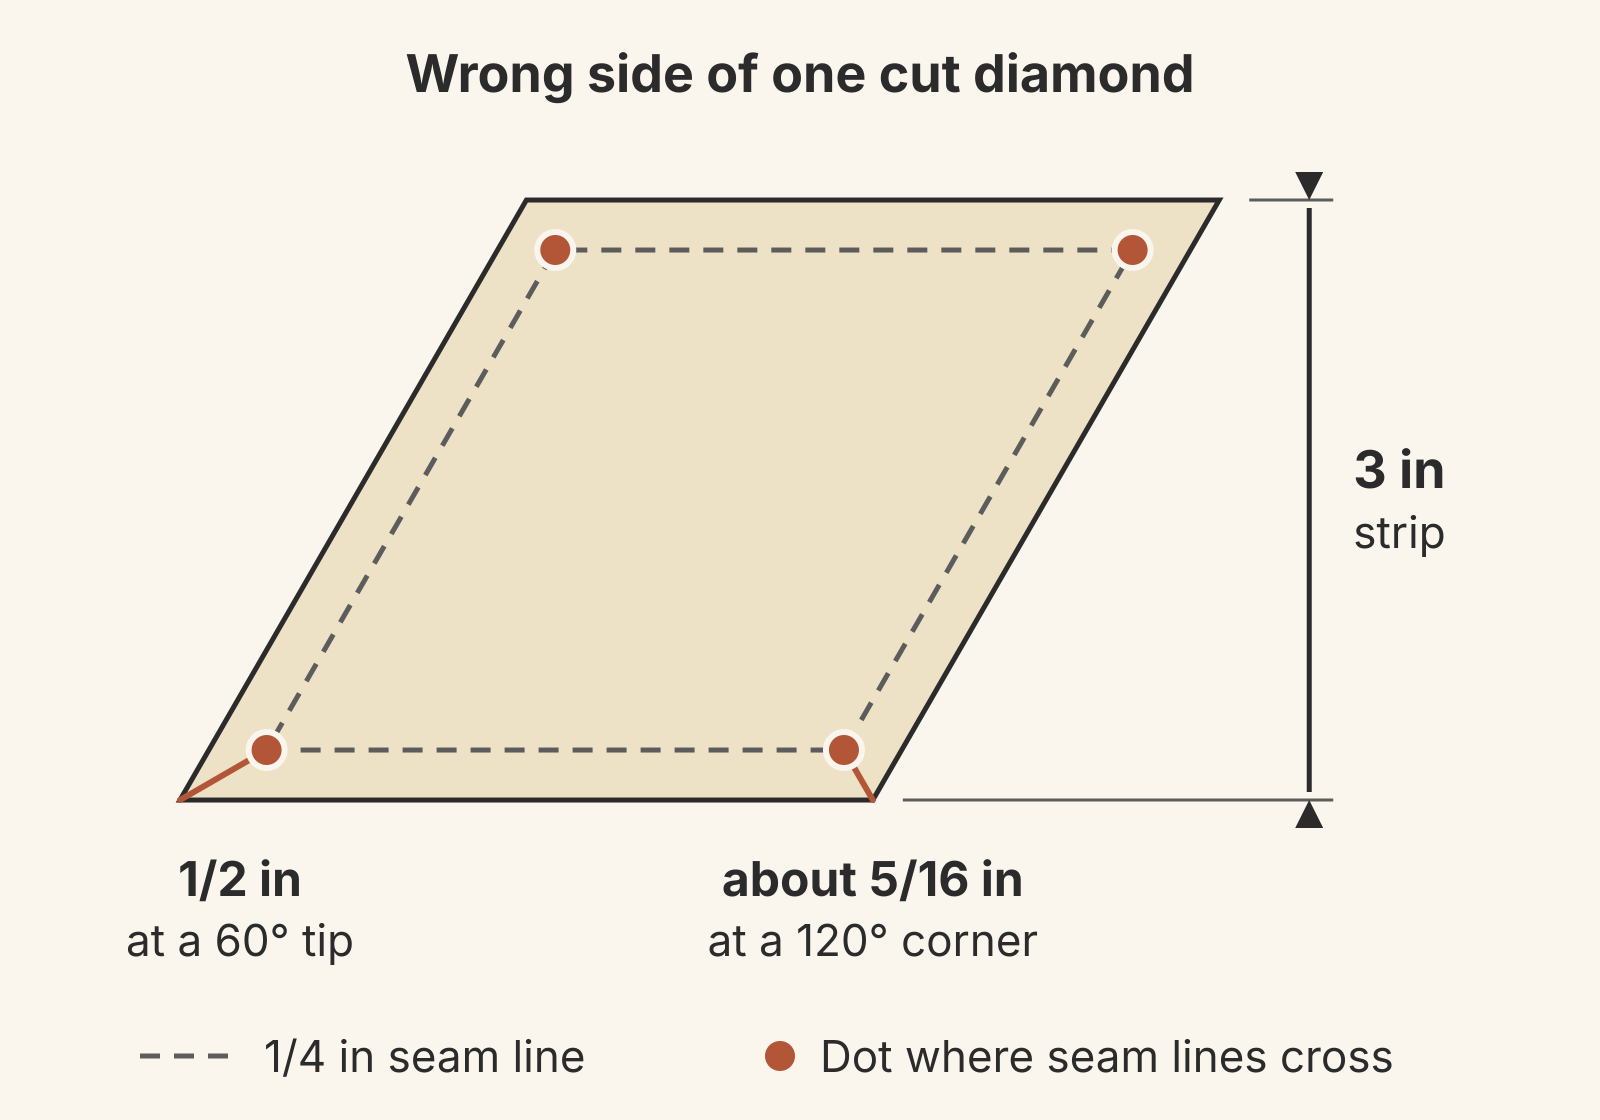
Don't eyeball "a quarter inch from the corner." Measured from the cut tip, the dot sits farther in than that, and the sharper the corner, the farther in it sits:
| Corner | Distance from the cut tip to the dot |
|---|---|
| 60-degree tip | 1/2 in |
| 90-degree corner | about 3/8 in, along the diagonal |
| 120-degree corner | about 5/16 in |
At a 60-degree tip, that's twice the seam allowance.
For our tumbling block, each diamond finishes 2 1/2 in wide between its parallel sides. Cut 3 in strips, trim one end at 60 degrees, then cut each diamond 3 in wide, measured from that angled edge. That's the same rule Clements uses for her diamonds: the strip is the finished width plus 1/2 in. Each finished side is about 2 7/8 in. Three diamonds make a hexagon that finishes 5 in across the flats and about 5 3/4 in from point to point.
Choose the sewing order
A three-piece junction always takes three seams. The first joins two pieces. The other two set the third piece into the notch the first seam leaves. The AQS steps say it plainly: add the next patch with one seam, then "pivot the patch, align the remaining edges, and sew the final seam in the same manner."
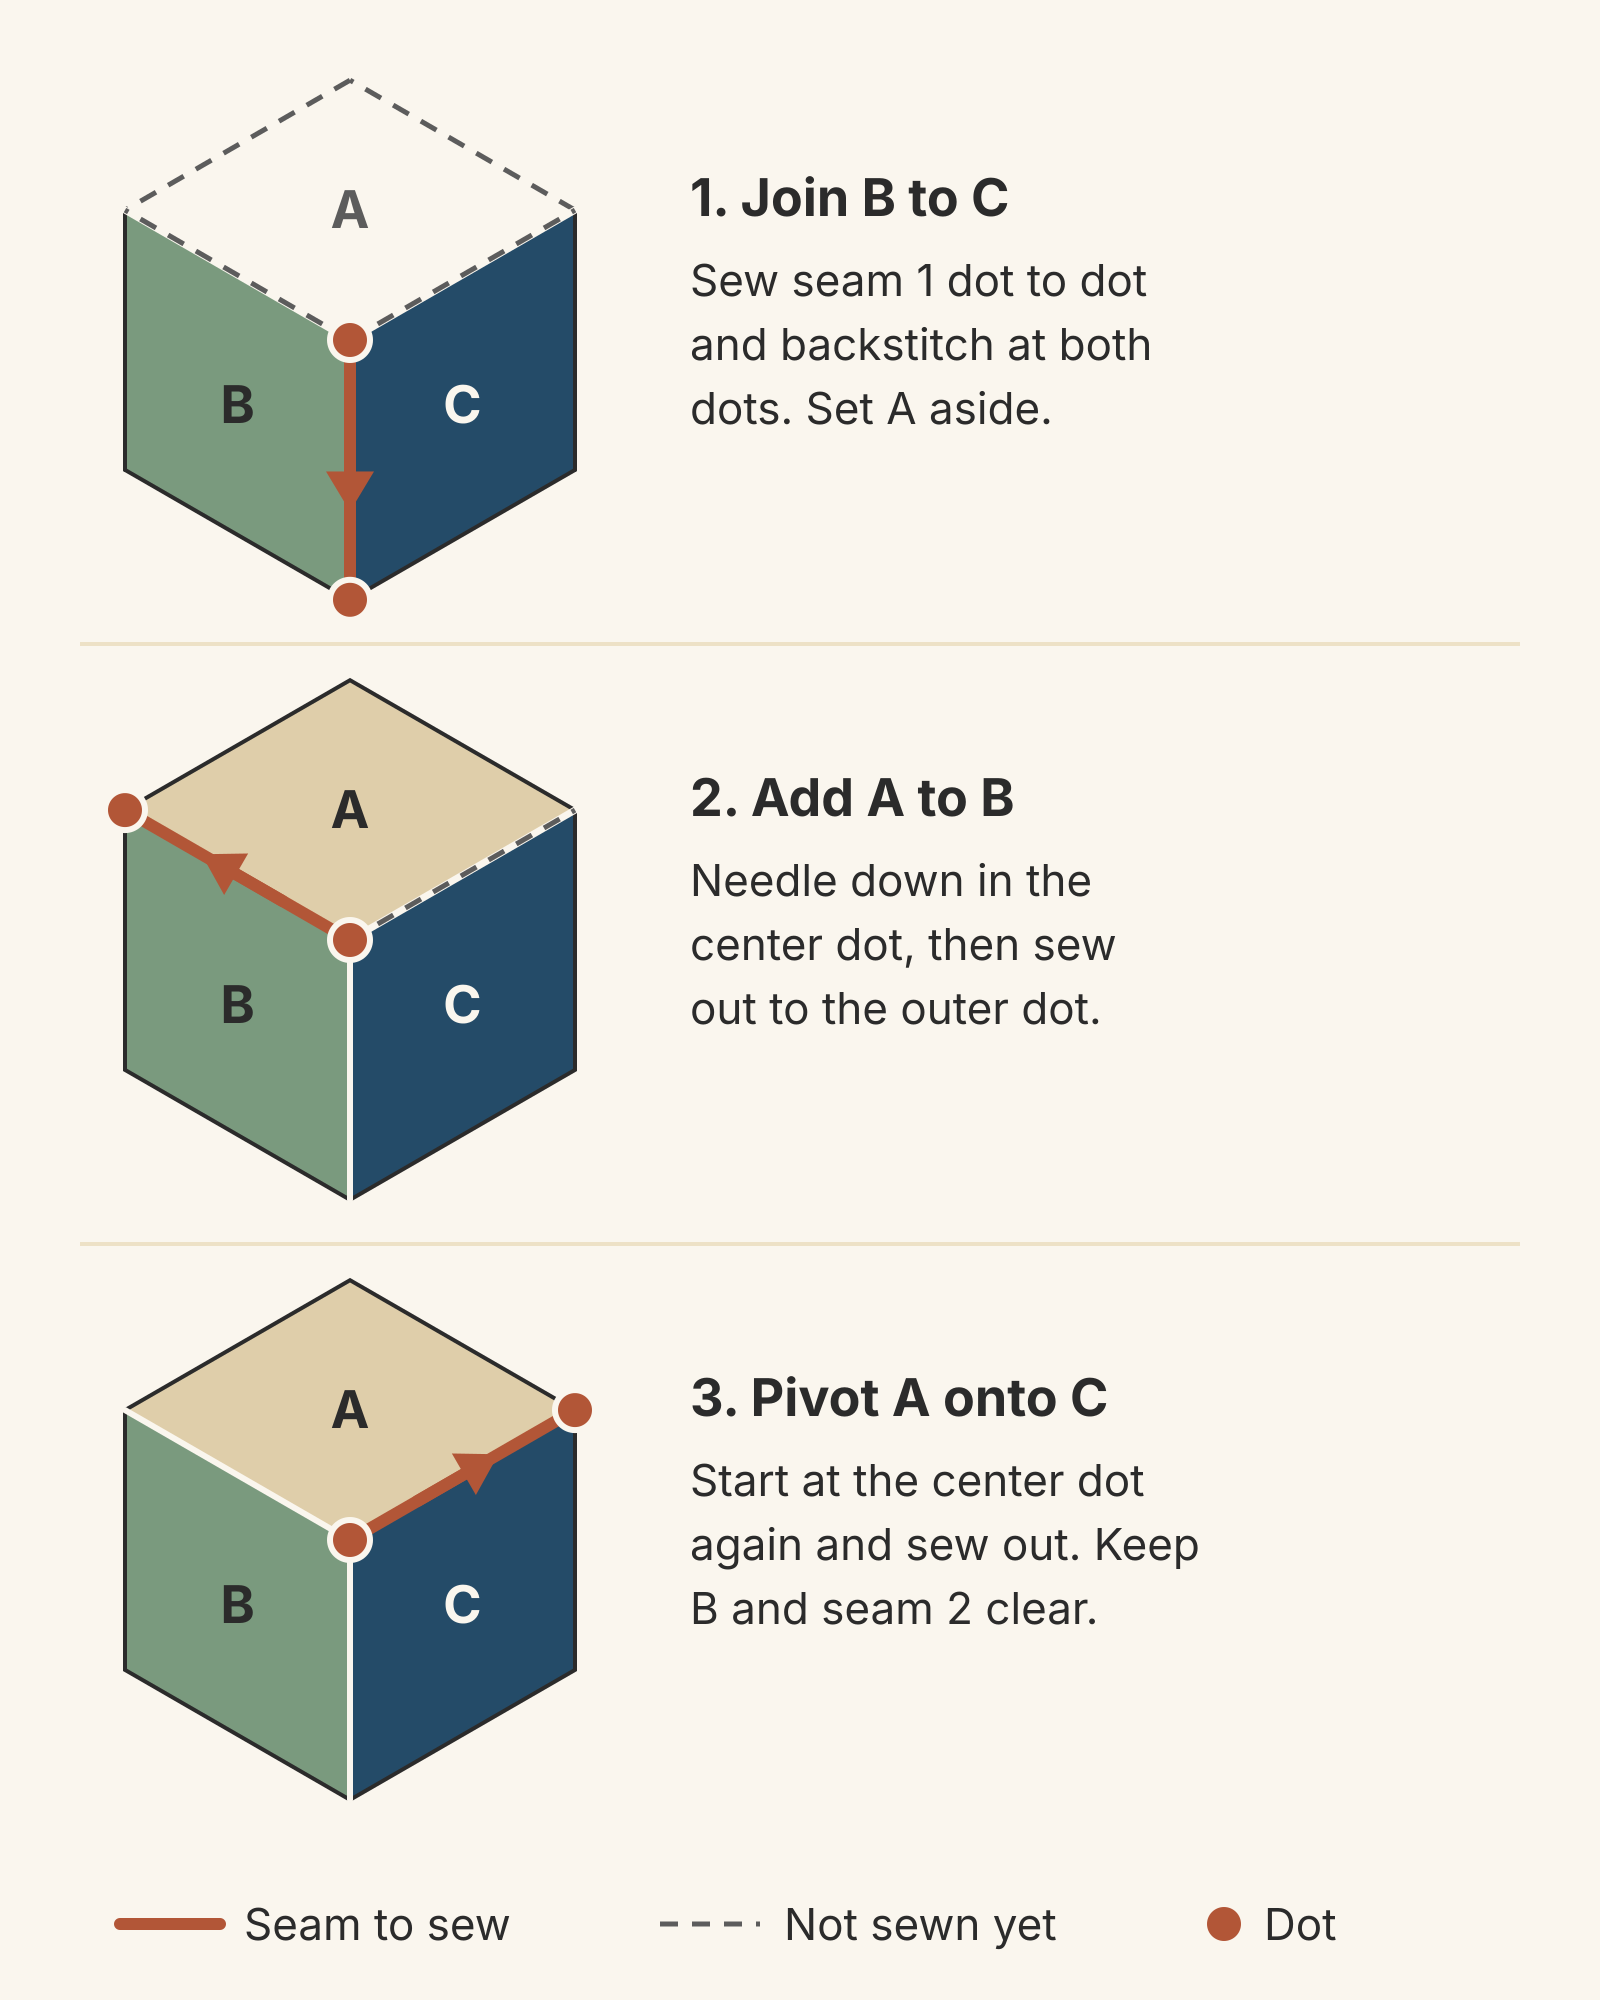
For the tumbling block, call the top diamond A, the left one B and the right one C.
| Seam | Joins | Start | Stop |
|---|---|---|---|
| 1 | B to C | Center dot | Bottom dot |
| 2 | A to B | Center dot | Left dot |
| 3 | A to C | Center dot | Right dot |
- Join B to C. Sew seam 1 from dot to dot and backstitch at both ends.
- Add A to B. Put the needle down in the center dot, then sew out to the outer dot. The National Quilters Circle editors begin every seam this way, and they warn against sewing past the first seam.
- Pivot A onto C. Start at the center dot again and sew out. Keep B and the allowances from seams 1 and 2 folded clear so the needle doesn't catch them.
Clements starts her hand-pieced tumbling block the same way, with two diamonds, and sews diamond A from the center out. For her machine-pieced Attic Windows, she lowers the needle into the first dot before stitching. She sews the square to both strips first, and the miter comes last. Our window corner follows that order. Seam 1 joins the pane to the bottom strip, from the junction dot to the right edge. Seam 2 joins the pane to the side strip, from the dot to the top edge. Seam 3 is the miter, from the dot out through the outer corner.
Starting at the dot puts your first stitch exactly where accuracy matters most. Don't stitch past it. The National Quilters Circle editors say stitching into the seam allowance is what puts a pucker on the front, and the fix is to unpick the extra stitches. Once the unit is sewn, our guide to pressing seams open or to the side lists Y seams among the seams to press open.
If your pattern gives an order, follow it. If you drafted the block yourself, write your own order on the drawing, like the table above.
Can you avoid the Y seam?
Often, yes. The AQS post notes that you can usually change a block to avoid set-in seams. The catch is that the extra seam lines can take away from the block's look and make the sewing and quilting more complicated.
Tumbling blocks show the tradeoff. Each 60-degree diamond splits along its short diagonal into two equilateral triangles. Those triangles can be sewn in straight strips, with no set-in seams at all. The cost is one more seam across every face of every cube: three extra seams per hexagon, each about 2 7/8 in long. Even with one fabric per face, each extra seam shows as a line across the face. If you want each face to read as one piece, plan the Y seams.
Plan your block in QuiltLab
To see the junctions before you cut, draw the block in the Block Editor. Its Polygon tool draws angled pieces: click each corner, then press Enter to finish the piece. Give the three faces different fabrics and the Y points stand out. The Block Editor guide covers drawing pieces and choosing fabric, and our Tumbling Blocks page shows the traditional repeat.
The Block Editor doesn't mark set-in seams, dots or a sewing order, and it doesn't work out cut sizes, so keep those on your paper plan. If you're writing a pattern, the Diagram Editor's Insert menu has a Stitching line, an Arrow and a Label. Use them to show each step's seam number and direction. Our guide to quilt pattern sewing diagrams covers how to draw those steps clearly.
Draw a block with angled pieces →Use the Block Editor's shape tools, assign fabrics and save the block for your quilt.Your next step
Take the block you want to make and mark up the drawing. Circle each junction, write "dot" or "edge" at each seam end, and number the seams. Then cut one set of pieces, mark the dots and sew one unit. For our tumbling block, the sewn hexagon should measure 5 1/2 in across the flats, raw edge to raw edge. If it's off, recheck your dots and your 1/4 in seam before you cut the rest. Our guide to quilt blocks that come out too small has a strip test for checking your seam. You can draw the block in QuiltLab on the Free plan.
Related posts

How to Design a Bargello Quilt: Plan the Wave on Paper
A bargello wave is a staircase of stepped columns. Number your strips, write one row per column, and see how column width turns a zigzag into a curve.

Borderless Quilt Design: Plan an Edge That Looks Finished
With no border, the outer blocks and the binding make the edge. Compare whole and halved motifs on one 48 x 60 inch quilt, then pick the binding color.

Crosshatch Quilting: How to Make the Lines Meet at the Edges
Space a 45-degree crosshatch so the lines meet in a V at every edge and corner. Choose the edge step first, mark dots around the quilt, then connect them.