


How to Design a Medallion Quilt So Every Border Fits
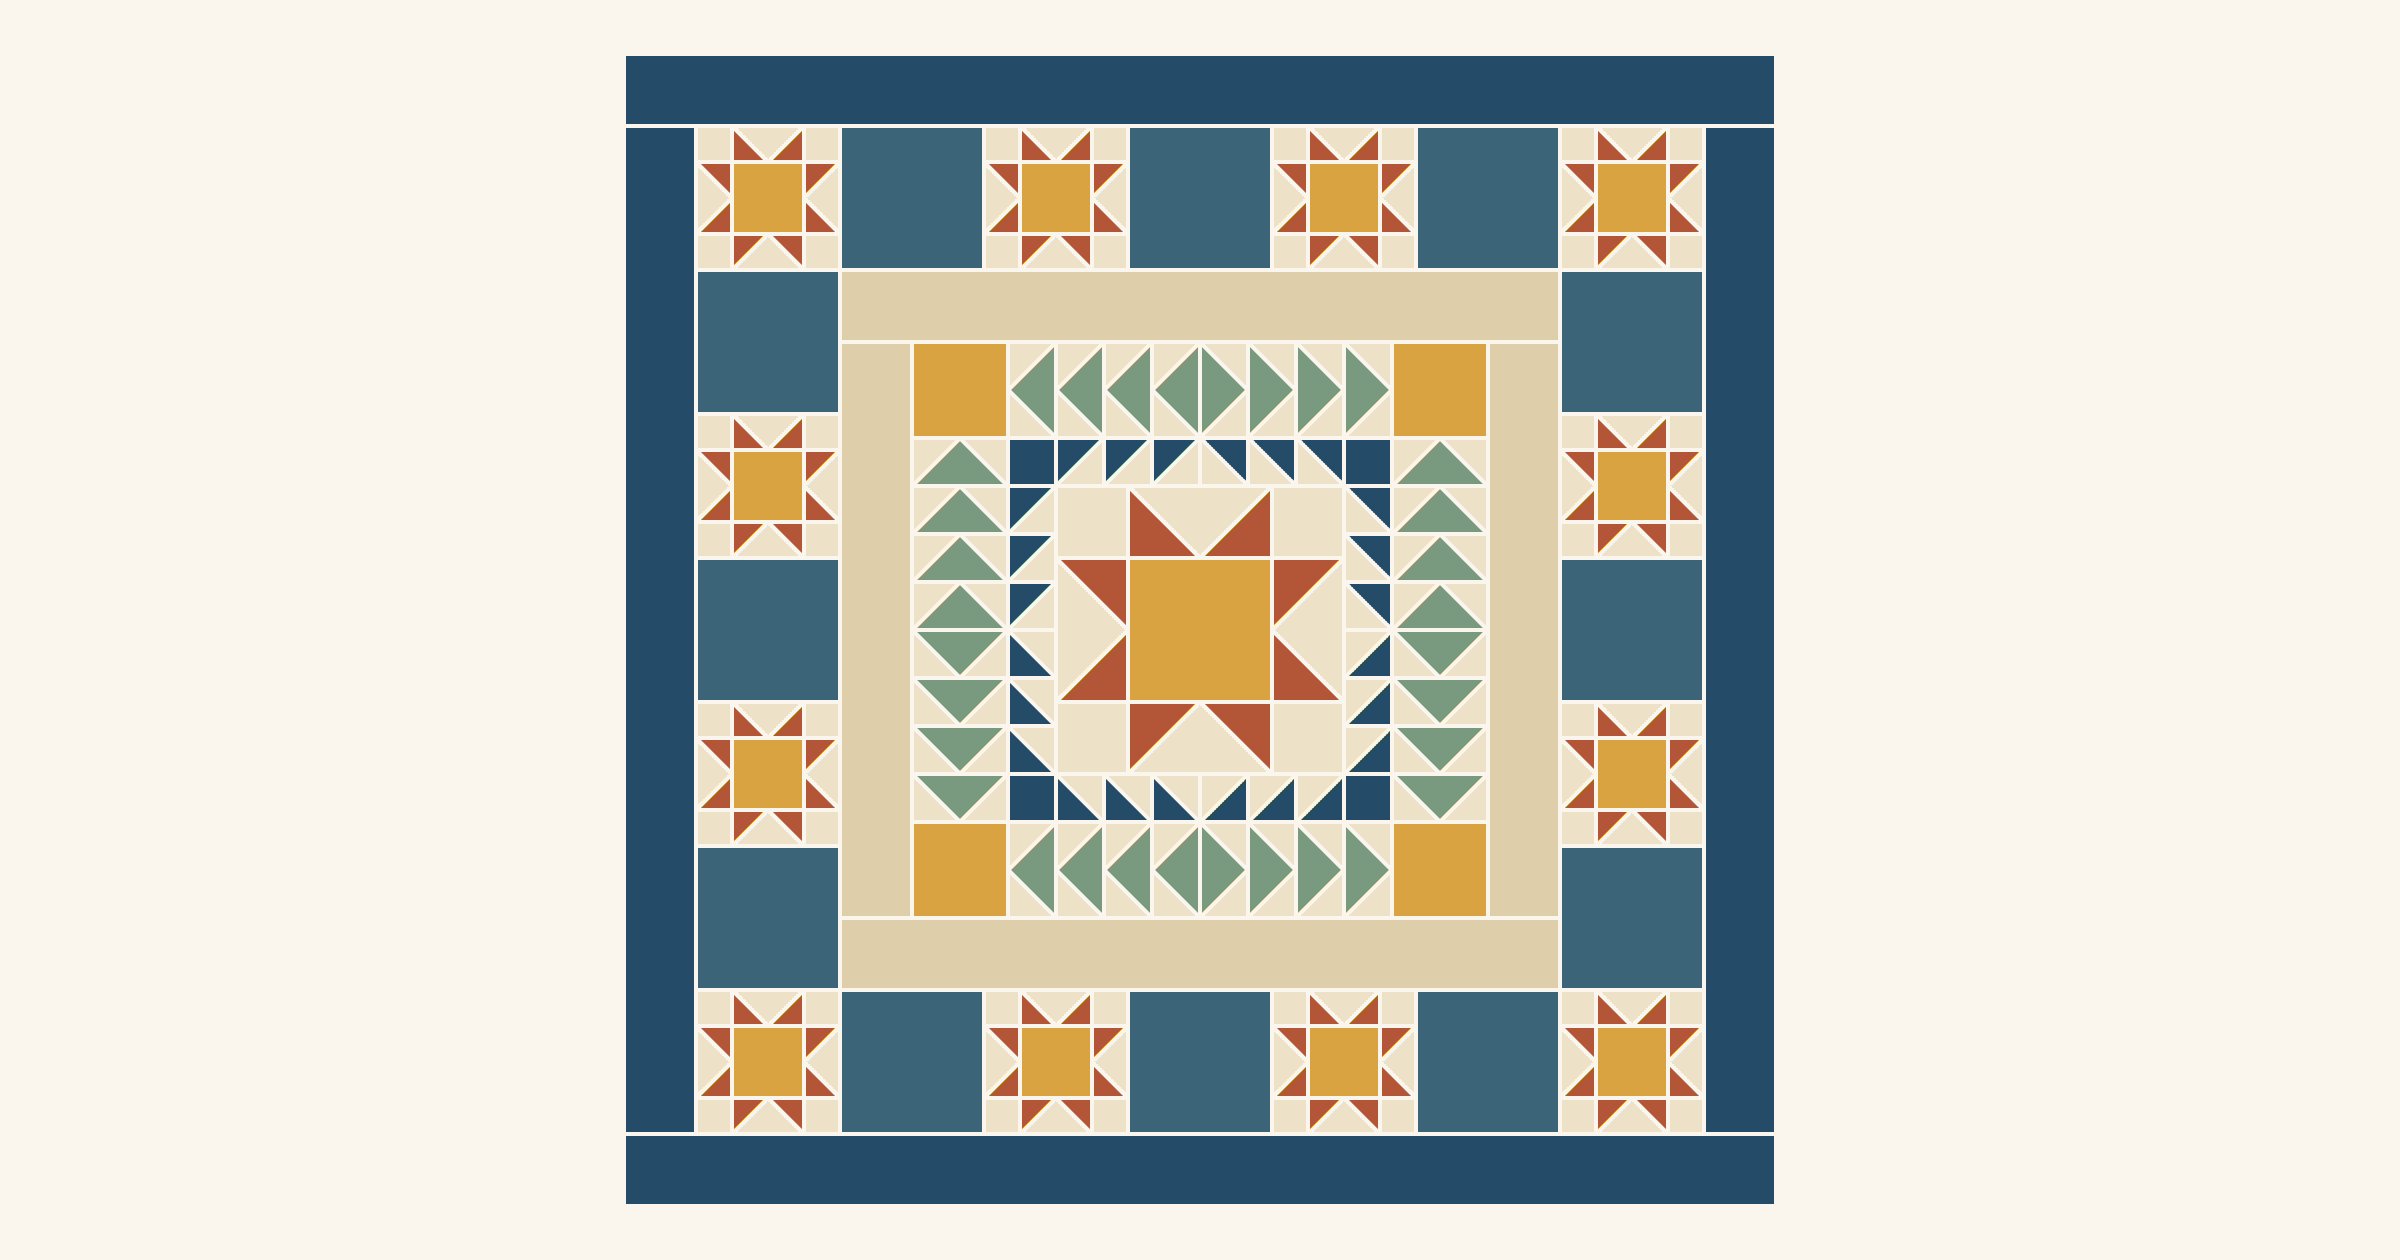
To design a medallion quilt, work outward from the center in finished sizes, one ring at a time. Every ring adds twice its width to the quilt, and a pieced ring only fits when its unit length divides the side it sits on. When it doesn't, add a plain spacer border first. Make it half as wide as the gap between the size you have and the size the pieced ring needs. Melanie McNeil lays out that arithmetic in her border size problems post at Catbird Quilt Studio, part of her medallion sew-along.
For a first medallion, keep every pieced ring on whole inches and check each ring against the next one before you sew. Below, a 12 in sawtooth star grows to a 48 in square in five rings, with the math for each. We drew these diagrams for this article and haven't sewn them.
Start with the center and the finished size
A medallion is a center framed by a series of borders. The International Quilt Museum notes it was the dominant quilt format in the Atlantic world until the 1840s. Its March 2014 quilt of the month, probably made by Belle Abram in England between 1799 and 1808, puts the smallest shapes in the center and makes them larger with each border. That's still a good default: let the units grow as the rings move out.
Pick the finished size before the first border. In Proportion, Part 1, McNeil says the centers she likes are about a quarter of the quilt's width or more, and suggests a quarter to a half for most quilts. A 12 in center suits a quilt about 24 to 48 in wide. Our example finishes at 48 in, so the star is a quarter of the width.
If your center is an awkward size, such as an orphan block, a panel or a block set on point, make the first ring a plain frame that brings it to a friendly number. A 12 in block on point measures about 17 in across (12 × 1.414 = 16.97), and its setting triangles can do the framing. Cut them oversized, then trim the center to 18 1/2 in so it finishes at 18 in. The block's corners float about 1/2 in inside the seam. Then 2, 3, 4 1/2, 6 and 9 in units all fit the next ring. Our on-point setting guide covers cutting those triangles.
Plan in finished sizes throughout. The American Quilter's Society blog post Medallion Math Made Easy suggests drafting on graph paper; in its example each square stands for 2 in. It also reminds you to add 1/2 in to finished sizes for cutting.
The fit check for every ring
Two numbers decide whether a ring works:
- Units per side = the side it sits on ÷ the unit's length along that side. It has to come out whole.
- Size after the ring = size before + 2 × the ring's width. The corner squares are as wide as the ring.
Measure each unit along the side, not across it. A half-square triangle takes its own size. A flying goose is twice as wide as it is tall, as the AQS post reminds you, so a 2 × 4 in goose flying along a border makes a ring 4 in wide and takes 2 in of side per goose.
The real planning is checking one ring ahead. A ring that fits perfectly can still leave a size the next ring can't use. In her first sew-along border post, McNeil points out that 24 in divides easily into 1, 1 1/2, 2, 3, 4, 6 and 12 in units, which makes it a good size to build on. Her awkward example in the border size problems post is 41 in, which no single unit size divides easily.
A worked plan: a 12 in star to a 48 in square
Here's the whole medallion as a ring-by-ring table. All sizes are finished.
| Ring | What it holds | Fit check | Top after |
|---|---|---|---|
| Center | 12 in sawtooth star | none | 12 in |
| 1 | 2 in HSTs, 2 in corners | 12 ÷ 2 = 6 a side | 16 in |
| 2 | 2 × 4 in flying geese, 4 in corners | 16 ÷ 2 = 8 a side | 24 in |
| 3 | 3 in plain spacer | (30 − 24) ÷ 2 = 3 in | 30 in |
| 4 | 6 in stars and plain squares, star corners | 30 ÷ 6 = 5 a side | 42 in |
| 5 | 3 in plain border | none | 48 in |
The ring widths add to 2 + 4 + 3 + 6 + 3 = 18 in per side, and 12 + 2 × 18 = 48 in.
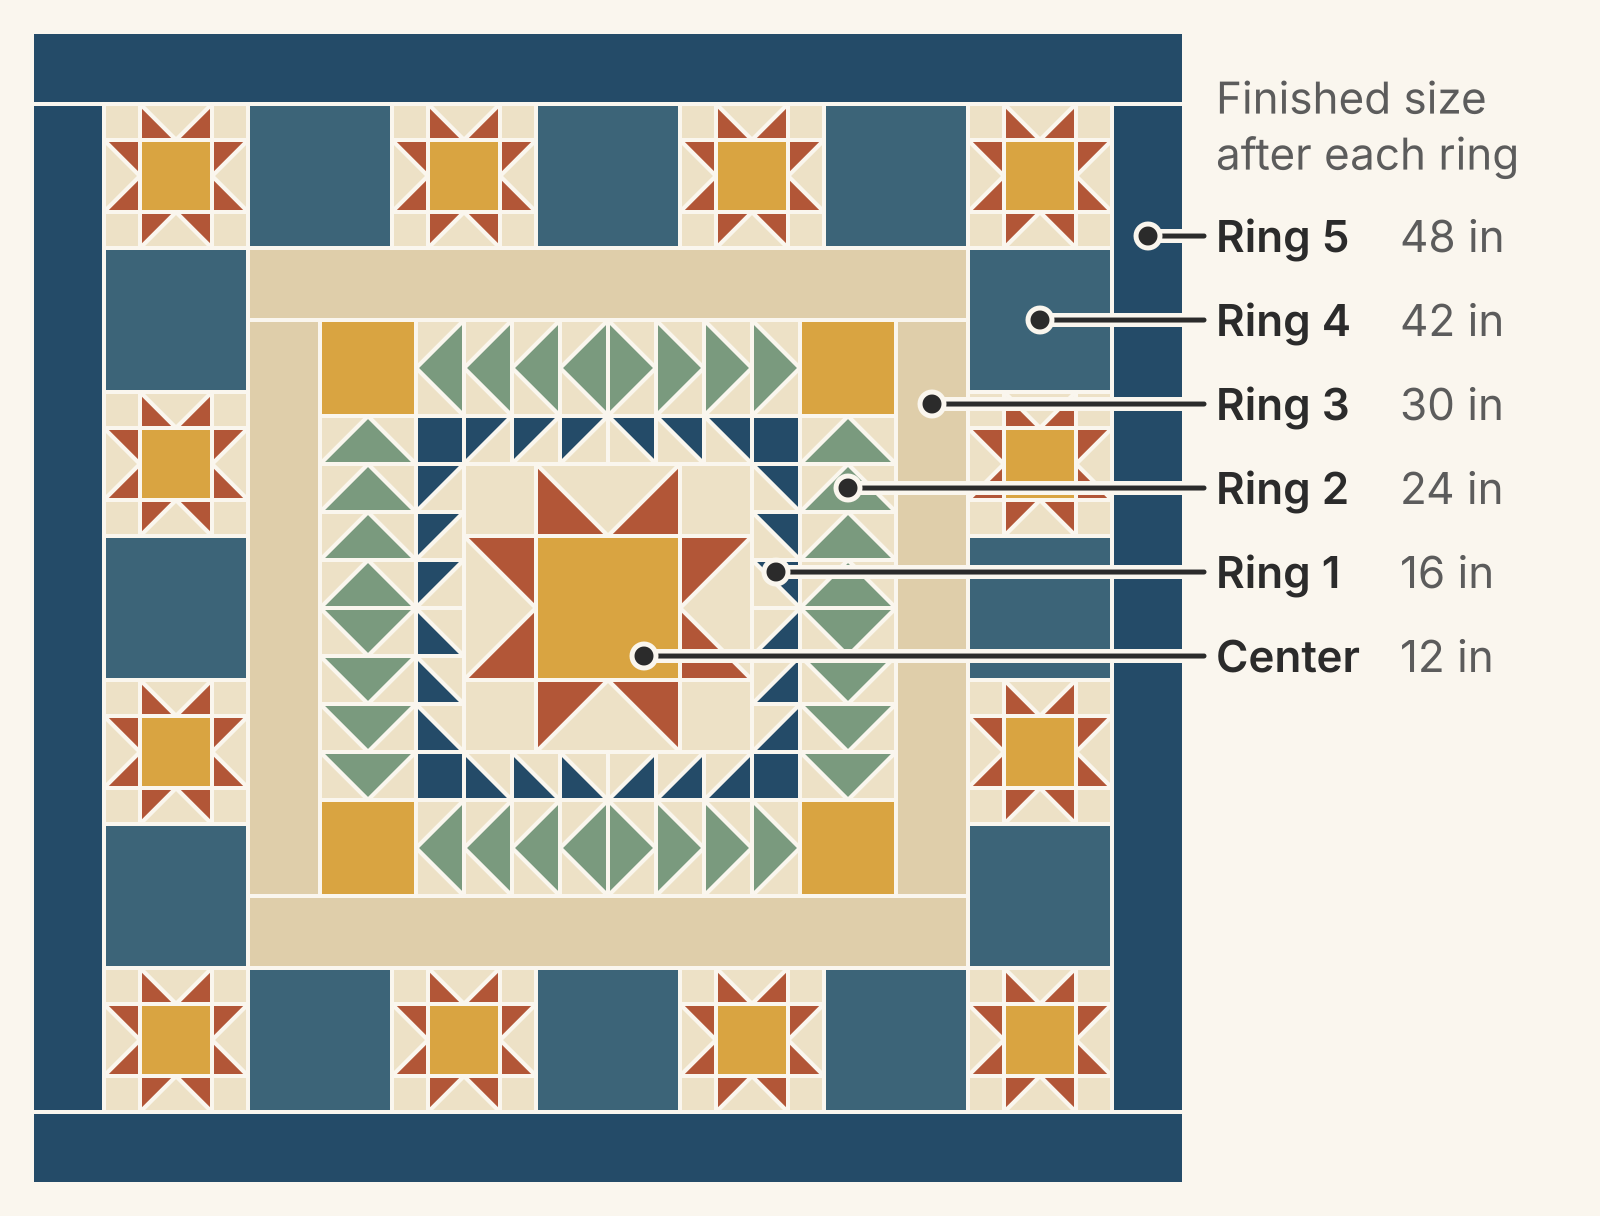
Counting units from the table: ring 1 needs 24 HSTs and four 2 in squares. Ring 2 needs 32 geese and four 4 in squares. Ring 4 needs 24 six-inch units: 12 small stars, including the four corners, and 12 plain squares. Our comparison of flying geese made one at a time or four at a time uses the same 2 × 4 in goose as ring 2.
When the next ring won't fit, add a spacer
After ring 2 the top is 24 in. Six-inch blocks fit that four to a side, so why add ring 3? Because ring 4 alternates plain squares and stars between star corners. McNeil notes that alternating units work well with an odd number per side and can look awkward with an even one. With four a side, two stars touch at one end of every side.
To find the spacer, list the multiples of the unit above your current size: 30, 36 and 42 in. Thirty gives five blocks a side, an odd count, and McNeil's formula gives the spacer width:
Spacer width = (size you want − size you have) ÷ 2
Here that's (30 − 24) ÷ 2 = 3 in. If the answer comes out negative, trim a plain ring instead of adding one. In Calculating Borders to Fix Size Problems, she works a simpler case: five 6 in shoofly blocks need 30 in, so a 28 in top needs a 1 in spacer. She also mentions that some quilters call these coping or framing borders.
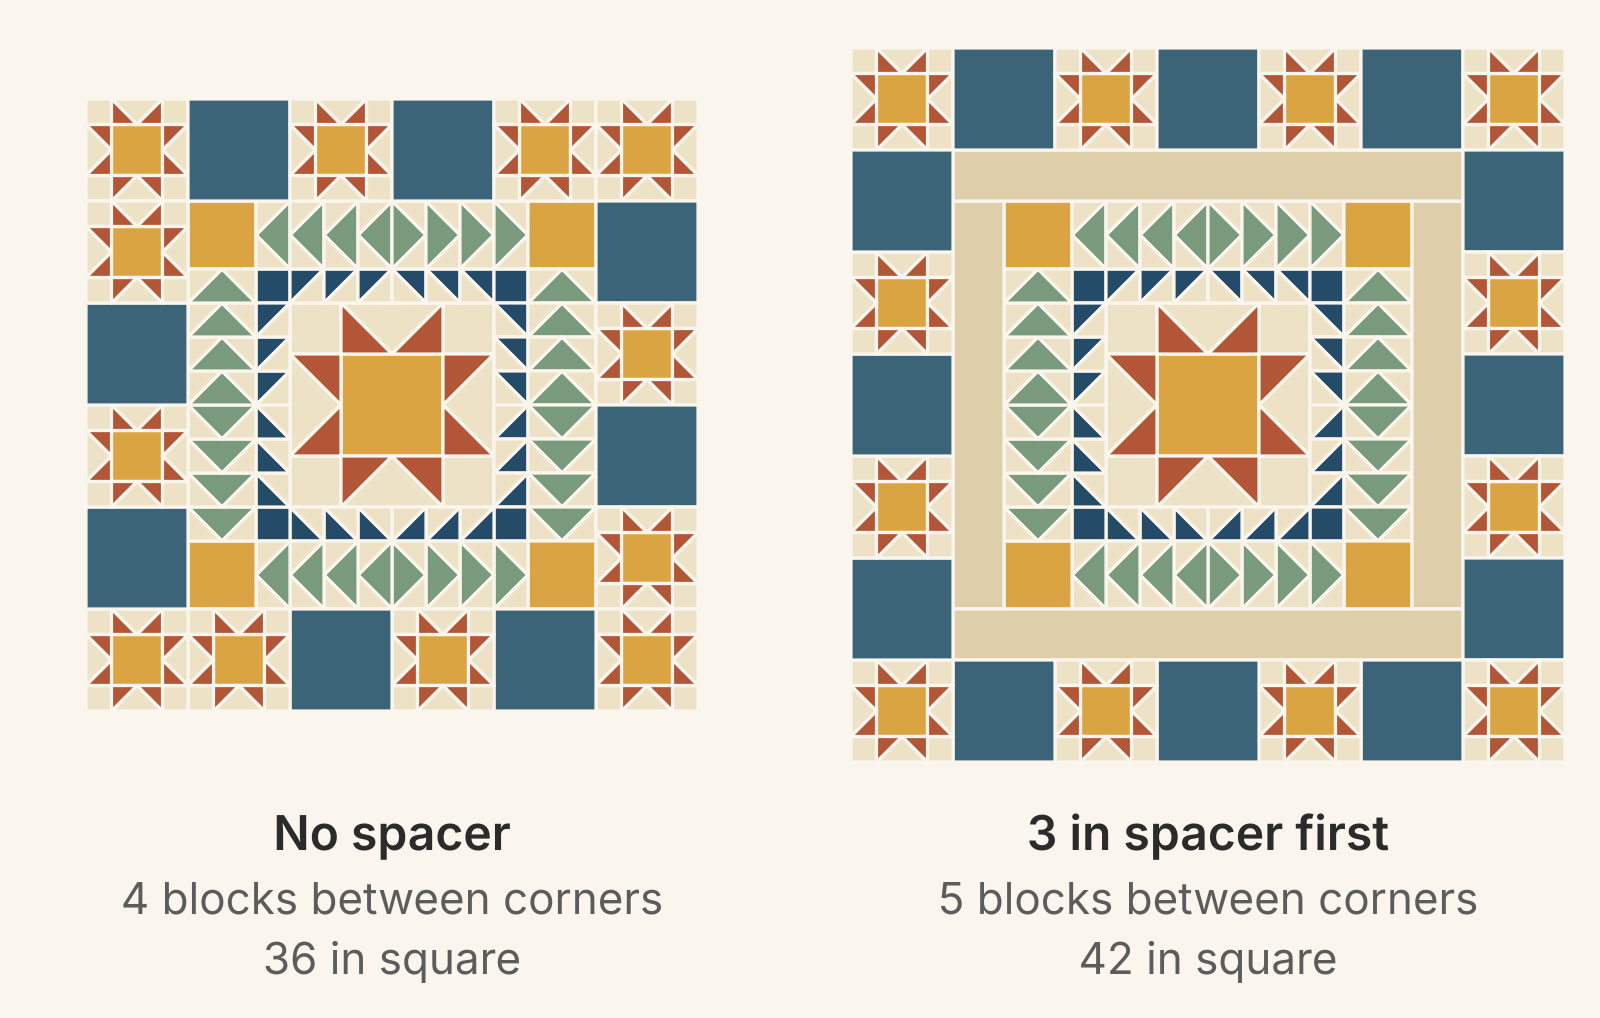
A spacer isn't the only fix. You can change the unit instead: 8 in blocks fit 24 in three to a side, which reaches 40 in, and a 4 in outer border brings that to 48 in too. Choose the spacer when you like the unit and want a rest for the eye between busy rings. Choose a new unit size when the quilt already has enough plain space. A ring of scrappy strips can also mix unit widths: our guide to planning a piano key border with mixed strip widths builds a repeat that fits each side.
Plan corners and direction
Each corner square is as wide as its ring: 2 in, 4 in and 6 in in our plan. Decide early whether a corner is plain or pieced, because a pieced corner has to look right from two sides. Our quilt border ideas post compares corner styles and border widths on one center.
Directional units need a turning point. An even count lets them mirror at the middle of each side, which is why ring 2's eight geese split into four flying toward each corner. With an odd count, the middle unit should be one that reads the same either way, like the plain square at the center of each side in ring 4.
Then decide which seams have to line up. Ring 2's geese each take 2 in of side, the same step as ring 1's HSTs, so every goose seam lands on a ring 1 seam. Pin those. In her first sew-along border post, McNeil suggests deliberately unmatching seams between neighboring rings: put 4 in pieces next to 5 in pieces and nobody expects the seams to meet, so fudging is easier. A plain spacer between two pieced rings does the same job.
Measure after every ring
A sewn top runs a little off its plan, and a pieced ring has a fixed length. So measure before each ring, using the unfinished size: finished plus 1/2 in. In this plan the checkpoints are 12 1/2, 16 1/2, 24 1/2, 30 1/2, 42 1/2 and 48 1/2 in.
Measure the pieced strips too, before sewing them on:
- Ring 1: side strips of six HSTs, 12 1/2 in long; top and bottom strips with corners, 16 1/2 in.
- Ring 2: side strips of eight geese, 16 1/2 in; top and bottom, 24 1/2 in.
- Ring 4: side strips of five blocks, 30 1/2 in; top and bottom, 42 1/2 in.
Small differences ease in. In a comment on her calculating post, McNeil says fabric can stretch or scrunch an extra 1/8 in, and sometimes more, pretty easily. Bigger differences belong in a plain ring. That's one more reason this plan puts the spacer right before the block ring. Say the top measures 24 1/4 in after ring 2 instead of 24 1/2 in. Cut the spacer strips 4 in wide instead of 3 1/2 in, sew them on, then trim the top to 30 1/2 in square with the star centered. The spacer finishes at 3 1/8 in a side, and the blocks still fit. Our guide to preventing wavy borders shows how to measure the top in three places and set plain strip lengths.
Make it a rectangle with an uneven spacer
A throw or bed quilt is rarely square. The AQS post asks whether the quilt needs to be a rectangle before you draw its outline, and the spacer is the easiest place to make that happen. McNeil reminds sew-along quilters that borders don't have to be symmetrical. In the same post she frames a rectangular block with 1 1/2 in strips at the top and bottom and 1 in strips at the sides.
Keep the center and the first two rings at 24 in. Make the spacer 3 in at the sides and 9 in at the top and bottom, so the top measures 30 × 42 in. Six-inch blocks then fit five across and seven down, both odd, and the top measures 42 × 54 in. The 3 in outer border finishes it at 48 × 60 in. Ring 4 now needs 28 six-inch units: 14 stars and 14 plain squares.
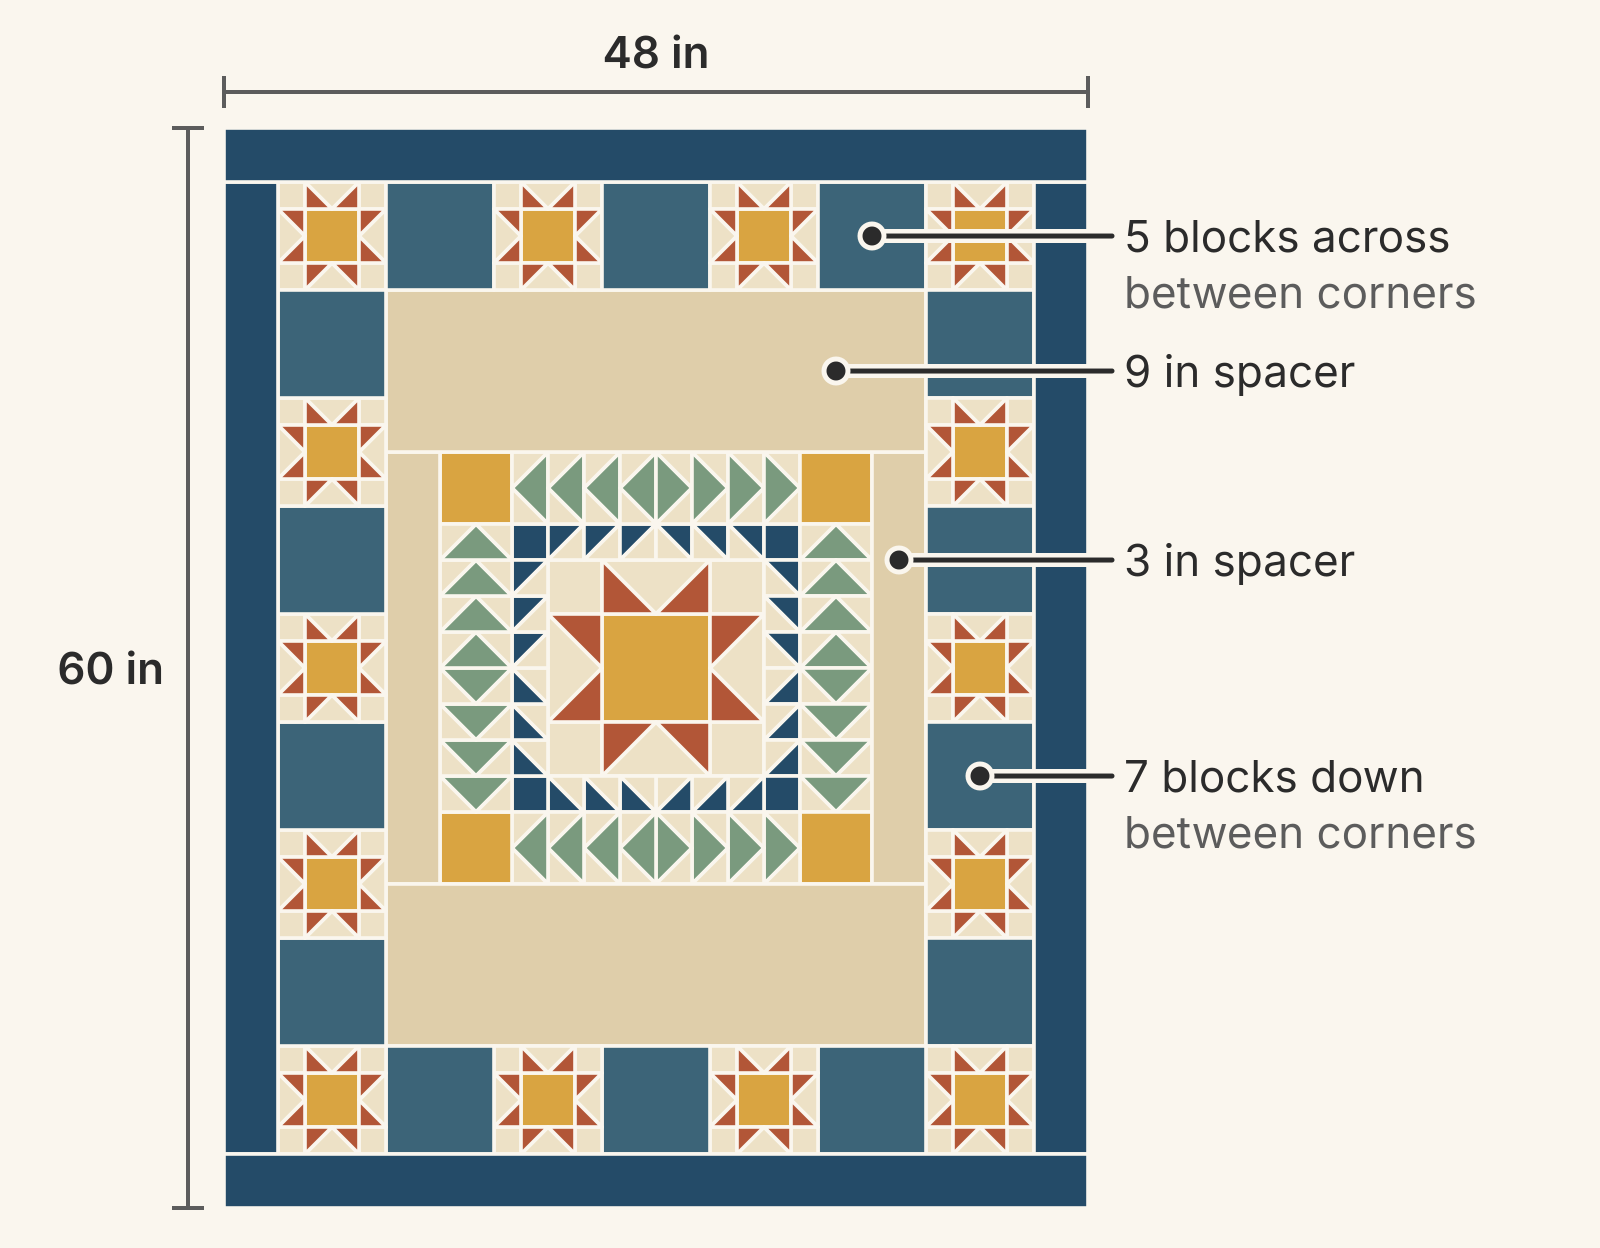
Other spacer pairs don't work as well. A 6 in top and bottom spacer gives 36 in, which takes six blocks, an even count. Check every pair against both side lengths before you settle on one.
Your next step: write the ring table
Copy the table above and fill it in for your own center: the size before each ring, the unit, the count per side, and the size after. Check each division before you cut anything. Wherever a ring doesn't fit, try a spacer or a different unit size, and recheck every ring outside it.
To check the proportions and colors before you cut, sketch the solid version in QuiltLab's Quilt Editor. QuiltLab borders are plain bands: they don't hold or count pieced units, and each uses one width all the way around. Keep the unit counts and the uneven spacer in your table. Start a Grid quilt with 1 column, 1 row and a 12 in block size. Under Borders in Properties, choose Add border five times and set the finished widths to 2, 4, 3, 6 and 3 in, listed from the quilt top outward. Their widths add to the overall size, which comes to 48 × 48 in. Give each ring a solid color or fabric and compare how much space each one takes.
Quilt Editor guide →Set up a Grid quilt, add borders and read the finished sizeRelated posts

How to Design a Bargello Quilt: Plan the Wave on Paper
A bargello wave is a staircase of stepped columns. Number your strips, write one row per column, and see how column width turns a zigzag into a curve.
English vs Foundation Paper Piecing: Which Should You Try?
Compare what the paper does, where stitching happens and which project brief suits EPP or sew-through FPP before choosing a pattern.
Fussy Cutting Hexagons: Plan Repeats for a Rosette
Count six matching motifs, record their orientation and preview a hexagon rosette before cutting the fabric.