


Log Cabin Quilt Layouts: Four Rotation Plans
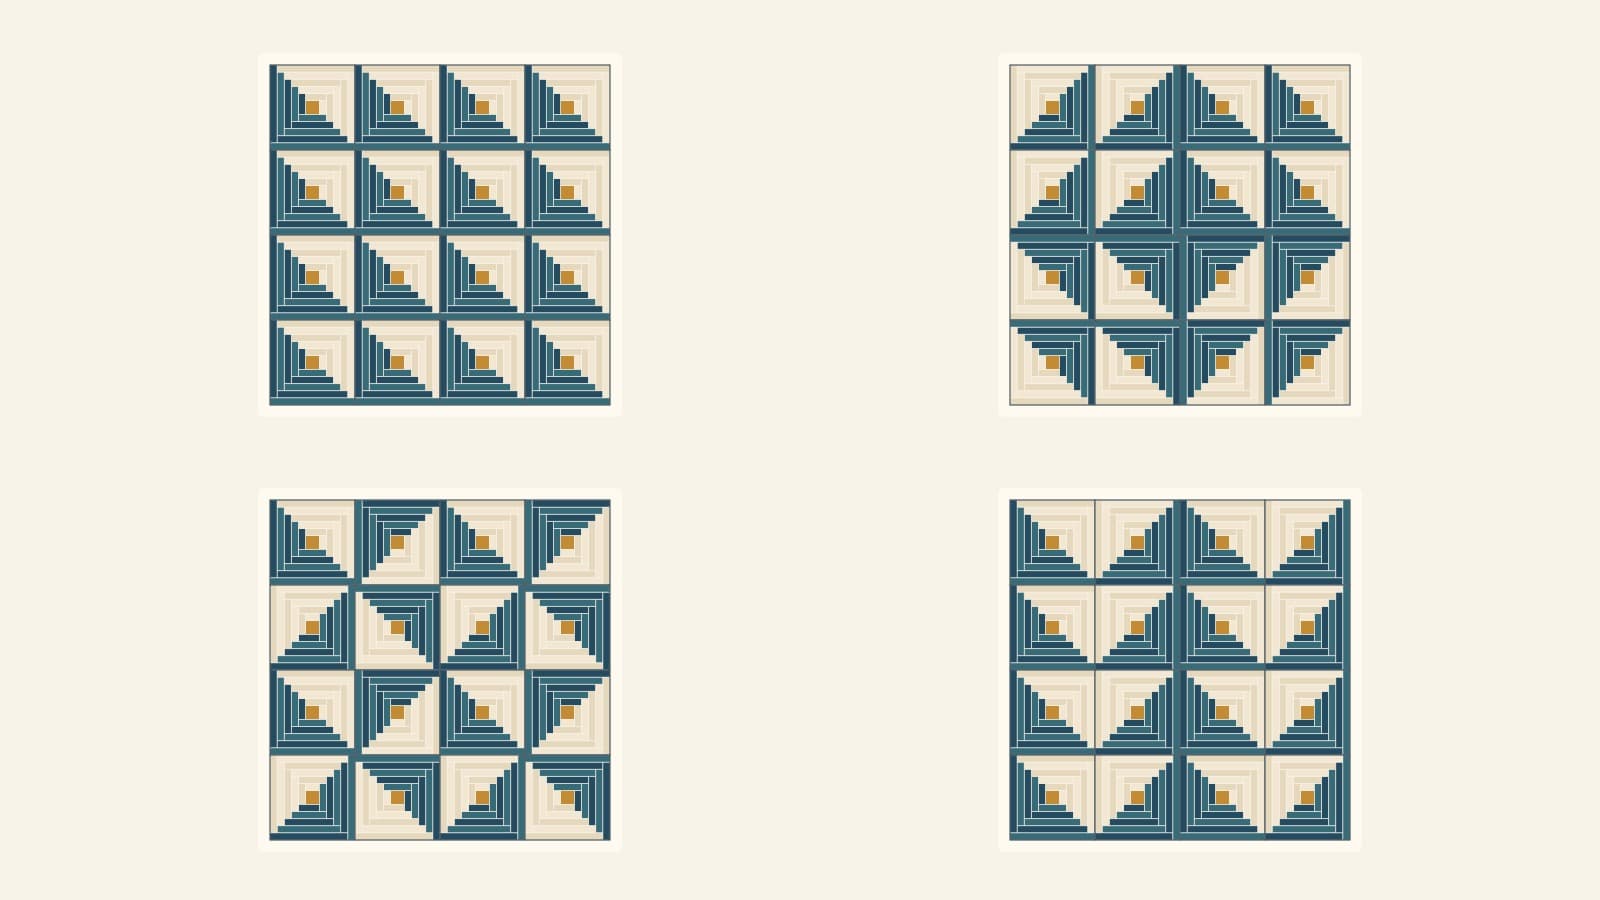
Log cabin quilt layouts change when you turn the blocks, even when the fabrics, strip widths and block count stay the same. A dark-and-light division can read as diagonal bands, a central diamond, small pinwheels or repeated chevrons.
The four original plans below use sixteen identical 12-inch finished blocks, arranged four across and four down. Every plan measures 48 x 48 inches before borders. A dark-corner key makes the rotations repeatable, so you can compare the arrangements before joining rows. These are finished-geometry drawings, not sewn samples or cutting instructions.
Make the light and dark sides readable first
A Log Cabin block grows around a center square, with logs arranged so that two adjacent sides read light and the other two read dark. Jo's layout guide at Thimbles and Needles explains how rotating that value division creates larger shapes across a quilt.
Value means how light or dark a fabric looks, rather than its color name. Navy and pale cream are easy to separate in our diagrams. Two medium fabrics may be different hues yet blend at a distance, leaving the logs visible but the planned diamond or band difficult to read.
Our original block has a 2-inch finished center and five rounds of 1-inch finished logs. Each round adds 1 inch on both opposite sides, so its width is 2 + (5 x 2) = 12 inches. That measurement defines this drawing only; use a construction pattern for cut sizes and assembly.
Keep the same block geometry in all four comparisons. Changing the strip widths, swapping light and dark roles, and rotating blocks at the same time makes it hard to identify which decision changed the layout.
Read the dark-corner key
The key identifies the corner surrounded by predominantly dark logs:
- BL: bottom left.
- TL: top left.
- TR: top right.
- BR: bottom right.
Start with BL and turn the block clockwise in 90-degree steps: BL becomes TL, then TR, then BR. These labels describe the whole block's orientation, not a single patch's color. A spiral of rectangular logs does not have a perfectly straight diagonal division.
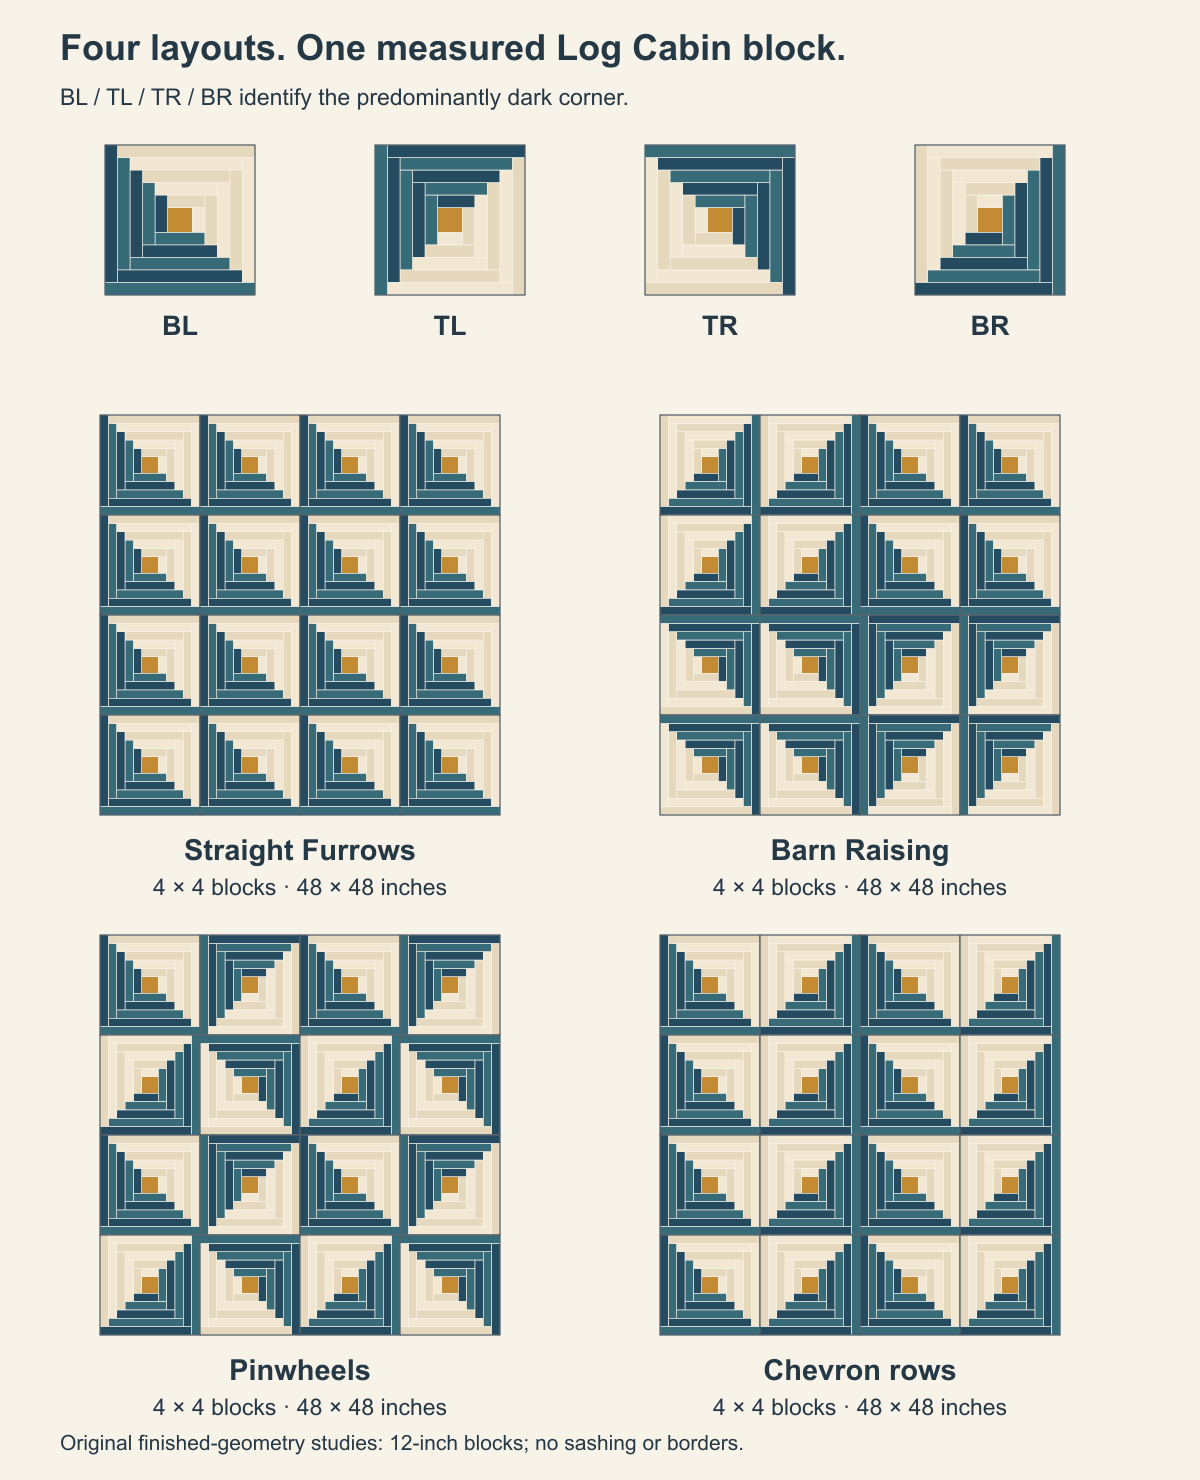
Read every map from the quilt's top row to its bottom row, left to right. Keep that viewpoint consistent when moving between the drawing, a design wall and a sewing table. Turning a row around to sew it can make the written left and right look reversed.
Straight Furrows: repeat one orientation
Set all sixteen blocks to BL:
BL BL BL BL
BL BL BL BL
BL BL BL BL
BL BL BL BL
The repeated light-and-dark divisions form diagonal movement across the field. This is a useful baseline: every block faces the same way, and a misplaced rotation is easy to spot against its neighbors.
Look at the quilt from several feet away or reduce the image on screen. You should see the larger diagonal rhythm before the individual logs. If it disappears, change the value separation inside the block before trying a more complex arrangement.
The American Patchwork & Quilting editors' Log Cabin gallery includes diagonal, chevron and pinwheel arrangements. It is a useful reference for the range of effects; the measured block and orientation maps here are our own examples.
Barn Raising: organize the field around its center
Use four quadrant orientations:
BR BR BL BL
BR BR BL BL
TR TR TL TL
TR TR TL TL
The dark sides of the four central blocks face the middle. Repeating each quadrant's direction outward creates a centered diamond arrangement. Follow the value boundaries across the block seams; the design emerges from the whole field, rather than from a special center block.
For this 4-by-4 plan, the center lies at the intersection of four blocks, 24 inches from each outside edge. Mark that intersection on a paper map, then check the two rows above and two rows below it separately. A wrong rotation near the middle breaks the central shape more visibly than the same error at an outer corner.
This is the arrangement to compare when you want a centered composition. An even number of rows and columns gives this particular four-block center. An odd-sized grid has a central block instead, so it needs its own orientation plan; do not simply add one row and expect the center to remain identical.
Pinwheels: repeat a four-block group
Build a 2-by-2 group with BL and TL above BR and TR, then repeat it:
BL TL BL TL
BR TR BR TR
BL TL BL TL
BR TR BR TR
Each four-block group turns around its own center. Four such groups fill our sixteen-block quilt. The repeat is 24 x 24 inches, and two repeats across and down make the 48-inch square.
Check the first group before duplicating its arrangement. If one member has the wrong corner label, repeating the group repeats the error too. In a physical layout, place a small row-and-column label beside each block rather than relying on the center square to tell you its direction: that square looks the same after every turn.
Pinwheels distribute movement across the field. Compare them with Barn Raising at the same scale: the block count and dimensions match, but the eye moves between four small centers rather than one large center.
Chevron rows: alternate two orientations
Alternate BL and BR across every row:
BL BR BL BR
BL BR BL BR
BL BR BL BR
BL BR BL BR
Those paired value divisions create repeated V shapes. Four columns give two block pairs per row; four rows repeat that rhythm down the quilt. Keep the second pair identical to the first while comparing the effect.
A turned Log Cabin is not necessarily an exact mirror of every seam in its neighbor. The block's logs spiral around the center. Judge this plan by the large light-and-dark chevron, then look closely at how the logs meet along the pair's shared edge.
If you want a different zigzag direction, make another complete map. Randomly turning a few blocks can make an interesting composition, but it no longer repeats this two-orientation plan. Record the new arrangement before moving the blocks again.
Check size without changing the comparison
For a direct-set grid with no sashing, multiply the number of blocks by their finished size:
| Grid | Blocks needed | Finished center |
|---|---|---|
| 4 columns x 4 rows | 16 | 48 x 48 inches |
| 4 columns x 5 rows | 20 | 48 x 60 inches |
| 5 columns x 6 rows | 30 | 60 x 72 inches |
These are arithmetic size options, not promises that every four-block repeat or centered design fits unchanged. A 4-by-5 grid has an incomplete final pair of pinwheel rows. A 5-by-6 grid cannot tile the 2-by-2 pinwheel group evenly across its width. Decide whether to revise the repeat or choose different row and column counts.
Elizabeth DeCroos's Epida Studio guide also explores alternate blocks, sashing and on-point settings. Those change more than rotation: they alter spacing, block requirements or edge construction. The four examples here deliberately stay within a direct-set grid of identical blocks.
Save the chosen orientation plan before assembly
Choose one arrangement, then inspect all sixteen positions against its map. Keep a photograph or saved preview with the top edge identified. Record the row and column counts, 12-inch finished block size and any later border decision beside it.
The Quilt Editor guide explains measured Grid layouts. For this study, set four columns, four rows, and 12-inch block width and height. Check the quilt-top dimensions separately from any borders.
To place the stock block in the current Quilt Editor:
- Open the Blocks tab, then Templates.
- In Search templates, enter "log cabin" and find Log Cabin in Stock templates.
- Choose Use template, then click a canvas cell to place it.
- Select the placed block, open Properties > Transform, and use Rotate clockwise to turn it in 90-degree steps. Match the dark-corner key rather than assuming the template begins in BL orientation.
The current stock entry is 12 x 12 inches and has 21 shapes. We verified its placement and visible light-and-dark logs in an authenticated editor session. That verifies this starting workflow; the four comparison drawings above remain our own geometry, rather than screenshots of the template. Repeat placement and check each position against the selected map.
The diagrams are layout studies. QuiltLab does not turn these orientations into Log Cabin cutting instructions or fabric yardage. Use your construction pattern for the blocks, and use the final saved map to preserve the light-and-dark arrangement when those blocks become rows.
To change the block itself, use the block-design grid walkthrough and recalculate its construction measurements. Once the rotation map is settled, compare border widths and corner choices around the same center.
Related posts
Fussy Cutting Hexagons: Plan Repeats for a Rosette
Count six matching motifs, record their orientation and preview a hexagon rosette before cutting the fabric.
Sampler Quilt Layouts: Plan Before Block One
Compare three settings for twelve sampler blocks, check their finished dimensions, and record the decisions that make the blocks work together.
Half-Square Triangle Quilt Layouts: One Block, Many Quilts
One half-square triangle, seven named layouts. How to orient each unit, plus a 48-inch 8 × 8 you can try in QuiltLab before you sew.